Here are my updates from this past weekend...

Here's a small item that I finally got knocked off my list thanks to a local machine shop. They drilled out my lower rear coilover mounts to fit the KAD 1/2" stub axles.

I was all over the map this past weekend, taking a look at a host of items and assemblies just to see what problems I'll be facing in the near future. With the modified bodywork on my car, I was beginning to think I would not be able to run bumpers. Turns out I will, provided I perform a few modifications. I'll come back to this in a few weeks.

There are a number of panels that need to be fitted to my car. From the factory these would have been spot welded in. As the car is being built up from scratch, it is easier to get access to various panels to spot weld them. Also, factories will build very specialised tools to reach hard-to-reach areas. All that means that for someone like me, trying to reinstall a small panel like the handbrake mount above, spot welding is usually not a viable option. Instead MIG plug welding would be the way to go. This time though I thought I'd try something else that I have read about - Panel Bonding Adhesive. It is glue made for this type of application that will supposedly leave a bond that is stronger than the metal itself.

Result? Three days later the adhesive still hadn't fully dried and I was able to break the piece free. I believe I applied too much adhesive and not enough clamping force. The cold, damp weather didn't help the curing process either I'm afraid. No worries. I'll work on attaching this later.

With my lessons learned, I decided to tackle the next body panel - the upper dash. You'll recall that I cut out the remnants of the original upper dash last week so now I was ready to go. Only problem was that the new dash panel would not match the contours of the car. Once the two outer edges were in place, the dash bowed outwards about one inch away from the car. Due to its complex curvature, it wasn't easily bent either. Time for some mechanical advantage. I cut up a 4x4 and placed the pieces in the car along with a bottle jack.

I then cut another length of 4x4 to match the curvature of the dash. This would spread the load across the dash panel. Since I only have two hands, I used some straps and bungee hooks to hold everything in place while I arranged it and extended the jack enough to hold everything in place. Looks hokey, but test-fitting confirmed that it worked perfectly. I removed the upper dash, applied adhesive to it and to the car, carefully set it back in place and cranked on the bottle jack until the panels were touching or close to touching all along the length of the panels. I then grabbed every clamp I owned and put them to work. Good thing I did, too. These panels did not want to go togther. I could see the panels visibly coming together as I tightened each C-clamp. 3M states the adhesive will be fully set after 4 hours at 70 degrees F. Again, due to the temperature, I gave it much longer and I left a heater going in the car for hours. By the middle of the next day, the adhesive was dry and the clamps all came off.

I'm happy with the results. The dash ended up right where it needs to be with none of the issues with plug welding (drilling out tons of holes, heat distortion, burn-thru, etc.). Very cool.

So now I had both the upper and lower dashboards in the car! I layed in the vinyl mat and used my old central instrument binnacle to test fit things. As you can see, the roll bar cross-tube passes right through where the binnacle normally runs. Some strategically-placed holes might allow me to install the binnacle in its original location and still hold the Smiths gauges without conflicting with the bar in back.

Once I had trimmed back enough of the old binnacle to fit in my car, I gutted its insides with a Dremel cut-off wheel, allowing it to 'cap' the new binnacle I had ordered. It wouldn't slip down all the way, but it was close enough to serve as a working template.

I knew that I would definitely have to cut passageways for the rollcage crossbar to 'slice' thru the binnacle so I transposed those shapes onto the new binnacle. I wasn't sure if the bottom of the binnacle would also have to be chopped up in order to slide between under the bar and above the lower dash.

With just the first cuts made, I did my first test fit. I thought this would take five to twenty attempts of cutting, checking, retrimming, rechecking, etc. Nope. First time was perfect! The template served its job very nicely and the binnacle almost looks like it was designed to have a bar pass right through it!

Here you can see that I transferred the chrome trim strip from the old binnacle to the new, along with the original speedometer for the car, plus two new Smiths electronic gauges - oil pressure and oil temp. Just for grins I threw a few other parts on - the chrome ashtray and center control switch panel.

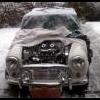
Last shot - here's how she looks with the headlights and indicator lights installed.
Joe
Edited by Joe250, 24 February 2009 - 09:09 AM.


 Those upper arms are one of just a few usable items that came with the car. They look awful and will be getting powdercoated before final assembly, but believe it or not they are new. I guess they sat out in the rain or something.