Jump to content


Photo
- - - - -

Elliot - The Second Attempt

roundnose

  • Please log in to reply
1658 replies to this topic

#376 Deathrow

Deathrow

    Have you tried turning it off and on again?

  • TMF IT Specialist
  • PipPipPipPipPipPipPipPipPipPip
  • 5,734 posts
  • Name: Adam
  • Location: Manchester, UK

Posted 14 July 2009 - 12:18 PM

Well the camshaft is gone now, gone to a much more suitable home where it sounds like it will be loved even more than I would have done haha.

I've still got the cylinder head and short engine to shift but I'm sure time will take them away for the right money. I'm going to list a few of the other little bits I've collected that I now don't require in the classifieds section later this evening I think.

On the other hand, I have had confirmation from the financial department at Lancaster University stating that I will be recieving my scholarship next year which means an extra £1000 to spend on Mini bits :). I'm still going to do some work and get a little extra money here and there as I want to start saving in the anticipation of an engine conversion, but thats miles off yet.

Anyway, I'm now going to head to the garage to do some work on Elliot so with any luck there will be an update later this evening.

Oh, while I'm here, had a different idea about the wheels, inspired by what Lund did with his dustcaps. I'm going to paint the wheels completely black, buy some wheel nut covers for a Vauxhall Corsa, shorten them for my wheel nuts and paint the covers the same orange as the roof. The theory being, when stationary, they're just orange wheel nuts and at speed the wheel nuts will create a cool ring as they spin because of the large amount of contrast between orange and black :dontgetit:.

This also makes painting the wheels a thousand times easier and I think it will actually look alot better, might mean I can get away with orange brake callipers too, mmmm.

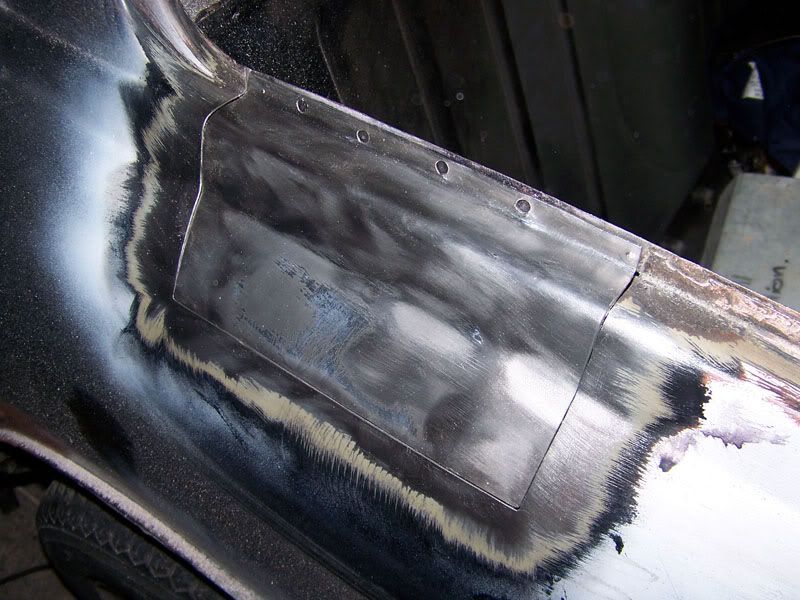
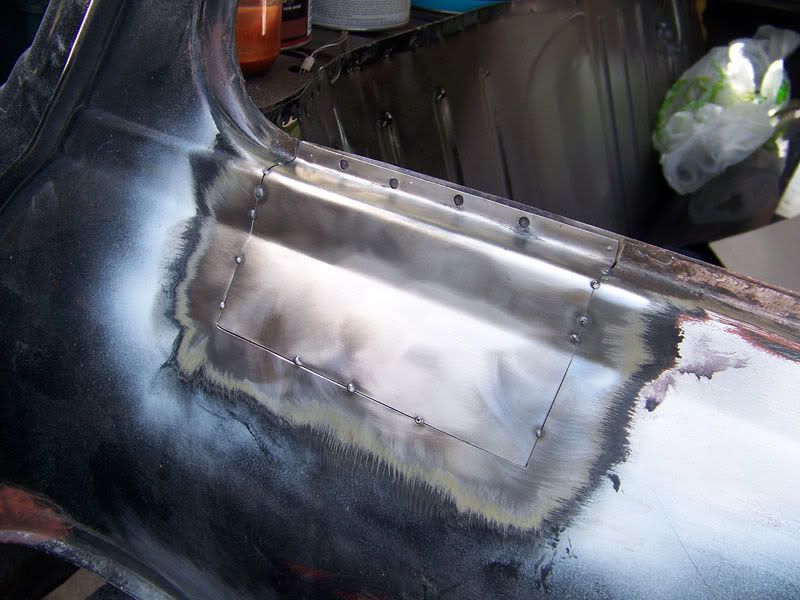
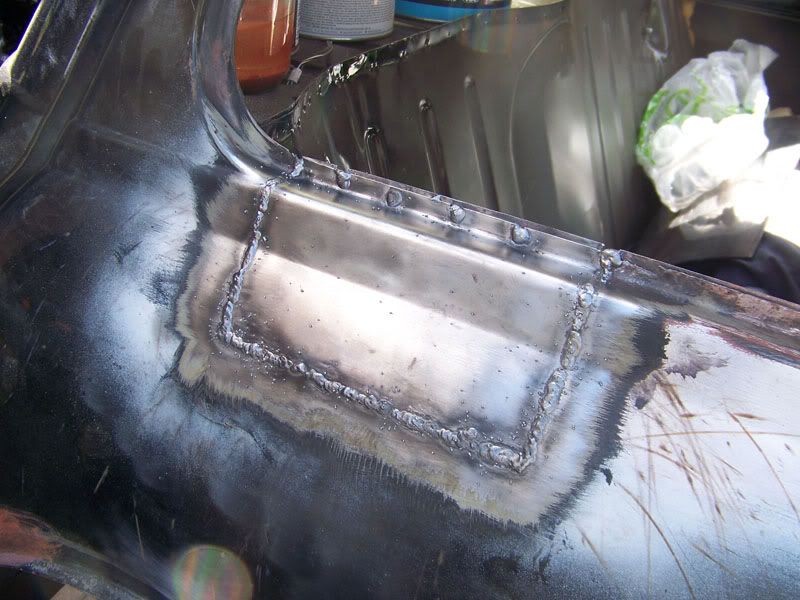
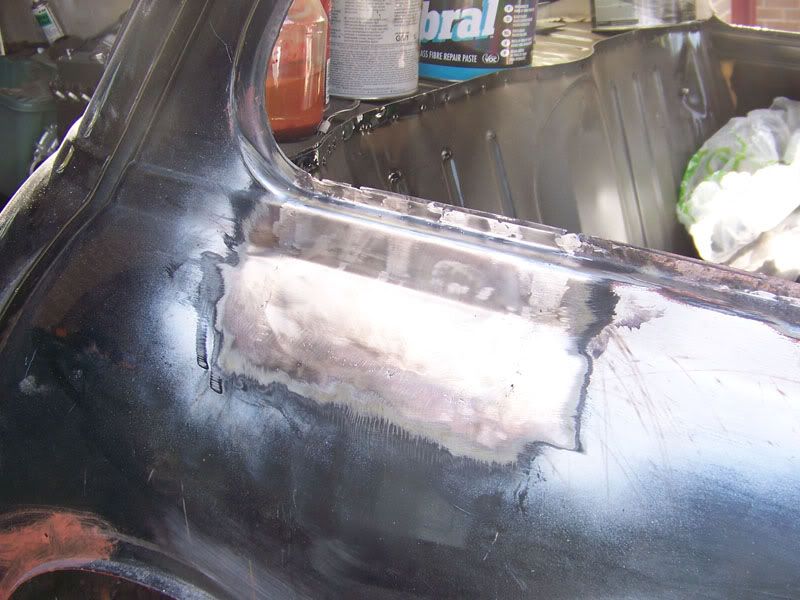
Right enough dribbling, I'm off to weld and grind!

#377 deemo

deemo

    Mini Mad

  • Members
  • PipPipPipPip
  • 185 posts
  • Local Club: LCMOC

Posted 14 July 2009 - 01:44 PM

Wow, I haven't read Elliot 2 in a while.
You have been busy :dontgetit:
Some really great work as well, I feel a bit more confident about doing a gearbox rebuild too after seeing yours. or maybe your making it look much easier than it is...

Looking forward to the next updates, Your thread is as well constructed as Elliot will be. It's really good to read.
Keep it up :)

And I love the orange wheel nut idea.

#378 Deathrow

Deathrow

    Have you tried turning it off and on again?

  • TMF IT Specialist
  • PipPipPipPipPipPipPipPipPipPip
  • 5,734 posts
  • Name: Adam
  • Location: Manchester, UK

Posted 14 July 2009 - 06:01 PM

Wow, I haven't read Elliot 2 in a while.
You have been busy :D
Some really great work as well, I feel a bit more confident about doing a gearbox rebuild too after seeing yours. or maybe your making it look much easier than it is...

Looking forward to the next updates, Your thread is as well constructed as Elliot will be. It's really good to read.
Keep it up :)

And I love the orange wheel nut idea.

Cheers deemo, I was reading your project log last night and it made me really anxious to crack on with Elliot today, glad I could return the favour with the gearbox rebuild :dontgetit:.

I'm glad you like the wheel nut idea, I think I might have to make a mock up in photoshop sometime soon.

I'll go write todays update up now, check back in ten.

#379 Deathrow

Deathrow

    Have you tried turning it off and on again?

  • TMF IT Specialist
  • PipPipPipPipPipPipPipPipPipPip
  • 5,734 posts
  • Name: Adam
  • Location: Manchester, UK

Posted 14 July 2009 - 06:10 PM

Right here we go for todays update!

Posted Image
This was the main area of attack today. I got the lot cut out and just as I was about to take a picture it started hammering it down.

Posted Image
So I retreated to the garage and continued inside.

Posted Image
Bad bits chopped out. The patch panel is nearly ready for fitting in also after some tweaks. You can see there is some rot at the bottom of the heal board, because this is hidden behind the subframe I'm going to ignore it until I do the boot floor and patch it while the rear subframe is off. It's only a small patch thats needed, won't take long at all.

Posted Image
Rear side window repair resting in place after areas to be welded were bare metaled.

Posted Image
Slowly started tacking in place. I'm really taking my time here because I don't want my rear quater to be rippled as sin and full of filler. I'm still thinking about redoing the patch in front of the arch just because of how much filler has been needed on it.

In other news, my socket arrived for the first motion shaft bolt so I can continue with my gearbox a little further so be expecting to see that sometime soon. I also need to go and buy some under seal (the oily sticky type), I want to paint some in to my sills before I weld the outter sill on, should help keep them happy for many many years to come.

Thanks for looking :wub:.

Edited by Deathrow, 14 July 2009 - 06:14 PM.


#380 dezshearer

dezshearer

    Speeding Along Now

  • Members
  • PipPipPipPipPip
  • 441 posts
  • Location: Belfast
  • Local Club: mini-chat.co.uk

Posted 14 July 2009 - 07:00 PM

If your selling all your enginey bits... why not go Vauxhaul? hehehe

In other news, lookin' good!

#381 GraemeC

GraemeC

    Crazy About Mini's

  • TMF+ Member
  • PipPipPipPipPipPipPipPipPipPip
  • 7,426 posts
  • Location: Carnforth

Posted 15 July 2009 - 07:52 AM

Looking good mate!

I would be tempted to make sure the two subframe mounting bolts come out easily, whilst you have access to the back of them if they don't want to play. Just whip them out and put them back (with a little copper slip) one at a time.

#382 Deathrow

Deathrow

    Have you tried turning it off and on again?

  • TMF IT Specialist
  • PipPipPipPipPipPipPipPipPipPip
  • 5,734 posts
  • Name: Adam
  • Location: Manchester, UK

Posted 15 July 2009 - 10:53 AM

Looking good mate!

I would be tempted to make sure the two subframe mounting bolts come out easily, whilst you have access to the back of them if they don't want to play. Just whip them out and put them back (with a little copper slip) one at a time.

Yeah, Minivanman told me the same thing, it just slipped my mind completely!

I'll do it this afternoon when I go to the garage. I'm sure I have some copper grease...somewhere.

#383 Deathrow

Deathrow

    Have you tried turning it off and on again?

  • TMF IT Specialist
  • PipPipPipPipPipPipPipPipPipPip
  • 5,734 posts
  • Name: Adam
  • Location: Manchester, UK

Posted 15 July 2009 - 07:09 PM

Righty, todays write up!

I went down to the local motorfactors this afternoon and bought some copper grease for the subframe mount bolts and for the general rebuild of the subframes. While I was there I also got a litre tin of nice black sticky underseal which the bottom of my car will be covered in to keep it solid. I'm also going to paint it inside the sills so that if any water does find its way in there it'll get a very harsh welcome.

Anyway, then I went to the garage so here are the pictures:

Posted Image
How I left it yesterday.

Posted Image
Sill patch adjusted so that it fits where it's meant to.

Posted Image
Window patch fully welded in. Took my time doing it to avoid distortion.

Posted Image
Welds cleaned back, the welded areas sit a mm or so lower than the rest so it'll need a gentle skim of filler.

Posted Image
Overall look of the rear quater at this point.

Posted Image
Welds roughed down on inner sill.

Posted Image
Seam sealed, etch primed and red oxided. I'll paint the entire inner sill with rustoleoum for extra protection.

Posted Image
How I left it today.

Posted Image
A look down the repair for straightness.

And that is all for today!

In other news, I managed to sell my cylinder head, will be popping it in the post tomorrow to it's new owner. Thats more cash in the bank, just need to sell the block, pistons, rods and crank now. I'm going to get my 998 brought home before long and start stripping and rebuilding that so it can go back in Elliot when she's ready for it.

Thanks for looking :D.

EDIT: Also, I think I'm going to leave the repair I did in front of the rear arch as redoing it, I could always make it worse. I'll see how the other side comes out and if I manage to do a much better job then I'll redo this side.

Edited by Deathrow, 15 July 2009 - 07:20 PM.


#384 mighty mini jack

mighty mini jack

    Mighty Before a Pint

  • Members
  • PipPipPipPipPipPipPipPipPipPip
  • 5,095 posts

Posted 15 July 2009 - 07:27 PM

That rear quarter repair looks really good. I need the same part for mine.

Edited by mighty mini jack, 15 July 2009 - 07:29 PM.


#385 Deathrow

Deathrow

    Have you tried turning it off and on again?

  • TMF IT Specialist
  • PipPipPipPipPipPipPipPipPipPip
  • 5,734 posts
  • Name: Adam
  • Location: Manchester, UK

Posted 15 July 2009 - 07:31 PM

That rear quarter repair looks really good. I need the same part for mine.

All I can say is take your time!

I actually ended up using the second power setting on the welder to get good penetration with the short bursts I was giving in order to let the panel cool off between welds. Just goes to show though, patience is your best friend!

#386 Saxo-Fiesta-Mini

Saxo-Fiesta-Mini

    Up Into Fourth

  • Members
  • PipPipPipPipPipPipPipPipPip
  • 2,889 posts
  • Local Club: LCMOC

Posted 15 July 2009 - 07:32 PM

no it isnt the hammer is :D

#387 Deathrow

Deathrow

    Have you tried turning it off and on again?

  • TMF IT Specialist
  • PipPipPipPipPipPipPipPipPipPip
  • 5,734 posts
  • Name: Adam
  • Location: Manchester, UK

Posted 15 July 2009 - 08:27 PM

no it isnt the hammer is :D

Start looking forward to your very rippled panels then! Haha.

Hammer is your best friend for ball joints though haha.

#388 Deathrow

Deathrow

    Have you tried turning it off and on again?

  • TMF IT Specialist
  • PipPipPipPipPipPipPipPipPipPip
  • 5,734 posts
  • Name: Adam
  • Location: Manchester, UK

Posted 15 July 2009 - 08:34 PM

Not an update as such but I consider it a turning point so want to document it anyway.

The driver side is now pretty much complete, bar the outer sill which won't go on for a bit yet because I need to do my various treatments to the insides of the sill. So in order to make my life easier I popped round while my friend Scott was in and we turned Elliot around so that I can make a start on the passenger side tomorrow.

Posted Image
Before.

Posted Image
And after.

That is all :D.

Edited by Deathrow, 15 July 2009 - 08:35 PM.


#389 johnbest981

johnbest981

    Mini Mad

  • Members
  • PipPipPipPip
  • 269 posts
  • Local Club: Basingstoke Mini Club

Posted 15 July 2009 - 10:41 PM

Posted Image
Before.


That is all :D.


Does the tool box give good power?
I cant see the torque being all that good... aha.

Joking aside, good stuff!
Still cant believe how well you've taken to this welding lark..

John.

#390 Deathrow

Deathrow

    Have you tried turning it off and on again?

  • TMF IT Specialist
  • PipPipPipPipPipPipPipPipPipPip
  • 5,734 posts
  • Name: Adam
  • Location: Manchester, UK

Posted 15 July 2009 - 10:48 PM

It'll do 0-0.5 in about 10 seconds! It's all about what you put in the tool box.

Cheers mate, I'm really happy with how my welding has come along today, feeling much more confident with it.


Also tagged with one or more of these keywords: roundnose

2 user(s) are reading this topic

0 members, 2 guests, 0 anonymous users