If you live and drive in warm(er) weather you should consider installing one. I got one of a junkyard for pennies, but new ones aren't that pricey. Although if you buy a "mini specific" one then you can expect to pay higher for it.
When you install it you must make sure it points outward (blows to the wheel).
The reason for this is, the air needs to circulate to have a cooling effect. The mechanical fan on the minis blows air out through the rad and then it exits through the wheel arch. If you were to place the electric fan blowing to your rad from the wheel arch it will just create turbulence and keep the hot air trapped in the radiator.
Consider also getting a thermo-switch (buy it new and make sure it's a screw on) and tell the people at a rad place to weld up the bung/nut and get your rad checked/cleaned at the same time.
That's if you plan to use your old radiator. You can get new radiators with the bung or even the switch already in place.
Starting from the fact that head gaskets and overall engines don't like drastic changes in temperature, they seem to be happier with rather steady temps. I may suggest that a good range for the thermo-switch could be:
ON (opening) at about 2 degrees above your thermostat opening
(ie. if the stat is 88deg, then get a 90deg opening)
OFF (closing) about 6 degrees lower.
Now please, these figures are my choice, you might know/think some others that are better and of course I'll stand corrected if you prove me wrong.
You can also install the fan without the switch so it's always on (when the engine is running) but it probably won't last as long.
Alternatively instead of having a thermo-switch, you could wire a simple switch on your dash that way you can switch the fan on when the temp gauge start to raise.
I personally prefer the automatization of the function and actually concentrate on driving and enjoying my mini.
Remember to install your fan securely as it can foul on the radiator and make a big mess.
This guide is only for negative (-) ground/earth cars.
Always disconnect your battery’s ground/earth when working on your car, regardless if it’s not an electrical procedure!
This should be a rough guide on how to safely wire your fan, you’ll need:
(1) Electric fan
(1) Radiator (with thermo-switch bung welded)
(1) Thermo switch
(1) Relay and holder
(1) Fuse and holder (it’ll depend on the wires but a 15 amp blade fuse it’s a good start)
(4) Lengths of wire, preferably different colors
Assorted Crimp Connectors/Terminals:
Relay / inline fuse
(6) connectors
Fuse box
(1) female spade type
Fan
(2) male spade type
(2) female spade type
Switch
(2) female spade type
+12v / Ground
(3) Ring connector/terminal
Thermo-switch should look like this:

The wiring of the relay should be like this:

I had done this drawing for a friend so it’s in spanish but I’m positive you can make out what it says, lol.
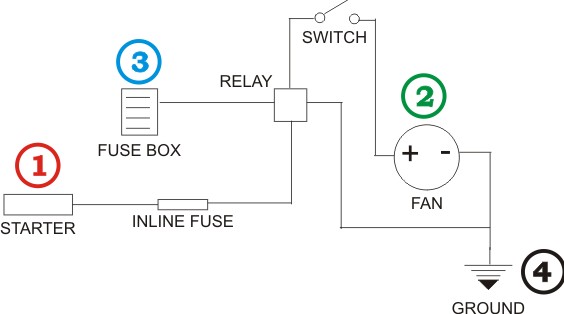
And this is how it should all go:

1 - LIVE
You can use the starter, same point where your battery +12v is attached.
The fuse should be installed close the live, I recommend no longer than 1 foot from the starter.
Run wire to relay’s connector #30
2 - FAN (accessory)
Run your wire from the FAN + to your switch and then to the relay’s connector #87
3 - SIGNAL (ON/OFF)
Run a wire from your fuse box to relay’s connector #86
I use the top fuse (1) as it is only on at ignition II
You could use the bottom fuse (4) and this will keep the fan on even after you turn the engine off. The fan will turn itself off once the water inside the radiator has reached the lowest temp your thermo-switch is able to read. Some Fiats had a setup similar to this. I wouldn’t recommend it though. Draw your own conclusions.
4 - GROUND
Relay’s connector #85, join with - (negative) from the fan, run to a good ground/earth.
Edited by BJst416, 21 June 2008 - 03:26 PM.


