


'95 Mini Cooper
Started by
dezshearer
, Feb 08 2008 08:26 PM
168 replies to this topic
#46

buddylove
-

- TMF+ Member
-

- 1,639 posts
Camshaft & Stage Two Head
- Location: North America
- Local Club: SAMOA
Posted 06 December 2008 - 11:51 PM
Floor looks good
#47
dezshearer
-
- Members
-
- 441 posts
Speeding Along Now
- Location: Belfast
- Local Club: mini-chat.co.uk
Posted 07 December 2008 - 06:28 PM
To Do List:
Inner Wings seam sealed DONE
Front Panel seam sealed DONE
Both Stonechipped DONE
both hammerited DONE
Enginebay seam sealed DONE
Rest of Engine Bay stonechipped DONE
Rest of Engine Bay hammerited DONE
Underside of car seam sealed DONE
Underside of car stonechipped DONE
Underside of car hammerited
Boot seam sealed DONE
Boot stonechipped DONE
Boot hammerited
Inside of car (only some parts) seam sealed started
Inside of car (only some parts) stonechipped
Front Subframe stuff:
Inner boot on passenger driveshaft
Brakes set up on front subframe (set up the new disks!)
weld up the stupid front mount holes i drilled bigger for the bonnet pins, glad i didn't go flip front now!
re-drill the mount holes for front
Fit Front Subby
Rear Subframe stuff:
Brakes set up on rear subframe (rebuild the drums, set up handbrake stuff)
Fit new polybushes to mounts DONE
Fit Rear Subby
Fit old wheels.
At this point i'll have a rolling shell. Woo Hoo
#48
dezshearer
-
- Members
-
- 441 posts
Speeding Along Now
- Location: Belfast
- Local Club: mini-chat.co.uk
Posted 07 December 2008 - 06:40 PM
So yeh, to prove the updated to do list... here's the evidence. Didn't get much done today, i've run out of seam sealer, and stone chip and hammerite, will buy more tomorrow.
The boot seam sealed:


The boot stone chipped:


This is where the last splurge of seam sealer went!

The boot seam sealed:
The boot stone chipped:
This is where the last splurge of seam sealer went!
#49
dezshearer
-
- Members
-
- 441 posts
Speeding Along Now
- Location: Belfast
- Local Club: mini-chat.co.uk
Posted 17 December 2008 - 06:37 PM
To Do List:
Inner Wings seam sealed DONE
Front Panel seam sealed DONE
Both Stonechipped DONE
both hammerited DONE
Enginebay seam sealed DONE
Rest of Engine Bay stonechipped DONE
Rest of Engine Bay hammerited DONE
Underside of car seam sealed DONE
Underside of car stonechipped DONE
Underside of car hammerited
Boot seam sealed DONE
Boot stonechipped DONE
Boot hammerited
Inside of car (only some parts) seam sealed started
Inside of car (only some parts) stonechipped
Front Subframe stuff:
Inner boot on passenger driveshaft
Brakes set up on front subframe (set up the new disks!)
weld up the stupid front mount holes i drilled bigger for the bonnet pins, glad i didn't go flip front now! DONE
re-drill the mount holes for front DONE
Fit Front Subby DONE
Rear Subframe stuff:
Brakes set up on rear subframe (rebuild the drums, set up handbrake stuff)
Fit new polybushes to mounts DONE
Fit Rear Subby DONE
Fit old wheels. DONE
At this point i'll have a rolling shell. Woo Hoo It's Rolling!!
Inner Wings seam sealed DONE
Front Panel seam sealed DONE
Both Stonechipped DONE
both hammerited DONE
Enginebay seam sealed DONE
Rest of Engine Bay stonechipped DONE
Rest of Engine Bay hammerited DONE
Underside of car seam sealed DONE
Underside of car stonechipped DONE
Underside of car hammerited
Boot seam sealed DONE
Boot stonechipped DONE
Boot hammerited
Inside of car (only some parts) seam sealed started
Inside of car (only some parts) stonechipped
Front Subframe stuff:
Inner boot on passenger driveshaft
Brakes set up on front subframe (set up the new disks!)
weld up the stupid front mount holes i drilled bigger for the bonnet pins, glad i didn't go flip front now!
DONEre-drill the mount holes for front
DONEFit Front Subby DONE
Rear Subframe stuff:
Brakes set up on rear subframe (rebuild the drums, set up handbrake stuff)
Fit new polybushes to mounts DONE
Fit Rear Subby DONE
Fit old wheels. DONE
At this point i'll have a rolling shell. Woo Hoo It's Rolling!!
#50
buddylove
-
- TMF+ Member
-
- 1,639 posts
Camshaft & Stage Two Head
- Location: North America
- Local Club: SAMOA
Posted 17 December 2008 - 06:47 PM
Congrats on getting it rolling
#51
dezshearer
-
- Members
-
- 441 posts
Speeding Along Now
- Location: Belfast
- Local Club: mini-chat.co.uk
Posted 17 December 2008 - 07:14 PM
Thanks man, i'll have to get some pictures up to prove it!
#52
beaubrad
-

- Members
-
- 736 posts
One Carb Or Two?
Posted 17 December 2008 - 08:03 PM
not seen this in a while ,your doing really well mate keep it up brad
#53
mikko
-
- Noobies
-
- 119 posts
Mini Mad
- Location: belfast
Posted 05 January 2009 - 09:34 AM
good work mate, not long to go now, i'm doing a simalr job on mine at the minute and started with similar experience as yourself by the sounds of it. might start taking pics of mine to post up soon. by the way, you still got your flip front? if so would you be interested in selling?
#54
VulcanBomber
-

- Members
-
- 170 posts
Mini Mad
Posted 15 February 2009 - 08:21 AM
Just re-read this, its great!
I am just about to do the same with a shell from ebay. Great read, any updates?
I am just about to do the same with a shell from ebay. Great read, any updates?
#55
dezshearer
-
- Members
-
- 441 posts
Speeding Along Now
- Location: Belfast
- Local Club: mini-chat.co.uk
Posted 23 February 2009 - 12:29 PM
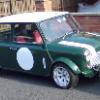
As of about a month ago:


Been realy busy and haven't had the drive to work on her.
Since that photo was taken i've finished all the sealing and stonechipped the inside of her.
I've also built my back brakes up, but one of the adjusters is seized =/ maybe both, and the brake pipes have been really *peeing* me off.
I'm not going to run the fuel or brakes lines on the inside of the car anymore, no point really!
Sigh, maybe i'll get some more work done at the weekend or thursday, i hope.. =(
#56
dfraser
-
- Noobies
-
- 121 posts
Mini Mad
- Local Club: Minis in Inverness
Posted 23 February 2009 - 02:18 PM
Excellent project, has the right ingredients - highs, lows, tears and laughter. I can see how much you've learned through this project.
Get some gas on those adjusters, take them apart and rebuild with plenty grease - you'll thank yourself for it later!
Best of luck with that.
Get some gas on those adjusters, take them apart and rebuild with plenty grease - you'll thank yourself for it later!
Best of luck with that.
#57
RRT22R
-

- Noobies
-
- 16 posts
Learner Driver
- Local Club: Nope
Posted 23 February 2009 - 09:07 PM
Great project!
You have done most of the hard work, so you can look forward to bolting on some shiny bits!
You have done most of the hard work, so you can look forward to bolting on some shiny bits!
#58
scrippo
-

- TMF+ Member
-
- 535 posts
Super Mini Mad
- Location: Bromley
Posted 23 February 2009 - 09:10 PM
Thought I'd drop ya a comment mate. Mini is looking good! Fair play for doing all the body yourself, you're braver than me! I'd quite like to have a cooper one day. I'd go for a standard carbed cooper, and keep it standard with bread and butter mods like a stage 1 kit stage 3 head, and uprated shocks/cones. I'd keep my white mayfair though so maybe a van or pick up is in order instead! I'll stop dreaming.
Get out there and get cracking, you know you want to
Get out there and get cracking, you know you want to
#59
mikko
-
- Noobies
-
- 119 posts
Mini Mad
- Location: belfast
Posted 26 February 2009 - 05:25 AM
lookin good mate not long to go now. i've had a similar or maybe a bit less work to do than yourself and i'm now on teh final furlong, cant wait to get er on the road, it'll be worth the wait i'm sure.
a guy from ni minis said you might be selling your flip front, (thought i dropped you a pm a while back expressing interest but i may be wrong) if so i may be interested.
where in belfast are you?
a guy from ni minis said you might be selling your flip front, (thought i dropped you a pm a while back expressing interest but i may be wrong) if so i may be interested.
where in belfast are you?
#60
dezshearer
-
- Members
-
- 441 posts
Speeding Along Now
- Location: Belfast
- Local Club: mini-chat.co.uk
Posted 26 February 2009 - 10:02 PM
Thanks for the encouraging replies guys!!
I got a lot of work done today!
Mikko: I sold the hinges already to a guy here on the forums, sorry mate!
Anyway, Scrippo,here's a picture of the brake shoes, showing the way they should sit, this is the drivers side.

Heres a pic of the suspension hehe.

Brake lines are done! Only need to do the front subframe lines now, should be easy after doing all the others!

Bit of paint needed here!

Now, this shell, is an older one than my '95 shell, so it didn't have the holes in the bulkhead for the bracket for the Servo or the equalizer!
Easy fixed, i simply drilled a hole for the servo bracket, but the equalizer needed a hole drilled, and then i had to tap the metal left so that i could simply put the bolt in, no way in hell i could have got a long enough bolt to go through the bulkhead and into the cab!


I got a lot of work done today!
Mikko: I sold the hinges already to a guy here on the forums, sorry mate!
Anyway, Scrippo,here's a picture of the brake shoes, showing the way they should sit, this is the drivers side.
Heres a pic of the suspension hehe.
Brake lines are done! Only need to do the front subframe lines now, should be easy after doing all the others!
Bit of paint needed here!
Now, this shell, is an older one than my '95 shell, so it didn't have the holes in the bulkhead for the bracket for the Servo or the equalizer!
Easy fixed, i simply drilled a hole for the servo bracket, but the equalizer needed a hole drilled, and then i had to tap the metal left so that i could simply put the bolt in, no way in hell i could have got a long enough bolt to go through the bulkhead and into the cab!


1 user(s) are reading this topic
0 members, 1 guests, 0 anonymous users


