Cheers! It can get really over whelming sometimes when you think you're doing more damage than good!
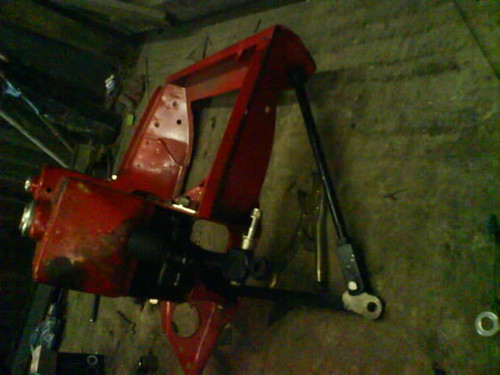
Yeh, the subframe you see painted red came from a friends manual mini, he has a 2.0 Vaux engine now in his!


'95 Mini Cooper
Started by
dezshearer
, Feb 08 2008 08:26 PM
168 replies to this topic
#16

dezshearer
-
- Members
-

- 441 posts
Speeding Along Now
- Location: Belfast
- Local Club: mini-chat.co.uk
Posted 13 April 2008 - 07:48 PM
#17
Mayfair85
-
- Members
-
- 268 posts
Mini Mad
Posted 13 April 2008 - 07:55 PM
No I dont think I can see any damage! I wish I had the time to take my little beastie of the road and do an engine swap. Or the cash. What other parts have you sourced for the change to manual, other than engine and box obviously!
#18
dezshearer
-
- Members
-
- 441 posts
Speeding Along Now
- Location: Belfast
- Local Club: mini-chat.co.uk
Posted 13 April 2008 - 07:58 PM
Nothing =(
I have all the engine related stuff really, that's it!
I'm focusing all the time and money and effort into the bodyshell first, it would be a shame to build a lovely engine, and then having nothing to put it in !
I have all the engine related stuff really, that's it!
I'm focusing all the time and money and effort into the bodyshell first, it would be a shame to build a lovely engine, and then having nothing to put it in !
#19
sway
-

- Noobies
-
- 125 posts
Mini Mad
- Local Club: Not Yet!
Posted 13 April 2008 - 09:03 PM
Excellent work Dez. You have a few rusty bits to work on there!   I must confess to having scrapped better cars than that in the past so fair play and well done for making the repairs.
I would say concentrate on making strong welds first rather than pretty ones. You can always tidy them up with a grinder/flap wheel later. A spot of seam sealer or a skim of filler and nobody will ever know!
Keep at it mate and keep those pics coming!!!
 I must confess to having scrapped better cars than that in the past so fair play and well done for making the repairs.I would say concentrate on making strong welds first rather than pretty ones. You can always tidy them up with a grinder/flap wheel later. A spot of seam sealer or a skim of filler and nobody will ever know!
Keep at it mate and keep those pics coming!!!
#20
dezshearer
-
- Members
-
- 441 posts
Speeding Along Now
- Location: Belfast
- Local Club: mini-chat.co.uk
Posted 13 April 2008 - 09:23 PM
I've been so tempted to throw the toys outa the pram and find the nearest skip, but hopefully it'll all pay off!!
If i was offered a fibreglass shell tho.. i'd jump at it !
yeh, seamsealer is the way to go i think, but i can't weld through that.. so the bulkhead lip will need to be nice and solid !
If i was offered a fibreglass shell tho.. i'd jump at it !
yeh, seamsealer is the way to go i think, but i can't weld through that.. so the bulkhead lip will need to be nice and solid !
#21
dezshearer
-
- Members
-
- 441 posts
Speeding Along Now
- Location: Belfast
- Local Club: mini-chat.co.uk
Posted 06 May 2008 - 10:36 AM
Okay, an over due update!
After giving the project a good long think, i originally only intended to rip the auto engine and put in a manual.
I had not intended to do major bodywork, at all, seeing as i couldn't weld, i learnt, but i'm C**p, and i want to actully get the car running/on the road. Not leave it sitting in my garage for years while i get better, i'll do a class for that.
Therefore, i've got in contact with a friend of mine who restores classic cars, and he said he's willing to do all the bodywork, flip front n all!
I've got all the panels ready to go, so should be sending it to his shed in the next week or so.
This has given me the chance to start stipping the old front subframe (housing the auto) for it's suspension bits.
I've also painted the manual engine block, and will start building it shortly.
Bit of advice to anyone doing a restore and has lots of that soundproofing stuff on their floor, get it ALL off, even if your only replacing the front floorpans.
I decided to hammer it all out, and found some nice wee rust holes underneath it, in what looked like a solid floor!
So yeh, i'll try n get some pics up soon, of nice shiney new paint on engine, and the stripped shell, and plenty when it's at his shed!
#22
Retro_10s
-

- Members
-
- 10,138 posts
Moderator
- Location: Bromsgrove
Posted 09 May 2008 - 09:57 AM
hey buddy, I'm nearly finished doing my auto to manual conversion but just can't get the bloody pedal box in. good luck!
#23
dezshearer
-
- Members
-
- 441 posts
Speeding Along Now
- Location: Belfast
- Local Club: mini-chat.co.uk
Posted 09 May 2008 - 04:00 PM
Thats awesome man, i read your thread. Nice work !
Rub it in enh?
Rub it in enh?
Edited by dezshearer, 09 May 2008 - 04:01 PM.
#24
mk1leg
-

- Members
-
- 9,343 posts
Crazy About Mini's
- Location: Jersey
- Local Club: Mini Club Jersey, MCR
Posted 09 May 2008 - 04:44 PM
Hi..Dezsheareryou have done a lot since I first saw this thread good luck and retro10s you have ti hold both peddles down and push in and up at same timeto put pedel box in place....good luck to you both.................. 
#25
elspedo
-
- Members
-
- 173 posts
Mini Mad
Posted 09 May 2008 - 04:46 PM
im swappin from auto to manual so will be keeping an eye on this
#26
dezshearer
-
- Members
-
- 441 posts
Speeding Along Now
- Location: Belfast
- Local Club: mini-chat.co.uk
Posted 11 November 2008 - 01:27 PM
We're alive and kickin', Back from the Dead.

Alot has happened over the the summer, before I went on holiday, i bought a shell for the small sum of £100. It was in pretty perfect condition except for the sills, and it had no front end. The scuttle/Bulkhead are mint.
And so..
Anyway, as i said, i have a friend who is quite good (bloody fantastic) with bodywork. He restores classic cars. He agreed to take on the bodywork for the shell.
I originally wanted a flipfront, but to be honest, i went off the idea. It's great in theory, but once i saw it in the flesh and had the brackets on. It wasn't worth the hassle.
Here you can see the shell with the subby and brace bars.

Bonnet Pins for the flipfront

Solid Mounts

More Solid Mounts

Flip Front Hinges/Brackets

Inner Sills made from spare metal, galvanised stuff. much heavier than the crappy replacement panels.

Jacking Point Welded up, no water getting there.

i LOVE oversills when they're done properly, no rot underneath them. We have to get people to stop thinking theyre evil. They're only evil then when they're hiding rot!

The shell had been cut for the sunroof. The original glass was broken

All the front panels welded on. 3 Hours of graft. No more flip front hinges. They're up for sale by the way. And if you look closey, a new sunroof. We had to cut the hole in the roof bigger with tin snips. That was un-nerving. No mistakes allowed!

Took the front subby out. Brace bars off. All front suspension refrubished and in and also new hi-los and rubber cones all round!
I also spent yesterday referbing my drive hubs. New Wheel bearings and new ball joints. There wasn't enough shims to do the ball joints. All the shims for both kits only did 2 ball joints so now i'm gettin some old shims off my mate to finish the other hub!
I'll go and take some better pictures of the shell/welds and some nice shiney pics of the subby!
Alot has happened over the the summer, before I went on holiday, i bought a shell for the small sum of £100. It was in pretty perfect condition except for the sills, and it had no front end. The scuttle/Bulkhead are mint.
And so..
Anyway, as i said, i have a friend who is quite good (bloody fantastic) with bodywork. He restores classic cars. He agreed to take on the bodywork for the shell.
I originally wanted a flipfront, but to be honest, i went off the idea. It's great in theory, but once i saw it in the flesh and had the brackets on. It wasn't worth the hassle.
Here you can see the shell with the subby and brace bars.
Bonnet Pins for the flipfront
Solid Mounts
More Solid Mounts
Flip Front Hinges/Brackets
Inner Sills made from spare metal, galvanised stuff. much heavier than the crappy replacement panels.
Jacking Point Welded up, no water getting there.
i LOVE oversills when they're done properly, no rot underneath them. We have to get people to stop thinking theyre evil. They're only evil then when they're hiding rot!
The shell had been cut for the sunroof. The original glass was broken
All the front panels welded on. 3 Hours of graft. No more flip front hinges. They're up for sale by the way. And if you look closey, a new sunroof. We had to cut the hole in the roof bigger with tin snips. That was un-nerving. No mistakes allowed!
Took the front subby out. Brace bars off. All front suspension refrubished and in and also new hi-los and rubber cones all round!
I also spent yesterday referbing my drive hubs. New Wheel bearings and new ball joints. There wasn't enough shims to do the ball joints. All the shims for both kits only did 2 ball joints
so now i'm gettin some old shims off my mate to finish the other hub! I'll go and take some better pictures of the shell/welds and some nice shiney pics of the subby!
#27
dezshearer
-
- Members
-
- 441 posts
Speeding Along Now
- Location: Belfast
- Local Club: mini-chat.co.uk
Posted 12 November 2008 - 10:04 PM
Not interesting enough?
I killed someone and dragged their body from my garage to my trailer!
I'm lying.
I actually dragged a fully built rear subframe to my trailer to take it to my mates garage to strip it down. It weighed the same amount as a dead body i'd say!
But yes, it's all stripped now, so i'm having the rear arms honed and cleaning everything up and then putting it all back together! Just like the front subframe, shock horror.
I'll get some pics of the stripping down of the rear arms, i know how much fun pics are to look at!
Wait out!
#28
dezshearer
-
- Members
-
- 441 posts
Speeding Along Now
- Location: Belfast
- Local Club: mini-chat.co.uk
Posted 02 December 2008 - 05:35 PM
Small Update, but quite huge... if you get me.
The front subframe is pretty much finished now, all it needs doing are the brake lines and the brakes themselves!
I managed to get a hold of more shims to finish the balljoints, so the hubs are in place now, and the steering rack is on the photo so i knew the track rods ends are roughly in the right place!


The rear subframe is all painted, along with the radius arms and back plates and brackets, and theyve all been re assembled. However no pics as of yet. I'll get some, i promise!

And finally, ive started to clean up the engine bay and paint it, and all seam seal all the welds. I've only a picture of the top of the bay so far tho!

Etch primed, and then hammerite!
Below this and the rest of the floor/under the wings and the inner wings will all be stone chipped first, and then painted with hammerite! Pics to follow.
And again, i apologise for the shitty camera phone pics, but i've managed to get my digicam back from my gf, so i'll be snappin with it!
The front subframe is pretty much finished now, all it needs doing are the brake lines and the brakes themselves!
I managed to get a hold of more shims to finish the balljoints, so the hubs are in place now, and the steering rack is on the photo so i knew the track rods ends are roughly in the right place!
The rear subframe is all painted, along with the radius arms and back plates and brackets, and theyve all been re assembled. However no pics as of yet. I'll get some, i promise!
And finally, ive started to clean up the engine bay and paint it, and all seam seal all the welds. I've only a picture of the top of the bay so far tho!
Etch primed, and then hammerite!
Below this and the rest of the floor/under the wings and the inner wings will all be stone chipped first, and then painted with hammerite! Pics to follow.
And again, i apologise for the shitty camera phone pics, but i've managed to get my digicam back from my gf, so i'll be snappin with it!
#29
johnbest981
-
- Members
-
- 269 posts
Mini Mad
- Local Club: Basingstoke Mini Club
Posted 02 December 2008 - 08:00 PM
Your project fascinates me, I wish I had your head/knowledge for cars, keep up the good work!
#30
dezshearer
-
- Members
-
- 441 posts
Speeding Along Now
- Location: Belfast
- Local Club: mini-chat.co.uk
Posted 02 December 2008 - 10:10 PM
johnbest981, thanks very much for the reply!
It feels as though i've been talking to a brick wall in here!
Before i started the project i knew nothing, it's very easy to pick up on. My advice, is, it's easy to strip something down, but as you do, study where the bolt is coming from, why its there, what it was doing, and remember where everything goes back !
Don't strip down a caliper or hub or suspension arm until you have all the new bits to go back in!


1 user(s) are reading this topic
0 members, 1 guests, 0 anonymous users


