Jump to content


Photo

Detailed Engine Bay Guide


  • Please log in to reply
26 replies to this topic

#16 mike.

mike.

    Crazy About Mini's

  • Members
  • PipPipPipPipPipPipPipPipPipPip
  • 6,176 posts

Posted 09 August 2008 - 10:47 PM

To be honest i've never examined a mini brae servo before so couldn't tell you much.

You'll still be able to do the visible bits of the clutch through the grill hole and i know people paint the servos and you can buy chrome cover for the reservoir which looks good. I guess you'll just have to allow extra time for doing your engine...

#17 stormintrooper

stormintrooper

    Up Into Fourth

  • Members
  • PipPipPipPipPipPipPipPipPip
  • 2,072 posts

Posted 12 August 2008 - 09:38 PM

Id love to know how u got the oil and grease outta the nooks and crannies as iv been cleaning now for 2 days and still havent got it all off, how did u manage the back of the engine block aswell?

#18 mike.

mike.

    Crazy About Mini's

  • Members
  • PipPipPipPipPipPipPipPipPipPip
  • 6,176 posts

Posted 13 August 2008 - 11:57 AM

Gunk is pretty much all i used, if you spray enough on the grime just rinces off with the hose

#19 stormintrooper

stormintrooper

    Up Into Fourth

  • Members
  • PipPipPipPipPipPipPipPipPip
  • 2,072 posts

Posted 13 August 2008 - 08:20 PM

i been doing this for 2 days now
lol

is there any downside in using hammerite instead of halfords own stuff?

#20 mike.

mike.

    Crazy About Mini's

  • Members
  • PipPipPipPipPipPipPipPipPipPip
  • 6,176 posts

Posted 13 August 2008 - 10:13 PM

The only downfall i found with hammerite is that it doesn't go on as nicey and as smoothly as the thinner engine paint.

Plus its abit of a pain to clean

#21 blasto

blasto

    Just On Tickover

  • Noobies
  • Pip
  • 9 posts
  • Local Club: No Mini Club

Posted 27 August 2008 - 05:11 PM

shine like a dime, good job. im planning to do mine. hopefully soon...

#22 malaysiaminilover

malaysiaminilover

    Learner Driver

  • Noobies
  • PipPip
  • 17 posts
  • Local Club: www.malaysiaminilover.com

Posted 19 September 2008 - 08:14 PM

Hi minimadmike,

Do u have more pictures during the cleaning process? Can you share to us?

#23 mike.

mike.

    Crazy About Mini's

  • Members
  • PipPipPipPipPipPipPipPipPipPip
  • 6,176 posts

Posted 21 September 2008 - 09:57 PM

Unfourtunatly i havn't. I didn't know i would be writing this guide so only took before and after pics.

The only pics i have were when i first bought my car. Originally the block was very oily and grimey so one of the first few things i did was give it a quick wash with some gunk - Just like i've explained in this guide.

Before:
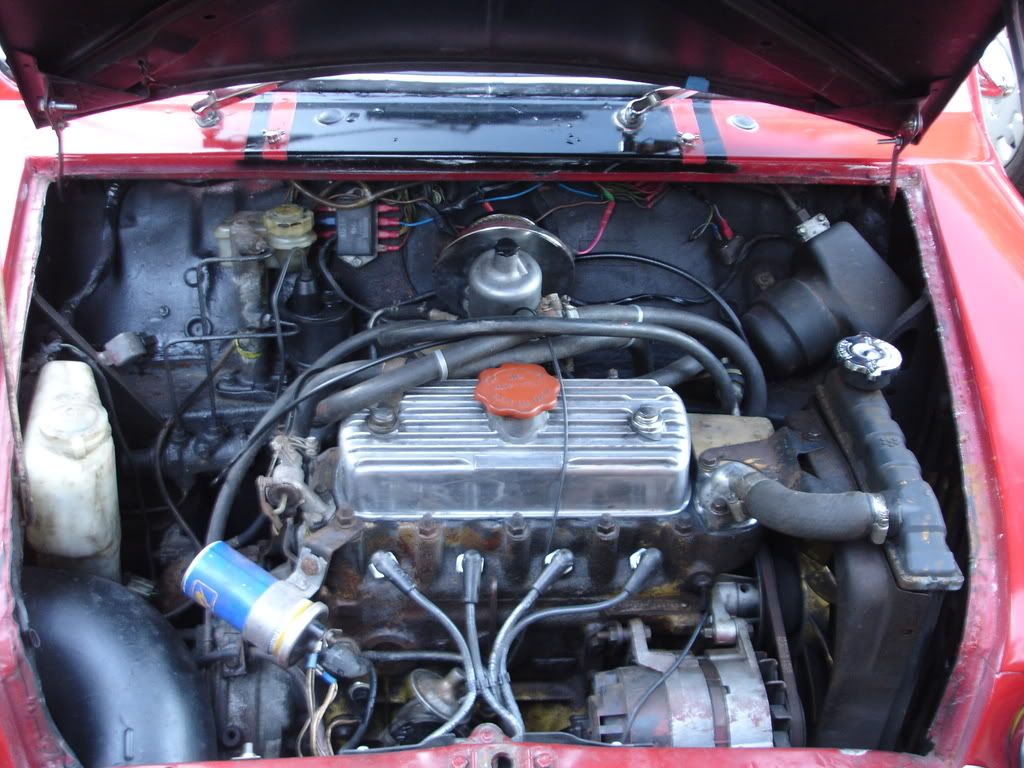
Posted Image

As you can see the blocks really oily

After:

Posted Image

Like i said all i did was degrease the block with some gunk cleaner - At that time i hadn't done anymore cleaning apart from that.

#24 mk1leg

mk1leg

    Crazy About Mini's

  • Members
  • PipPipPipPipPipPipPipPipPipPip
  • 9,343 posts
  • Location: Jersey
  • Local Club: Mini Club Jersey, MCR

Posted 21 September 2008 - 10:09 PM

Well I hpoe to do as good as job as this engine bay stunning ...................

Posted Image

.but I'm lucky to have a fresh empty engine bat to start with.........

Posted Image

and will soon have MY Swiftune EVO2 motor to install............... :P

#25 mike.

mike.

    Crazy About Mini's

  • Members
  • PipPipPipPipPipPipPipPipPipPip
  • 6,176 posts

Posted 21 September 2008 - 10:28 PM

Yeah thats nice. When i eventually fit a new engine in my car i'll go to that sort of effort.

#26 dougie1142

dougie1142

    Super Mini Mad

  • Members
  • PipPipPipPipPipPip
  • 500 posts
  • Location: Inverness/Elgin
  • Local Club: I.M.O.G

Posted 23 May 2009 - 01:42 PM

great guide, however, what if u have a brake servo like i do, because my engine bay is alot more cramped than yours lol


yeeah i agree haha! we just gotta deal with it!

#27 Brookesy

Brookesy

    Super Mini Mad

  • Members
  • PipPipPipPipPipPip
  • 507 posts

Posted 04 August 2011 - 04:16 PM

Began cleaning mine today..
Havnt began painting yet and granted not the best cleaning job as im stull unsure what can be removed/ what cant e.t.c. Fan needs a better clean but i ran out of energy :)

Before
Posted Image

After Spray and rinse
Posted Image

Then after wiping down all the other bits and bobs with some cillit bang and toothbrushes :D
Posted Image


1 user(s) are reading this topic

0 members, 1 guests, 0 anonymous users