Jump to content


Photo
- - - - -

My New Interior


  • Please log in to reply
29 replies to this topic

#16 mike.

mike.

    Crazy About Mini's

  • Members
  • PipPipPipPipPipPipPipPipPipPip
  • 6,176 posts

Posted 17 October 2007 - 07:31 PM

Thanks guys! :thumbsup:

Yeah the emulsion on the headlining worked really well, i did the same with the sun visors, they were grey before.

Luke, the seats are the new shape cobra classics they're £80 each i think + £45 each for the subframes but with my TMF discount and because i was buying loads of stuff from minispares it came to just over £200.

The dials are from a later mini. Minis made after 1988 had the 3 clock, flat face dial assembly, so i sourced those and fitted a magnolia dial kit, also from minispares.

#17 millsminis

millsminis

    TMF Moderator

  • Members
  • PipPipPipPipPipPipPipPipPip
  • 2,882 posts
  • Local Club: Cornish Mini Club

Posted 17 October 2007 - 08:07 PM

Looks really nice mate....that emulsion finish looks great!!!!

#18 mike.

mike.

    Crazy About Mini's

  • Members
  • PipPipPipPipPipPipPipPipPipPip
  • 6,176 posts

Posted 17 October 2007 - 08:48 PM

ooooh and before anybody says anything - Roll cage padding is on the way for that top bar!

#19 womwom

womwom

    Stage One Kit Fitted

  • Noobies
  • PipPipPip
  • 57 posts

Posted 17 October 2007 - 09:06 PM

did the later style gauges fit straight in with no additional wiring??

Looks nice, im not jelous tho!!

#20 bloomers

bloomers

    One Carb Or Two?

  • Members
  • PipPipPipPipPipPipPip
  • 815 posts

Posted 17 October 2007 - 09:08 PM

yea good touches :thumbsup:

#21 mike.

mike.

    Crazy About Mini's

  • Members
  • PipPipPipPipPipPipPipPipPipPip
  • 6,176 posts

Posted 17 October 2007 - 09:09 PM

Yeah theres no additional wiring needed. They use the same loom, same speedo cable and the bracket bolts through the bulkhead in the same way.

The wiring for the rev counter is already in most minis wiring loom. Theres a little black and white cable going from the coil and appears somewhere in the dash, they'll a bullet connecter and a spade connecter somewhere.

So yeah they were a pretty straight foward upgrade. I also put 5w bulbs in them rather than the 2.2w original ones so now they're much brighter - its great at night!

#22 Shylos

Shylos

    Super Mini Mad

  • Members
  • PipPipPipPipPipPip
  • 545 posts
  • Location: Minnesota

Posted 18 October 2007 - 09:14 AM

That's a really fantastic job - great work!

#23 blacktulip

blacktulip

    Crazy About Mini's

  • TMF+ Member
  • PipPipPipPipPipPipPipPipPipPip
  • 6,224 posts
  • Location: Braintree

Posted 18 October 2007 - 09:46 AM

looking sharp in there! ;)

#24 fatmini

fatmini

    One Carb Or Two?

  • Members
  • PipPipPipPipPipPipPip
  • 735 posts
  • Local Club: no

Posted 18 October 2007 - 10:44 AM

what did u do the roof lining i cant tell the differance between before and after ?

the rest looks good tho

#25 Gingerjoe

Gingerjoe

    Camshaft & Stage Two Head

  • Members
  • PipPipPipPipPipPipPipPip
  • 1,908 posts
  • Local Club: Tmf

Posted 18 October 2007 - 10:48 AM

Looks well smart mate! :]

#26 Tom07

Tom07

    Passed Test

  • Noobies
  • PipPip
  • 29 posts
  • Local Club: Basingstoke Mini Club

Posted 18 October 2007 - 01:04 PM

looks sweet

My interiors' in the same state as your's was in.........

i need to fix up.......

#27 mike.

mike.

    Crazy About Mini's

  • Members
  • PipPipPipPipPipPipPipPipPipPip
  • 6,176 posts

Posted 18 October 2007 - 10:29 PM

what did u do the roof lining i cant tell the differance between before and after ?

the rest looks good tho


Basically when i got the car my headlining just had some fur material glued to it, but in the few days of summer we had, the glue melted and all the fur fell off and hung down like a hammock. So i ripped it off and it revealed the original lining with a few milimetre thick layer of undryed glue. So when you were driving your hair got stuck to the roof and things and peoples clothes got covered in it trying to get in/out of the back, it was a nightmare.

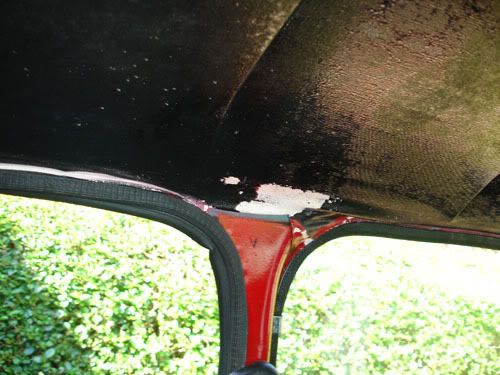
So basically it was covered in glue which is why it looks so shiney, and the original paint started to pull off with the glue. It looked really bad like this:

Posted Image

Posted Image

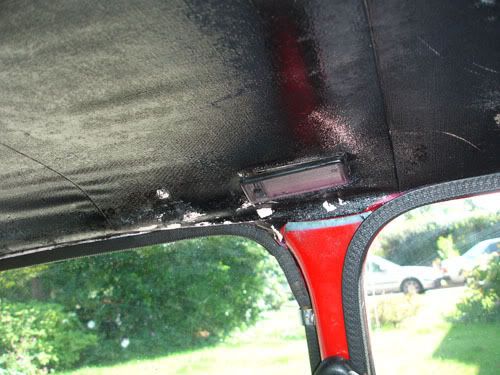
So i tryed using all sorts to get it off but taffy from the forum adviced to use thinners (thanks taffy) So i used about 2 litres of thinners and a load of rags to scrub down the headlining and remove all the old glue and original paint. Then even after that it was sticky to touch, so i got a can of this 'stick stuff remover' for removing sticker residue and things from halfords and used that to remove the stickyness followed by a bucket of warm soapy water to clean any other contaminents off. After all that it looked like this:

Posted Image

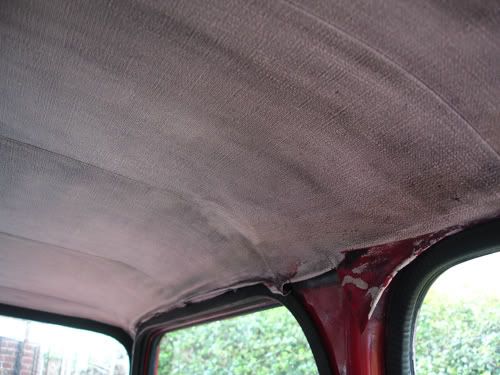
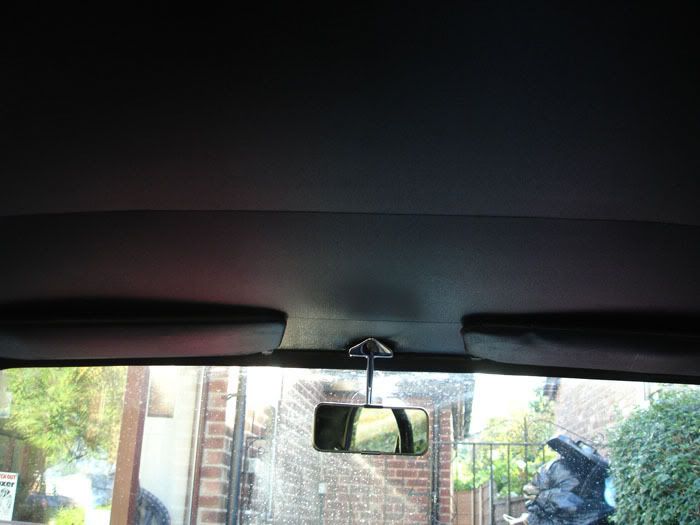
And then i painted it using a roller and a brush with black emulsion to give it a brand new looked and it worked really really well:

Posted Image

;)

#28 minili

minili

    Awesome and Flattering

  • Members
  • PipPipPipPipPipPipPipPipPipPip
  • 5,140 posts
  • Local Club: TMF South Central

Posted 18 October 2007 - 10:40 PM

Ooh well done, that's some impressive DIY! ;)

#29 Pie

Pie

    Crazy About Mini's

  • Banned
  • PipPipPipPipPipPipPipPipPipPip
  • 7,695 posts
  • Local Club: GoGoAuto

Posted 18 October 2007 - 10:47 PM

looks very nice. Where did you buy the speedwell gearnob out of intrest? and for how much moooney?

#30 mike.

mike.

    Crazy About Mini's

  • Members
  • PipPipPipPipPipPipPipPipPipPip
  • 6,176 posts

Posted 18 October 2007 - 10:50 PM

The gearknob was from minispares, it was about £18 so not cheap! But its beautifully shaped in brushed aluminium with the speedwell 'S' on the top, its a really nice little touch and its similar in size the the original, rather than some big, tacky looking plasticy ball gearknob.

Edit: Heres a link - Note that the colour around the 'S' logo is black and not BRG as it looks abit in the pic

Edited by minimadmike, 18 October 2007 - 10:53 PM.


1 user(s) are reading this topic

0 members, 1 guests, 0 anonymous users