hey guys its been a while since ive posted on here been busy with many thing, ive finaly sourced a local micra almost complete as a donor belived to be 1998, i hope it doesnt have the nats you were talking about - sounds like hassle to me.
well done to all you who have started this project alot of progress has been made since i last looked. as i have lots of square section lying around i think im also going to make a frame similar to yours flying banana - looks very nice, tho you decided to put the engine alot closer to the bulkhead and cut a bigger hole. what made you decide to do this?
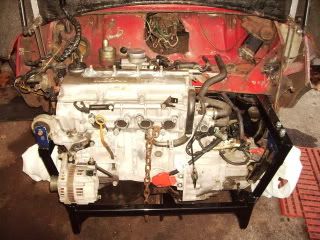
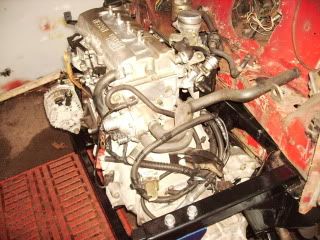
it had to go there you have to keep the drive shafts in line with the hubs,
i think where mine is a later injection it has a large inlet manifold so i had no choice than to
cut out more of the bulk head.
more pictures on way soon .
andy
I am using the 1300 from a 93 Micra in a standard steel round nose front Mini , inner wings cut out ..
Mine uses a Allspeed based frame . The bar running between the subframe towers was to high and stopped the engine sitting down in the frame. Once the bar was removed the engine dropped in straight away . I then welded the bar back in further down between the towers .
I am using similar style front mounts to Bigchief with LandRover rubbers and the the original large Micra rear mounting bracket modified to take a larger rear mount rubber which is a Rover 200 offside top engine mount , so the rear engine mount is quite beefy . I have welded a large flat plate to the top of the bracket and one to the bar between the subframe towers , so I may bolt a additional LandRover rubber in between the 2 plates .
Bulkhead modified to suit , it does loose the clutch master cylinder hole , just leaving the hole for the brake master cylinder . My car already had a welded in recessed box in the middle of the bulkhead below the crossmember that the standard Mini master cylinders mount onto . Because of this extra box (like a turbo box but mounted lower ) I have modified the pedal box by cutting off the clutch cylinder mounting bolts and that corner of the pedal box and then the nearside of the mounting brackets that bolt vertically through the bulkhead , this bracket will be re-made so its bolted on further down the bulkhead. The clutch pedal did not get its full throw because of the recess for the Micra engine in the bulkhead . So firstly I cut off the section of the pedal the master cylinder clevis pin passes through then I removed the clutch pedal and noticed that there is in fact 2 bushes with a gap in between both in the pedal where the pivot shaft passes through it and is bolted to pedal box . I cut between the bush so the top off the pedal was in 2 parts . I swapped the part cut from top right of pedal and welded it to the left hand end of the left hand section . What this all basically does is put the top of the clutch and brake pedals closer together . The clutch pedal now misses the bulkhead boxes but is almost touching the steering column . I overcame this by cutting the pedal into 2 sections and welding a small bit off box section to the side of one part and then welding the other section of pedal to the other side of the box . Basically it spaces the clutch pedal back across away from the column into its original position . I looks better than it sounds believe me . All I need to do regarding the clutch pedal is mount the cable to it , the engine and frame are out at the moment so its a job to do when they are back in . I guess I will have the clutch cable coming up from the floor ???? All work in progress .
With the allspeed frame there is a bar from the towers that goes down to the front of the frame , looks similar to the bulkhead bracing bars used with flip fronts . I am going to mount the alternator on that bar so it will face the engine rather than face out like all normal engines have them , I am not keen on the alternator mounted on top of engine . Means the alternator is mounted behind the headlamp but still accessible as I have no inner wings . I may have a issue with cooling the alternator as the fan inside it will be running in the wrong direction but I am happy it will still charge . Sure I can get round the fan issue , advice appreciated . The alternator may be solid mounted so the belt adjustment needs to be tight but still allow for movement of the engine . Many modern car engines have the alternator solidly mounted to the engine and use a hydraulic or sprung tensioner to self adjust and keep the belt tight . I may use a sprung damper that looks like a Mini coil over shock such as Diesel Peugeot alternator drive belt tensioners . I could bolt one end to the alternator and the other to the frame , the alternator will need to pivot slightly on its mounts , or if completly solid mounted I could bolt a tensioner like diesel VW's use (although this particular type is to large) to the engine and it will tension the belt conventionally as it would on the vw . Still a bit to do there to , trying to decide which to use . I reckon the coil over type may be the one as it is a lot simpler as it uses the alternator as the tensior due to the spring pushing on it .
Not looking forward to the driveshafts , I guess cutting pinning and sleeving is the way to go . Concerned about measuring them wrongly resulting in incorrect length shafts . As all our conversions will be mounted slightly differantly in the engine bay there will not be a guide length we can all go by . Bigchief is the exception here as his brackets are virtually off the shelf and all his conversions mount in the same place in the car , meaning shaft lengths are the same each time .
Edited by monkeyjim, 20 January 2010 - 09:28 PM.