Jump to content


Photo
- - - - -

'86 City Refurb


  • Please log in to reply
375 replies to this topic

#316 mike.

mike.

    Crazy About Mini's

  • Members
  • PipPipPipPipPipPipPipPipPipPip
  • 6,176 posts

Posted 17 October 2010 - 03:02 PM

Well progress has slowed now i'm back at uni. In my last year now so the pressure is on and i've got alot of work to do, but should still have time to work on the car at weekends.

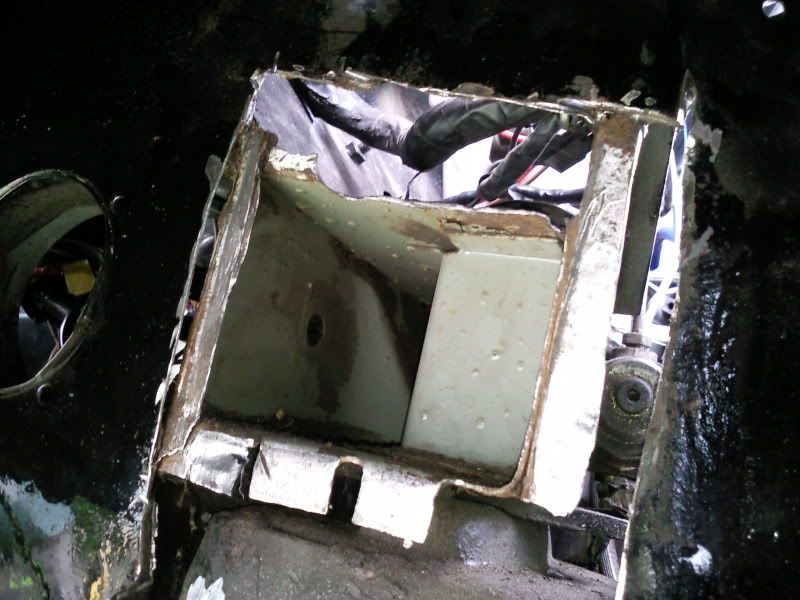
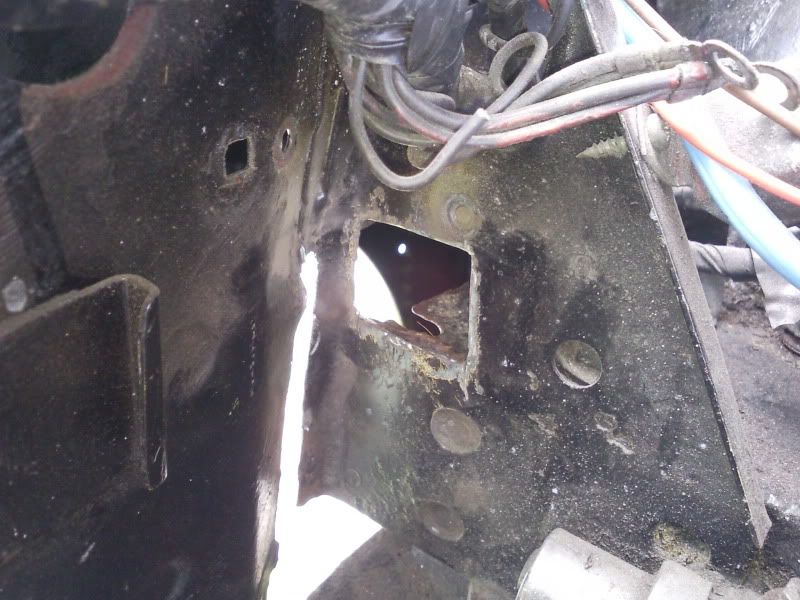
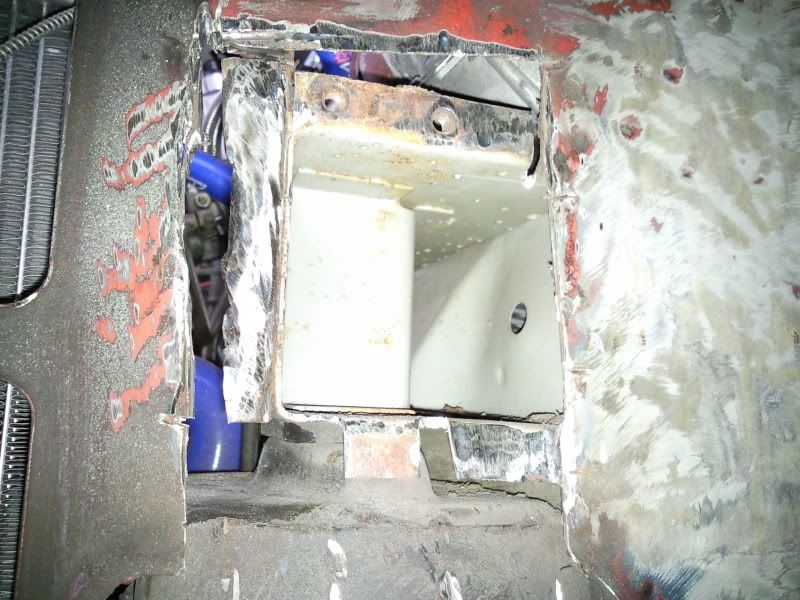
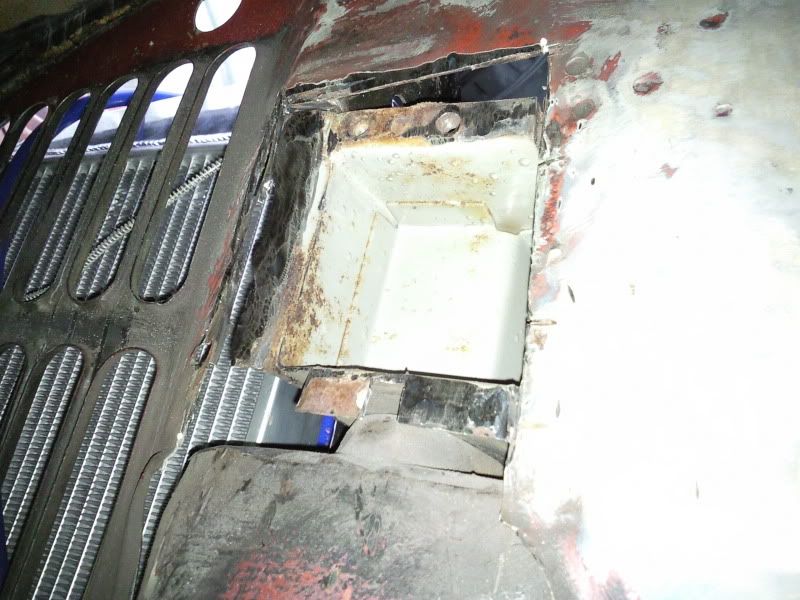
All i've been doing really is cutting out the rusty shock mounts. Its been a learning experience really because I didn't know that area of the car was as complexed as it is. When I first removed the shock mount itself and saw the hole behind it I thought I could just cut the rusty square out of the inner wing and get a plate welded in and it'd be done. But once I started cutting I realised the area was made up the bulkhead box section with threaded blocks welded into the end of it, a stiffening plate and then the inner wing itself, all welded together.

But i've been cutting and grinding for the last few weekends now and i've almost got it to a stage where all the rot is cut out and its ready for welding. The drivers side is worse than the passenger because the top of the box section had pretty bad rot, which had spread to a small area of the triangle stiffener on the inner wing. So thats all be cut out and the end of the box section has been cleaned up and filed to get it ready for welding onto:
Posted Image

Posted Image

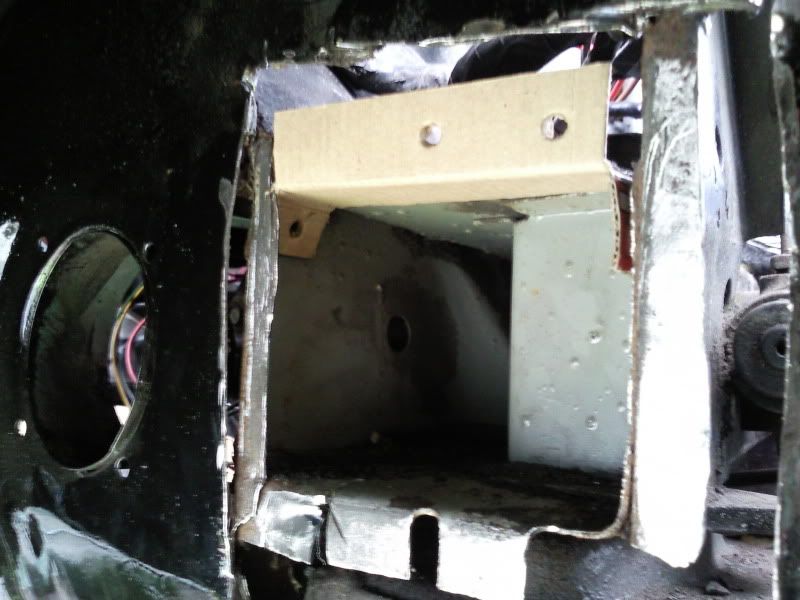
Heres how i'm planning on repairing the top of the box section, should be nice and strong with the tabs welded into the sides of the box section:
Posted Image

Passenger side i've not got as far, but then again it does need as much work as the box section is solid and doesn't need much prepping (crap photos)
Posted Image

Posted Image

The passenger side needs the left side of the box section finishing off, it needs grinding more to remove the last bit of metal which is spot welded to it, then I should be left with a solid end to the box section to weld to.

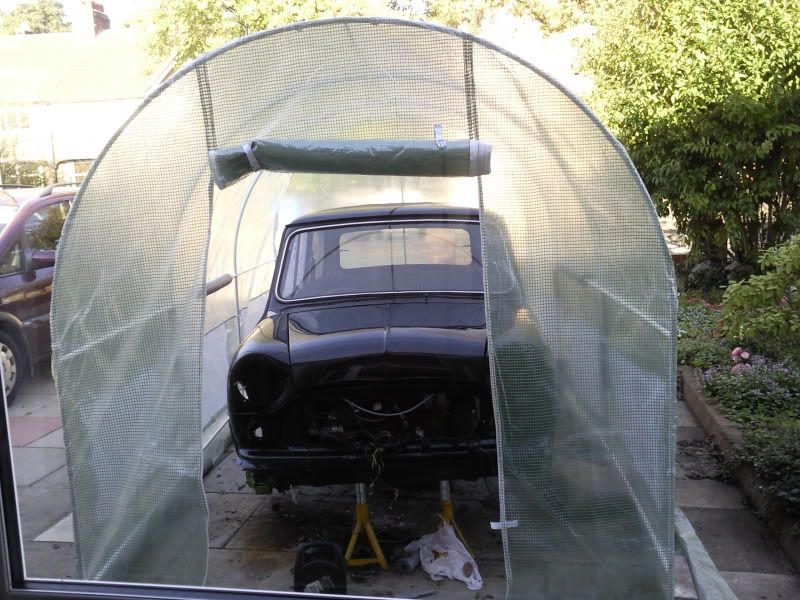
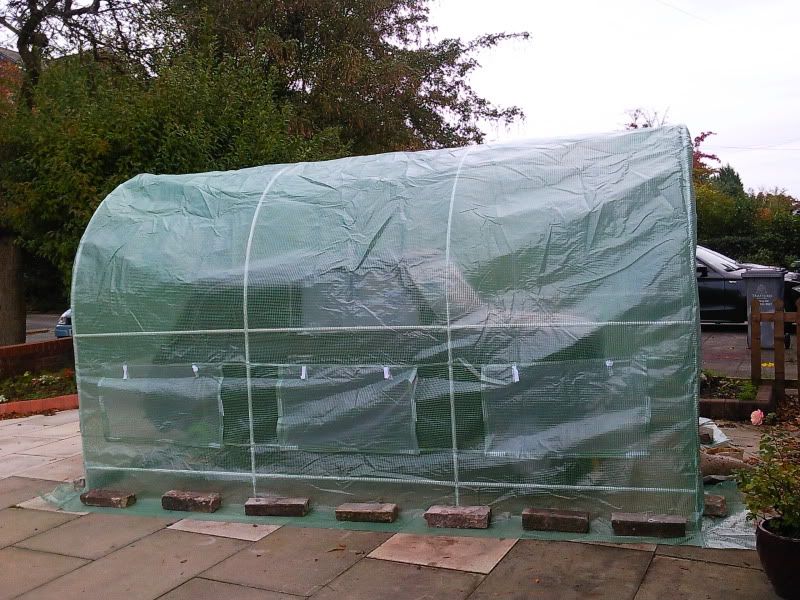
I've also bought a 'poly tunnel' green house to cover the car with. The cover I've got is abit worse for wear now and has some little tears in it hear and there from being pulled on and off so often, so in the heavy rain and wind we had, water was getting trapped up it against the paint. So I thought i'd best take it off and get it breath. So now i've got this plastic green house which covers it well and has venting windows on the side so it doesn't get humid in there. Its got just about enough room to work in aswell about 0.5m around the car, so hopefully aslong as its not too windy i'll be able to work out in the rain now its getting towards winter.
Posted Image

Posted Image

#317 LankyJames

LankyJames

    Speeding Along Now

  • Members
  • PipPipPipPipPip
  • 428 posts
  • Local Club: Heavy Handed Cluts Club

Posted 17 October 2010 - 07:46 PM

I'm sorry mike, no matter how much you water it, feed it, and greenhouse it, it won't get any bigger :(

#318 mike.

mike.

    Crazy About Mini's

  • Members
  • PipPipPipPipPipPipPipPipPipPip
  • 6,176 posts

Posted 17 October 2010 - 08:12 PM

I know :(

Its not made the mini or my bank balance any bigger!

#319 LankyJames

LankyJames

    Speeding Along Now

  • Members
  • PipPipPipPipPip
  • 428 posts
  • Local Club: Heavy Handed Cluts Club

Posted 17 October 2010 - 08:22 PM

I used to get shouted at by a neighbour for the same thing as i cleaned the suds off my mini with a watering can :(

He's gone now >_<

#320 mike.

mike.

    Crazy About Mini's

  • Members
  • PipPipPipPipPipPipPipPipPipPip
  • 6,176 posts

Posted 12 November 2010 - 10:28 PM

Well not progress has been made recently due to uni commitments. I've finished all the grinding now, just need abit of cleaning up then I can start making some patches.

However I have got some news, and its not good.

Up north we'd have some pretty extreme wind and overnight my poly tunnel tent that my cars in, managed to pull out of the 20 odd bricks and 2 bags of gravel I had sitting on the bottom of it and once the wind gets under it, there not alot you can do to stop it. So the poly tunnel took off, scraped over my car, flipped over and all ripped apart, the frame snapped and the whole lot ended up hitting and flipping over my neighbours car as she pulled in and ended up in somebody front garden down the road.

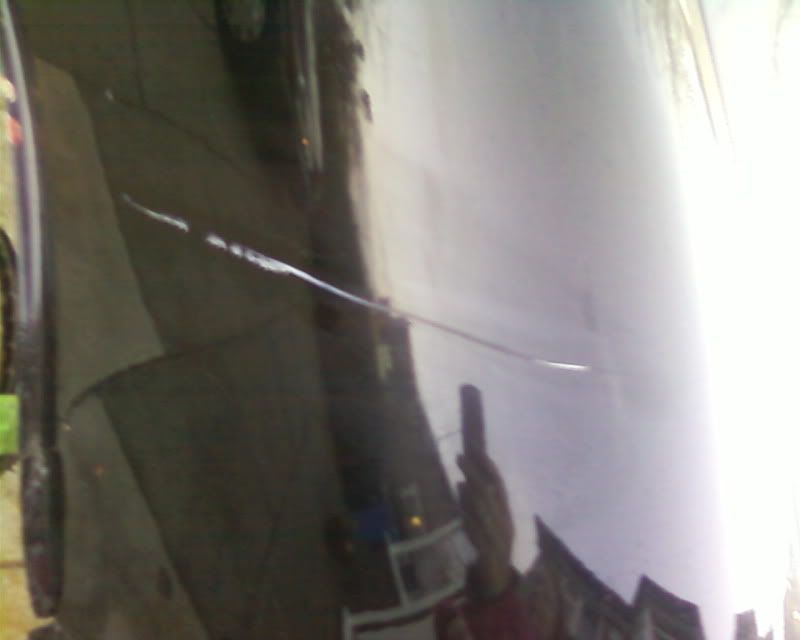
I've not seen the damage in person since i'm at uni, but i've had a couple of photos sent by my dad of the damage and its not pretty at all. Its left an 6-8 inch scrape across the whole wing:

Posted Image

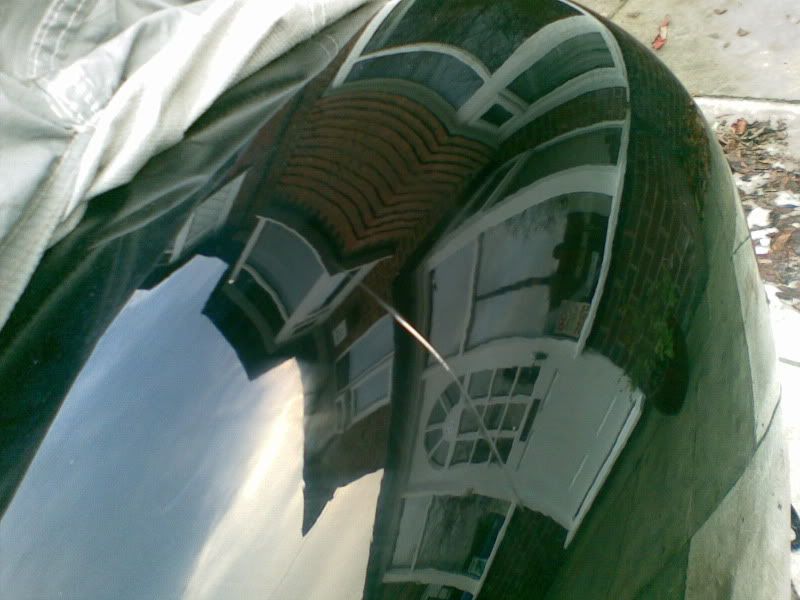
I asked my dad to see how much of it would polish out. Theres about an inch of the scratch which has gone down to the primer and the rest has just damaged the lacquer itself, but its still a big mark that my dad said is very obvious >_<

Heres how it looks after a quick buff - It kills me looking at how nice the rest of the paint is around the scratch. Looks like i'll be getting the wing resprayed...

Posted Image

Luckily theres no other damage, it could have been alot worse. Also none of the neighbours cars have been damaged, which could of been costly as next doors car is a gloss black bmw...

#321 GreaseMonkey

GreaseMonkey

    Has Ratchet, Will Make Noises

  • Members
  • PipPipPipPipPipPipPipPipPip
  • 3,663 posts

Posted 12 November 2010 - 11:01 PM

Doh! Really sorry to hear that, must be gutting >_<

#322 Shifty

Shifty

    Sponsored by Fosters (tm)

  • Admin
  • PipPipPipPipPipPipPipPipPipPipPip
  • 13,135 posts
  • Name: Sean
  • Location: Shropshire(sunny)
  • Local Club: TMF

Posted 12 November 2010 - 11:09 PM

Sorry to hear this, my polytunnels destroyed itself as well!!

I don't think they like 80/90mph winds. Mines getting some severe reinforcement before it goes back up again.

Have a word with Cliff(denty) he should be able to blow that wing back in for you easy enough.

#323 mike.

mike.

    Crazy About Mini's

  • Members
  • PipPipPipPipPipPipPipPipPipPip
  • 6,176 posts

Posted 12 November 2010 - 11:39 PM

Yeah pretty gutted really, just glad its only one panel thats damaged.

My mum said that literally every pole of the frame either snapped or crushed in and bent.

Yeah, cliff was the one who sprayed my car in the first place and I'm happy with the job he did, so i'll be getting in touch with him soon.

#324 morley

morley

    One Carb Or Two?

  • Members
  • PipPipPipPipPipPipPip
  • 903 posts
  • Location: Devon

Posted 29 January 2011 - 07:11 PM

Any updates mike?

#325 mike.

mike.

    Crazy About Mini's

  • Members
  • PipPipPipPipPipPipPipPipPipPip
  • 6,176 posts

Posted 30 January 2011 - 11:09 AM

Unfortunately not!

I've not done anything on it since my last update. In November I had an assignment in each week, so had quite a lot on at uni and wasn't going home at weekends. Then I had exams in December to revise for and once I got home over Christmas - We had about a foot of snow that lasted about 3 weeks! Now i'm back at uni again and i've got loads of work to do. I've got a 12,000 word dissertation to write that i've not started yet, aswell as 3 other assignments all to be done before the end of March. Then i'll have exams after that aswell!

So basically I expect the next time i'll get some proper work done on the car will be Easter and then when I finished uni in May I can crack on in hopefully some decent weather. Its annoying but i'm in my last year now at uni and the last 2 years my grades haven't been as good as they could be, so this year I need to get my head down to make up for it and get a good average.

The only thing I have done is contact cliff who welded/sprayed my car about the wing. He said it'll be around £120 to get the wing redone, so once the cars MOT'd i'll drive it up to him and get that done ASAP!

#326 mike.

mike.

    Crazy About Mini's

  • Members
  • PipPipPipPipPipPipPipPipPipPip
  • 6,176 posts

Posted 03 June 2011 - 09:52 PM

Right! I'm done at uni forever now, so i've now moved back home and am currently a full time bum.

Hoping to have a couple of months off doing as I please and finishing my car before I start on a serious job hunt!

I've been back at home for a couple of weeks now but just not had the motivation to touch my car. Theres so many little jobs that need doing, I never know where to start when I do feel like working on it. The last time I tried to start the car over a month ago, it just turned over making no attempt to start before back firing massively through the carb, which is what it does when I try running it without the MJ and on the EDIS alone. The only thing thats changed since I had it running last is i've wired in an inertia fuel cut off switch so i'm thinking because the MJ wiring the guy did on my car isn't that great, its got a loose connection somewhere. The main reason I got the megajolt was because I wanted better reliability and the MJ will only be as good as the wiring its running off, so think i'm going to rip it out and make another proper new loom for it and then get it going again.

Today I gave the car a good wash since its just been sat for ages with no cover on, and I went around it and made a quick list of the top of my head of the jobs I need to do to get it finished.

So below is the list i've made, I know all these jobs aren't really an MOT requirement but they're all stuff I want to do before i'll class the car as 'done'

To do List:


• Prepare inner wings/shock mounts for welding
• Make patches/repair pieces to be welded
• Order square bar to fabricate new shock mount threads
• Try fitting steering rack limiters again
• Fit new track rod ends/steering rack boots
• Rewire and remount MJ system
• Order and fit return spring pieces for clutch and bleed/adjust clutch
• Check manifold gaskets for blowing/leaks
• Remove current bottom pulley and source/fit suitable one
• Paint under passenger wing with POR15
• Clean/rub down under sills and floors and paint/seal
• Check interior for leaks
• Wire in rear lights and mount/wire in fog light
• Check fuel pump wiring/mounting and strap down fuel tank
• Re-route and rewire headlight and indicator wiring
• Fit new headlights and indicators
• Check relays, fuses, plugs and wiring for problems
• Wire in spotlights and test all electrics
• Clean out interior, wipe out floors and touch up paint on floors/sills
• Remove radio/amp wiring
• Mount MJ unit properly
• Wire in alarm system and central locking
• Fit new carpets, seatbelts/harness
• Remount/replace heating and air vent ducting
• Fit arches – With rivnuts preferably
• Polish and spray remaining 2 alloy wheels
• Fit interior – Seats, gaiters, dash lining, visors, mirror etc
• Fit exterior parts – Mirrors, wipers, bumpers, grill
• Try fitting bonnet struts
• Touch up paint in engine bay

So its quite a list but really the jobs themselves aren't too major apart from the welding and MJ wiring, although i'm sure i'll have a few problems along the way.

I'm going to the tatton park classic car show this weekend so hoping i'll feel a bit more motivated after that to start cracking on next week. Ideally I want to get it all done by the end of june - Which is my 21st birthday too!

:)

#327 mike.

mike.

    Crazy About Mini's

  • Members
  • PipPipPipPipPipPipPipPipPipPip
  • 6,176 posts

Posted 01 July 2011 - 12:19 AM

Can't believe its been a month since I wrote that last reply! I've barely done anything on the car since then, bit embarrassing really considering how much some people get done in the amount of time I waste!

I've done a few bits but nothing major.

I've took the whole MJ system out to re-do it all, re wire it and re mount it and also find a more suitable bottom pulley/trigger wheel.

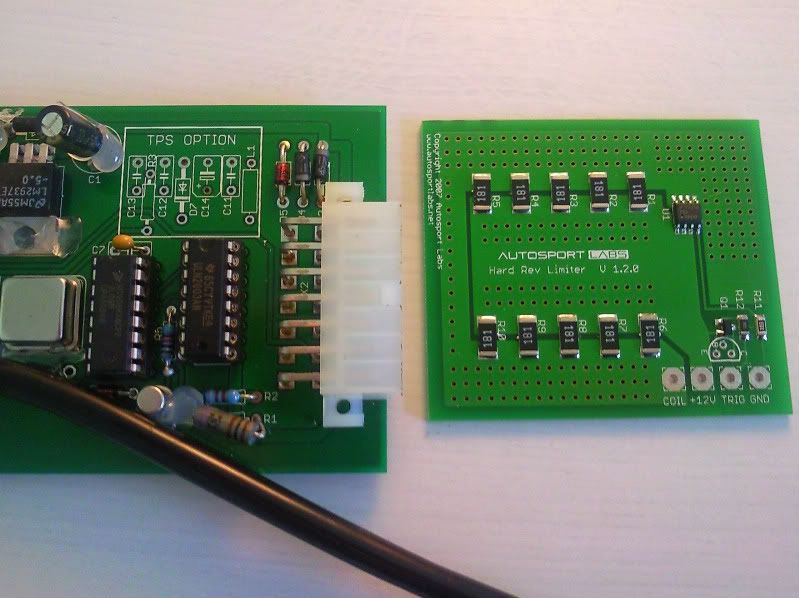
Also ordered this to go with it:

Posted Image

Need to solder that into the MJ in a few places, and once its all back up and running its going to hopefully provide me with some pops/bangs/flames to scare the boy racers away haha

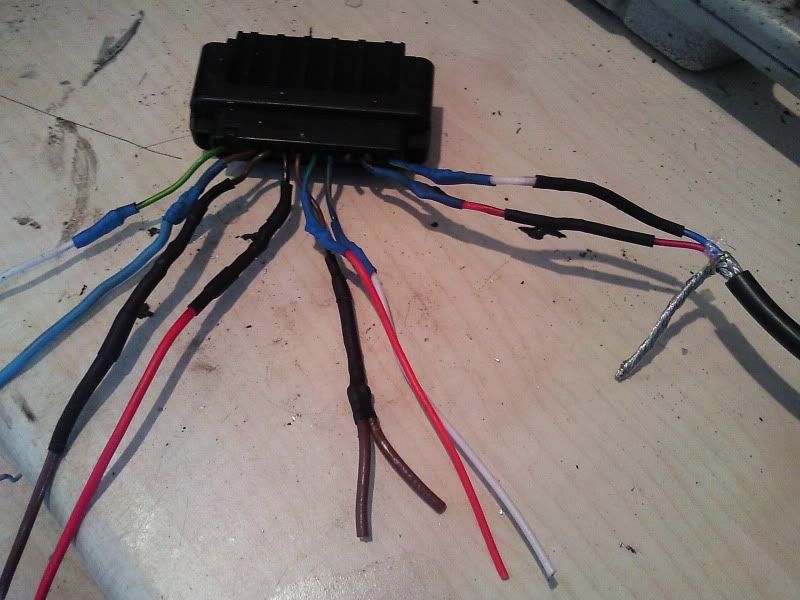
Also pretty much got the loom finished for the MJ now, not got an up to date photo but I took this one when I first started, not the most exciting photo to take but this is after cutting all the old wiring off and starting from scratch with soldered connections and plenty of adhesive heatshrink to try and keep everything nicely held and reliable.

Posted Image

The loom is pretty much ready to go back in now and be cut to length, but i've decided i'm going to wire in a second fuse box to run all my extras off rather than taking everything from the fuse box. Since i've got spotlights, radio, fuel pump and the MJ inc the coil and things I think i'm going to order a 6 blade fuse box and have a few ignition switched connections and a couple of permanent lives as well.

I've pretty much sussed out all the wiring that i've got hanging out of the grill as well - The first guy that had my car simply cut the wires going to everything when the car was stripped down, so I was left with a load of loose ends hanging out with no plugs on the end and me with no idea what went where. So that took a fair few hours of sitting looking at the haynes wiring diagrams but i've got everything labelled now and ready to be extended and connected.

I've done a load of other small jobs as well like coming up with a mount for the MJ, fitted my fuel regulator and inertia cut switch properly with rivnuts through the bulkhead, mounted my oil pressure/water temp gauge in a pod and just need to sort out a way to hold it into the pod properly.

Was going to fit the headlamp bowls and things the other day but realised the old ones that I fitted with my angel eyes won't fit my new wipac free forms because of the mounting rim needed on the wipacs, so need to put in what will hopefully be a final minispares order for a while which should cover all the little bits and bobs I need like lamp gaskets, screws, grommets, return bits for the clutch etc. Only problem is that all these little bits add up and i'm sure once i've had VAT and postage added on it'll be another £100+ order :!:

I was also having trouble finding a mobile welding service to sort the shock mounts for me, so decided to just get the car taken away again for a few days and get it sorted a a garage. Found out about minichanics at the tatton park classic car show on the Manchester minis stand and spoke to the guy who runs it. Seem like a nice bunch and all recommended minichanics so i've got the car booked in and it should be getting picked up tomorrow or monday to be taken away to be welded up and brought back to me - Hopefully in a fairly short period of time.

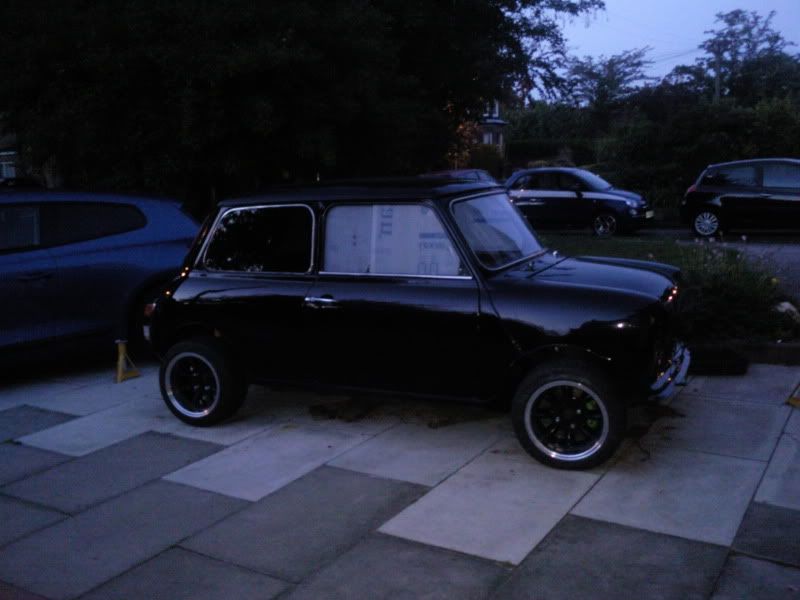
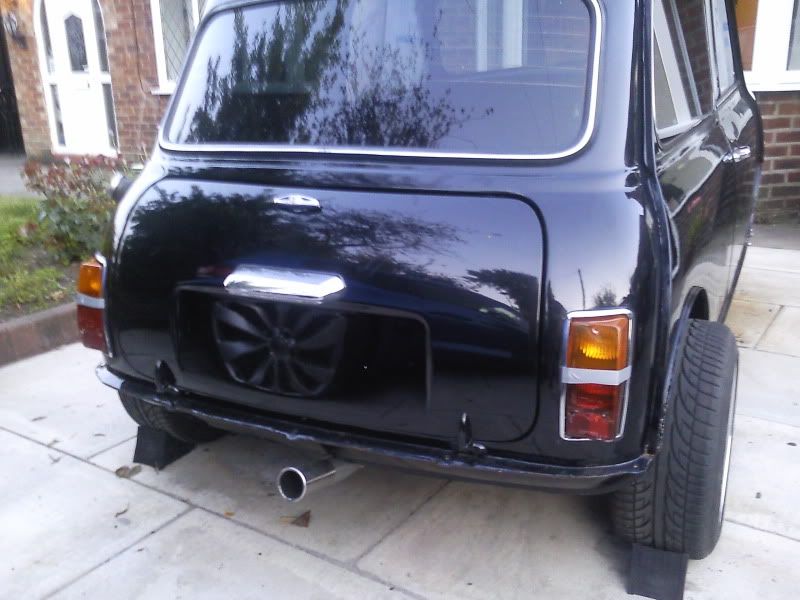
So heres a quick pic of the car off its stands and back on the wheels for the first time in I don't know how long. Feeling pretty happy and motivated seeing it on wheels once again, should look pretty cool at night out on the streets! Suspension is really high though, must need time to settle again now there weight on it again:

Posted Image

#328 mike.

mike.

    Crazy About Mini's

  • Members
  • PipPipPipPipPipPipPipPipPipPip
  • 6,176 posts

Posted 14 July 2011 - 09:29 PM

Got a bit more done over the last few days, had a spurt of motivation!

I'd already cut the rot out from the inner wing/shock mount area, but just really couldn't be bothered making the repair pieces up for a mobile welder to come and weld in. I think mainly because i've got all these shiney bits lying around ready to go on, so spending time grinding/cut out rust and making patches really was not appealing.

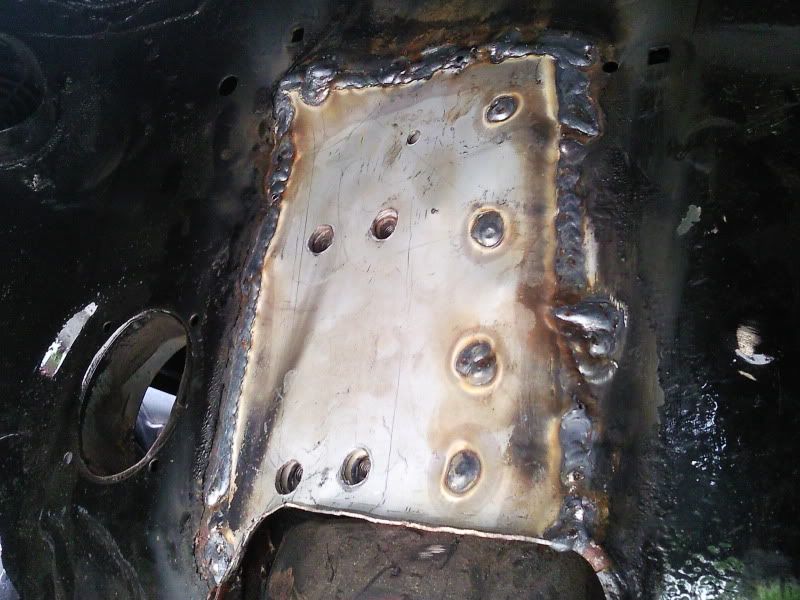
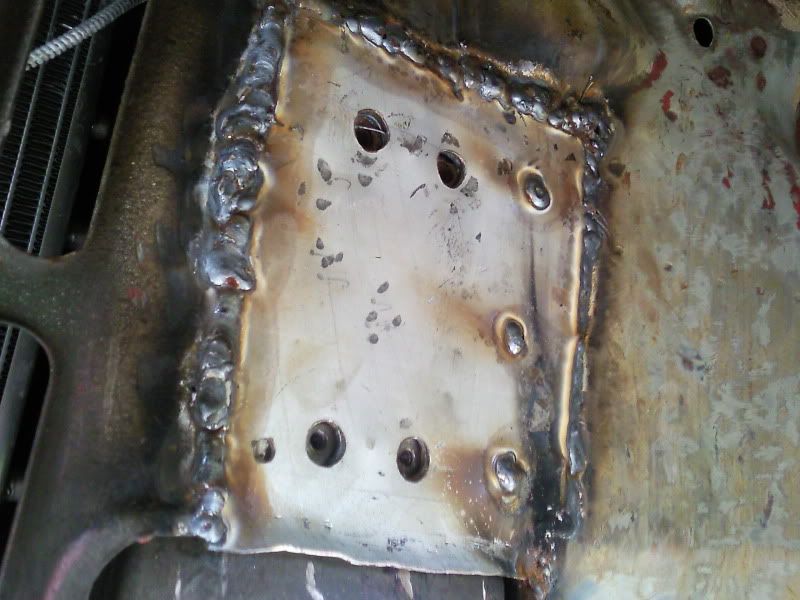
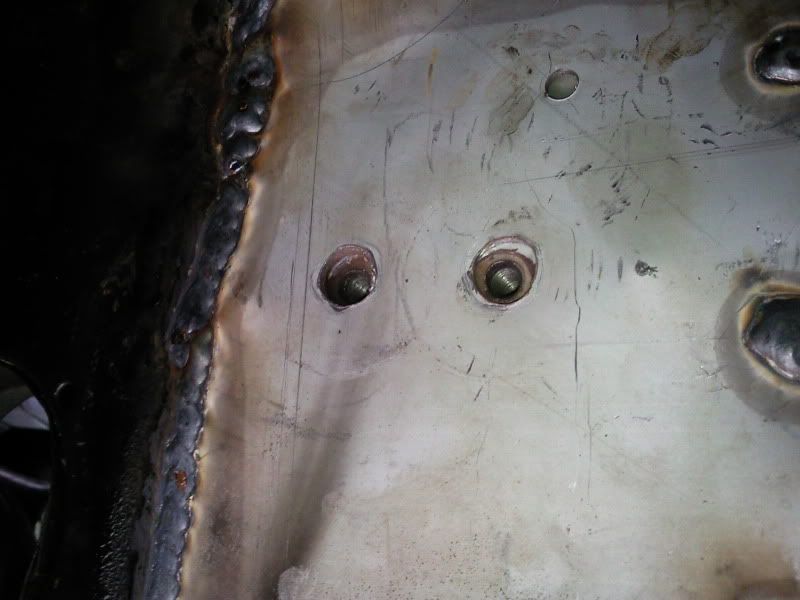
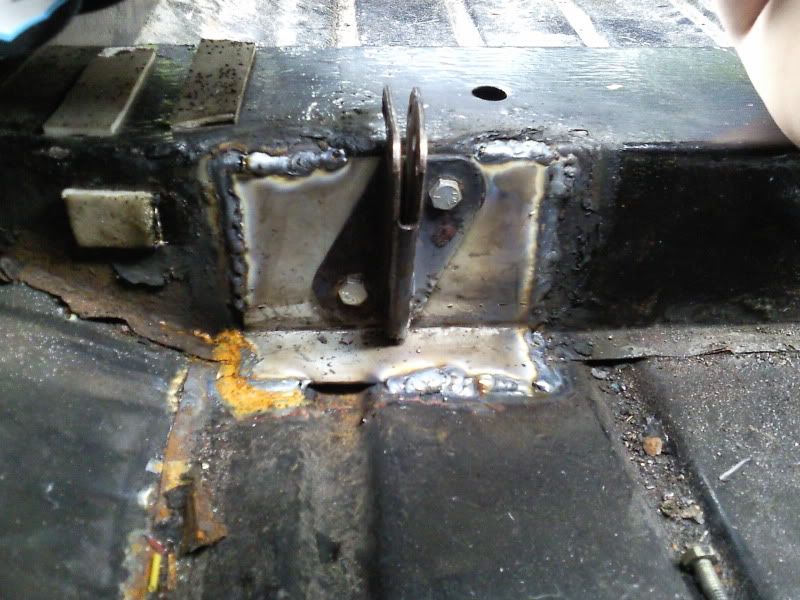
So as I mentioned in my last post I was having the work done by Minichanics in Manchester; thats been done now and I would definitely use them again! The mini was took away monday morning on an A frame and brought back to me the next day all sorted. Shock mounts were repaired properly just as i'd asked, with new threaded mounting blocks welded in and a couple of other little patches done to the interior at no extra cost. So quality of work is good, price was reasonable and the turn around time was immense - So if your in Manchester or the Northwest, give minichanics as try.

Few pics of the welding:

Posted Image

Posted Image

Repaired properly with 2 plates plug welded together:

Posted Image

And the extra bit of welding done to the crossmember:

Posted Image


So really pleased with that, just waiting for some zinc plated mounting bolts to come through the post off ebay and I can test the fit of the shocks and things. Also need to get some seam sealer and seal up the new plates and welding before I can carry on painting underneath.

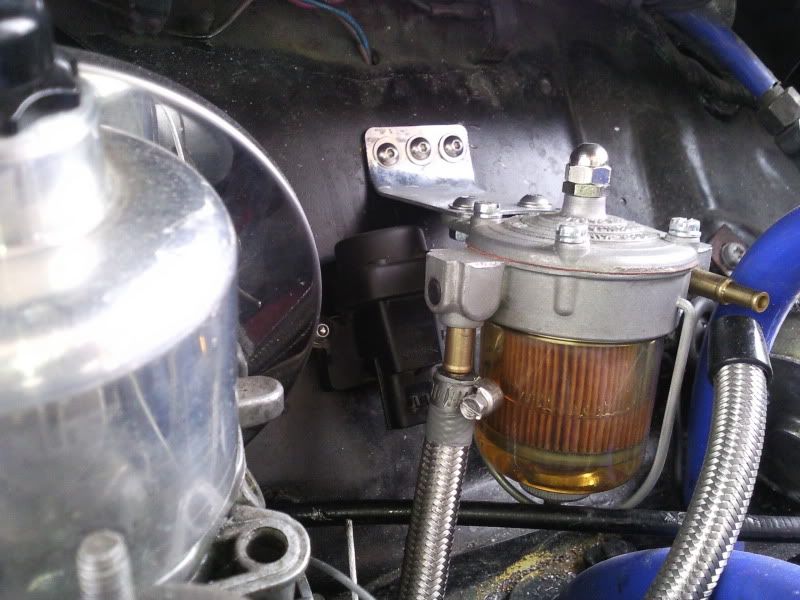
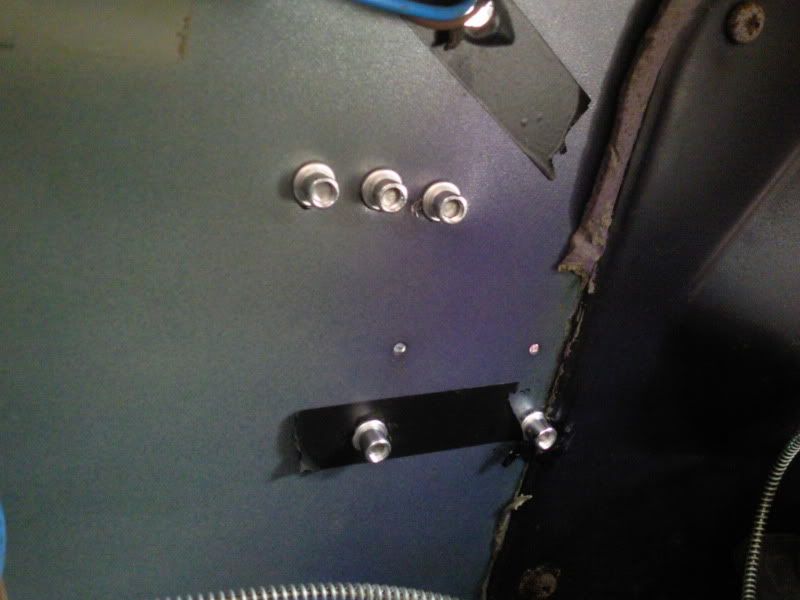
Also bought a budget rivnut gun from CBS, so been playing around with that. I'm planning on getting rid of any self tapping screws that go through my body work and using rivnuts instead. So far i've used it to mount the fuel regulator and the inertia cut off switch, used some nice stainless allen head bolts I got off ebay. Gave the mounting bracket a bit of a polish as well:

Posted Image

They work really well and the uses are endless. The don't take up much room behind the panel either and look neat:

Posted Image

Hoping to use them for my mirrors, arches, headlight bowls and possibly the grill as well.

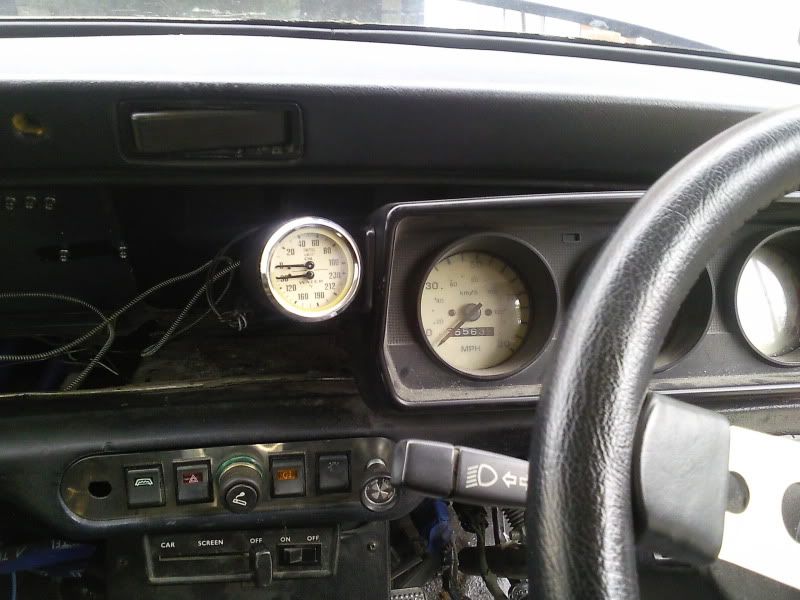
Mounted my oil pressure/water temp gauge in a pod on the side of the clocks which looks pretty neat and is nicely in view whilst driving. Just need to figure out a way to hold the gauge in there though, may end up resorting to glue:

Posted Image

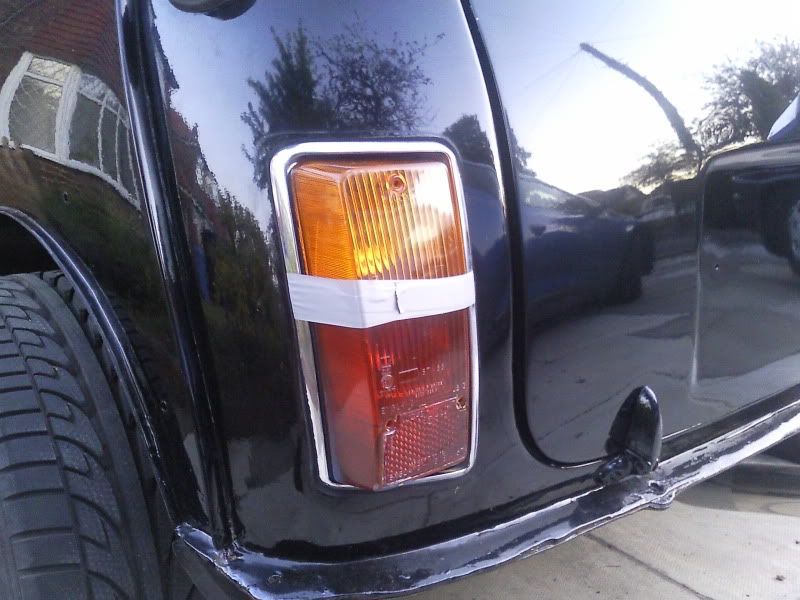
Ages ago I bought some mk2 rear lights, ended up buying 2 full sets as the chrome on the first set wasn't too good and mixing and matching to get the best condition combination. The lenses went in the dishwasher and then had a good polish afterwards and came out pretty clean, the lamp bodys were pretty dirty and it wasn't shifting so I stripped the electrical contacts and wiring out of them and put them in a bucket of hot water with some bleach and bathroom limescale remover and gave them a good scrub after a couple of hours soaking, followed by a polish with some autosol and they came out great. Chrome still not perfect but about as good as you'll get considering I paid about a fiver for them.

Put them back together with some new gaskets and trial fitted them, lenses are taped on at the mo since the only bit i've not got is the lens screws, but i've sourced some so just waiting for delivery on those:

Posted Image

Posted Image

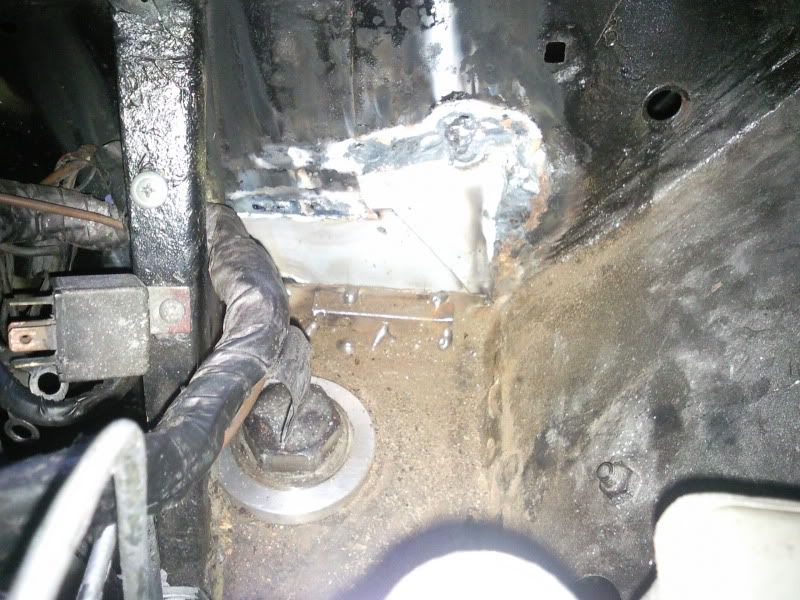
Heres another pic of the welding from the bulkhead side with the 2 plates and mounting blocks welded in place. You might notice the solid subframe mounts which I finally got round to fitting today. Took my a bit longer than I expected because I had to take the manifold off to get enough clearance to drop the subframe down, but it gave me a chance to fit a new manifold gasket whilst I was at it since I was pretty sure it was leaking. Whilst the manifold was out of the way I spent a bit of time cleaning up round the bulkhead and touching up paint that'd been eaten by spilt fuel from the fuel regulator...

Posted Image

So the subbys solid mounted at the floor and tower mounts now, didn't bother with the teardrop mounts.

Other little jobs i've done are fit the return spring stuff for the clutch, just need to get some R clips for the clevis pin on that and then I'll bleed it. Also sorted the cables for the bootlid, what a nightmare they've been for such a simple thing! Both threads in the bootlid were stripped out, so ended up cutting a bit of the inside of the bootlid away so I could put a nut on the back of the bolt, and the mounting tabs in the boot had rivets stuck in them so had to grind them out before the new cables could be bolted in.

I'm going to move my fuel pump aswell, at the moment its mounted to the back of the rear seats, but its just in the way there and can't really use the boot with it there incase stuff slams into it. So going to remount it underneath the tank on the rear subframe. Don't know how well the facet pumps hold up to being mounted outside the car, especially considering the amount of crud and spray it'll be subject to. Might try and make a bit of a shield up for it if I can be bothered.

#329 mini_mad69

mini_mad69

    Let future you worry about it

  • Traders
  • PipPipPipPipPipPipPipPipPipPip
  • 5,417 posts
  • Local Club: urrrr no

Posted 14 July 2011 - 10:40 PM

Looking great, if your wondering about the gauge, I know it's pikey. But I wrap the gauge in a couple layers of insulation tape. It golds the gauge in, but can be removed and you can't see it.

#330 Mini-Mad-Craig

Mini-Mad-Craig

    Crazy About Metro's

  • Members
  • PipPipPipPipPipPipPipPipPipPip
  • 9,298 posts
  • Location: Travelling in a fried out Kombi

Posted 14 July 2011 - 11:09 PM

Looks awesome dude! Tottally different car to what you started with years ago!!


2 user(s) are reading this topic

0 members, 2 guests, 0 anonymous users