Jump to content


Photo
- - - - -

'86 City Refurb


  • Please log in to reply
375 replies to this topic

#301 mike.

mike.

    Crazy About Mini's

  • Members
  • PipPipPipPipPipPipPipPipPipPip
  • 6,176 posts

Posted 09 September 2010 - 08:39 PM

Well I filled up a lid off a 500ml aerosol tin and only used about a quarter of that to do the underside of the drivers front end, the rest I knocked over luckily onto the mat I was sat on :trooper:

But yeah to do that with one thick coat i'd say I used maybe 50ml of paint at the most - Not alot at all really.

I didn't notice the 6 mini cans until i'd ordered the bigger 490ml (or whatever size it is) can. I'd probably go for the smaller tins. I'd read about getting paint in the grove but the size of tin I bought I had nothing that'd fit in the can to dispense the paint so ended up pouring it out and filling the grove in the can. I cleaned it as much as I could be bother to with a rag and some cotton buds and then I put some cling film over the can before putting the lid on to keep them seperate.

#302 mike.

mike.

    Crazy About Mini's

  • Members
  • PipPipPipPipPipPipPipPipPipPip
  • 6,176 posts

Posted 13 September 2010 - 11:59 PM

Nothing much to report really. Just alot of rain...

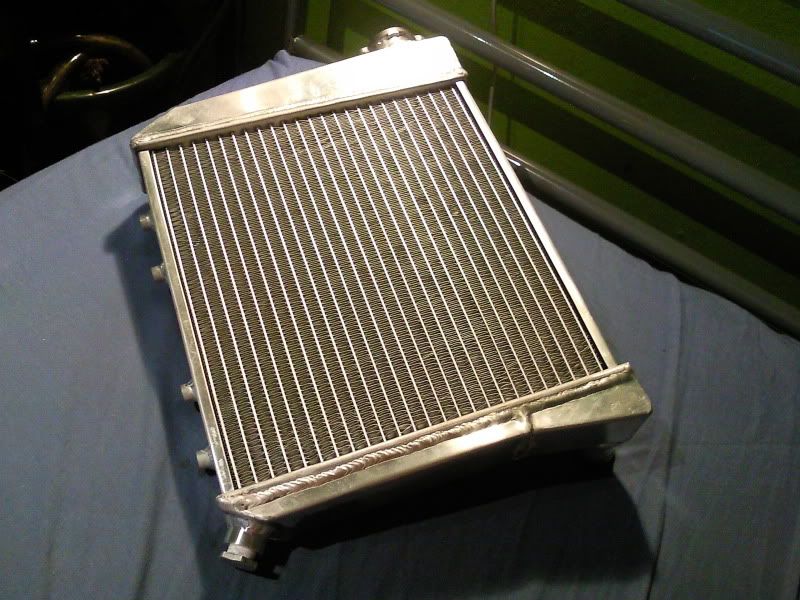
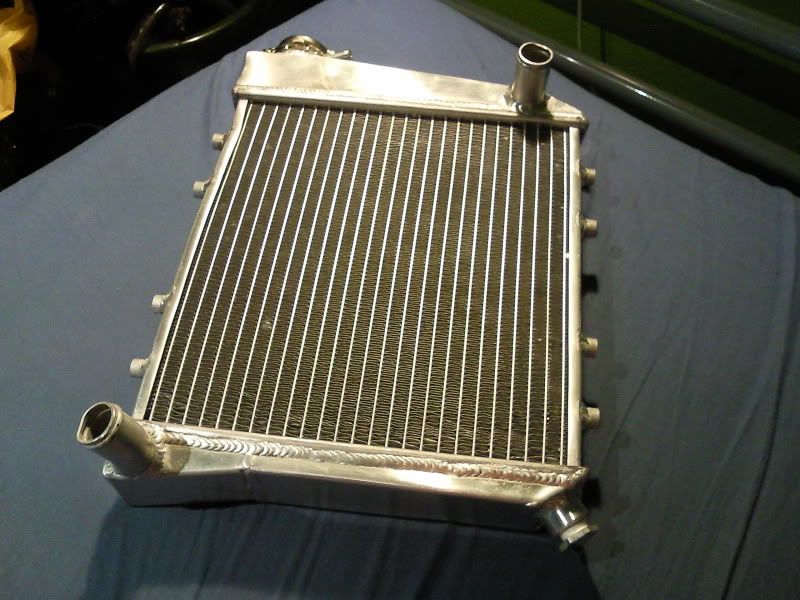
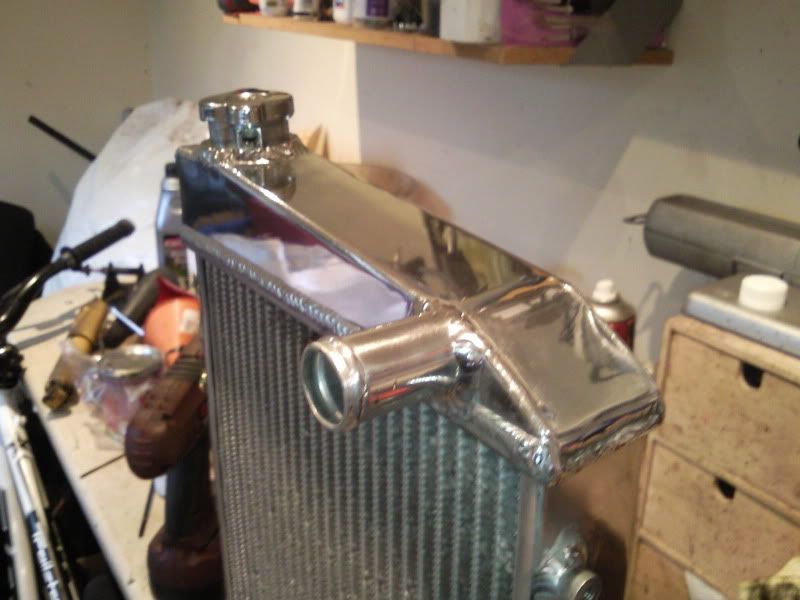
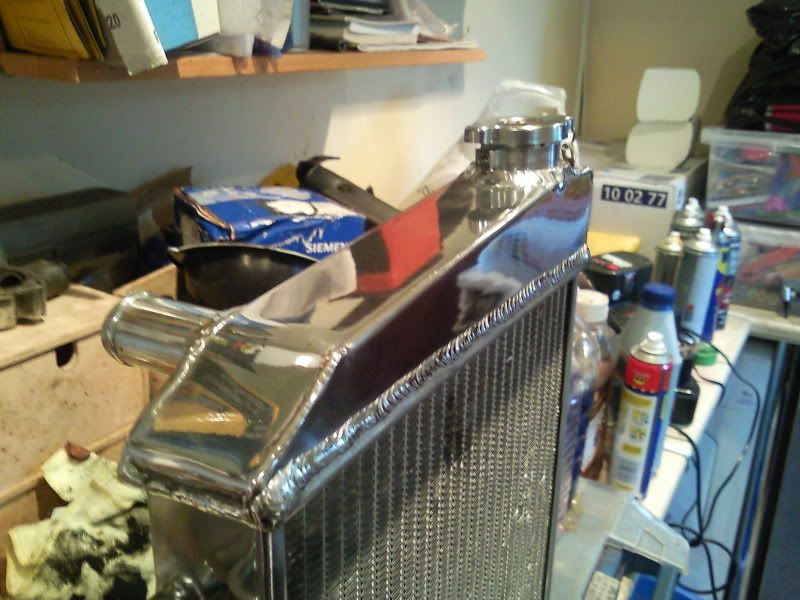
Although my alloy radiator turned up to day from china.

Looks pretty good. Obviously not the sort of quality you'd get if you bought a radtec one but at a 5th of the price its not bad at all.

You can tell they are mass produced and the manufacture does like as though it was pretty rushed, but as long as it doesn't leak and cools the engine i'll be happy for the money I paid. A few of the fins look as though they were bent abit during hasty production or possibly during postage, but they'll straighten out no problem.

I plan on giving the visible parts a quick polish and fitting it with some proper coolant at some point this week if the weathers alrite. Although painting the underside is the main job.

Couple of pics:

Posted Image

Posted Image

The fan boss/drain plug is going to make it worth every penny when it saves me removing the bottom hose to drain the coolant!

#303 xtr hardcore

xtr hardcore

    Speeding Along Now

  • Members
  • PipPipPipPipPip
  • 330 posts
  • Location: Reigate
  • Local Club: Still Looking

Posted 14 September 2010 - 02:35 AM

Yeah i was thinking that, but theres nowhere practical to put it otherwise. My boots full of tools and spares, i'm keeping my rear seats and theres no room i the front for it. Once i'v got the interior sorted i'm going to do get some decent sounding ICE with some 6x9s and a couple of pairs of speakers in the front. Might try and mount the amp on the heel board somehow then put the speakerboard over the top. Not decided yet but time will tell. But yeah i am conserned about it.


Why dont you custom make a stealth shelf for it?

This way it covers the amp and the speakers and no-one know's its there!

Either this or tint the windows?

#304 mike.

mike.

    Crazy About Mini's

  • Members
  • PipPipPipPipPipPipPipPipPipPip
  • 6,176 posts

Posted 14 September 2010 - 09:32 AM

I'm going to put my new amp on the underside of the parcel shelf and just have my speakers on the shelf.

I've also had my windows tinted now.

#305 mike.

mike.

    Crazy About Mini's

  • Members
  • PipPipPipPipPipPipPipPipPipPip
  • 6,176 posts

Posted 14 September 2010 - 02:12 PM

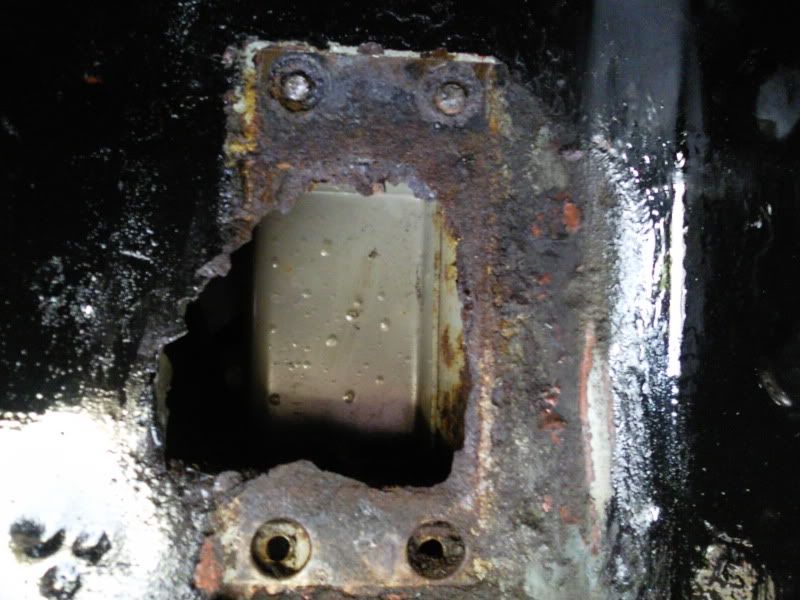
Ermmmm:

Posted Image

Both sides are the same - The sheared bolts don't help matters...
:D

#306 GreaseMonkey

GreaseMonkey

    Has Ratchet, Will Make Noises

  • Members
  • PipPipPipPipPipPipPipPipPip
  • 3,663 posts

Posted 14 September 2010 - 02:41 PM

:D

#307 mike.

mike.

    Crazy About Mini's

  • Members
  • PipPipPipPipPipPipPipPipPipPip
  • 6,176 posts

Posted 15 September 2010 - 05:34 PM

Its been throwing it down all week so far and the wind has made is twice as bad. The cover on my car has near enough been torn off!

Been in touch with a mobile welder whos going to do the shock mounts for me. I've just got to cut out the rot and prepare it for him to come and weld patches in. Broken studs will cause me problems though.

All i've done really is spend about 20 mins polishing the areas of the rad that'll be in view. Looks really nice:

Posted Image

Posted Image

If the weathers ok tomorrow i'll fit that and get the grinder going on the shock mounts...

#308 mini_mad69

mini_mad69

    Let future you worry about it

  • Traders
  • PipPipPipPipPipPipPipPipPipPip
  • 5,417 posts
  • Local Club: urrrr no

Posted 15 September 2010 - 08:17 PM

All i've done really is spend about 20 mins polishing the areas of the rad that'll be in view.


How did you do it? I've got the same rad and want it like that?

Is it the same kit as your wheels? do you have a link to it?

#309 mike.

mike.

    Crazy About Mini's

  • Members
  • PipPipPipPipPipPipPipPipPipPip
  • 6,176 posts

Posted 16 September 2010 - 11:41 AM

Yeah same kit as i've used for my wheels.

Heres a link: Link

First kit on that page. Mines older than that and didn't come with the little arbours, but you don't need them anyway.

I just gave the rad go over with the medium mop and green compound to remove any light surface scratches, then gave it a quick go over with the light mop and blue compound. Didn't take long at all to get it to that. If i'd of spent longer on it, it'd be mirror finish, but its good enough how it is.

#310 mini_mad69

mini_mad69

    Let future you worry about it

  • Traders
  • PipPipPipPipPipPipPipPipPipPip
  • 5,417 posts
  • Local Club: urrrr no

Posted 16 September 2010 - 03:20 PM

Just ordered the kit, im going to do the same with my rad, and probably my rocker too.

Thanks mike, your car is looking great now.

#311 josh.evans

josh.evans

    One Carb Or Two?

  • Members
  • PipPipPipPipPipPipPip
  • 1,439 posts

Posted 16 September 2010 - 03:35 PM

looks good like the alloy rad :) i had the same problem with the bolts snapping in the shick mounts it took me ages to drill them out and i had to use a air drill as normal drill would fit in the wing i used a dewalt metal drill bit i highly recommend and the bolts are reallt tough :(. then just need a tap to re tap the threads no too hard job just a a time consuming one
good luck with them

have fun :)

josh

#312 mike.

mike.

    Crazy About Mini's

  • Members
  • PipPipPipPipPipPipPipPipPipPip
  • 6,176 posts

Posted 16 September 2010 - 05:18 PM

Cheers guys.

Weather finally calmed down abit today. Still really windy but not raining sideways like it has been all week.

I've started grinding out the shock mounts ready for some fresh metal to be welded in by a mobile welder.

Still deciding whether or not to have one thick plate welded in or have 2 thinner ones put in on top of each other like it would be as standard. Also not sure whether or not to keep cutting all the way down the panel, it'd be easier but would mean i'd need to bend a lip into the repair patch.

With the broken studs (on the other side to the pic below) I just used a punch and a mallet to knock them through and snap the threaded block off the inside of the wing. So now i'll just be using 2 nuts and bolts to hold the top of the shock mount on, as you can get to the back of the holes.
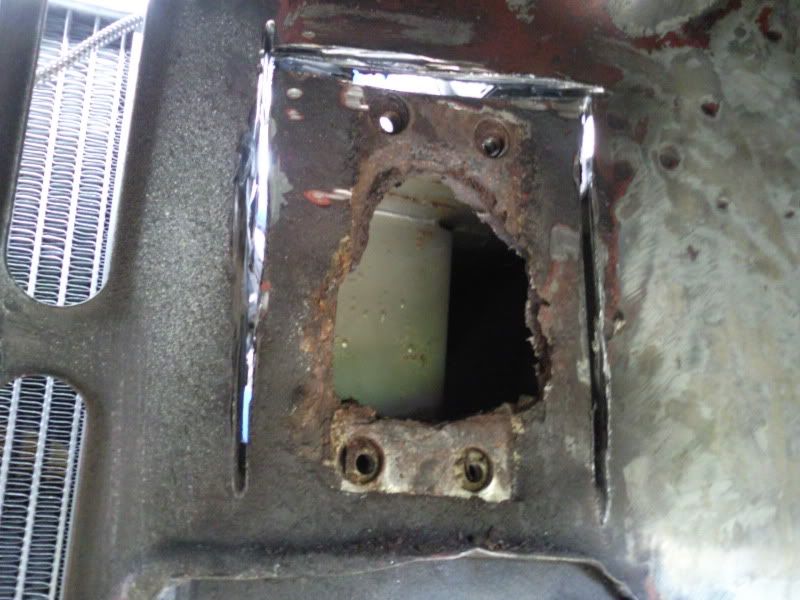
Posted Image

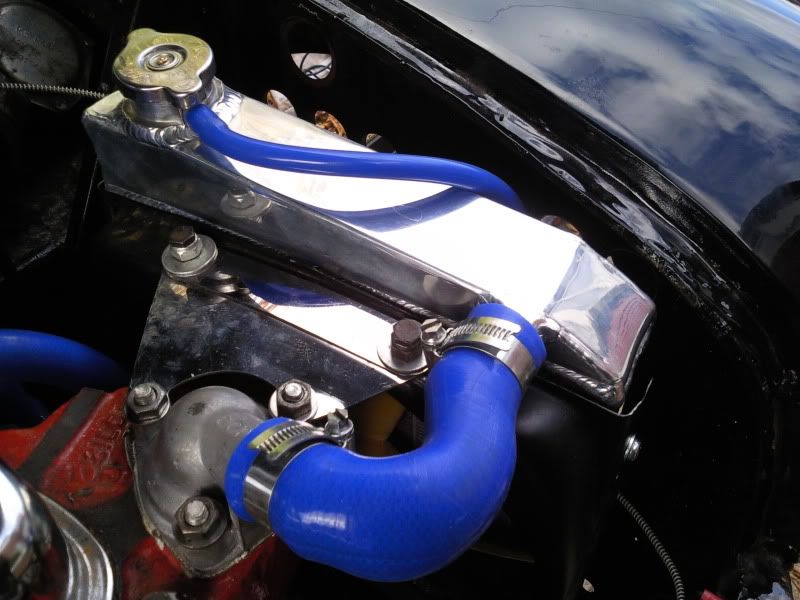
Also fitted the rad today. It fitted pretty easily, just as easy as a standard rad so thats good. I also flushed out the cooling system, just connected one of the heater tubes to the garden hose and left that running for a few mins to blast some of the crud out. I've filled it back up with some clean water and some holts rad flush. So i'm supposed to let the engine fast idle for 10 minutes to let that stuff wash out inside the engine. I had the engine running for a few mins but noticed abit of smoke - Turns out a load of crud that'd flicked off the wire brush from the underside of my car had stuck to the exhaust and was starting to burn. So need to scrape that off before I try again.

Only other thing to say about the rad is that its sitting too close to the fan. The very edge of the fan blades is rubbing on the outer metal of the rad, its no so much of a problem, but obviously needs abit of clearance. So i'll probably just file the holes in the rad housing abit wider to get the rad sit a few mil further out. Also cut about 2cm off the top hose in an attempt to get it to fit better and not kink. Its still got a very slight kink but as good as its going to get.

Couple of pics of rad/engine:
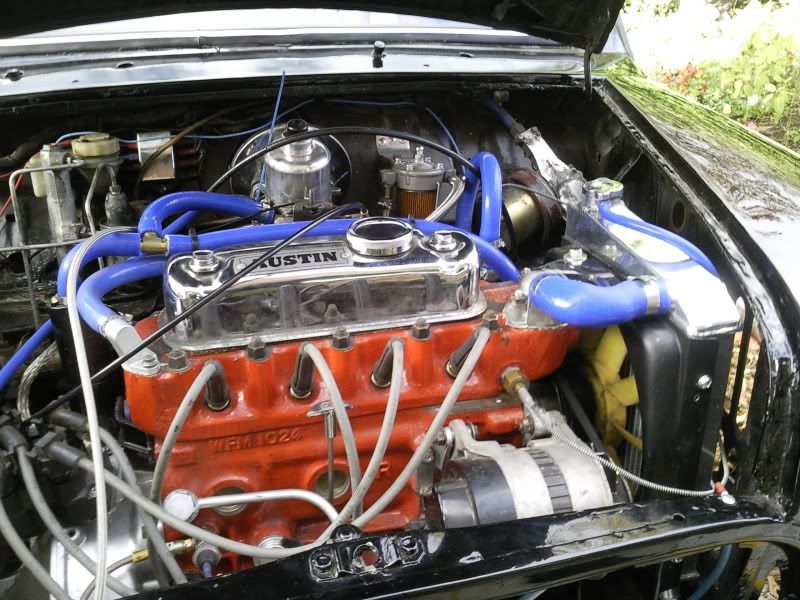
Posted Image

Posted Image

#313 M44K TS

M44K TS

    Up Into Fourth

  • Members
  • PipPipPipPipPipPipPipPipPip
  • 3,104 posts

Posted 16 September 2010 - 05:27 PM

The rad looks cool mate, very nice now it's polished. Been thinking of getting one myself as my rad isn't the best, works fine, just a little tatty. Do they seem good quality for the price?

I also lolled at this..

Still really windy but not raining sideways like it has been all week


Made me think of this...


#314 mike.

mike.

    Crazy About Mini's

  • Members
  • PipPipPipPipPipPipPipPipPipPip
  • 6,176 posts

Posted 16 September 2010 - 05:57 PM

haha ollie williams

The quality seems good for the price.

It does feel abit more flimsy than a standard rad, but its because its all aluminium. I just took abit of extra care when fitting it, not to bash it about.

Like I said the only problem i'm got with it is it sits too close to the fan. But that should be an easy enough fix.

As far as cooling goes its not really been fully tested yet, but I can tell you that you can definitely feel alot more heat being dispersed off it.

#315 M44K TS

M44K TS

    Up Into Fourth

  • Members
  • PipPipPipPipPipPipPipPipPip
  • 3,104 posts

Posted 16 September 2010 - 06:28 PM

Cool, I'll let you be the guinea pig then :) If it's reliable and works well, I'll buy one!


3 user(s) are reading this topic

0 members, 3 guests, 0 anonymous users