Hi Guys - I've searched and searched the forums, but I can't find an answer to this request.
I have a 1961 MK1 Saloon. I have almost finished rebuilding it after a total strip down / restoration. I have loads of questions, but for now, does anyone have a tried and tested method they have used for reinstalling sliding windows using all new channels, onto new heritage doors? I stripped the old ones over 18 months ago, and they were trashed, as a result I cannot work out how it all goes back together. It would appear that I need to drill holes in the new chrome channel retainer and the felt channels.
Any help very gratefully received
Thanks
Greg


Sliding Windows
Started by
gmb101
, May 25 2007 01:12 PM
22 replies to this topic
#2

minislapper
-

- Members
-

- 1,957 posts
Camshaft & Stage Two Head
#3
Cater_Racer
-

- Members
-
- 423 posts
Speeding Along Now
- Local Club: HRCR
Posted 25 May 2007 - 02:09 PM
Hi Guys - I've searched and searched the forums, but I can't find an answer to this request.
I have a 1961 MK1 Saloon. I have almost finished rebuilding it after a total strip down / restoration. I have loads of questions, but for now, does anyone have a tried and tested method they have used for reinstalling sliding windows using all new channels, onto new heritage doors? I stripped the old ones over 18 months ago, and they were trashed, as a result I cannot work out how it all goes back together. It would appear that I need to drill holes in the new chrome channel retainer and the felt channels.
Any help very gratefully received
Thanks
Greg
Where abouts in the country are you gmb?
#4
gmb101
-
- Noobies
-
- 16 posts
Learner Driver
Posted 25 May 2007 - 02:19 PM
Hi Cater Racer
I'm in Cornwall - the deep south
I'm in Cornwall - the deep south
#5
Cater_Racer
-
- Members
-
- 423 posts
Speeding Along Now
- Local Club: HRCR
Posted 25 May 2007 - 02:23 PM
Hi Cater Racer
I'm in Cornwall - the deep south
Oh gawd, I was going to offer to come round in my MK1 and lend a hand, but its rather a long way.
I did the job myself yesterday, but not to heritage doors, just put my old ones back together.
If I can take any photos and send them let me know.
#6
gmb101
-
- Noobies
-
- 16 posts
Learner Driver
Posted 25 May 2007 - 02:33 PM
that would be great. it seems there are no holes in the actual door for the self tapper screws to fit into. Also no holes in the chrome channel (of a smaller size for screws). I can't work out how I am suppose to reattach the channel whilst holding both pieces of glass in place... or am I barking up the wrong tree?
Cheers
Greg
Cheers
Greg
#7
Cater_Racer
-
- Members
-
- 423 posts
Speeding Along Now
- Local Club: HRCR
Posted 25 May 2007 - 02:49 PM
that would be great. it seems there are no holes in the actual door for the self tapper screws to fit into. Also no holes in the chrome channel (of a smaller size for screws). I can't work out how I am suppose to reattach the channel whilst holding both pieces of glass in place... or am I barking up the wrong tree?
Cheers
Greg
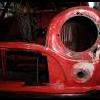
There are no holes in the chrome channel it is held by metal clips in over the edge of the top of the door. See the pictures attached.
Attached Files
-
 2007_0525Oz0005.JPG 1.42MB
11 downloads
2007_0525Oz0005.JPG 1.42MB
11 downloads
-
2007_0525Oz0006.JPG 1.38MB
9 downloads
-
2007_0525Oz0009.JPG 1.4MB
7 downloads
#8
gmb101
-
- Noobies
-
- 16 posts
Learner Driver
Posted 25 May 2007 - 03:00 PM
i can see the clips, don't they hold on the chrome trim to the outside of the door? i thought the chrome channel runner was screwdown using self tap screws?
#9
Cater_Racer
-
- Members
-
- 423 posts
Speeding Along Now
- Local Club: HRCR
Posted 25 May 2007 - 03:03 PM
i can see the clips, don't they hold on the chrome trim to the outside of the door? i thought the chrome channel runner was screwdown using self tap screws?
Nope, not a self tapper in sight, they would foul the catch whic has to slide along the chrome channel.
#10
gmb101
-
- Noobies
-
- 16 posts
Learner Driver
Posted 25 May 2007 - 03:05 PM
thats weird. thanks for your help. I can't see the clips from mini spares though. Where did you get yours from?
#11
Gibbon
-
- Noobies
-
- 102 posts
Mini Mad
Posted 25 May 2007 - 03:05 PM
Oooo my god gmb101 .... it's a right b@rstard of a job 
No it isnt !
Did mine a few weeks ago, new seals everywhere like you.
Here's my method, not sure if it's the right one! but here goes...
- Check the lower (rigid) channel is the right length & remove
- Fit the upper (mine was flexible) seal into the window frame cm by cm. It will have cuts in the back to facilitate the passage round the bends of the frame, make sure you fit it the right way round or the cuts don't line up with the frame! It helps to keep the seal tightly compressed with your fingers or it either pops out or goes tits up and doesn't sit properly. Mine were too long so I cut them to size with the upper corners fitted.
(I didn't screw the lower channels to the door, I used a mastic, LOCTITE 5368 and glued them in. The originals were badly corroded where they were fixed to the door so I hope this will cure the problem... if they're glued in then the only place the water can go is down the 2 pipes in the door, yeah?)
- Assemble the chrome base and lower channel. Push the windows into the channel and slide them together in the middle. Push down firmly to seat them correctly. Sitting inside the car, ease the top of the windows into their slots in the upper seal. The slightly tricky bit is then getting the lower channel into the top of the door without damaging the paintwork, but with a bit of heaving and swearing it goes in.
I then closed the windows which fixed everything in place... Left 24hrs for the mastic to set solid before touching anything with my grubby paws. The windows were very stiff and difficult to slide. A bit of 3-in-1 in the lower channel cured it though.
Have fun !
windowMK2.jpg 222.92K
7 downloads
Edited by Gibbon, 25 May 2007 - 03:24 PM.
#12
gmb101
-
- Noobies
-
- 16 posts
Learner Driver
Posted 25 May 2007 - 03:17 PM
Cheers Gibbon. I reckon I have realised why I am struggling so much. I bought the new channels from somerford mini spares, all mine are flexible, even the lower channels, because they said that nobody is supplying the rigid type anymore. As a result, they keep pinging open and don't sit in the chrome runner unless pressed up ahains the door lip. I guess I need 6 pairs of hands and a lot of patience.
Thanks again everyone for your help.
Thanks again everyone for your help.
#13
Gibbon
-
- Noobies
-
- 102 posts
Mini Mad
Posted 25 May 2007 - 03:30 PM
Rigid ones from www.minisport.com

#14
gmb101
-
- Noobies
-
- 16 posts
Learner Driver
Posted 25 May 2007 - 03:37 PM
just on the phone to them now
#15
dklawson
-

- TMF+ Member
-
- 10,923 posts
Moved Into The Garage
- Name: Doug
- Location: Durham, NC - USA
- Local Club: none
Posted 25 May 2007 - 04:43 PM
You GLUED the chrome lock strip on? I sincerely hope your car isn't ever exposed to rain/rust again and that no damage ever comes to your window glass. If you used enough glue to hold these in place there's a good chance you'll never get them out again. You certainly won't get them out without ruining the chrome strip.
Clips? Not on a Mk1 with sliders. Not for the bottom chrome locking strip... for the outer trim... yes.
The procedure may not be in the standard Haynes service manual but I believe you'll find a detailed description of fitting sliders in the Porter (Haynes) restoration guide. To succinctly (and yes... the text below is shortened) go through the steps below.
1) Fit the replacement channel strip to the top of the door frame and cut off just enough of the excess length to squeeze it in place. Final trimming will come later.
2) Temporarily fit just the chrome lock strip to the top of the door. Use a permanent marker or dab of paint to mark on the chrome strip where the cross-braces on the door are... these are the places the screws go. Then remove the chrome strip again.
3) Rest the bottom felt channel on the chrome strip and fit this to the door. Trim the top and bottom channels to the "correct length" with mitered corners.
4) Look for your paint marks on the chrome strip and use a center punch to make center punch marks through the felt channels into the chrome strip. You want to make these punch marks on the "inside" channel for the front of the chrome strip... on the "outside" channel towards the rear of the chrome strip. (Why will become apparent later).
5) Remove the chrome strip and bottom channel again. Drill through the chrome strip where you made the center punch marks. Punch larger holes through the bottom felt channel at these points for screw clearance.
6) Remove the locks from the window glass if they're installed.
7) Rest the bottom felt channel on the chrome strip then rest both pieces of glass on that. Remember that the front glass goes in the outer channel, rear glass in the inner.
8) Have a friend help you lift the glass, channel, and chrome up to the door. Guide the glass into the channel fitted to the top of the door and slide the assembly into place.
9) While pushing the assembly towards the outside of the door, transfer the locations for the holes you drilled in the chrome strip through to the top of the door. (Unfortunately you've got to remove this all again and drill pilot holes for the screws). Remove it all again.
10) Drill pilot holes for the screws.
11) Put a little bit of sealant on the top of the door where the pilot holes were drilled and repeat the lifting and fitting steps beginning with #7 above and this time fit the screws. Put a little bit of sealant at each end of the chrome strip where it contacts the door frame.
12) Re-fit the locks.
As mentioned in previous posts... it's a lot of work but this is the way your original glass was fitted.
by the way, I would not use "self tapping screws". Perhaps it was just the wrong word choice. Self tapping screws are typically machine screws with fine threads and they cut like a tap when inserted. In this location you want small, flat-head (Phillips) stainless sheet metal screws (think wood screws threaded all the way to the head). I used size #6. That would be just a little smaller than a 4mm diameter screw.
You place the screws in the locations I mentioned in step #4 because you need to access these screws with the windows in place. You need to drill the through holes in the chrome strip before the glass is in place and then transfer their locations to the top of the door WITH the glass in place. The screws have to be flat-heads so that when they are tightly installed the glass will slide over their heads. This isn't possible with other screw types.


1 user(s) are reading this topic
0 members, 1 guests, 0 anonymous users


