Supercharged Mini Project Not A Bmw Charger!
#16

Posted 07 April 2007 - 11:33 PM
#18

Posted 08 April 2007 - 05:48 PM
is this the head rails ???the cant rail does all the work...
#19

Posted 09 April 2007 - 10:44 AM
is this the head rails ???the cant rail does all the work...
yeah the bit where the headlinner sticks sit in... the carbon roof is just bonded on
Edited by Matrix, 20 May 2009 - 01:54 PM.
#20

Posted 13 April 2007 - 09:20 PM
* Removed pics
Edited by minimad998, 13 April 2007 - 09:21 PM.
#21

Posted 14 April 2007 - 03:10 PM
not sure whats going on inside the car though.
J
Edited by $way, 14 April 2007 - 03:10 PM.
#22

Posted 14 April 2007 - 10:54 PM
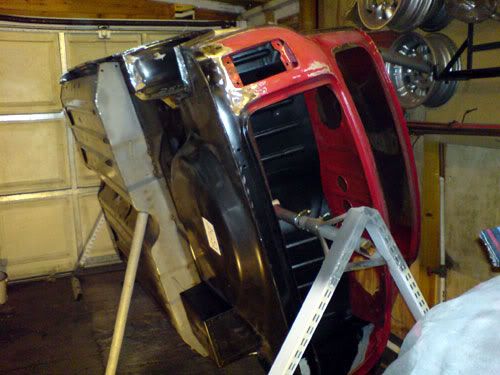
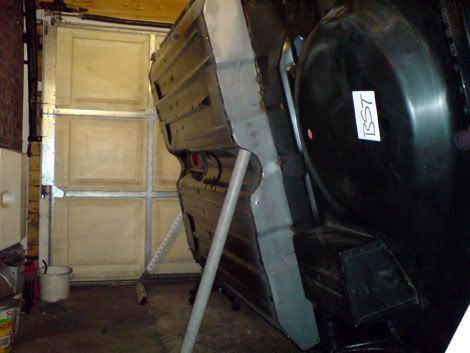
from the pictures it looks like two triangles with axle stands welded to them.
not sure whats going on inside the car though.
J
Spot on dude that's exactly what it is
Angle iron accross the two front shocker mounts with an old axle stand bolted to it... same accross the rear shocker mounts and two A frames knocked up out of some old shelf stands from work.
Cost= 1 hours worth of welding LOL
#23

Posted 15 April 2007 - 07:29 AM
Looks to me like you are using a later shell, with a few new panels on it!
#24

Posted 15 April 2007 - 08:39 PM
from the pictures it looks like two triangles with axle stands welded to them.
not sure whats going on inside the car though.
J
Spot on dude that's exactly what it isyou can only do this if the inner wings are off...
Angle iron accross the two front shocker mounts with an old axle stand bolted to it... same accross the rear shocker mounts and two A frames knocked up out of some old shelf stands from work.
Cost= 1 hours worth of welding LOL
oh yh didnt see that at first good idea might be wippin one of them up then
#25

Posted 16 April 2007 - 10:09 AM
Can I just ask how come it has a rod change tunnel and rear seat belt mounts if it is a 1970 shell?

Looks to me like you are using a later shell, with a few new panels on it!
course you can ask... because you can't get hold of the early floors now and as stated in an earlier post the gearbox has been changed to a rod type so the floor mod is perfect! The rear belt mount have been added from a later car so I have some where the bolt the harness to... I do hope your not suggesting its a ringer
The flip carbon front is none orig..the rear beam is not orig there's loads of stuff that's not going to be orig but it will still be a 1970 shell! I have never posted any where its going to be an original 1970 rebuild as that is not possible on the budget this car is getting!
Edited by Matrix, 06 March 2008 - 10:29 AM.
#26

Posted 16 April 2007 - 10:48 AM
Anyway, sure looks like you've got your work cutout with all that welding!
#27

Posted 16 April 2007 - 05:20 PM
#28

Posted 16 April 2007 - 08:25 PM
Wooo, nice once, how did you replace the 3/4 panel and why? Did you buy the entire side panel of the car and cut it down?
I have replaced both rear quarter's complete! not the eastest job in the world but doable...why near side rear was pretty bad afer it big off and the offside had been filled once before and was starting to go on the arch as they do. I tried the lower repair panels but the lines just wern't right. I took a good three days to get the fit right before I started to weld them on..lol
worth it in the end though and the car now has the straightest line I have seen on any Mini
#29

Posted 19 April 2007 - 09:29 PM
#30

Posted 19 April 2007 - 10:05 PM
my gosh, that's some task. I only ask as the corner of the arch (other side from the valance) has rusted through on mine and i need to work out how to do it. Obviously yours was worse so i think the repair panel will be okay for mine, just not sure how i'll get a good finish with welding in the middle of a panel! I need to learn some more!
get yourself a joggler if you going mid panel dude it will help stop some of the heat distortion on the panel
http://www.toolstati...ment/d40/sd2666
2 user(s) are reading this topic
0 members, 2 guests, 0 anonymous users


