Jump to content


Photo
- - - - -

Morspeed Engine Build


  • Please log in to reply
53 replies to this topic

#16 TimS

TimS

    Mini Doctor

  • Members
  • PipPipPipPipPipPipPipPipPip
  • 2,712 posts
  • Local Club: TMF

Posted 24 February 2007 - 04:40 PM

I am now back home in Bucks and have booked two days off work so that I can really get stuck in building this engine. For the majority of today I have been cleaning up the ancillaries such as brackets, fuel pump, water pump, oil filter piece, dizzy and so on. After stripping them down to pare metal I am then masking off and painting them in black and silver and will hopefully go on the engine tomorrow. Also tonight I plan on putting the pistons into the block as I left my piston ring compressor (thanks mum for the Christmas present) down here.

Posted Image

Posted Image

Posted Image


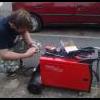
Also a quick picture of where the engine had been living before I brought it down here, not that the girl friend was too pleased about it :D

Posted Image

#17 TimS

TimS

    Mini Doctor

  • Members
  • PipPipPipPipPipPipPipPipPip
  • 2,712 posts
  • Local Club: TMF

Posted 24 February 2007 - 04:41 PM

I shall have more pics and progress after tea time as I start to built the head back up

#18 Sprocket

Sprocket

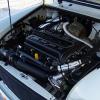
    Great on Injection faults

  • Members
  • PipPipPipPipPipPipPipPipPipPip
  • 7,266 posts
  • Location: Warrington
  • Local Club: Manchester Minis

Posted 24 February 2007 - 08:25 PM

LOL, I keep my engines in the downstair loo :D

#19 TimS

TimS

    Mini Doctor

  • Members
  • PipPipPipPipPipPipPipPipPip
  • 2,712 posts
  • Local Club: TMF

Posted 24 February 2007 - 11:09 PM

I've been busy all afternoon rebuilding the head and painting.

I have lapped all of the valves back in now, cleaned any oil left over off the valve springs and fitted new stem seals. Iv also checked all of the threads on the head incase any junk or dirt had got into them while being sat in the garage.

Posted Image

Posted Image

I recieved earlier in the week a nice new Payen BK450 head gasket set, ready to bolt the head back onto the block.

Posted Image

I ended up building the head back up on top of the freezer as it seemed the cleanest place at the time :angel:


I shall have pictures tomorrow of all of the part iv been painting today and another day of cleaning and building :wub:

#20 jameswildcooper

jameswildcooper

    Camshaft & Stage Two Head

  • Members
  • PipPipPipPipPipPipPipPip
  • 1,991 posts

Posted 25 February 2007 - 01:58 PM

awsome build mate keep up the good work :wub:

#21 Pie

Pie

    Crazy About Mini's

  • Banned
  • PipPipPipPipPipPipPipPipPipPip
  • 7,695 posts
  • Local Club: GoGoAuto

Posted 25 February 2007 - 03:51 PM

Awesome build. How much are you looking to fetch when its all fully built? as i am looking to get something for the daily drive rather than use the 998 with 100bhp lol.

Keep up this amazing post.

Pie

#22 TimS

TimS

    Mini Doctor

  • Members
  • PipPipPipPipPipPipPipPipPip
  • 2,712 posts
  • Local Club: TMF

Posted 25 February 2007 - 04:13 PM

Im doing just that. I have spent most of my time so far in the garage today putting the engine together and doing more painting.

Posted Image
Posted Image
Posted Image
Posted Image

I have rebuilt and greased up the clutch thrust arm (don't know specific name) Each thread gets a quick going over with the die and tap set to make sure they are all clean and then torqued up.

Posted Image
Posted Image

I have also been putting the pistons back in. Iv been using my nice new Christmas present, a piston ring compressor from Halfords.
Posted Image

Each piston got a wipe down before I added the new bearing shells to the conrod and cap. Then a small squirt of 20/50 was added to the shells and crank to allow lubrication on start up (before oil pressure is achieved)
Posted Image

I tapped each piston in gently with the handle of a hammer giving it plenty of time not to use too much force. You don't want a piston ring to snap at this stage as you can only buy them in set at nearly £50 a time. I only made this mistake once :angel: ... never again now :wub:

Anyway after turning the crank round so that the journal was as far away from the rod as possible, to make sure the studs didn’t damage the journal surface, I put piston in, tapped it down and then guided the conrod with my spare hand onto the crank. Next was to add the cap and nuts finger tight untill all the rods were installed and then could be torqued up.

Posted Image
Posted Image

Once all of the pistons are in you want to turn the crank to check there are no tight spots in the bearings or bores. There will be more resistance now due to the rings taking hold on the honed bores but nothing excessive.

Posted Image

#23 TimS

TimS

    Mini Doctor

  • Members
  • PipPipPipPipPipPipPipPipPip
  • 2,712 posts
  • Local Club: TMF

Posted 25 February 2007 - 04:22 PM

I used this engine for a daily driver for over a year. The power output will be around 85bhp and being 1330 and not having a silly cam will give good torque through out too. though after its trip to the ring it will also keep going to over 6500rpm at times of anger (or just Toms Stage 4 1293 Purple clubby in front). Although the idle isnt exactly the same as a road cam it's still very usable in trafic, meaning the clutch has an easier time and time between services is longer.
The more time I spend building it the sadder I will be to see it go but I need the money for my vauxhall engine rebuild now.

Edited by Flappyplasticbits, 25 February 2007 - 04:23 PM.


#24 Dog

Dog

    Deathwish Fairy

  • Banned from Buying/Selling
  • PipPipPipPipPipPipPipPipPipPip
  • 9,550 posts
  • Local Club: Shatrats.com

Posted 25 February 2007 - 05:17 PM

What cam are you using?

#25 TimS

TimS

    Mini Doctor

  • Members
  • PipPipPipPipPipPipPipPipPip
  • 2,712 posts
  • Local Club: TMF

Posted 25 February 2007 - 06:26 PM

Morspeed Phase 2.

#26 Dog

Dog

    Deathwish Fairy

  • Banned from Buying/Selling
  • PipPipPipPipPipPipPipPipPipPip
  • 9,550 posts
  • Local Club: Shatrats.com

Posted 25 February 2007 - 07:43 PM

Fairly mild cam then :wub: awesome!
I've just got his Phase 3, but my engine is a 1380, so should be a little more forgiving in town...

#27 TimS

TimS

    Mini Doctor

  • Members
  • PipPipPipPipPipPipPipPipPip
  • 2,712 posts
  • Local Club: TMF

Posted 25 February 2007 - 08:14 PM

Yeah thats right. Tom had the Phase 3/ trackday cam in his 1293 and that wasnt too bad in traffic, though in a 1380 should be alot better :wub:

#28 TimS

TimS

    Mini Doctor

  • Members
  • PipPipPipPipPipPipPipPipPip
  • 2,712 posts
  • Local Club: TMF

Posted 26 February 2007 - 10:29 PM

Iv now painted everything I can and put the block together as much as I can without the cam and the gearbox.

Posted Image
Posted Image
Posted Image
Posted Image

Now I just have to wait for Morspeed to get another cam in stock and will be dropping the gearbox off with Guessworks to have an overhaul. :dozing:

Hope to have it all finished around about the 20th of March.

#29 TimS

TimS

    Mini Doctor

  • Members
  • PipPipPipPipPipPipPipPipPip
  • 2,712 posts
  • Local Club: TMF

Posted 19 March 2007 - 11:29 PM

Well im back again and now I have a nice new cam shaft and a rebuilt gearbox by Guessworks (thankyou John). I dropped in to Morspeed on the way down and sadly they didn't have any Phase 2 cams so I went for a Phase 3. Being a larger bore engine with standard lift rockers this cam will still be very usable on the road and should compliment the head better.
Posted Image
Posted Image

Posted Image

The gearbox has had a nice acid dip in some very expensive dip and has come out all shiney and clean as well as having lots of bits changed, it now feels sooo smooth!
Posted Image

Anyway so this morning I got out of bed after having lovely warm days recently and b*gger me we get this...

Posted Image
Posted Image

Down in the garage its only 4 degrees. I can see this being a fun day to work an a freezing cold lump of metal.
Posted Image

Anyway I set to in lubing up the new followers and cam lobes with some MPZ cam lube to help on startup. Earlier on in the morning I polished up the bearing surfaces as they were they same oxidised colours as the rest of the cam.
Posted Image
Posted Image
Posted Image
Going gentle placing the cam in so that I don't scratch the surfaces on the new cam bearings.

Iv also been messing about trying to get the timing gears set right as the cam has an offset key it can use just dot to dot as advised by Morspeed. This though is alot harder than the dot to dot that I used to do when I was younger =]


The last thing I did tonight was attached the gearbox to the block, to a I can start with the drop gears tomorrow.
More updates then.

#30 TimS

TimS

    Mini Doctor

  • Members
  • PipPipPipPipPipPipPipPipPip
  • 2,712 posts
  • Local Club: TMF

Posted 21 March 2007 - 08:41 AM

I know having the timing gears on. Had a little trouble lining the dots up, but with a bit of patience I got there eventually. I check to make sure they are in the right place by putting cylinder no1 at TDC on the compression stroke and then make sure that the dizzy drive lines up as the same angle as the Haynes which is 45 degrees.
I then got my little trolly out which I made at work last week as the engine was starting to gain some weight-
Posted Image

Posted Image


Posted Image


1 user(s) are reading this topic

0 members, 1 guests, 0 anonymous users