

Posted 14 November 2023 - 08:43 PM


Posted 14 November 2023 - 11:17 PM
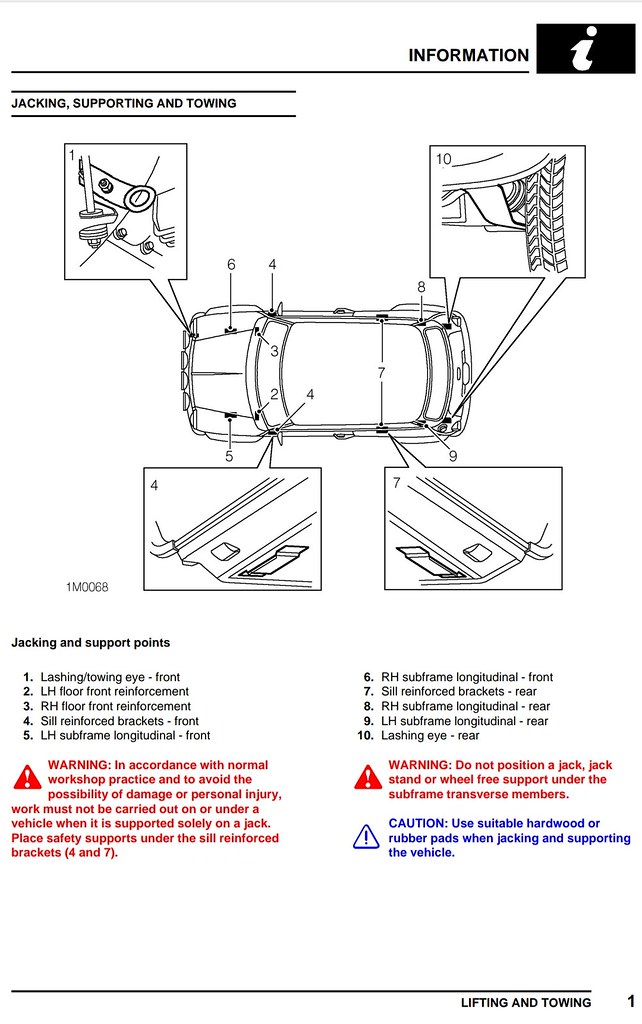
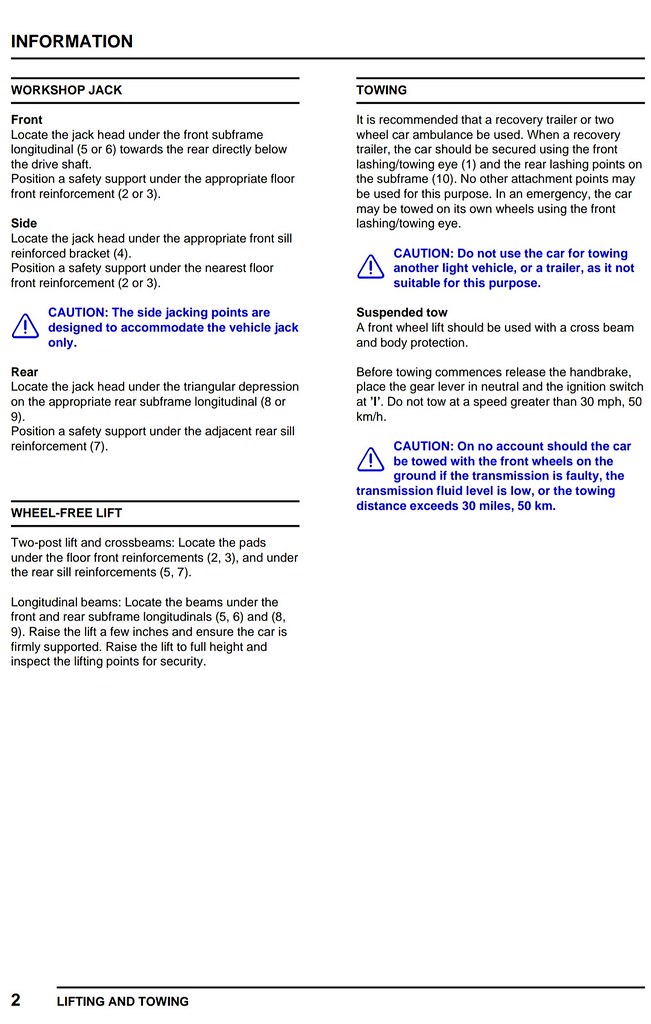
Opinions seem a little mixed on this, I've seen those pages before and they were disputed then as well.. personally having seen them on my car totally flattened, and the floor pan needing banging back into shape, I don't think they're strong enough (and don't do any work at all to spread load) I don't really know what Rover was thinking suggesting them as jack points because AFAIK that was never their original intention
I suppose it was just their best offer at the time without the cost of work to change the design of a car which was by then pretty much on it's last legs in terms of sales?
the positions are right obviously it's just the reinforcement is insufficient that's all
Edited by stuart bowes, 14 November 2023 - 11:52 PM.
Posted 15 November 2023 - 07:12 AM
Posted 15 November 2023 - 07:58 PM
That dizzy housing could be original. The electric part with 'Luminition' on it definitly not, that is aftermarket pointless ignition system. You should also have box somewhere to go along with it about 3 inches wide. Check whether the axle of the dizzy is still straight and you could use it again, but I'd get a new unit from Minispares that is a electric one. Have one in mine and works excellently.
Going without ballast wire is also the most sensible idea, enough instances where the wire melted or even burned a car down in the most extreme situations.
Edited by Be87n, 15 November 2023 - 08:30 PM.
Posted 15 November 2023 - 08:21 PM
Posted 15 November 2023 - 08:38 PM
Ah thanks you got in just in time as I was about to say .. er.. what box
the loom used to have the pink ballast wire but I've removed that an now it's just 12v on a normal wire, so I'm guessing now I just connect the black wire to the coil negative (with the rev counter connector?) and the red wire to the positive side with the switched ignition live, and jobs a good un ? with a standard 3ohm coil of course
>> have I got that right or did I just write out the recipe for instant engine bay fire ??
Edited by stuart bowes, 16 November 2023 - 04:04 PM.
Posted 16 November 2023 - 06:11 PM
Just from the top of my head:
- White w/ black stripe wire (signal wire for rev counter) + plug on the negative side of coil
- White wire on + side along with the red wire from dizzy
- Negative from dizzy to negative from loom that exits it roughly around spot of loom
I've got the same build year but it came with an inertia starter and other weird stuff. Did fit a new loom that could be used with that starter so some colours could be different. From the wiring diagram the black from the dizzy does always go to a ground, there is never a full black wire going to the coil in all the diagrams I've seen.
Edited by Be87n, 16 November 2023 - 06:12 PM.
Posted 17 November 2023 - 09:30 AM
thanks :) at least we've confirmed I haven't lost anything then in the depths of the shed
there is the question of the bracket that holds it to the block though just need to work out which is the right one and then once I know I can look for it (A+ engine)
Posted 17 November 2023 - 08:17 PM
For A+ engines it's this one: http://www.minispare...rs/TAM1671.aspx
Posted 19 November 2023 - 07:55 PM
cheers that's what I thought but nice to confirm, I'll find it in a box somewhere no doubt. double checked and its not still bolted to the engine (would get in the way of the engine stand bracket)
anyway I did finally get a bit of time to do some welding and finished up the boot floor strengthening plates on one side
not beautiful but totally solid (nice signs of penetration all round on the other side) and will be smoothed out with seam sealer anyway because I want to be as sure as possible no moisture gets between the layers over time
took longer than expected and days are short so this is going to be a bit of a slow burn job over the next couple of months I think.. That back edge needs finishing and tidying up as well, ready for the valance. It's all going to be welded solid and complete as-is before adding that on at the end just as a cosmetic finishing touch, zero danger of the important bits splitting apart over the first speed bump
work in the garage still goes on though, gave the dizzy body a good polish up and a spritz of paint to the vacuum chamber, other parts on order new rotary tip, O ring and and spring clips (and obviously will get new cap and leads)
then I took a look at the radiator, half expecting to throw it away. actually turned out to be in pretty good nick, no leaks and not excessively bashed about around the fins - straightened out a bit here and there made sure freely flowing as much as reasonably possible. filled with Kilrock and boiling water for an hour or so, flushed through, came out slightly brown for a bit then clean. happy days
found one side has somehow lost a welded on nut, so had to Dremel that side out a little ready to feed in a nut at some point, that's gonna be fun
and then just gave it a nice coating of VHT paint
and that will be totally fine when it's finished (with a new shiny radiator cap just for good measure)
in terms of cooling i'm thinking some sort of ducting to force air from the grille in the direction of the radiator and fan (pretty much what already happens but a bit more directed) then I might put a temp sender in the piping somewhere and run an external electric fan in the wheel arch (or at the front of that duct?) just for slow moving traffic situations
Edited by stuart bowes, 20 November 2023 - 01:11 PM.
Posted 22 November 2023 - 08:24 PM
nothing massively exciting just found a couple of nice little stickers to suit the radiator clean-up and respray
give it a sort of factory look again rather than all homemade and rattle tin finished (probably not the way it was originally, that doesn't really interest me though it's just something that looks sensible in that place)
went over with a layer of clear lacquer to try and prevent them peeling up over time, and easy to wipe clean
looking at it again I'm gonna give it a bit of a rub down and sort out that lumpy bit on the right side, seeing as that is the most visible obvious part of the job
Edited by stuart bowes, 23 November 2023 - 09:48 AM.
Posted 22 November 2023 - 09:42 PM
Posted 26 November 2023 - 06:50 PM
not a huge amount of progress this weekend but made sure I got at least something done just to keep the momentum going
did all the plug welds on the nearside outer sill, linished and etched, cleaned out that rear wheel arch and rust cured, etched (some filler required there to smooth out evidence of repairs before the stone chip goes on, will brush back that area again first before doing that )
Did a bit more wire brushing and a bit of pin-hole welding on the boot floor, rust cured and etched
Cleaned up around that slinger bracket to have a look how to cut it off, seems simple enough (don't want to have to do any more floor repairs if I can avoid it) but no chance to actually do the removal so lobbed a bit of etch on that as well temporarily
Plan is to clean up and prime the 'top' half (as it is in this orientation) including work in the front wheel arch, then turn it round and on its side the other way to do the rest, then get the valance on and paint
Spent most of the time just sipping tea and looking at it if I'm honest, an important part of the process obviously
Edited by stuart bowes, 27 November 2023 - 12:38 AM.
Posted 28 November 2023 - 08:28 PM
Trial fit of subframe today shows all 4 boot floor holes about 4-5mm too far towards the front of the car
oh well lol it was always a possibility having messed about with the boot floor so much. in my defence, all 4 are consistently incorrect and the distance between them is correct (i.e. only wrong in one direction and the same amount on both sides it seems)
soooo yes I will be welding in those holes and redrilling to suit (through 4mm of metal, excellent)
only thing I can think is, subframe is now on new bushes and I did the locating on the old bushes? maybe that caused the problem, who knows. nevermind that's why I made sure to try the test fit, better to find out now while it's mid-job and easiest access
my only worry now is will the bolt heads clear the wheel arch bracket with the new hole positions .. not a lot I can do if not, just have to cut brackets off and get new ones I guess, I think there should be enough wiggle room though
Edited by stuart bowes, 28 November 2023 - 08:31 PM.
Posted 28 November 2023 - 08:40 PM
in other news I started to prep the valence thinking I was nearing that time (how wrong was I)
that corner needed finishing off so i welded a new bit on
and tried a coat of etch
at which point I realised it was a total sh.tshow and folded the whole thing up and stuck it in the bin
new valance ordered, also got the closing panels, and a tidy little LED fog light - will do a better job of the frenching this time as well, after the first practice run. another reason being I want to keep the small bit of lip that attaches to the bottom of the rear quarter, because thats where I'm ending the seam, and it's an easy place to clamp and plug weld to get the positioning started as well
also found a set of hi-los for a decent price which I'd been umming and ahhing about for a while, so I can ditch those old trumpets now, I might bung them up for sale I suppose seeing as they're clean and nicely painted
Edited by stuart bowes, 29 November 2023 - 11:19 AM.
0 members, 1 guests, 0 anonymous users