Great work Vik! I've enjoyed catching up on this one!
#811

Posted 03 August 2023 - 09:10 PM
#812

Posted 21 August 2023 - 06:13 PM
Thanks! I'm back from Spain now, so will get some updates soon...
#813

Posted 24 October 2023 - 02:15 PM
I'm officially back to garage duties! First day and picking it up from where I left it...
I have an unfinished business with the door jam where the A-panel should be folding over. I have this spare Clubman inner wing, from which I'm planning to get the piece I need.

This is the area I'm planning to fix, as you can see the repair has not the lip where the A-panel should fold over.


Before cutting anything, I removed the black paint and cut the piece I needed.

Next, I fixed it to the car using nuts and bolts.


Now, before I spot weld it, I need to know if this is correct, can anyone advise if this is the correct way of doing this? Any reference photos would be very welcome.

While I wait for feedback, I decided to carry on with other works...
The dash needed welding so I preped it.

Welded.

Then grinded and painted. It would need some filler to make it smooth, but other than that is good and solid.


Then I decided to try a new skill. Panel beating...
I got this kit from Amazon with the idea of fixing the roof repairs I did some months ago. One of them was okay, the other one got a lot of distortion, so wanted to fix it.

This is the corner that is in the worse condition, you can really see and feel the bump on the roof...


Then I started to beat the panel very slowly and with small blows. It looks much better now, but it would still need a nice skim of filler.

When passing the hand, you can feel now that it is almost flat and continuous.

And that was all for today.
Once I get comments on the inner wing, I will get that done and move to the other side.
Cheers.
Victor.
#814

Posted 24 October 2023 - 06:23 PM
Looking into my archives, I found this photo from when I removed the old A-panel. It does not clarify it much, as it was very rotten!

So until unsure if what I'm doing is the right thing...
Victor.
#815

Posted 24 October 2023 - 06:53 PM
mine ended up looking this
then I replaced the step and sill, and it looked like this
then the A panel fitted on like this
as you can see the outer lip of the A panel sits on the last inch or so of the seam formed by the sill and step
hope that helps
Edited by stuart bowes, 24 October 2023 - 06:55 PM.
#816

Posted 24 October 2023 - 07:03 PM
Im not any sort of expert so don't take this as gospel im just thinking though, some of the problem here is theres a lot missing and therefore not a lot to line things up to
but im wondering if what you should be doing is cutting down to just the lip (i.e. lose the bits with the bolt holes) and getting that tacked on in the right position
but to achieve that surely you need either the scuttle / wing / a panel all clamped in place (then would be hard to get at the rear side for welding) or a door.? which makes me think it's possibly worth bolting a door back on and getting the window frame and lock edge gaps reasoable, then using that to judge the gap for the a panel edge? allowing a little extra of course for the thickness of metal at the fold?
I dunno I'm just spitballing ideas. interested to read what others think on it. is it possible relying on those bolt hole locations might lead you astray
Edited by stuart bowes, 24 October 2023 - 07:08 PM.
#817

Posted 24 October 2023 - 07:11 PM
The inner wing flange (lip the a-panel fits onto) goes in-between the sill and the door step.
The bit that looks wrong is the piece of metal you have protruding beyond the inner cill.
This is the best picture I have of how I did mine.
 IMG_20200504_145245.jpg_1152 X 864.jpg 66.6K
1 downloads
#819

Posted 24 October 2023 - 07:27 PM
#820

Posted 24 October 2023 - 08:35 PM
The A-post
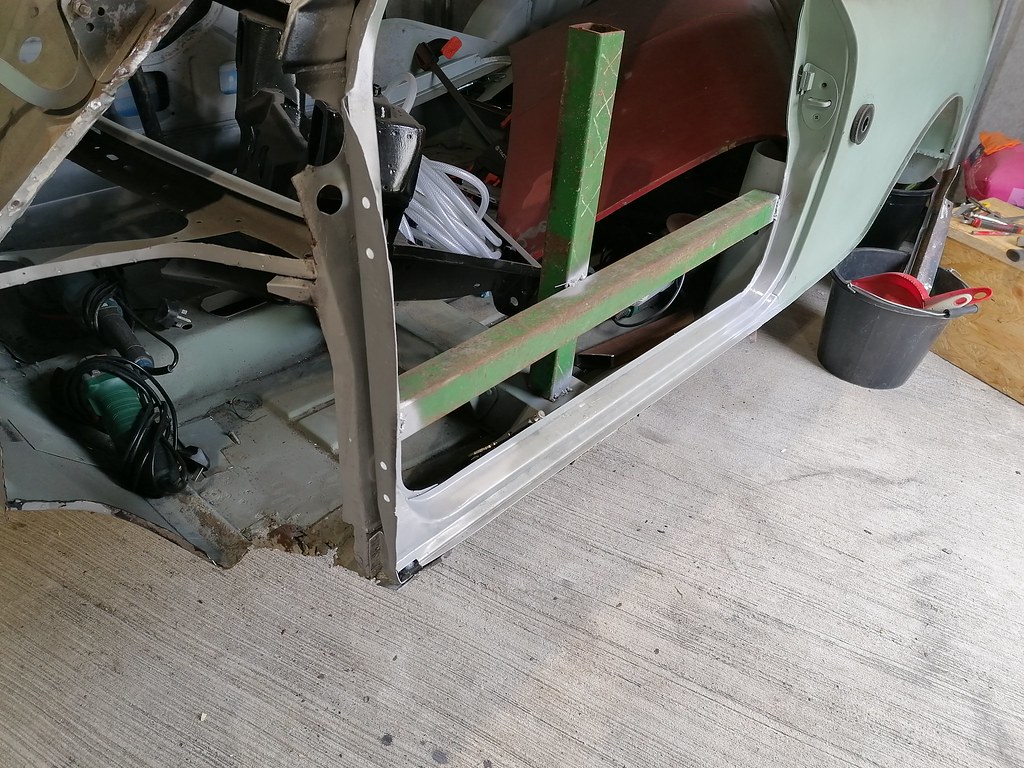
Then inner wing on top of A-post
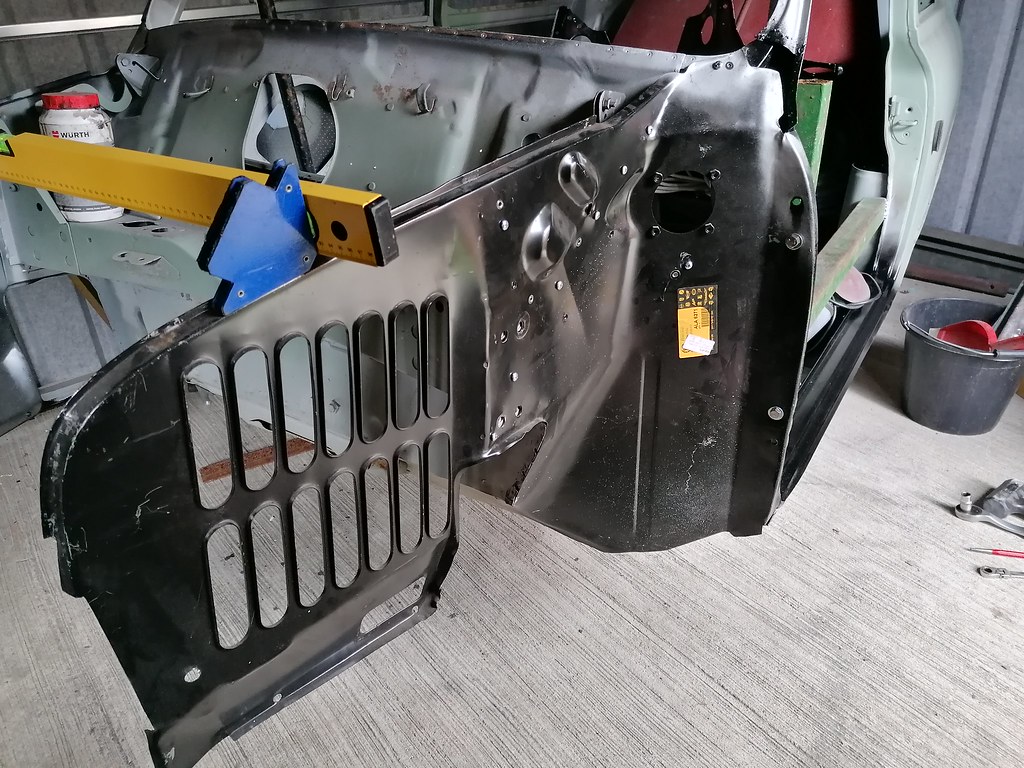
From underside

An alternative view

#821

Posted 25 October 2023 - 08:26 AM
this bit is the bit that looks wrong to me.
Cheers Mito. That bit can be cut out / folded back if needed.
Looking at all other people pictures, it looks like the new piece I'm adding (the inner wing flange) is correctly aligned. This should allow the A-panel to sit in position and aligned with the door step edge.
I will have a closer look again later.
Thanks everyone for your feedback, I really appreciate it.
Cheers.
Victor.
#822

Posted 26 October 2023 - 04:58 PM
A couple of more jobs done today.
First I finish the inner wing flange on the passenger side. Spot welded and painted.


I left the bit at the bottom for now. Once I have the A-panel I will cut whatever needs cutting.

Then I did the same on the other side. Panel prep and cut.

Spot welded and painted.


Next the rear seat belt brackets that I got from a later model. Cut it into shape and ready for welding.


Put in position based on some pictures I have, but this is obviously approximate...

Welded in place and then grinded and painted. It would need some seam sealer to smooth it before painting, but other than that it is pretty solid.


That was it for today. I need to do the seat belt bracket on the other side and then moving to the front end.
Scutle panel, wings, front panel and A-panels... A huge bill... ;(
Victor.
#823

Posted 26 October 2023 - 05:10 PM
that bottom end bit we were discussing the other day, I don't think the A panel will really show you anything more that you don't already see, in fact if anything having it fitted will be getting in the way
all you need to do is match the bottom line of the bodywork, and make sure the tab that sticks out is trimmed to match the tab on the end of the outer sill
anything else can just be filed down or cut off
all good progress though nice to see it moving along again after a quiet period
Edited by stuart bowes, 26 October 2023 - 05:12 PM.
#824

Posted 27 October 2023 - 07:14 AM
You've spot welded the new part in but you haven't seam welded it from top to bottom.
#825

Posted 28 October 2023 - 04:41 PM
Hi Pete, yes I haven't seam welded it intentionally. That is a very long and difficult weld to do, especially as it is in vertical. I had very bad experiences before trying to weld things in vertical, so I'm not doing it.
The piece is solid with the spot welding. I'm planning to seal it using seam sealer all along the joint. When putting the piece in position I made sure there were no gaps, so once is sealed there shouldn't be any problems, or water ingress... Fingers crossed.
Thanks for pointing it out.
Cheers.
Victor.
Also tagged with one or more of these keywords: roundnose
Projects →
Mini Saloons →
Mini Cooper Project - Finally StartsStarted by piphatch , 08 Jan 2025 |
|
|
||
Projects →
Mini Saloons →
1965 Austin Mini Restoration - Canadian Mk1Started by DoubleEh , 14 Nov 2022 |
|
|
||
Projects →
Mini Saloons →
Project Joe - 1991 Mini Mayfair 998Started by Eggers , 02 Jun 2022 |
|

|
||
Projects →
Mini Saloons →
Mpi Dashboad ProblemStarted by mikeprez , 22 Dec 2021 |
|

|
||
Projects →
Mini Saloons →
1978 Oew - Willy The MiniStarted by smalltreegrower , 11 Nov 2021 |
|

|
8 user(s) are reading this topic
0 members, 2 guests, 0 anonymous users
-
Bing (6)


