Jump to content


Photo
- - - - -

1976 Austin Mini 1000 Le Stripey

roundnose

  • Please log in to reply
948 replies to this topic

#556 Viktor

Viktor

    Super Mini Mad

  • Members
  • PipPipPipPipPipPip
  • 653 posts
  • Location: London

Posted 09 October 2022 - 07:12 PM

Thanks Steve, that would for sure help. I will give it a try next weekend. You are right, the tunnel is quite thin in some areas, especially where it gets the curves (due to the pressing). I will be more carefull when welding on these areas.


Following on Stuart's comments, I have been thinking on getting a sheet of copper and cut it in pieces. Then do a small cut in the middle on each side, so it can be put under the welding clamps. This way, I would have a continious sheet of copper underneath between the clamps, which I hope it would help with the welding.


I will give it a go next weekend and let you know how that goes. Fingers crossed!


Victor


#557 Verderad

Verderad

    Speeding Along Now

  • TMF+ Member
  • PipPipPipPipPip
  • 406 posts
  • Location: Porthcawl

Posted 09 October 2022 - 08:34 PM

I had the same problem. I had to make a couple of repairs to the tunnel.
Get/ make plenty of the clamps
Ensure you have a min 1mm gap between panels. I know this feels like it’s going to make the job harder.
I flattered a 22mm copper pipe with hammer and vice, then put it between the clamps. If you can get someone over to push the copper on the other side it will close up any gap and be 10x faster.
Start weld on good metal and then move it over. Ned good light to see what you are doing.
Good luck

#558 Gilles1000

Gilles1000

    Speeding Along Now

  • Just Joined
  • PipPipPipPipPip
  • 438 posts
  • Location: Karlsruhe

Posted 10 October 2022 - 07:32 AM

It seems from my side one of both metal sheets (old or new) you have is somehow contaminated (paint, or stonechip or sthg else) due to the white fumes you pictured.


Plue the old metal has some pitting, which makes it even thinner, so it's weaker to the heat.


Two solutions there: cut the pitted areas and replace, or as the other said, use a copper part to absorb some heat from the old part (the new one should get more heat to be welded correctly).

Be careful, the pure copper tends to stick quite strong at the metal once you did the welds.

I also used brass, it works a bit differently by absorbing less heat, but it does not stick to the welds.


Good luck,

Gilles


#559 Kevinmini

Kevinmini

    Mini Mad

  • Noobies
  • PipPipPipPip
  • 144 posts
  • Location: Cambridgeshire

Posted 12 October 2022 - 07:51 PM

Victor


Check out my latest video.......... it may help! What you don't see is the following


The cleaning of the metal

Testing the welder prior to welding

The huge amount of time I leave in between welds to keep the heat and distortion down


https://youtu.be/hQUOPMxR_50


Drop me a message on Instagram - @pocket rocket garage


#560 Viktor

Viktor

    Super Mini Mad

  • Members
  • PipPipPipPipPipPip
  • 653 posts
  • Location: London

Posted 14 October 2022 - 12:18 PM

Super excited about the delivery from M-Machine received today.


New cross member and rear jacking points (not sure if I'm going to use these, but for ÂŁ5 each worth a try)


rKafl3d.jpg


Companion bin repair panels


LUPRBHJ.jpg


And the floor panels. These come with all the fittings underneath and both internal and external sills. Not sure how they will fit, but the quality of the material is outstanding.


tkatiHf.jpg


wNZ4zW0.jpg


k3AtLsP.jpg


OkbUayt.jpg


And the other side:


RlEG4pX.jpg


PuGBioP.jpg


XzWuYhI.jpg


26lLb31.jpg


With these and the quarter panels, it should keep me going for another year! 


Busy weekend ahead!


Victor.


#561 Viktor

Viktor

    Super Mini Mad

  • Members
  • PipPipPipPipPipPip
  • 653 posts
  • Location: London

Posted 14 October 2022 - 12:21 PM

Victor


Check out my latest video.......... it may help! What you don't see is the following


The cleaning of the metal

Testing the welder prior to welding

The huge amount of time I leave in between welds to keep the heat and distortion down


https://youtu.be/hQUOPMxR_50


Drop me a message on Instagram - @pocket rocket garage

Thanks Kevin, I will have a look on the video. Sorry, I don't have an Instagram account... :(


#562 sonscar

sonscar

    Up Into Fourth

  • Members
  • PipPipPipPipPipPipPipPipPip
  • 2,917 posts
  • Location: crowle
  • Local Club: none

Posted 14 October 2022 - 02:40 PM

Just a small note,they are not rear jacking points,they are/were used in the factory.Resist jacking on them.Steve..


#563 colinf1

colinf1

    One Carb Or Two?

  • Members
  • PipPipPipPipPipPipPip
  • 989 posts
  • Location: Dundalk

Posted 14 October 2022 - 02:55 PM

Slinger brackets, for lifting the shell on an overhead crane during assembly.

Suppose you may put them on to keep the originality, seeing that the front ones are already on the new panel.

The rear one is spot welded to floor, the seam welded onto the heelboard.
Fitment should be good from m-machine!

Your dog doesn't look impressed...

#564 Viktor

Viktor

    Super Mini Mad

  • Members
  • PipPipPipPipPipPip
  • 653 posts
  • Location: London

Posted 14 October 2022 - 05:33 PM

Hi Steve, Colin


Thanks for the comments. I would need to do some research to see where and how those brackets are fixed.


I finished work earlier today and went into the garage to do some work. First I removed the old cross member, to make room for the floor panels.


2r3apMG.jpg


I have damaged the tunnel a bit, removing the spot welds, but it should be an easy fix.


IUkSIvj.jpg


The other side, where I tried to do the repair last week, is quite rusted. that would need cutting the rust away to bring fresh metal in.


bGuLZbh.jpg


R7ZDjQ3.jpg


I marked up the position of the companion bin repair panel, and cut a bit to get more room for the fllor panel


2t98PjI.jpg


I did a first attempt to get the panel in, but I would need to cut more of the old floor panel first. That would be tomorrow...


tJCF2gC.jpg


And that was it for today, not bad for a Friday!


Victor.


#565 Verderad

Verderad

    Speeding Along Now

  • TMF+ Member
  • PipPipPipPipPip
  • 406 posts
  • Location: Porthcawl

Posted 15 October 2022 - 08:51 AM

Good luck Victor. 

My rcommendation would be to fully clean back paint, rust etc on the centre tunnel, degrease for really clean metal.   Leave off the weld through primer. 

Get the floor in so that you have overlap with the tunnel, clamp up and cut both with a cutting disk at the same time. 

Then clamp an tack.  


I didn’t do this, must have removed panel 20 times, marked, grind, fit, remove.  Each time the fit was different.  

Then when it was good I needed to remove and clean of paint etc.  


I also left the panels without protection and ended up having to de rust later, save some time by giving them an blast of primer before you put them on.  


`hope today is a good day for you 


#566 Verderad

Verderad

    Speeding Along Now

  • TMF+ Member
  • PipPipPipPipPip
  • 406 posts
  • Location: Porthcawl

Posted 15 October 2022 - 08:51 AM

Sorry double post


Edited by Verderad, 15 October 2022 - 08:52 AM.


#567 Viktor

Viktor

    Super Mini Mad

  • Members
  • PipPipPipPipPipPip
  • 653 posts
  • Location: London

Posted 15 October 2022 - 09:45 AM

Thanks Darren mate. Exactly what I was thinking to do. It is better to do all the prep first, before attempting to fit the panel. Once is in, is in!


Let's see how it goes today!


Victor.


#568 Viktor

Viktor

    Super Mini Mad

  • Members
  • PipPipPipPipPipPip
  • 653 posts
  • Location: London

Posted 16 October 2022 - 06:58 AM

This post is from yesterday, but for some reason the Mini Forum website wasn't working...


I focused on getting the central tunnel clean and ready to receive the new floor panels. Some photos of the process:


I removed the paint and all the dirt with the wire brush and a flap disk (to remove paint)


Gs9310h.jpg


The driver's side has a bit of rust, that would need to be taken care of. The rest is quite solid


6P9jo1u.jpg


Then it was time to remove the battery cable holder. A few spot welds and it was out. I will re-use it once the new floors are in.


MxXRbZJ.jpg


bF82Xt1.jpg


Then time to get the underneath cleaned and ready


FokQw7b.jpg


goGfqTO.jpg


And to finish off, I made a few repairs using a piece of copper to cover the holes.


MQnk4Q7.jpg


All done, but run off time to grind them done, which I will be doing today, together with more prep!


yvEkyQO.jpg


Victor


#569 Viktor

Viktor

    Super Mini Mad

  • Members
  • PipPipPipPipPipPip
  • 653 posts
  • Location: London

Posted 16 October 2022 - 07:02 AM

Slinger brackets, for lifting the shell on an overhead crane during assembly.

Suppose you may put them on to keep the originality, seeing that the front ones are already on the new panel.

The rear one is spot welded to floor, the seam welded onto the heelboard.
Fitment should be good from m-machine!

Your dog doesn't look impressed...

Hey Colin, do you have any pictures of how these brackets are fixed to the floor. I was looking at it yesterday, but can't figure it out! Any reference you have would be very helpful!


My dog 'Chunky' has seen quite a lot of panels delivered, but not that many going in the car! ;)


#570 colinf1

colinf1

    One Carb Or Two?

  • Members
  • PipPipPipPipPipPipPip
  • 989 posts
  • Location: Dundalk

Posted 16 October 2022 - 07:25 AM

Hi Victor, you can see it here on the left hand side, if you zoom in you can see its seam welded on each side onto the heelboard
52281672155_eb42f5d829_b.jpg

And again looking from front

52205054615_3c9efac5b8_b.jpg

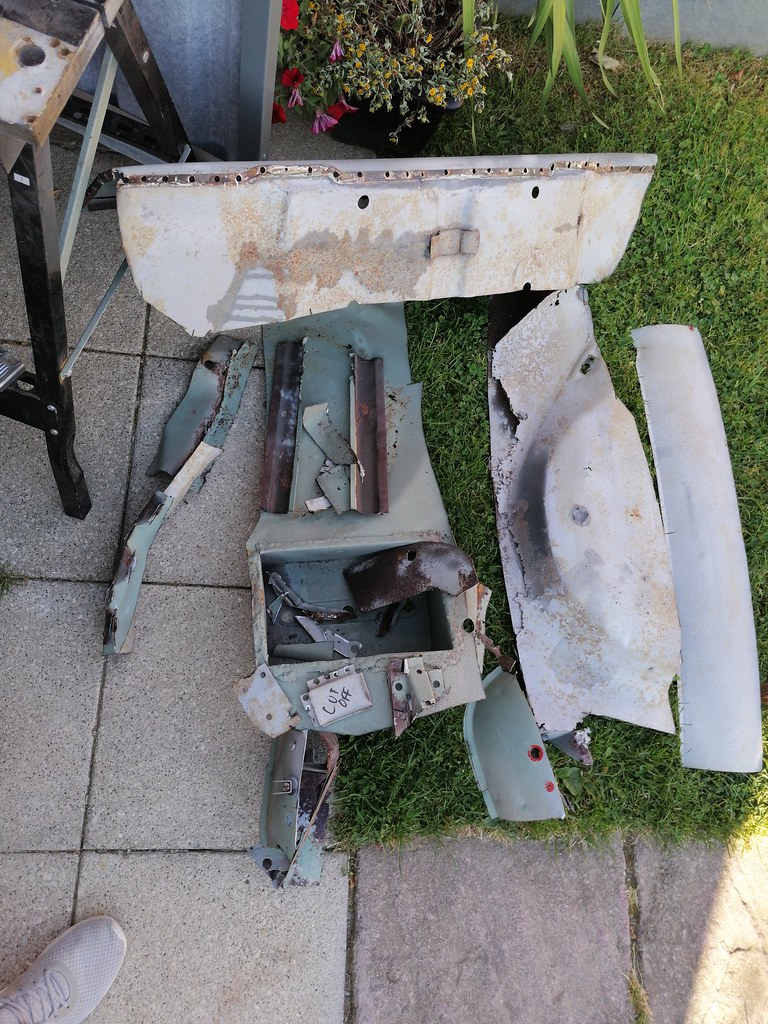
And here sitting on the battery box with cut off written on it..to give you an idea of how many spot welds to do..

52281191616_95b2cc95cb_b.jpg


Also tagged with one or more of these keywords: roundnose

1 user(s) are reading this topic

0 members, 1 guests, 0 anonymous users