Jump to content


Photo

Bonnet Bending


  • Please log in to reply
12 replies to this topic

#1 Tornado99

Tornado99

    One Carb Or Two?

  • Members
  • PipPipPipPipPipPipPip
  • 750 posts
  • Location: Vancouver

Posted 08 August 2020 - 07:54 PM

Hi.

Noticed my '88 Mini (only had it around a month) bonnet developing stress bends a little way forward of the underside reinforcing gussets, along both side vertical edges. Appears as an outward puckering of the vertical edge. I presume this if from over-torque or stiffness on the hinge pivot bolts? Will be checking that today.


Are there any tips to reinforce that area of the bonnet? Obviously would like to preserve the paintwork if possible.


#2 KTS

KTS

    Up Into Fourth

  • TMF+ Member
  • PipPipPipPipPipPipPipPipPip
  • 2,392 posts
  • Location: Herts

Posted 09 August 2020 - 09:00 AM

i'm fairly sure there's a project thread where someone bonded (stainless steel?) stiffener strips to the inside of the edges


#3 nicklouse

nicklouse

    Moved Into The Garage

  • TMF+ Member
  • PipPipPipPipPipPipPipPipPipPipPip
  • 18,409 posts
  • Location: Not Yorkshire
  • Local Club: Anonyme Miniholiker

Posted 09 August 2020 - 09:35 AM

pictures?

the sides are not smooth.


#4 sonikk4

sonikk4

    Twisted Paint Polisher!!!

  • Admin
  • PipPipPipPipPipPipPipPipPipPipPip
  • 16,015 posts
  • Name: Neil
  • Location: Oxfordshire

Posted 09 August 2020 - 10:12 AM

There is nothing to stop you from adding some metal strips on the inside and either plug weld or spot weld them in place. The plugs / spots will need to be very close together though to get the maximum benefit.

Round nose bonnets are flimsy at the best of times so adding a reinforcement strip will help. Something I wish I had done on my lads car.

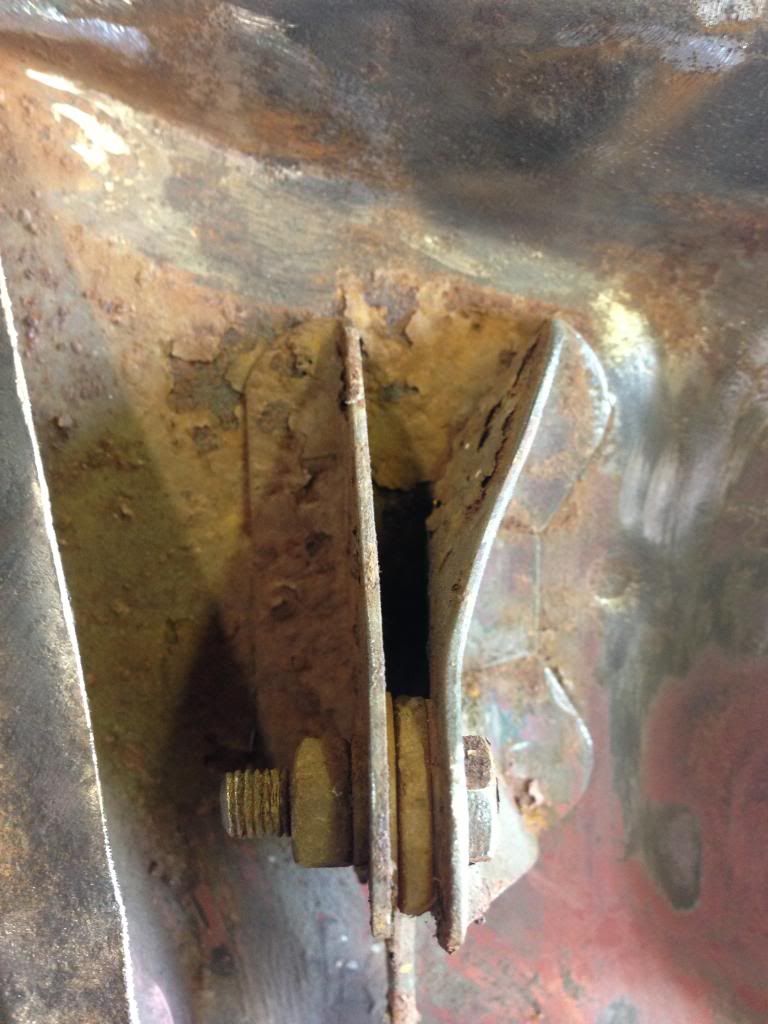
However a standard bonnet should be ok so as you mentioned if the hinges are stiff then that will be the cause of your issues. Take the bonnet off. Remove the hinge arm and check to see if the nylon washers are fitted. One either side of the arm on each mount.

#5 sonikk4

sonikk4

    Twisted Paint Polisher!!!

  • Admin
  • PipPipPipPipPipPipPipPipPipPipPip
  • 16,015 posts
  • Name: Neil
  • Location: Oxfordshire

Posted 09 August 2020 - 06:10 PM

Just to add to this, the clubman bonnet has strips welded to the side from new. It helps a lot but the bonnet is still relatively flimsy. Thicker ones will help there.


I had originally stripped my old Clubby bonnet back to a skin, removing all internal bracing to get at the hidden rust. As it was i added replacement strips down the side with 1.2mm steel but all for nothing as i could not get rid of the ripple in the skin. My replacement Heritage bonnet was not given the same treatment alas due to time and me being thoroughly hacked off having to spend big bucks on a brand new item.


#6 Tornado99

Tornado99

    One Carb Or Two?

  • Members
  • PipPipPipPipPipPipPip
  • 750 posts
  • Location: Vancouver

Posted 09 August 2020 - 06:44 PM

OK I checked the hinge pivot bolts...were too tight. Slackening them & oiling them....now lets the hinge move freely now. It was mentioned earlier there should be some nylon/? bushings on the pivot bolts. Could not see them when fiddling the nut looser.

I do have the MiniSpares quick release hinges still to put on. The instructions do not say anything about such bushings and state to leave the Nylok type nuts just barely secured to make quick-fitting easier. If there should I fit bushings with the Quick Release hinges?


My bonnet creases have progressed to actual fractures at the crease points. Has not yet damaged top surface paint but may do one day. I'm thinking a length of angle steel spot welded along the inside edge & underside should provide decent reinforcement in this area. Alternatively, the corner gusset section could be extended forward to do a much better job supporting this very flimsy area. 


Edited by Tornado99, 09 August 2020 - 06:45 PM.


#7 sonikk4

sonikk4

    Twisted Paint Polisher!!!

  • Admin
  • PipPipPipPipPipPipPipPipPipPipPip
  • 16,015 posts
  • Name: Neil
  • Location: Oxfordshire

Posted 09 August 2020 - 06:55 PM

There should be nylon washers not a bush.


Cant comment on the quick release hinges as i have Minivation articulated hinges.


Now the fact your bonnet has actually cracked, it will get bigger and also corrode, so my recommendation here is the crack is welded and knocked back. Then add your reinforcement and weld in place (plug welds will create minimal damage to any paint.)


#8 sonikk4

sonikk4

    Twisted Paint Polisher!!!

  • Admin
  • PipPipPipPipPipPipPipPipPipPipPip
  • 16,015 posts
  • Name: Neil
  • Location: Oxfordshire

Posted 10 August 2020 - 02:04 PM

OK I checked the hinge pivot bolts...were too tight. Slackening them & oiling them....now lets the hinge move freely now. It was mentioned earlier there should be some nylon/? bushings on the pivot bolts. Could not see them when fiddling the nut looser.

I do have the MiniSpares quick release hinges still to put on. The instructions do not say anything about such bushings and state to leave the Nylok type nuts just barely secured to make quick-fitting easier. If there should I fit bushings with the Quick Release hinges?


My bonnet creases have progressed to actual fractures at the crease points. Has not yet damaged top surface paint but may do one day. I'm thinking a length of angle steel spot welded along the inside edge & underside should provide decent reinforcement in this area. Alternatively, the corner gusset section could be extended forward to do a much better job supporting this very flimsy area. 


I thought i had a picture with hinge mount, hinge arm, bolt with all washers.

01d564d13f16f1af17533addc711bba85b1ec2df


#9 alex-95

alex-95

    I am THE CLAMP MAKER

  • Members
  • PipPipPipPipPipPipPipPipPipPip
  • 6,020 posts
  • Location: l

Posted 10 August 2020 - 06:55 PM

I bonded some right angle steel to mine (it was actually cut off a scrap bonnet) it's been working fine for the past 3 years it's been on and I'm using mitigation articulated bonnet hinges. I think I used Gorilla glue.


#10 Tornado99

Tornado99

    One Carb Or Two?

  • Members
  • PipPipPipPipPipPipPip
  • 750 posts
  • Location: Vancouver

Posted 10 August 2020 - 08:54 PM

I bonded some right angle steel to mine (it was actually cut off a scrap bonnet) it's been working fine for the past 3 years it's been on and I'm using mitigation articulated bonnet hinges. I think I used Gorilla glue.

Interesting. Been thinking I might try some angle aluminium with epoxy as a temp fix until a future hood re-paint is in order. Could also work with a line of small flat head pop rivets or countersunk bolts through outer edge to an angle plate...small nuts to secure along inside.. 


Edited by Tornado99, 10 August 2020 - 08:56 PM.


#11 Tornado99

Tornado99

    One Carb Or Two?

  • Members
  • PipPipPipPipPipPipPip
  • 750 posts
  • Location: Vancouver

Posted 18 August 2020 - 12:29 AM

I've just added a stiffener to one side of my bending bonnet. Used a 6" length of 1/16" alu angle, about 1/2" square. Needed to trim it down using a file and then some dremel grinding to better match the bonnet edge depth, worked out to about 12mm on one side. Because the failed/cracked edge was within only 1 inch of the corner reinforcing gusset, the stiffener piece was placed so it extended from a couple of inches over the gusset and then another 4" forward of the crack.  Roughened up the painted surface where the stiffener would cover for better epoxy adhesion. Also roughed with anodized alu using emery cloth. After wiping with degreaser, applied the epoxy (West System G-Flex 650) thickened with silica powder. Used an old wire brush to scrub epoxy into the alu surface...this helps remove oxidation that otherwise forms instantaneously on the wire brushed alu surface, aiding adhesion properties significantly. These are tricks I learned when working with epoxy and high performance sailboats.

Placed the coated stiffener along the edge and clamped in place to setup. Hoping this will greatly improve the ever weakening bonnet edge. Planning to do other side once satisfied first one is doing what I need.


Edited by Tornado99, 18 August 2020 - 12:31 AM.


#12 Tornado99

Tornado99

    One Carb Or Two?

  • Members
  • PipPipPipPipPipPipPip
  • 750 posts
  • Location: Vancouver

Posted 19 August 2020 - 03:31 AM

Some pics of the cracked bonnet edge and stiffener being bonded in place:

Attached Files


#13 Tornado99

Tornado99

    One Carb Or Two?

  • Members
  • PipPipPipPipPipPipPip
  • 750 posts
  • Location: Vancouver

Posted 20 August 2020 - 04:10 PM

Happy to report all work now completed. Bonnet is showing no signs of flexing in the area of the the cracks. The stiffeners do not affect closing at all, lots of clearance all around. As for aesthetics, nothing visible from either side and unless looking at underside of hood the stiffeners are not obvious when hood is open. 


I'll declare victory on not worry about further deterioration of those cracks again until some future bonnet body work is in order (hopefully many years out).


1 user(s) are reading this topic

0 members, 1 guests, 0 anonymous users