Jump to content


Photo
- - - - -

Welding Tips (Where To Place Weld?)


  • Please log in to reply
16 replies to this topic

#1 designermatt

designermatt

    Mini Mad

  • Members
  • PipPipPipPip
  • 255 posts

Posted 07 November 2018 - 05:58 PM

I want some advice on MIG welding,


Lets say ive got 2 panels together with a 8mm overlap and there pressed flush against each other, when I'm pulse welding where do I want to aim my wire? Also , once I've started the arc, what mmovement should I do for that 1 tack , should I spiral it a little, should I zig zag the 2 panels together?


And how much penetration should I be gettting, as in what sort of size blob on the other side of the panels?


Lets say I'm butt welding 2 x 1mm panels together, and ive got a 0.6mm gap between the panels, when I'm welding where do I start to aim , and what  motion should I do?


Thanks for advice


My welder is a R-tech 180 mig, set up with 0.6 wire using BOC argos light shielding gas. 


#2 sonikk4

sonikk4

    Twisted Paint Polisher!!!

  • Admin
  • PipPipPipPipPipPipPipPipPipPipPip
  • 16,005 posts
  • Name: Neil
  • Location: Oxfordshire

Posted 07 November 2018 - 06:09 PM

Ok where to start.


So pulse welding. At the edge of the metal is where you aim the wire. Now a pulse weld is effectively a tack weld but held there a bit longer. Its all down to practise, wire speed and power settings.


The same applies for a seam weld. Again at the edge of the overlap, start the weld a slow side to side movement drawing it back. Or some do a rotation type method as well.


Now butt welding thin steel such as found on a mini, use a piece of flattened copper on the back of the area you are going to weld then pulse weld. The amount of penetration will in effect show as a small peak. And i would pulse weld.


#3 sonikk4

sonikk4

    Twisted Paint Polisher!!!

  • Admin
  • PipPipPipPipPipPipPipPipPipPipPip
  • 16,005 posts
  • Name: Neil
  • Location: Oxfordshire

Posted 07 November 2018 - 06:11 PM

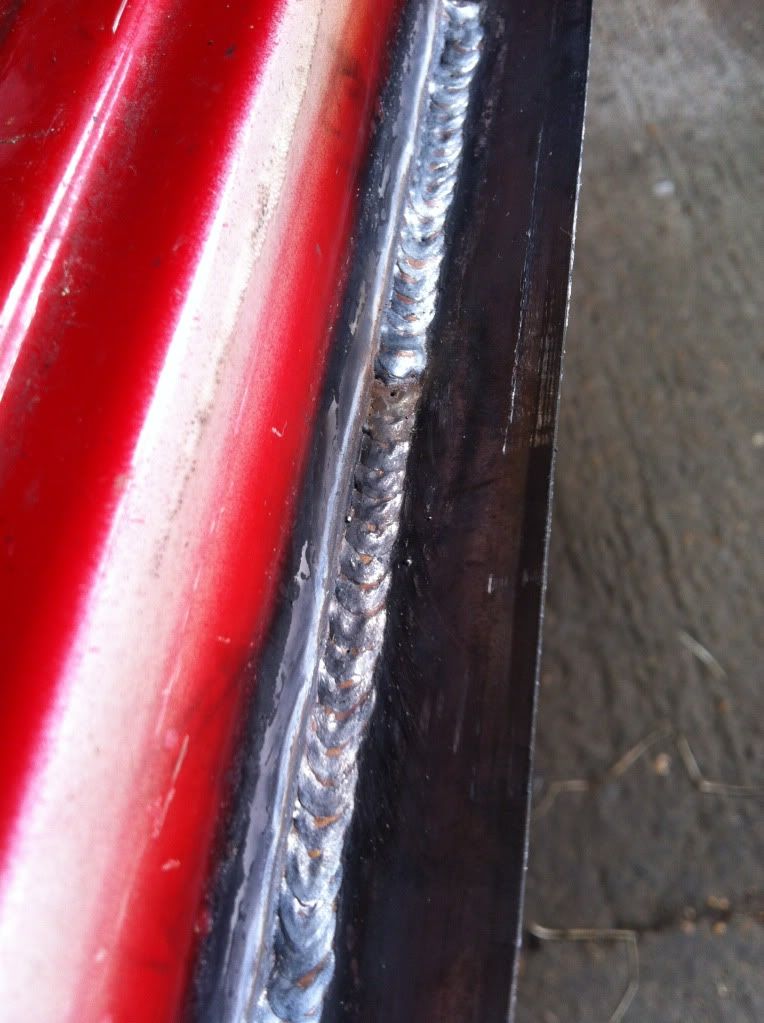
This is pulse welding although i could easily have seamed welded here

gBemzJk.jpg


#4 sonikk4

sonikk4

    Twisted Paint Polisher!!!

  • Admin
  • PipPipPipPipPipPipPipPipPipPipPip
  • 16,005 posts
  • Name: Neil
  • Location: Oxfordshire

Posted 07 November 2018 - 06:13 PM

http://www.theminifo...se-for-welding/


There are some welds shown on here


#5 sonikk4

sonikk4

    Twisted Paint Polisher!!!

  • Admin
  • PipPipPipPipPipPipPipPipPipPipPip
  • 16,005 posts
  • Name: Neil
  • Location: Oxfordshire

Posted 07 November 2018 - 06:18 PM

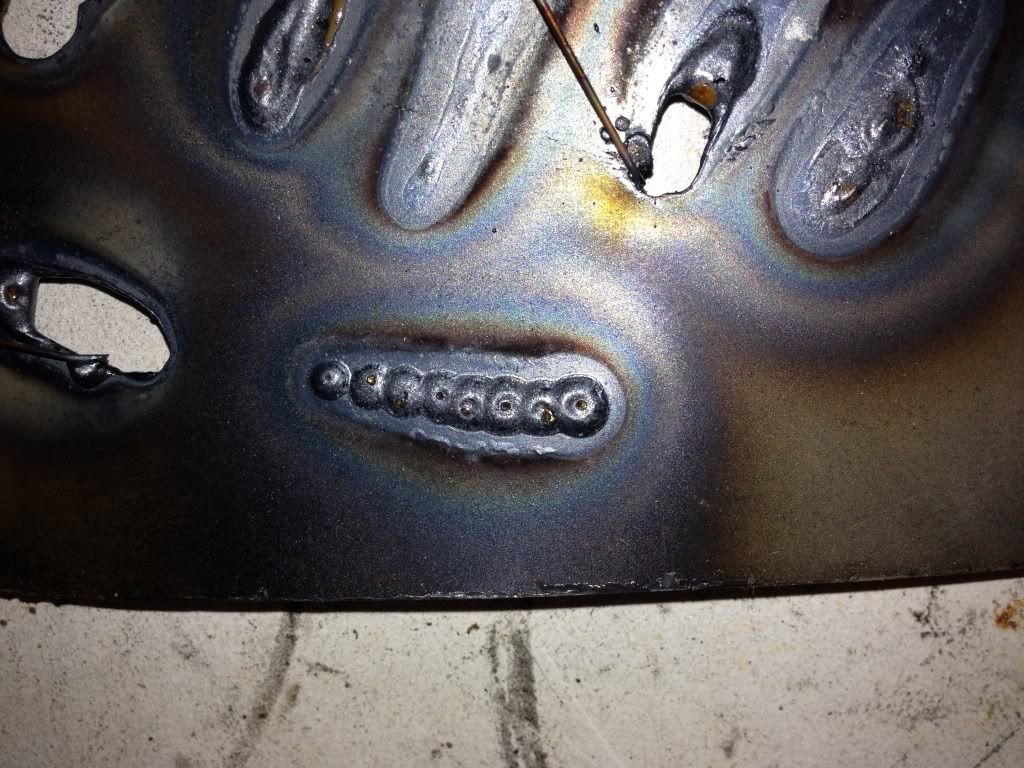
Now this bit of scrap was used to show various wire speeds and power settings using a R Tech 160 Mig.


Pulse welds and the penetration.

96ac49954a446b0fa63169e4ec6b081e34dd1fe0


#6 sonikk4

sonikk4

    Twisted Paint Polisher!!!

  • Admin
  • PipPipPipPipPipPipPipPipPipPipPip
  • 16,005 posts
  • Name: Neil
  • Location: Oxfordshire

Posted 07 November 2018 - 06:19 PM

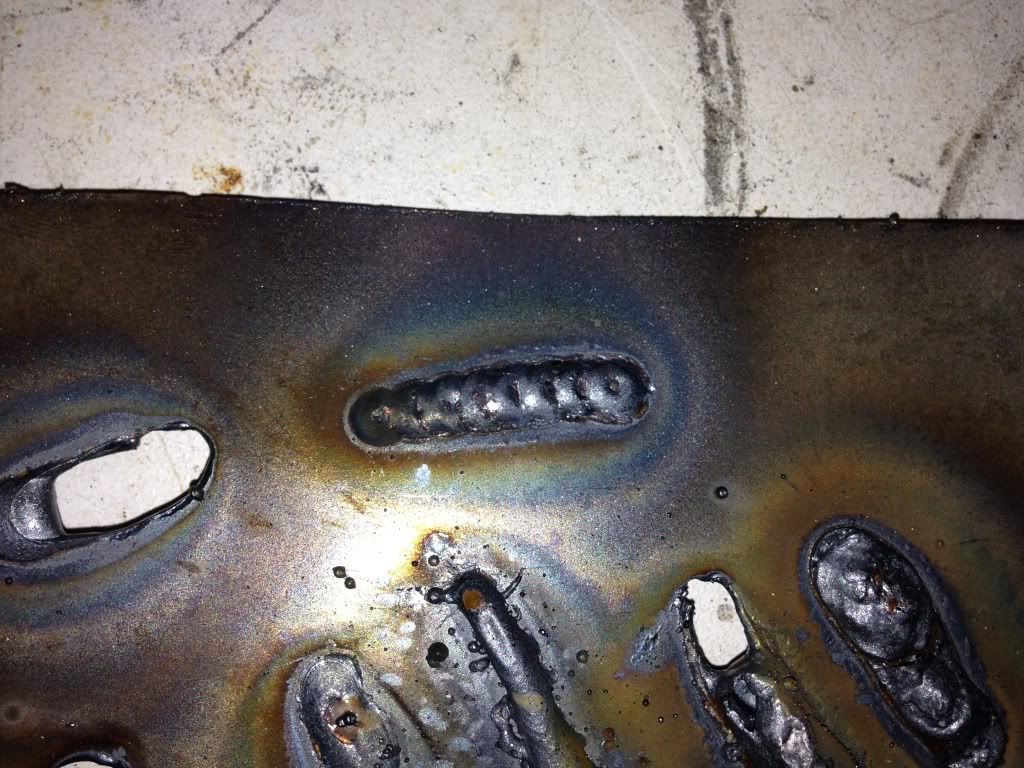
These is the pulse weld that created the penetration

65e959958c6c83e3f3960b0fa64a4bc1b8761d43


#7 sonikk4

sonikk4

    Twisted Paint Polisher!!!

  • Admin
  • PipPipPipPipPipPipPipPipPipPipPip
  • 16,005 posts
  • Name: Neil
  • Location: Oxfordshire

Posted 07 November 2018 - 06:21 PM

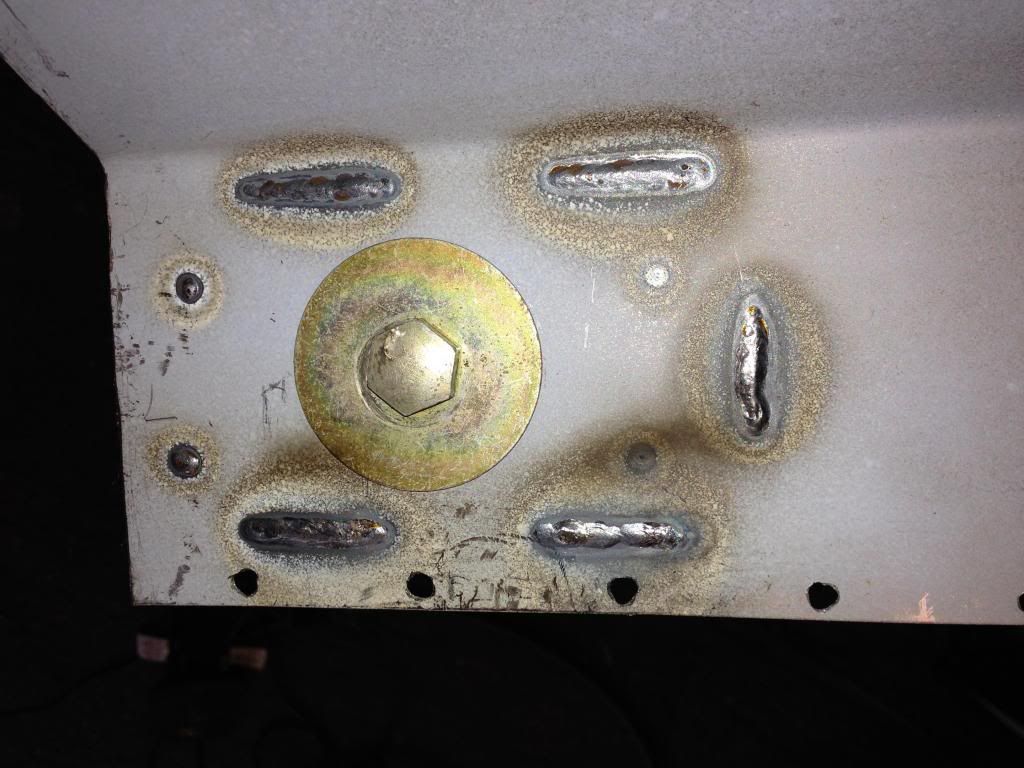
Seam welding and the penetration

2a9efb662f244029e639962ea58c5ff589109b36

6cf5f2d73482a3fe99ed39c1f29932bceb6a8f7d


#8 sonikk4

sonikk4

    Twisted Paint Polisher!!!

  • Admin
  • PipPipPipPipPipPipPipPipPipPipPip
  • 16,005 posts
  • Name: Neil
  • Location: Oxfordshire

Posted 07 November 2018 - 06:23 PM

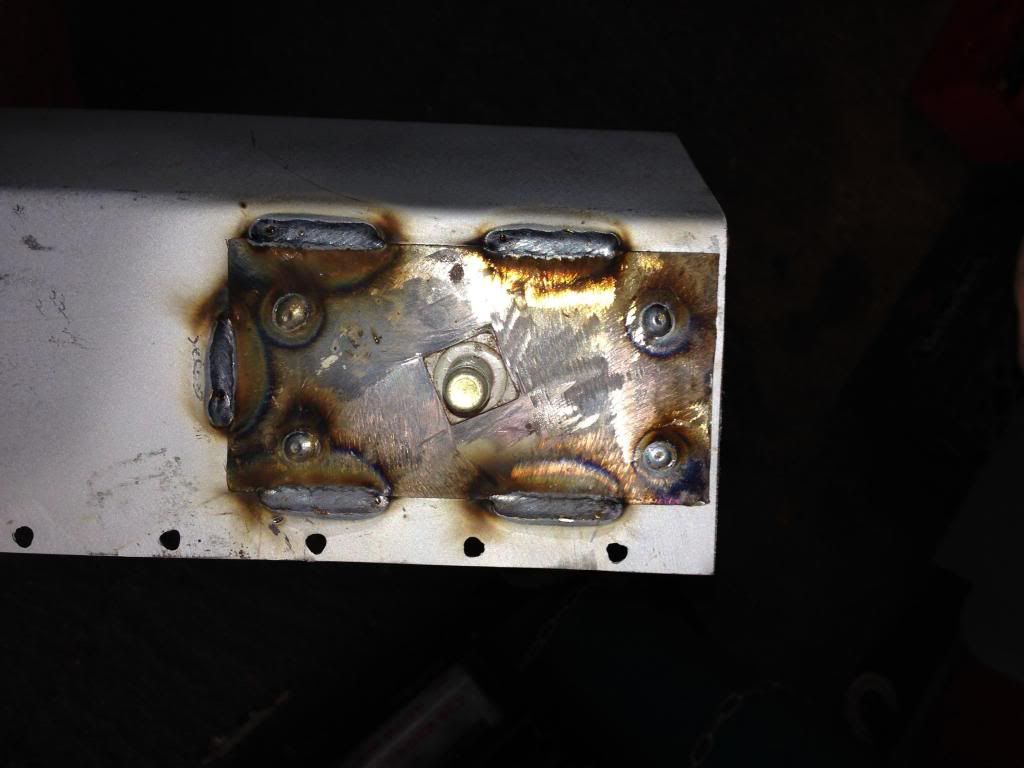
And pulse welding instead of seam welding

d4c6822cec2d2e2bcb982a54b5bb7ae537fc1db6


#9 designermatt

designermatt

    Mini Mad

  • Members
  • PipPipPipPip
  • 255 posts

Posted 07 November 2018 - 06:41 PM

And pulse welding instead of seam welding

d4c6822cec2d2e2bcb982a54b5bb7ae537fc1db6

 Pretty good going fella, really appreciate the help, now do you have any guide to how to move the mig when welding?


#10 grizzler73

grizzler73

    Speeding Along Now

  • Members
  • PipPipPipPipPip
  • 300 posts
  • Location: Cheshunt

Posted 07 November 2018 - 07:04 PM

The most important thing when welding a continuous bead is to be comfortable and able to move freely. Then you can get a nice consistent speed, also as a tip for thicker welds go up a size in wire so that you do not have to feed the wire at a fast rate, it will feed more consistently at a slower speed. Practice on scrap first to get your pacing right.

#11 grizzler73

grizzler73

    Speeding Along Now

  • Members
  • PipPipPipPipPip
  • 300 posts
  • Location: Cheshunt

Posted 07 November 2018 - 07:06 PM

personally I never use 0.6 wire as I find it too thin, if you want to weld anything over 1.6mm it feeds too fast and is more prone to jamming

#12 designermatt

designermatt

    Mini Mad

  • Members
  • PipPipPipPip
  • 255 posts

Posted 07 November 2018 - 07:28 PM

personally I never use 0.6 wire as I find it too thin, if you want to weld anything over 1.6mm it feeds too fast and is more prone to jamming


I tried 0.8 first, but kept blowing through , so I thought I'd try the 0.6 as a way to help me on thin metal welding.


Ive just done a bit more and I can do a lovely pulse weld of beads and get excellent penetration that left no gaps, so I was well chuffed.


However  I just butted 2 pieces of metal together of the same thickness and I tried pulse welding it and I didn't get great penetraion at all on the other side, I tried holding my mig there for slightly longer but just blew through , I might try increase the voltage a smidgen to see if that helps get the correct penetration on my butt welds.


cheers 


#13 sonikk4

sonikk4

    Twisted Paint Polisher!!!

  • Admin
  • PipPipPipPipPipPipPipPipPipPipPip
  • 16,005 posts
  • Name: Neil
  • Location: Oxfordshire

Posted 08 November 2018 - 01:25 AM

You will have to keep playing with the settings until you find whats right for you. Practise practise then practise some more.


Try upping your wire speed a notch, keep the power the same and then see what happens. The problem is every welder has different settings so unless someone has exactly the same model as you then its a bit hit and miss.


All of the welds on my builds is done with a Clarke 135TE Turbo running 0.6mm wire and Argoshield Light. The picture of the Door was done with the R Tech 160. Easy enough for me to replicate with with my 135.


#14 nicklouse

nicklouse

    Moved Into The Garage

  • TMF+ Member
  • PipPipPipPipPipPipPipPipPipPipPip
  • 18,377 posts
  • Location: Not Yorkshire
  • Local Club: Anonyme Miniholiker

Posted 08 November 2018 - 01:34 AM

oh the joys of welding.


please remember practicing on nice new metal is nice but is nothing like the metal on the car. cleanliness is first-. corrosion cut it away. then life can be easier.


be prepared to cut it away and start again.


#15 antcole

antcole

    Speeding Along Now

  • Members
  • PipPipPipPipPip
  • 307 posts
  • Location: Devon

Posted 08 November 2018 - 03:49 AM

Just practice loads.
It's all about learning what's enough, not enough and too much.
If there's anything proud on the back side of the weld, you know you've fused the metal.
Everyone on here was the same once.


1 user(s) are reading this topic

0 members, 1 guests, 0 anonymous users