
i plan to remove my clutch also this year because of an oil leak. I hope this beast pops easy off.


Flywheel Removal
Started by
myminipickup
, Feb 26 2017 01:46 PM
43 replies to this topic
#32

tiger99
-

- Members
-

- 8,584 posts
Crazy About Mini's
- Location: Hemel Hempstead
Posted 09 March 2017 - 07:38 PM
Lapping is a reasonable thing to do, especially if there has been fretting and subsequent galling, but I am not convinced that it solves the problem. Unlikely to make it worse, so lap away merrily! Have a careful think about where the bolt engages the thread in the crankshaft, and what stretches and what compresses as the bolt is torqued up, and you may suspect that the taper angles become slightly mismatched when torqued up.
I believe there is a modification available which uses a different, longer bolt and ensures that the crankshaft nose does not go into extreme tension. Last time I looked it was rather expensive.
If you do any machining at home or at work, have a think about why an R8 style spindle taper may be better than the traditional Morse type, and you will see where my thoughts are heading.
I think we are yet to see the ultimate improvement in this area. It will probably come.
#33
Spider
-

- Admin
-
- 14,843 posts
Moved Into The Garage
- Location: NSW
- Local Club: South Australian Moke Club
Posted 09 March 2017 - 07:50 PM
For what it's worth, I lap the flywheel and crank tapers together.
On assembly, I use a very light Oil on the crank taper. This gets a VERY tight fit between the two, so freting never occurs. The light Oil film strength breaks down under the pressure of the fit between these parts, so it doesn't lubricate when fitted.
HOWEVER, unless you've got a hydraulic flywheel puller, don't do this or you'll never get them apart.
#34
GraemeC
-

- TMF+ Member
-
- 7,438 posts
Crazy About Mini's
- Location: Carnforth
Posted 10 March 2017 - 08:04 AM
I do the same Moke, but only have an old Sykes puller and never have a problem separating them (cue an issue this weekend when I change the clutch.....)
#35
myminipickup
-
- Noobies
-
- 152 posts
Mini Mad
- Location: Southampton
Posted 15 March 2017 - 03:45 PM
I've just got to say - what a great service from John at GuessWorks - I hired the puller - it arrived the next day. I used it and sent it back, and the deposit was refunded into my paypal right away... I would highly recommend this if you need to hire a flywheel puller.
#36
tiger99
-
- Members
-
- 8,584 posts
Crazy About Mini's
- Location: Hemel Hempstead
Posted 17 March 2017 - 10:55 PM
In the old days all pullers were adequately strong. They only seem to make cheap tat at fancy prices these days. Such is progress... It is good that there are sources of excellent ones for hire.
I bought a cheap unbranded one maybe about 1974, made from a very thick, at least 20mm, triangular plate and a large bolt with a very fine thread, possibly UNEF. Cheap and simple, no fancy castings. This was well before the era of cheap Chinese imports so it was almost certainly made in the UK by some engineering company with spare capacity, probably using offcuts from some major project. Apparently just hacked out from raw metal with a flame cutter, bored and tapped, and given a coat of green Hammerite. It has never failed me, and I drilled a second set of holes for pulling something else too, I forget what.
A thing like that could be made at home. Hacksaw (bandsaw?), large drill and tap, and lots of hard work. You may want access to a lathe briefly to make the plug that fits into the end of the crankshaft and make the hollow in the end of the bolt for a bearing ball, which makes it work more easily.
#37
johnR
-

- Members
-
- 2,297 posts
Up Into Fourth
- Location: Dorset
Posted 17 March 2017 - 11:19 PM
I just removed my (verto) clutch/flywheel with a newly purchased Draper puller. It took an 18" bar with an extra 18" of tube to get enough leverage. I'd been working at the back of my Mini in the garage with the puller facing the car, luckily I had a moment of insight and turned the engine away a few heaves before it fired nearly 2' across the floor.
#38
MRA
-
- Banned
-
- 7,607 posts
Previously known as 'mra-minis.co.uk'.
- Location: Due to move again....
Posted 17 March 2017 - 11:29 PM
Lapping is a reasonable thing to do, especially if there has been fretting and subsequent galling, but I am not convinced that it solves the problem. Unlikely to make it worse, so lap away merrily! Have a careful think about where the bolt engages the thread in the crankshaft, and what stretches and what compresses as the bolt is torqued up, and you may suspect that the taper angles become slightly mismatched when torqued up.
I believe there is a modification available which uses a different, longer bolt and ensures that the crankshaft nose does not go into extreme tension. Last time I looked it was rather expensive.
If you do any machining at home or at work, have a think about why an R8 style spindle taper may be better than the traditional Morse type, and you will see where my thoughts are heading.
I think we are yet to see the ultimate improvement in this area. It will probably come.
If you lap the flywheel and crank tail AFTER it has been fretting then its too late and you are really wasting your time, at best you are prolonging an engine failure !
Did you mean crank tail ?? anyway 2 things spring to mind from youur post.... 1) the tapers are already different (not a lot of people know this, and no I'm not about to divulge the difference) 2) JKD in about 2004 ish started to develop a tapered spline for the crank TAIL and the flywheel
Edited by MRA, 17 March 2017 - 11:49 PM.
#39
MRA
-
- Banned
-
- 7,607 posts
Previously known as 'mra-minis.co.uk'.
- Location: Due to move again....
Posted 17 March 2017 - 11:40 PM
I've just rented the one from GuessWork - going to have a go at it this weekend - lets hope that it works!
it will. spanner/socket size for the drive bolt is 34mm or imperial equivalent. (crank damper bolt/hub nut/steering wheel nut size)
read the instructions.
34mm ? no its 38.1mm ;)
#40
nicklouse
-

- Members
-
- 18,581 posts
Moved Into The Garage
- Location: Not Yorkshire
- Local Club: Anonyme Miniholiker
Posted 18 March 2017 - 08:44 AM
34mm ? no its 38.1mm ;)it will. spanner/socket size for the drive bolt is 34mm or imperial equivalent. (crank damper bolt/hub nut/steering wheel nut size)I've just rented the one from GuessWork - going to have a go at it this weekend - lets hope that it works!
read the instructions.
Fairly sure it was a 34mm I used.

#41
MRA
-
- Banned
-
- 7,607 posts
Previously known as 'mra-minis.co.uk'.
- Location: Due to move again....
Posted 18 March 2017 - 10:52 AM
34mm ? no its 38.1mm ;)
it will. spanner/socket size for the drive bolt is 34mm or imperial equivalent. (crank damper bolt/hub nut/steering wheel nut size)I've just rented the one from GuessWork - going to have a go at it this weekend - lets hope that it works!
read the instructions.
Fairly sure it was a 34mm I used.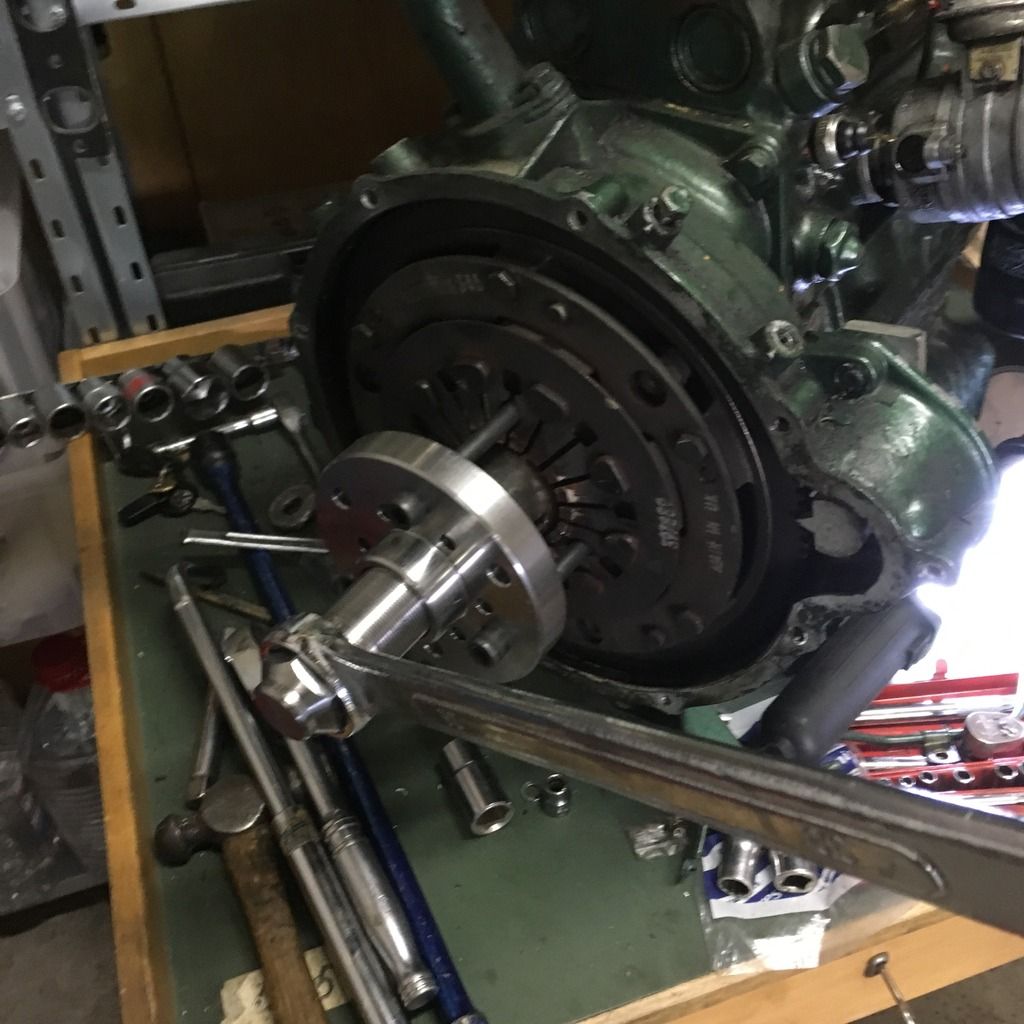
Not being big headed, however that does look like a 38mm spanner, or at least it looks like it has 38 written on it :)
#42
Rorf
-

- Members
-
- 866 posts
One Carb Or Two?
- Location: Cape Town
Posted 19 March 2017 - 11:35 AM
Yip, 38mm or 1.5 inch, same size as the pre Verto flywheel bolt
#43
neilw
-

- Noobies
-
- 57 posts
Stage One Kit Fitted
- Location: Shaftesbury, Dorset
Posted 18 May 2017 - 06:36 PM
I appreciate that this thread has discussed in detail how to remove the flywheel but I just wanted to add my experience. I saw the Guessworks tool which looked impressive but slightly more money than I wanted to spend so I bought a cheaper Draper one (~£20) and it worked first time without any problems. I put a bit of 3 in 1 oil on the main bolt and used an extension on my breaker bar and just slowly turned it, I left it under pressure for an hour or so and came back and gave it a few more turns and it popped right off. No real bang or flywheels flying across the room, but I was expecting the worse.
I suppose if you have a stubborn one like some others have had above then the Guessworks tool is the only way to go. The Draper survived to fight another day with only the washers a little out of shape :)
#44
nicklouse
-
- Members
-
- 18,581 posts
Moved Into The Garage
- Location: Not Yorkshire
- Local Club: Anonyme Miniholiker
Posted 18 May 2017 - 07:15 PM
34mm ? no its 38.1mm ;)
it will. spanner/socket size for the drive bolt is 34mm or imperial equivalent. (crank damper bolt/hub nut/steering wheel nut size)I've just rented the one from GuessWork - going to have a go at it this weekend - lets hope that it works!
read the instructions.
Fairly sure it was a 34mm I used.
Not being big headed, however that does look like a 38mm spanner, or at least it looks like it has 38 written on it :)
it does indeed and it is but for some idea i had the wrong number in my head.


1 user(s) are reading this topic
0 members, 1 guests, 0 anonymous users


