What goes in the heel board sub load bed "hole" on the pickup?

"bad Boy" Pickup
Started by
g111mds
, Jan 06 2017 06:00 PM
174 replies to this topic
#122

g111mds
-
- Members
-

- 432 posts
Speeding Along Now
- Location: Edinburgh
Posted 19 January 2018 - 07:12 PM
What goes in the heel board sub load bed "hole" on the pickup?
Do you mean the space between the load tray in the back and floor area in the cab? If so, absolutely nothing.
#123
g111mds
-
- Members
-
- 432 posts
Speeding Along Now
- Location: Edinburgh
Posted 19 January 2018 - 07:18 PM
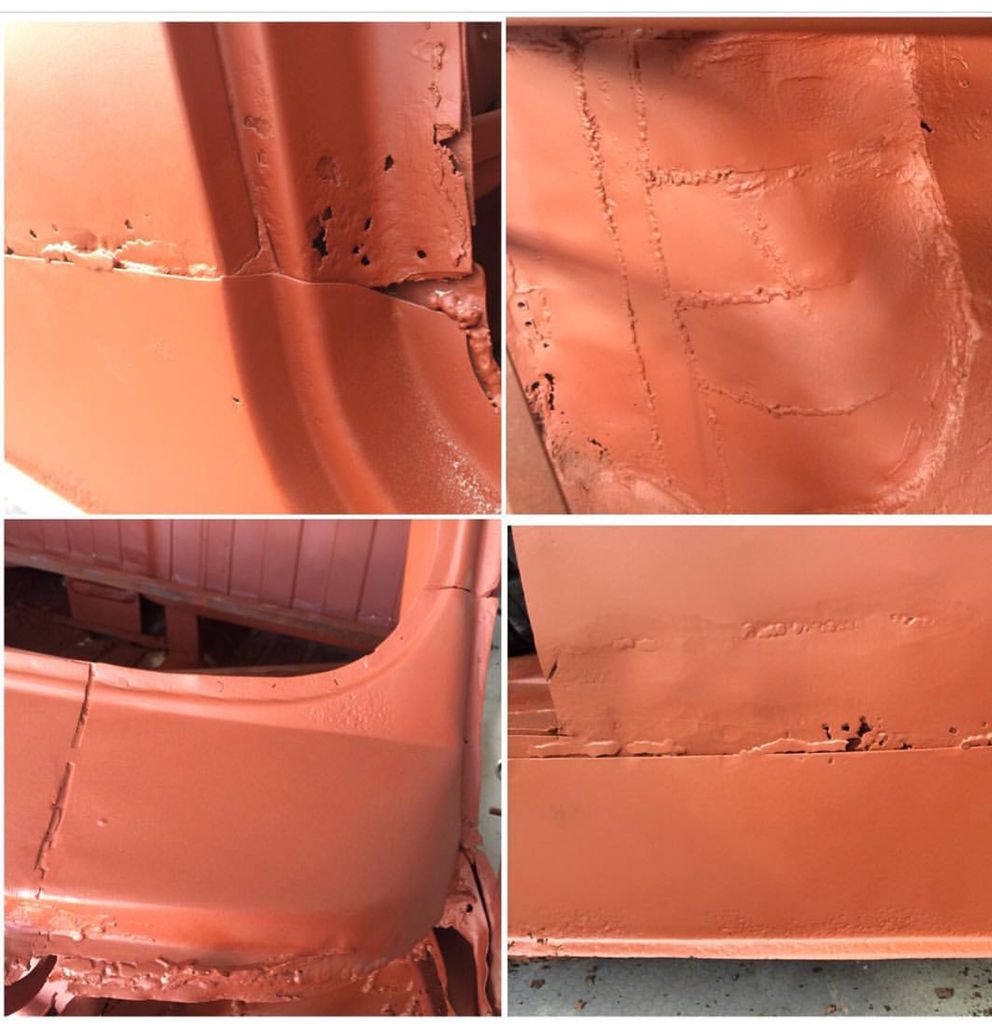
With a bit of major expenditure ahead of me to purchase the floor, load tray, and bulkhead, I had a good rake about the parts I'm not going to need to get them pictured and advertised for sale. Quite a few bits n pieces actually, plus a couple of sets of wheels for other cars too which I'll get advertised. Hopefully that'll go a reasonable way towards the cost of the parts.
On top of that, also had a poke about the rear subframe, and starting stripping it down. It's looking in pretty good shape actually.
 image.jpeg 137.81K
2 downloads
image.jpeg 137.81K
2 downloads
On top of that, also had a poke about the rear subframe, and starting stripping it down. It's looking in pretty good shape actually.
image.jpeg 137.81K
2 downloads
#124
g111mds
-
- Members
-
- 432 posts
Speeding Along Now
- Location: Edinburgh
Posted 21 January 2018 - 06:05 PM
I'll start with how I'm feeling about this pickup - "what the f*#k was I thinking when I thought I'd be able to return this to its former glory??!!"
Right, with that out of the way, a quick update.
Lots of snow round here, so more time at home than planned.
Having decided that I'm going new floor, load liner, and bulkhead, I decided it was time to lop the back end off.
Fuel tank removed first, then lopped off the drivers side rear light panel as I'll try to save that. Then, it was many cutting discs and the back end roughly chopped off. Actually took my quite a while to do this.
Another pile of rusty ******* left on the garage floor needing swept up. This thing really is in bad shape.
Needing a good clean up in the garage, then some extra bracing before the floor comes off and the rest if the bulkhead. Hopefully this'll keep me out of mischief while I gather some funds for the floor and load tray.
image.jpeg 75.01K
3 downloads
image.jpeg 62.39K
4 downloads
image.jpeg 76.88K
3 downloads
image.jpeg 67.29K
1 downloads
Attached Files
-
image.jpeg 62.5K
0 downloads
Edited by g111mds, 21 January 2018 - 06:36 PM.
#125
MrBounce
-

- TMF+ Member
-
- 2,645 posts
Up Into Fourth
- Location: The Manroom in Ipswich
Posted 21 January 2018 - 07:13 PM
Whoa! 
#126
Jared Mk3
-

- Members
-
- 1,974 posts
Has a small thing but it does make a difference
- Location: Kokstad, South Africa
- Local Club: MOCKZN
Posted 21 January 2018 - 07:25 PM
Is there anything left?
#127
g111mds
-
- Members
-
- 432 posts
Speeding Along Now
- Location: Edinburgh
Posted 21 January 2018 - 07:47 PM
Is there anything left?
There's still a bit left at the moment, but it needs pretty much every single part replaced including the roof. :)
#128
Miniowner123
-

- Members
-
- 987 posts
One Carb Or Two?
- Location: Brighton
Posted 21 January 2018 - 07:51 PM
I'm in the same situation with my pickup. Everything rotten so I cut the front end off and the complete rear, ended up with just the cab and sent that to be blasted. This is what horrors were filled over and hidden from sight
#129
g111mds
-
- Members
-
- 432 posts
Speeding Along Now
- Location: Edinburgh
Posted 21 January 2018 - 08:08 PM
I'm in the same situation with my pickup. Everything rotten so I cut the front end off and the complete rear, ended up with just the cab and sent that to be blasted. This is what horrors were filled over and hidden from sight
Ouch! At least we'll know that everything is sorted when they're finally back in the road.
#130
g111mds
-
- Members
-
- 432 posts
Speeding Along Now
- Location: Edinburgh
Posted 21 January 2018 - 10:15 PM
601E4B98-40B8-4E5F-9F13-292C4AFEE0D4.jpeg 61.38K
6 downloadsNot mine, but Im thinking Im needing to strip the cab back to this stage with some extra bracing and itll be minus the front bulkhead too. Then, with the new floor and load tray in place, lower the cab section on to it and go from there adding a new bulkhead etc. What I will do though is leave the current door steps on to give the cab an extra surface point on the new floor.
#131
Haygate
-

- Noobies
-
- 115 posts
Mini Mad
- Location: Telford
Posted 21 January 2018 - 10:19 PM
Thats a brave build but think of the achievement and value when its done.
#132
carthorse
-

- Members
-
- 257 posts
Mini Mad
- Location: Cheshire
Posted 21 January 2018 - 10:39 PM
601E4B98-40B8-4E5F-9F13-292C4AFEE0D4.jpeg
Not mine, but Im thinking Im needing to strip the cab back to this stage with some extra bracing and itll be minus the front bulkhead too. Then, with the new floor and load tray in place, lower the cab section on to it and go from there adding a new bulkhead etc. What I will do though is leave the current door steps on to give the cab an extra surface point on the new floor.
This is basically exactly where I am at. Unless you are positive the original shell is correct I wouldn’t bother with the bracing. Your not retaining enough of the shell for it to matter especially if your replacing the bulkhead as well. I tried fit it all together using bracing points from my old shell and it’s just caused more issues for me.
My advice would be to lay your new floor and load bed section out and align the two using the rear subframe as a jig. Make sure the two sections are square and temp fix them together through the top of the heel board with panel pins or tek screws. Bolt the new bulkhead to the front subframe with solid mounts so there’s no play and offer it up to the front of the floor section make sure it’s square and centered and again temp fix it together. Make sure the whole floor assembly you’ve just created is level fore and aft and side to side and level up the front subframe as well then try the remains of your cab section on top and see how it looks.
#133
wagon_rider
-

- Noobies
-
- 30 posts
Passed Test
- Location: Bafgate
Posted 22 January 2018 - 01:38 PM
haha! pow!!
A bit scary but well done for taking it on man. Mothing a bit of welding and grinding wont fix :)
#134
KTS
-

- TMF+ Member
-
- 2,423 posts
Up Into Fourth
- Location: Herts
Posted 22 January 2018 - 07:35 PM
it'll definitely be worth it in the end, and you know it'll be a damn sight better built than it was when it left the factory.
useful details on key dimensions in the following link. may be of some use if you haven't already seen it
http://mk1-performan...al_drop_dia.jpg
Edited by KTS, 22 January 2018 - 07:35 PM.
#135
g111mds
-
- Members
-
- 432 posts
Speeding Along Now
- Location: Edinburgh
Posted 22 January 2018 - 07:37 PM
Thats a brave build but think of the achievement and value when its done.
Yes, possibly too brave, but well see how we get on :)


1 user(s) are reading this topic
0 members, 1 guests, 0 anonymous users


