Jump to content


Photo
- - - - -

Timing And Carb Setup


  • Please log in to reply
17 replies to this topic

#1 Awjunkies

Awjunkies

    Just On Tickover

  • Noobies
  • Pip
  • 8 posts
  • Location: Mississippi

Posted 14 October 2016 - 01:48 PM

Hello all this is my first post here!!

Been in the auto industry a bit, worked at a restoration shop for a few years here in the states.

This is my second mini, had a 69 about 5-6 years ago before I moved into the 4x4 realm. Built a 69 bronco, 85 Gelandewagen, 74 FJ40, 84 FJ60, and now I'm back into a 1974 Leyland 1275gt that I'm turning into my track/rally rig.

Initially when I bought her she had issues backfiring and not wanting to go past 2500-3k in any gear. Figured it was a fuel issue and I knew I was going to refresh a bunch of components so I put it on the back burner.

Gutted and painted the car, put in a cage, new seats, poly Windows, etc. and now I'm trying to get her road worthy.

Put in a 45d electric red rotor (vac adv) sold through minimania (model psd5), new coil/plugs/wires.

Did a quick check to make sure #1 was at top by removing the plugs and sticking a pencil in the hole till it went all the way up before heading back down. Installed the dizzy (only fits in one way due to the diff slots) and the rotor was pointing at #1 at roughly the 2oclock position.

The car is just as it was before I tore her apart. Starts and idles just fine, can sit forever at idle without overheating (added a heater core front mount rad :) ).

I got her on the road it and it still had the same issue. I need to point out that I have a timing light but my car doesn't have the timing tab so I did it by ear the best I could.

I removed the carb, cleaned her out and assembled with anew filter, gaskets, and changed the original filter to a cone type (SU carb).

Still the same outcome. I checked the mixture ratio by pushing up the lifting pin on the underside of the dash pot and found that the mix was lean cause at full lift the engine wanted to die. Lowered the nut till a small lift would raise the rpm then level out.

Hesitation and sputtering seemed to get a bit better. I can feather the gas and push pass the dead zone and every now and then the engine will climb like it's supposed too.

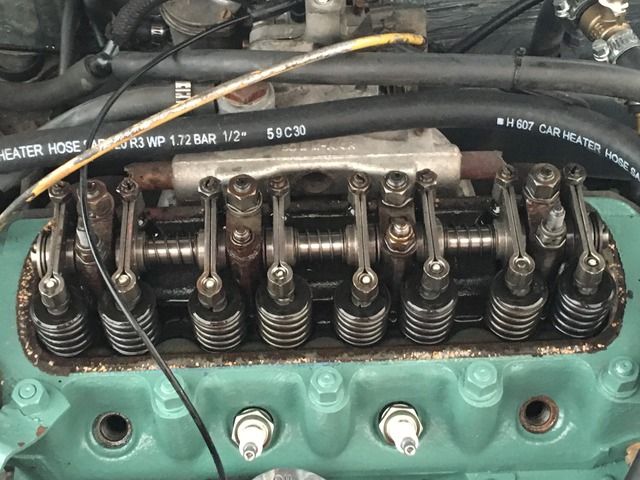
This weekend I plan to remove the rocker cover and make sure the valves and #1/4 are truly where they are supposed to be.

But I need pointers basically a step by step on things I might be overlooking.

Haven't checked to see if I have an inspection cover but in the event that I do what do I check? What do I lineup? Where do I put a makeshift tab and what do I set my gun too?

I've tried 15/40, marvels mystery oil, 20/50 in the dash pot with the same outcome.

Would really like to get her on the road sometime soon.

Thanks in advance!!

image.png

image_1.jpeg

image_2.jpeg


image_3.jpeg

#2 nicklouse

nicklouse

    Moved Into The Garage

  • TMF+ Member
  • PipPipPipPipPipPipPipPipPipPipPip
  • 18,330 posts
  • Location: Not Yorkshire
  • Local Club: Anonyme Miniholiker

Posted 14 October 2016 - 02:24 PM

so what have you not made a timing mark?


that is the first thing I would be doing.


then you can take the guessing out of the whole thing.


#3 carbon

carbon

    Up Into Fourth

  • Members
  • PipPipPipPipPipPipPipPipPip
  • 2,590 posts
  • Location: UK

Posted 14 October 2016 - 04:38 PM

Also when checking the carb mixture at idle you mention 'I checked the mixture ratio by pushing up the lifting pin on the underside of the dash pot and found that the mix was lean cause at full lift the engine wanted to die. Lowered the nut till a small lift would raise the rpm then level out.'


If you push the lifting pin up to full lift you're taking it too far. 'Tuning the SU Carb' book states 'Check for correct mixture by gently pushing the lifting pin up about 1/32 inches after the free movement has been taken up'


If the mixture is correct then as you say a small lift will raise the rpm, but only momentarily and it then levels out at same rpm as before.


Is it still running a single HS4 carb? I would suggest taking out the needle and seeing what is fitted, there are letter codes stamped on the end where it goes into the piston.


#4 Awjunkies

Awjunkies

    Just On Tickover

  • Noobies
  • Pip
  • 8 posts
  • Location: Mississippi

Posted 14 October 2016 - 05:03 PM

Haven't made a mark yet.

Correct my logic on this...

I have no timing tab, haven't checked to see if there is a mark/notch on pulley.

If I have a flywheel inspection cover remove that and look for the #1 stamp and then what?

#5 Spider

Spider

    Moved Into The Garage

  • Admin
  • PipPipPipPipPipPipPipPipPipPipPip
  • 14,580 posts
  • Location: NSW
  • Local Club: South Australian Moke Club

Posted 14 October 2016 - 07:02 PM

Probably not related to your current problem, though could be and one I'd check as a matter of course. The Distributor you have purchased may not suit the Engine you have. There's an awful rash of new parts getting about these days and Lucas Distributors are among them. If the Distributor was sold as a 'one size fits all' or a 'Lucas 45D4 Distributor', it's likely not right for your engine. There's more here on this;-


http://www.theminifo...d-distributors/


The Timing Markers on the front pulley only appeared about 1976-ish and after.


Yours will be done off the Flywheel.


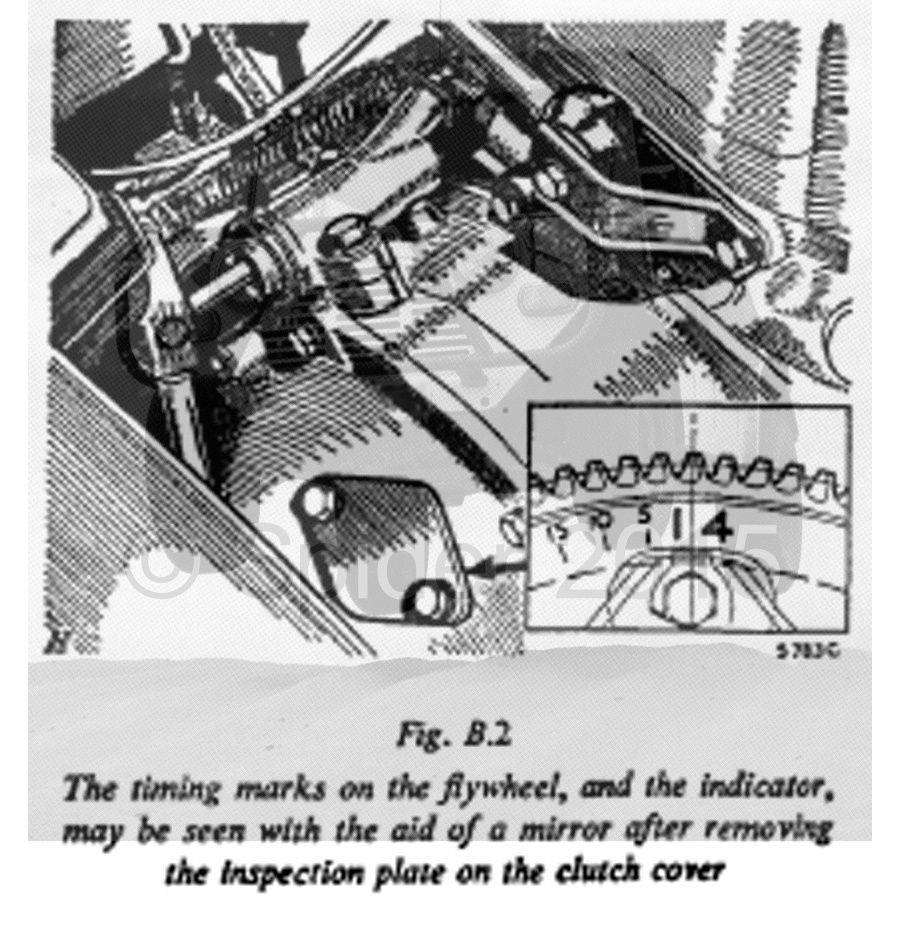
You'll find the Flywheel Timing Marks here


TimingMarksWM_zpsm8undlu2.jpg


Your current problem could be related to a Manifold (Vacuum) Leak and / or the Fuel Bowl Level being too low, the wrong Needle in the Carb, dirty Air Filter, Coil (though I think you said you replaced that), Fuel Pump Pressure to list a few more items.


When checking the Mixture as Carbon has suggested, it's sometimes helpful to 'trial' the lift pin method with the engine off and the air filter removed as it can sometimes be hard to feel when the Carb Piston is being raised, though when you have a 'feel' for it all, you'll notice some change in engine revs just as the piston is being raised that 1/32 - 1/16". Note that that this ONLY sets the mixture at Idle. If you do have the right Carb Needle, it will then be correct though the whole Rev and Load Range, however, if it's not the right Needle, the Mixture could be any one's guess.


Is the engine standard or had work done to it?


#6 Spider

Spider

    Moved Into The Garage

  • Admin
  • PipPipPipPipPipPipPipPipPipPipPip
  • 14,580 posts
  • Location: NSW
  • Local Club: South Australian Moke Club

Posted 14 October 2016 - 07:04 PM

Oh and I do like the paint job / colour scheme  :shades: 


#7 carbon

carbon

    Up Into Fourth

  • Members
  • PipPipPipPipPipPipPipPipPip
  • 2,590 posts
  • Location: UK

Posted 14 October 2016 - 07:45 PM

Good point by Moke Spider about checking the distributor is correct for the car. The UK versions of the 1275GT ran either 25D 41257, or 45D 41419. I think both were 10 deg mechanical advance with advance all in by 5000 rpm and 3-10-10 vacuum advance can.


In my experience this distributor is pretty good for a modified fast road 1275 unit, just replace the primary advance spring with a much lighter one and set the static advance to about 8 deg (95 octane) or about 12 deg (99 octane).


#8 Awjunkies

Awjunkies

    Just On Tickover

  • Noobies
  • Pip
  • 8 posts
  • Location: Mississippi

Posted 14 October 2016 - 10:26 PM

I'll try all the carb related issues after I set the timing.

With the inspection plate removed, assuming their are marks how do I set the timing from there?

#9 mikal

mikal

    Mini Mad

  • Members
  • PipPipPipPip
  • 240 posts
  • Location: Melbourne

Posted 15 October 2016 - 12:51 AM

What about the fuel flow rate ?


#10 Awjunkies

Awjunkies

    Just On Tickover

  • Noobies
  • Pip
  • 8 posts
  • Location: Mississippi

Posted 15 October 2016 - 07:03 PM

Here's where I'm at now.

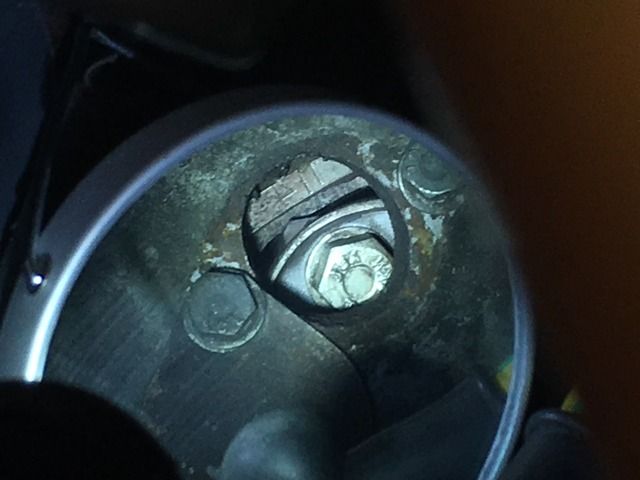
Removed the inspection cover and rotated the wheel until I could see the markings. Looks exactly like all the photos posted and when what I presume is the #4 showing 1/4 pistons are at the top.

What's weird is from my understanding all valve rocker arms should be tight with exception of 1 and 4. Doing the wiggle test, both arms on number 1 are loose however 4 is tight. Also on Pistons 2/3 the rocker arms closest to the radiator have play as much as piston 1.

And last, I did notice a notch on the crank pulley, however when it is in sight piston 1 is at btdc. With the way Pistons 1 and 4 are up and the markings visible on the flywheel the notch on the crank is not.

Next step?

image_5.jpeg

image_4.jpeg

#11 nicklouse

nicklouse

    Moved Into The Garage

  • TMF+ Member
  • PipPipPipPipPipPipPipPipPipPipPip
  • 18,330 posts
  • Location: Not Yorkshire
  • Local Club: Anonyme Miniholiker

Posted 15 October 2016 - 07:26 PM

Ok you have some misunderstanding on what the rockers should be doing when 1/4 are at TDC.

FIRST DISREGARD 2-3 what they are doing does not matter.

One set of rockers should be in contact with the valves and rocking up and down the other set of rockers should not be touching the valves and should free to have some movement.

The piston that is at TDC and on the firing stroke is the one where there is free movement in the rockers. The other has the valves opening and closing.

#12 Spider

Spider

    Moved Into The Garage

  • Admin
  • PipPipPipPipPipPipPipPipPipPipPip
  • 14,580 posts
  • Location: NSW
  • Local Club: South Australian Moke Club

Posted 15 October 2016 - 08:19 PM

The early harmonic Dampers did have a notch in the Pulley 1800 around from the keyway. This is for checking for Damper Failure and for what you're trying to do here, ignore it.


With Nos. 1 & 4 at TDC, the Rockers for 1 & 4, one set will be firm, looking like they are closed (but in fact are not quite) and the other set will have clearance and you'll feel that. Depending on what part of the cycle the engine is on when you check this will dictate which set is loose and which set if firm. The 'loose' set s on the firing stroke.


If you've a timing light, follow the instruction for the light to connect it. Disconnect the Vacuum Advance, set the engine RPMs to 1000 RPM (use the Idle Screw) and set the timing to 130. Check the engine speed again as it will change from adjusting the timing, and then check the timing again. It's a back and forth operation for a few times. To adjust the Ignition timing, slacken the distributor clamp a little and rotate the distributor a little each way and you'll see the timing makes 'move' with the aid of your timing light. Then reconnect the Vacuum Advance and nip up the distributor clamp. The figures I've quoted here are for a 72 to 74 1275GT in standard form.


Also, if in standard form, the correct Needle for the Carb is an ABB with a Red Spring.


#13 Awjunkies

Awjunkies

    Just On Tickover

  • Noobies
  • Pip
  • 8 posts
  • Location: Mississippi

Posted 15 October 2016 - 08:56 PM

Thanks for the clarification.

Moke, I'm pretty familiar with the timing light/distributor process but my issue is that there is not timing tab. The only reference point are the marks on the flywheel.

How would I go about timing it?

And I removed the needle the other day and it has "DZ" stamped on it. Also what spring are you talking about? Only spring I know about is the main one between the jet needle assy and damper and it's not colored.

#14 Spider

Spider

    Moved Into The Garage

  • Admin
  • PipPipPipPipPipPipPipPipPipPipPip
  • 14,580 posts
  • Location: NSW
  • Local Club: South Australian Moke Club

Posted 15 October 2016 - 09:16 PM

You use the Timing Marks on the Flywheel in the same way that you would for those that would be on the Harmonic Balancer. There's the 1/4 mark as you've found and also 5, 10 and 15 degree marks on it.


The needle's a little on the rich side. The Spring that I was referring to is inside the Carb, and fits between the Carb Piston and inside the dashpot Bell


Classic-SU-Carburettor-HS2-Dashpot-Pisto


There's different springs and to differentiate them, they are colour codes, though the colour seems to disappear in a short space of time!


Edited by Moke Spider, 15 October 2016 - 09:18 PM.


#15 Awjunkies

Awjunkies

    Just On Tickover

  • Noobies
  • Pip
  • 8 posts
  • Location: Mississippi

Posted 15 October 2016 - 10:14 PM

Thanks again. I'll time it through the inspection cover then.

Yeah I figured that was the spring, mine is cast colored...all washed off.

As far as the needle goes at the moment my issue seems to be that it runs lean at 3k in all gears. Maybe things will change after I figure out the timing first.

Thanks again


1 user(s) are reading this topic

0 members, 1 guests, 0 anonymous users