Jump to content


Photo
- - - - -

Jdimini Restoration/track Day Toy @ Mill Road Garage Isle Of Wight


  • Please log in to reply
457 replies to this topic

#76 Carlos W

Carlos W

    Mine is purple, but I have been told that's normal

  • TMF+ Member
  • PipPipPipPipPipPipPipPipPipPipPip
  • 10,114 posts
  • Location: Sittingbourne, Kent

Posted 24 August 2016 - 08:39 PM

Hi Ben, the attention to detail for the engine steady is amazing and the bottom of the door and and...  and the subtle coca cola product placement I hope you're getting paid :-)

Nice pic of the fiat, one of the few cars that makes the mini look big 


You must look forward to the daily updates even more than the rest of us


#77 Ben_O

Ben_O

    Mill Road Garage

  • Paint Doctor
  • PipPipPipPipPipPipPipPipPipPip
  • 9,793 posts
  • Location: Isle of Wight

Posted 24 August 2016 - 08:53 PM

Hi Ben, the attention to detail for the engine steady is amazing and the bottom of the door and and...  and the subtle coca cola product placement I hope you're getting paid :-)

Nice pic of the fiat, one of the few cars that makes the mini look big 

Thanks Darren.


I think that was my 5th can of the day. It is like an oven in our bodyshop!


I expect the Fiat will be still sitting there tomorrow if you wanted to take a look. It's currently not running hence why it is there out of the way!


Cheers


Ben


#78 slidehammer

slidehammer

    One Carb Or Two?

  • Members
  • PipPipPipPipPipPipPip
  • 1,162 posts
  • Location: Surrey
  • Local Club: LSMOC

Posted 25 August 2016 - 06:17 AM

Great work as always Ben, and it is good of you to take so much time answering the various questions so thoroughly as it is a bit of a busman's holiday as it your trade rather than hobby like most of us on here. Your replys are as informative and interesting as the actual pictures and the thread its self.

#79 Ben_O

Ben_O

    Mill Road Garage

  • Paint Doctor
  • PipPipPipPipPipPipPipPipPipPip
  • 9,793 posts
  • Location: Isle of Wight

Posted 25 August 2016 - 05:50 PM

Hi all.


I spent the first part of the day going through the removed parts looking for the tower bolts and teardrop mounts for the front subframe but it turns out they are missing so i have ordered new ones


As i wanted to get the subframe fitted so i can align the front panel, i popped out to a nearby mini restoration guru called Frank of Austin Morris services to see if he could oblige but despite searching though stacks or parts could not find any so ill have to wait for the new ones to arrive.


He had a couple of early Mini's in. One restored under a cover and one a bare shell being restored. He also had a Morris Marina GT so it was quite an interesting visit.


Back at the workshop, i made a start on the other door frame. As Colin did the other and took zero photos, i thought i'd just demonstrate with a series of photos how i did this one.


bpZcLc6.jpg


hWYDSSi.jpg


BuXgc78.jpg


Ikxkjql.jpg


ALn3wAb.jpg


7pfYr7W.jpg


lGrPuyU.jpg


l8twGFS.jpg


YjMCZq2.jpg


YQk9HeU.jpg


uJr4QGe.jpg


8MQGFff.jpg


qic8pPA.jpg


IwWM89G.jpg


3yQrkf6.jpg


OViMjPL.jpg


And then i slipped it onto the skin to see how it was shaping up.


JHkMq3m.jpg


No problems at all so now both frames are repaired, ill get them and the skins painted in the morning and then fold the skins onto the frames.


The owners of the Mini Darren and Jack popped over today to have a look. It was great to see you both and i'm glad you are pleased with the progress.


Cheers

Ben


#80 JDImini

JDImini

    Super Mini Mad

  • TMF+ Member
  • PipPipPipPipPipPip
  • 679 posts
  • Location: Guildford

Posted 25 August 2016 - 09:12 PM


Hi Ben, the attention to detail for the engine steady is amazing and the bottom of the door and and...  and the subtle coca cola product placement I hope you're getting paid :-)

Nice pic of the fiat, one of the few cars that makes the mini look big 


You must look forward to the daily updates even more than the rest of us


Hi Carlos, it's like our birthday everyday


#81 Carlos W

Carlos W

    Mine is purple, but I have been told that's normal

  • TMF+ Member
  • PipPipPipPipPipPipPipPipPipPipPip
  • 10,114 posts
  • Location: Sittingbourne, Kent

Posted 25 August 2016 - 09:15 PM


Hi Ben, the attention to detail for the engine steady is amazing and the bottom of the door and and...  and the subtle coca cola product placement I hope you're getting paid :-)

Nice pic of the fiat, one of the few cars that makes the mini look big 


You must look forward to the daily updates even more than the rest of us


Hi Carlos, it's like our birthday everyday


He needs to get his bum back to Kent, there's homebrew to drink and BBQs to have (plus a little bit of work to do on my car)


#82 JDImini

JDImini

    Super Mini Mad

  • TMF+ Member
  • PipPipPipPipPipPip
  • 679 posts
  • Location: Guildford

Posted 25 August 2016 - 09:35 PM

Hi Ben, It was great to come over to the island today to see the car and meet you, where the magic happens. We used to have our summer holidays on the island so it was nice to bring back some of those memories.


Great work on the door. I note the chewing gum repair has gone, did you ever find out what flavour it was :-)


Thanks Darren 


#83 Baldspeed Racing

Baldspeed Racing

    One Carb Or Two?

  • Members
  • PipPipPipPipPipPipPip
  • 1,186 posts
  • Location: Southam

Posted 26 August 2016 - 06:40 AM

That door repair is spot on, defo skills ;D


#84 Ben_O

Ben_O

    Mill Road Garage

  • Paint Doctor
  • PipPipPipPipPipPipPipPipPipPip
  • 9,793 posts
  • Location: Isle of Wight

Posted 26 August 2016 - 08:40 AM

Cheers guys.


Well the cat is now out of the bag on the colour choice.


B5x8Pnc.jpg


dsSXPiY.jpg


I have just finished painting them so once the paint has hardened, ill get the skins on the frames!


Cheers]


Ben


#85 Ben_O

Ben_O

    Mill Road Garage

  • Paint Doctor
  • PipPipPipPipPipPipPipPipPipPip
  • 9,793 posts
  • Location: Isle of Wight

Posted 26 August 2016 - 07:39 PM

With the frames and skins painted, i set about the task of fitting the skins and then getting the doors to fit well.


The doors were removed when i received the car so i had no idea how well they fitted so ill just assume they were good and work to that.


First thing was to put a new anti drum pad on the inside of the skin


LUkTWSa.jpg


Then i laid the frame onto the skin, clamped the top and folded the bottom corners over. This is so that the skin is held tight to the frame for trial purposes but can still be moved if needs be.


Once i had done this, i popped the door on to see what i had to start with


wUklKa5.jpg


8oXFtgI.jpg


The gap to the quarter is far from perfect but not a bad start. At least i know that even gaps are achievable with the frame on the skin in this position


I took the door back off again and folded the skin all the way round.


F9cZQla.jpg


Then welded the top of the skin to the window frame


YHWk49C.jpg


ykO13fG.jpg


I haven't welded the bottom of the skin to the frame at this point so it gives me the option to still move the frame in the skin if needs be


So that's one door 90% complete


Yv1JBrM.jpg


Next, it goes back on the car


ceZVuM2.jpg


At this point, i fitted the catch and striker and fitted an old off cut of door rubber down the back edge to hold the door level with the quarter.

The gap is good enough for now.


So onto the front and fitting the A panel


pNGx272.jpg


With it clamped on, the gap is not too bad. I just need it to be the same width as the back edge at this point


Then I plug welded the A panel tight to the flitch so it can't move allowing me to further tweak the gaps


CJs8Hxl.jpg


And then folded it round the flitch


nhYb0FD.jpg


Now the door can go back on again for more tweaking


hMUd6UV.jpg


It is all level and the swage lines match so i finished welding the A panel to the wing


And this is where ill leave this side for the time being. It will be fettled more during prep.


7aWFYXX.jpg


LcQt6oT.jpg


Then onto the other side


Same process as the other side obviously and here it is after it's first trial fit


rZyoTXI.jpg


And tried the A panel too


23GrBuW.jpg


wHeaLkm.jpg


This side will need a lot more work but as time ran out, ill have to go back to it on Tuesday.


Thanks


Ben


#86 JDImini

JDImini

    Super Mini Mad

  • TMF+ Member
  • PipPipPipPipPipPip
  • 679 posts
  • Location: Guildford

Posted 26 August 2016 - 09:19 PM

Hi Ben it's great to see some colour on the car and it looks brilliant and the work on the doors is amazing


Have a great bank holiday weekend - just means no update until Tuesday evening boo hoo  ;D


#87 JDImini

JDImini

    Super Mini Mad

  • TMF+ Member
  • PipPipPipPipPipPip
  • 679 posts
  • Location: Guildford

Posted 26 August 2016 - 09:27 PM

and to think I thought Jack and I could have a go at reskinning the door OMG it would have been a disaster!


#88 Ben_O

Ben_O

    Mill Road Garage

  • Paint Doctor
  • PipPipPipPipPipPipPipPipPipPip
  • 9,793 posts
  • Location: Isle of Wight

Posted 26 August 2016 - 09:39 PM

Thanks Darren.


Colin is working on it tomorrow so progress will continue. 


We are planning to trial fit the roll cage on Tuesday all being well.


The subframe mounting kit arrived this afternoon so the final piece of the puzzle can go on and then we can prep for paint.


Cheers 


Ben


#89 alchall

alchall

    Super Mini Mad

  • Just Joined
  • PipPipPipPipPipPip
  • 604 posts
  • Location: Chorley

Posted 28 August 2016 - 08:16 AM


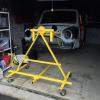
Great work as always, I've just taken delivery of the same rollover jig you're using and your pictures of the shell on the jig have been a great help over the last couple of days as I've been figuring out how to bolt the thing together!

Cheers


I'm not sure that this one is assembled correctly as i have no instructions.

It is supposed to turn easily by hand with one person but we always struggle at the half way point so it needs two of us to do it


Ben


Hi Ben,


Thanks for the call today


Regarding the spit jig we didn't get it setup right, we bought the self loading/balancing tool but it doesn't work when using it for the mini although we weren't told that when we bought it. If you look at the video on the website you can see the drilled "u" shaped part on the front and back should be should be a "u" not "n" as it is at the moment.

Well I know what I mean


Great work as always, I've just taken delivery of the same rollover jig you're using and your pictures of the shell on the jig have been a great help over the last couple of days as I've been figuring out how to bolt the thing together!

Cheers
 
I'm not sure that this one is assembled correctly as i have no instructions.
It is supposed to turn easily by hand with one person but we always struggle at the half way point so it needs two of us to do it
 
Ben
Hi Ben,
 
Thanks for the call today
 
Regarding the spit jig we didn't get it setup right, we bought the self loading/balancing tool but it doesn't work when using it for the mini although we weren't told that when we bought it. If you look at the video on the website you can see the drilled "u" shaped part on the front and back should be should be a "u" not "n" as it is at the moment.
Well I know what I mean

I got no instructions at all with mine either which nacked me off a bit considering the price of the spit. I'll be even more cross if the loading / balancing tool doesn't work either - I went for this option specifically as the pickup shell is very rear heavy so will probably be a big of a pig to spin.

I'll be hopefully getting the shell mounted and spinning later this week so we shall see how it goes.......


Chaps,


I have the jig and the self balancing tool, while I did get instructions I didn't get a full set of nuts and bolts, it took a while to get a response but I did get replacements through in the end.


I found that the shell was difficult to turn on my own at first, however, if I raised it up higher so the centre of gravity is nearer the pivot point it became much easier, I have had to strike a balance between it being high enough to turn easily and low enough to roll in and out of my garage.


I also found that when the car was unbalanced due to having for example the rear corner removed on one side and not the other the car did become trickier to turn, but that makes sense.


The jig side of the mount can go either way up depending on how high you need to get the car.


The self levelling tool shown in the photo looks the same as mine and works, it basically pulls the the mounts at the jig side and the car side closer together (if you can picture that!) to make raising and lowering it easier than having to jack it up manually.


Oh and Ben; great work once again, I've been away on holiday for a week and come back to a lot of catching up on this thread :-)


#90 Ben_O

Ben_O

    Mill Road Garage

  • Paint Doctor
  • PipPipPipPipPipPipPipPipPipPip
  • 9,793 posts
  • Location: Isle of Wight

Posted 28 August 2016 - 09:24 AM

cheers Alchall.


That makes sense. I'll be putting it back on next week so ill have a play around to see if i can get it better.


Darren pointed out that the rotating mounts should go the other way up but he used them this way because he couldn't lift the shell high enough to get it on.


Thanks


Ben


2 user(s) are reading this topic

0 members, 2 guests, 0 anonymous users