Jump to content


Photo

Wet Sand Blasting Results


  • Please log in to reply
9 replies to this topic

#1 jchomme

jchomme

    Stage One Kit Fitted

  • Noobies
  • PipPipPip
  • 99 posts
  • Location: Georgia

Posted 27 June 2016 - 10:16 PM

Just wanted to pass on my results and thoughts on using a Wet sandblaster .


I used a "General Pump High-Pressure Abrasive Blasting Kit" which is basically an attachment that uses your pressure washer's pressure to siphon abrasive media from a bucket connected by a dry hose.  


It is messy, but not dusty and the panels come out really nice. If you contain the area you can reuse the media after it dries in the sun and is funneled out.  I didn't because I used medium grit crushed glass at $8 for 50lbs.  Ended up using about 15 bags.  I didn't contain my area , but the media pretty much was concentrated  just around the mini and under it.  Clean up really isn't too bad and it is non toxic.  


My pressure washer was pretty cheap $275 USD new and didn't need to be the most powerful at 2.5gpm and 3000psi( basic box store gas powered PW).  I like the simplicity of the system. no Compressor required.


Many benefits, no warpage because the water cools as you blast and the pressure is actually quite low.  The finish is very smooth/uniform and the ability to get into tight areas was great.  Also, with using crushed glass, the toxicity is pretty much non existent.  The biggest problem I had with the whole process is final rinsing of all the sand in all the nooks that exist in a mini


As a note, It is possible that my failed attempts at getting the paint off may have helped "soften the paint"  The next time I attempt this, I will probably do a quick scuff up and maybe a non toxic type paint remover before blasting begins.  Also, I might use a paint stripping disk or orbital sander to get the super accessible parts of the panels and use the wet blasting in the corners and inaccessible areas.  Hope to have primer on my project soon!


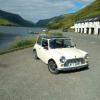
Results of Wet Blasting on my 1960:


20160501_212300_zpszezprvfs.jpg

20160501_212240_zpsqb2fwc68.jpg

20160501_212311_zpsl56o8rqd.jpg

20160501_212407_zpsdkzh4aif.jpg


This photo represents the result of many days, TONS of effort, various disks wheels,media,paint remover, and mental exhaustion.

20160424_172949_zpsgmrgqdek.jpg

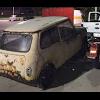
This represents before any work:


47_zpseqfm353c.jpg


Happy to answer any questions on this...


Edited by jchomme, 27 June 2016 - 10:33 PM.


#2 robminibcy

robminibcy

    Camshaft & Stage Two Head

  • Members
  • PipPipPipPipPipPipPipPip
  • 1,516 posts
  • Location: birmingham

Posted 27 June 2016 - 11:08 PM

whilst it may be good at removing paint does this not then leave water in places you really don't want water? I would worry that water could get between panel joints are sit there causing rust to develop.


#3 jchomme

jchomme

    Stage One Kit Fitted

  • Noobies
  • PipPipPip
  • 99 posts
  • Location: Georgia

Posted 28 June 2016 - 06:05 AM

whilst it may be good at removing paint does this not then leave water in places you really don't want water? I would worry that water could get between panel joints are sit there causing rust to develop.


Not really worried about the water at all.  Condensation will do the same.  I did hit everything with a blower and compressed air, and let the sun dry it out. A space heater would probably work too.   


#4 94touring

94touring

    Starting My Mini Up

  • Noobies
  • Pip
  • 3 posts
  • Location: Oklahoma

Posted 28 June 2016 - 08:40 PM

I recently added a wet blaster to my shop. I bought a generac 4200psi 4gpm pressure washer and fitted a Simpson wetblast kit. I bought fine sand in bulk at $3.85 an 80lb bag and use a phosphoric etch and prep afterwards to prep and prevent surface rust. Seems like I can do a full shell in about a day. Definitely a handy tool if you do as many shells as I do.

#5 tiger99

tiger99

    Crazy About Mini's

  • Members
  • PipPipPipPipPipPipPipPipPipPip
  • 8,584 posts
  • Location: Hemel Hempstead

Posted 29 June 2016 - 12:03 AM

Not so sure about the low toxic hazard. There would seem to be a risk of silicosis, especially if using sand, but as glass is mostly silica the same may apply. I would suggest a very good mask of some kind, bearing in mind that very small glass particles will be generated, and have the potential to escape from the water, or become airborne when the residue dries. I certainly would not want glass in my lungs.


 But other than that, a good process. A hot air gun would dry things quickly in odd corners, or you could flush with something that absorbs water, such as acetone, which would also degrease nicely, ready for primer. Or maybe you can apply a water-based etch primer while it is still damp?


#6 94touring

94touring

    Starting My Mini Up

  • Noobies
  • Pip
  • 3 posts
  • Location: Oklahoma

Posted 29 June 2016 - 12:27 AM

The one big reason for switching to wetblast is it's dustless. I wear a face shield to keep media from bouncing back into my face in the few hard spots. The metal should be flushed with a rust inhibitor like the kind I mentioned, dried, then sealer primered.

#7 1984mini25

1984mini25

    Crazy About Mini's

  • Members
  • PipPipPipPipPipPipPipPipPipPip
  • 8,784 posts
  • Location: -

Posted 29 June 2016 - 10:29 AM

Aqua blasting is nothing new...


#8 jchomme

jchomme

    Stage One Kit Fitted

  • Noobies
  • PipPipPip
  • 99 posts
  • Location: Georgia

Posted 29 June 2016 - 08:22 PM

Not so sure about the low toxic hazard. There would seem to be a risk of silicosis, especially if using sand, but as glass is mostly silica the same may apply. I would suggest a very good mask of some kind, bearing in mind that very small glass particles will be generated, and have the potential to escape from the water, or become airborne when the residue dries. I certainly would not want glass in my lungs.


 But other than that, a good process. A hot air gun would dry things quickly in odd corners, or you could flush with something that absorbs water, such as acetone, which would also degrease nicely, ready for primer. Or maybe you can apply a water-based etch primer while it is still damp?

Excellent point, pretty much everything to do with restoring a mini is toxic and it is important to  highlight the risks. You can do a lot of damage to your body.


#9 tiger99

tiger99

    Crazy About Mini's

  • Members
  • PipPipPipPipPipPipPipPipPipPip
  • 8,584 posts
  • Location: Hemel Hempstead

Posted 29 June 2016 - 11:36 PM

Indeed. Used engine oil, for instance. There may still be asbestos in the brake linings of older Minis. No PTFE (Teflon) in an unmodded Mini, but it is deadly if overheated. (Never use Slick 50 or similar in your oil!) Paints and adhesives. Antifreeze and brake fluid. Overheated PVC wiring. Lead, mostly in solder in the cooling system and interior heater. Many now banned substances in plastic bits and chrome plate. Maybe cadmium? Rodent droppings if the Mini has been left in a poor state for a while. Probably many more, but none coming anywhere near to two pack paint...

In my last several jobs there has been great emphasis on avoiding toxic hazards. Not everyone is fortunate enough to be trained by their employer. Such things should be widely known.

#10 94touring

94touring

    Starting My Mini Up

  • Noobies
  • Pip
  • 3 posts
  • Location: Oklahoma

Posted 30 June 2016 - 01:56 AM

Aqua blasting is nothing new...


Neither are minis...


1 user(s) are reading this topic

0 members, 1 guests, 0 anonymous users