Jump to content


Photo
- - - - -

My 1986 Podifold Supercharged Restoration Ground Up


  • Please log in to reply
10 replies to this topic

#1 chris27989

chris27989

    On The Road

  • Noobies
  • PipPip
  • 40 posts
  • Location: Gloucestershire

Posted 17 April 2016 - 09:24 AM

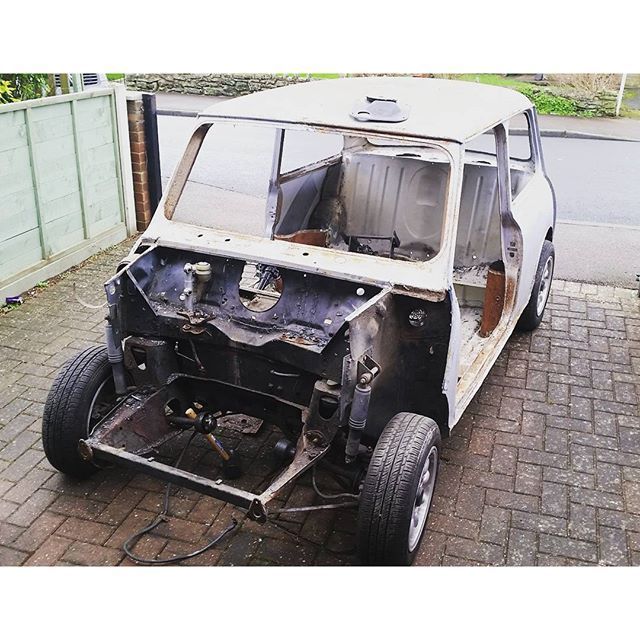
Like all good ideas it started in the pub, I was offered a classic mini shell as restoration project by a friend, which without any hesitation I jumped at the chance.  With a hangover I went looked a the shell and the car had seen better days. All the paint had been stripped off and the engine moved on to another home, surface rust on all the panels, holes in places  a normal person would run away from but a with a hangover my jugdement was clouded to say the least.  I was looking at a car that hadn’t seen love for many years and having always loved minis and tinkering with cars and motorcycle but never have owned a mini. I finally had the chance to own one I said yes; and the little girl was mine.
 
Shell%201_zpsniwly0ln.jpg
 
Shell%202_zpst5f6vlqz.jpg
 
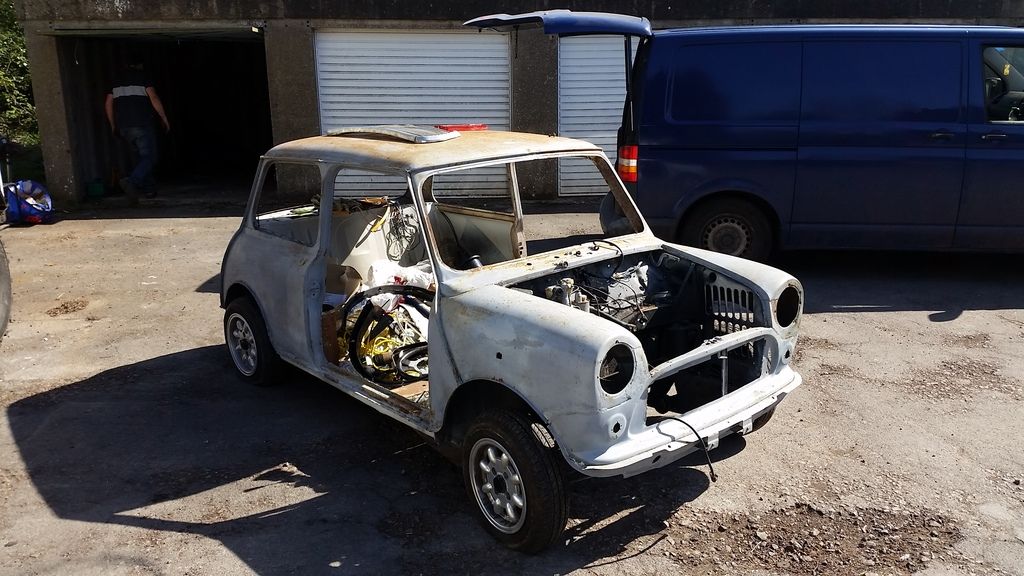
When I got the shell to my house, Then I started getting ideas for the car. Being tall and the mini being tight I decided that to make maintaining the car easier for me, I got the idea of having front of the mini as a complete flip front! So I brought a fibreglass front end for my mini and worked out some measurements and worked out where the front panels on the mini needed cutting to allow for the flip front, Once I was happy I started up the angle grinder and started cutting. Once removed the car looked remarkable!
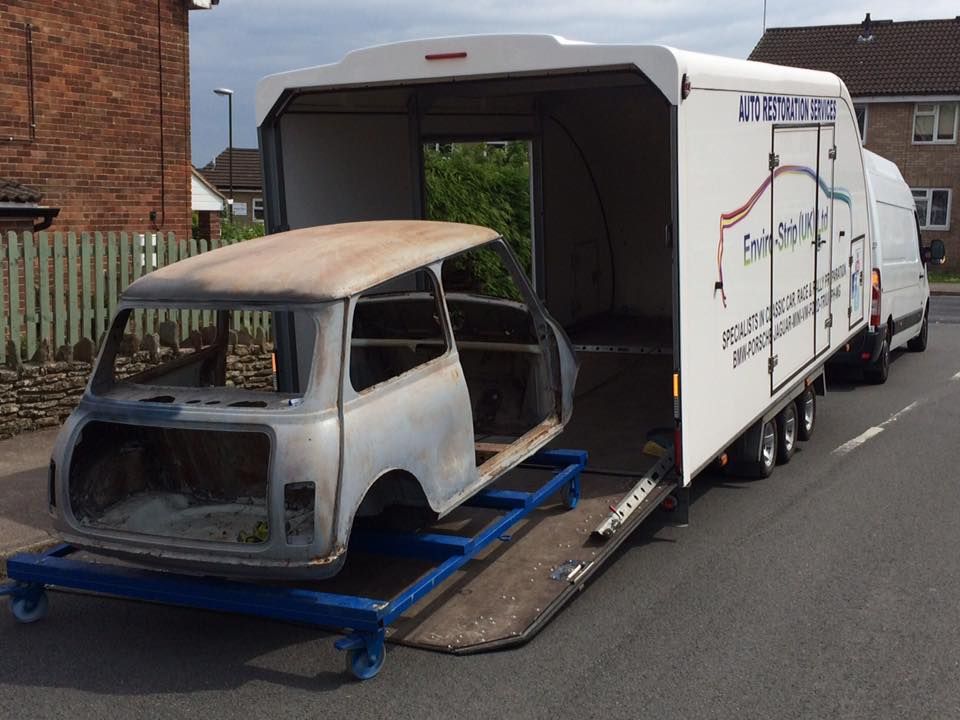
Once that had been done I didn’t want to carry on with any bodywork till the shell had been dipped to remove all rust and epoxy sprayed to help prevent the return of rust. The mini has been booked in to have this process done in 17th May 2016 with enviro-strip in Tamworth and paint by Napstok Customs in the Forest Of Dean. Along with the subframes and  an array of panels which will be replaced including the boot floor pan, the complete floor pan,windscreen scuttle and others. I was lucky enough to buy a pair of doors from a friend who had brought them from http://www.minidoor.co.uk/.
 
12523722_797094027062105_1684771078_n_zp
 
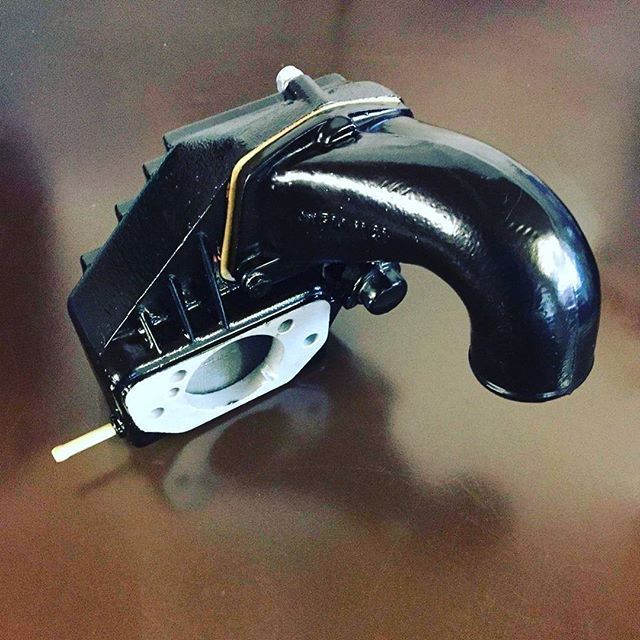
Just because I couldn’t work on the car didn’t mean I had to stop. I started planning the engine; the car originally had a 998cc engine which wouldn’t contend with motorway traffic. So I sourced on eBay a 1275cc mini engine which had over bored to a 1293cc engine. This would have much more power than the 998cc but the engineer in me wanted to make the car better, faster and different so I looked down the route of a supercharger conversion utilising the supercharger from the current BMW Mini John Works range! I managed to find get a prototype manifold from Podifold for a classic mini which could take the supercharger.  And this is where I stand today with my project the mini waiting to be dipped and waiting to save to complete buying the parts needed for the engine and car! SInce I have brought some parts for the car including HIF44 Metro Turbo Carb and Penulm, Omega Forged Pistons with a 18cc Dish.
 
12479440_1692516104329234_385685630_n_zp


12627884_199675867053219_342068258_n_zps


podifold_zpsuzejdqoa.png


As the car moves forward I will update with the progress.


Thanks
Chris


#2 chris27989

chris27989

    On The Road

  • Noobies
  • PipPip
  • 40 posts
  • Location: Gloucestershire

Posted 01 June 2016 - 12:26 PM

Lastest Update the car was collected by enviro-strip UK (http://www.envirostripukltd.com/) for their stripping process to remove paint and rust!

She will come back nice and clean and rust free but holey!


13312667_957318134389198_372290855196681


13342902_957318137722531_763026659161558


Edited by chris27989, 01 June 2016 - 12:27 PM.


#3 chris27989

chris27989

    On The Road

  • Noobies
  • PipPip
  • 40 posts
  • Location: Gloucestershire

Posted 07 July 2016 - 10:21 AM

So last week the car arrived back from the dipping process; I thought the dipping was a good process as it has very minimal clean up compared to other paint and rust removal processes like media blasting. The parts there were dipped where shell, doors, boot, subframes, wheels and the new panels that I brought. The panels still were wiped down with thinners and panel wipe first to remove and grime and handling (greasy hand print) marks that happened that we didn't know about (Even though gloves were worn during whole handle process by us this end). Then epoxy primer could be laid down on the parts and panels. The shell is being prepared this week for primer tomorrow. The front subframe was seam welding for extra strength and to hopefully try and stop any water getting between the metal panels that make up the subframe. The shell did come back with a few more holes and bodged repaired (from previous owners) than expected but these panels will be repaired or replaced.


The 3 processes done for the dipping are:


  • Stage 1 - Paint removal using pyrolysis

  • Stage 2 - De-rusting

  • Stage 3 - Protective Coating

The build is being documented on my Instagram which is chris27989


Thanks

Chris

13632895_10155101469014546_227865420_o_z

13621586_10155101469074546_847385283_o_z

13632822_10155101469009546_1073211284_o_

13621635_10155101469079546_1956835167_o_


#4 podifold

podifold

    Suck through sucks

  • Traders
  • PipPipPipPipPip
  • 376 posts
  • Location: Manchester

Posted 07 July 2016 - 02:12 PM

Love seeing things being done properly. Keep up the good work.


#5 chris27989

chris27989

    On The Road

  • Noobies
  • PipPip
  • 40 posts
  • Location: Gloucestershire

Posted 07 July 2016 - 03:35 PM

Thanks Jon. My philosophy for everything is over engineer and do it properly first time, so you don't have go back to it and make more work for yourself!

#6 fwdracer

fwdracer

    Mini Mad

  • Members
  • PipPipPipPip
  • 269 posts
  • Location: UK
  • Local Club: Mini7 Racing Club

Posted 08 July 2016 - 12:25 PM

Word to the wise. This stripping process removes paint between the spot weld seams and panel overlaps, very difficult to add the protection back unless the shell is dipped and E-coated.


#7 69k1100

69k1100

    Speeding Along Now

  • Members
  • PipPipPipPipPip
  • 376 posts
  • Location: Adelaide

Posted 08 July 2016 - 01:21 PM

Unlikely the panels were painted prior to spot welding. They were roto dipped after assembly. The hinges on the mk1 didn't even have paint under them.

Biggest concern is the hollow sections that would have had some form of coating left over from the roto dip, such as the a pillars, front cross member, seat cross member and the sills. Unless enviro strip uses a similar method for their "protective coating" in which case I wouldn't stress. Probably no less coverage that BMC at their peak.

#8 fwdracer

fwdracer

    Mini Mad

  • Members
  • PipPipPipPip
  • 269 posts
  • Location: UK
  • Local Club: Mini7 Racing Club

Posted 08 July 2016 - 02:18 PM

E-coat is applied post spot welding. This gets between the seams (electrostaically attracted to all exposed surface) and after top coat and seam sealer does a good enough job of corrosion resistance-it isn't brilliant even from the factory hence our favourite little car propensity to rust.


Dipped shells, unless re-E-coated lose this vital protection. I've seen plenty of resto horror stories with corrosion bleeding out of these areas-on exotic stuff that has been dipped as stating point for 6 figure restoration jobs (Alfas/E-Types). Seeing as the OP is intent on making a proper job of his resto, it'd be remiss not to pass on the info and other peoples experience.


Only way to do it properly is to repeat as closely as possible the factory E-coat. I suspect the people that stripped his shell can do this after it has had all welding repairs completed. For the record, this is one reason why I'd never part with my hard earned for a heritage shell. The corrosion protection is laughable-not even as good as when the cars originally left the factory...


Rota Dip was used on CKD. Full tank E-coat immersion at Longbridge.


Edited by fwdracer, 08 July 2016 - 02:24 PM.


#9 chris27989

chris27989

    On The Road

  • Noobies
  • PipPip
  • 40 posts
  • Location: Gloucestershire

Posted 09 July 2016 - 07:14 AM

When a section was cut out of the sill; post dipping the inner of the sill was completely clean as expected from the dipping process.

But due to the extent of the holes in the car the sills and a pillars need replacing. So all new panels will be e-coated and seam sealed and spot welded back in place. So the small void in between panels will be coated to prevent the return of the rust.

So hopefully the car will be better protected then when she first left the product line back in 86!

#10 fwdracer

fwdracer

    Mini Mad

  • Members
  • PipPipPipPip
  • 269 posts
  • Location: UK
  • Local Club: Mini7 Racing Club

Posted 11 July 2016 - 07:29 AM

Spraying the flanges with weld thru zinc primer prior to the spot welding will help massively. Then spray Dinitrol into the closed box sections after the shell has been through the paint booth.


I've done a ground up restoration as you are doing (also on an '86), and the thought of corrosion coming back was enough to drive me to extreme lengths to ensure it didn't, used Dinitrol inside on everything that wouldn't be seen by a spray gun, inside A-pillars, bulkhead cavities etc.


Figured that the extra few kilos in cavity wax would be a small price to pay to ensure I was driving and enjoying it in 10 years time. Good luck with your resto and be assured that you will produce something better mprotected than that which rolled out of Longbridge in '86..


#11 chris27989

chris27989

    On The Road

  • Noobies
  • PipPip
  • 40 posts
  • Location: Gloucestershire

Posted 01 August 2016 - 07:47 AM

Another update.


Started cleaning and decontaminating the shell ready for the epoxy protective coat but after removing the external seam trim panels there was still a small amount of corrosion. So I decided instead of spending hours cleaning the seams and wasting time. I booked the car into the local sandblaster to get all the seams blasted and all the parts that needed a good key for the epoxy coat.


Between making the decision and getting it to the sandblaster I had a day free so started cutting out some of the panels which had holes in; for three reasons

1. I had the free time.

2. Save money on paint as the epoxy is about £20 a litre.

3. Gave the blaster more angles to get to the areas that needed blasting.


Good a few free hours this week before work so the shell is geting flipped over ready for some more paint again to get better angles for paint coverage.

Areas on the shell that are being replaced are either being cut out or only mist coated to save cost on paint,


Cleaning

Cleaning_zpsfkarx256.png


Cutting

Cutting_zpsgjb1hrey.png


Blasting

Blasting_zpsfcdoxvsi.png


Epoxy Coat

Epoxy_zpsezckh6ib.png


1 user(s) are reading this topic

0 members, 1 guests, 0 anonymous users