Tom, I think the XXXXX you are referring to on the diff pin was put there as standard to help with lubrication. Mine was like that too. I replaced it with a hardened diff pin from minispares which I don't recall having them.


Rolling Snot
Started by
Tomf
, Aug 12 2006 03:30 PM
890 replies to this topic
#496

T.Harper
-
- TMF+ Member
-

- 714 posts
One Carb Or Two?
- Location: New Jersey
Posted 22 May 2008 - 02:00 AM
#497
Tomf
-
- Traders
-
- 6,440 posts
Baby Tom
Posted 22 May 2008 - 10:32 PM
Cheers, yea you are correct, i made another thread asking about it and found its an early diff and the xxxx are used for lubricating.
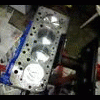
Well today i sorte the diff out, changing the gaskets and fitted that, i then put a gasket on the block and put the gearbox in place, but i couldnt find the bolts anywhere so i had to take some of my spare engine, which i didnt really want to do as i was planning on re-building this once i was done... So i took the bolts off and nipped the bolts up, but i couldnt find the torque figures anywhere in the hanes.
Thats as far as i got today as i had other things to do, but if i get the chance tommorow ill get the get the flywheel casing on, and fit the flywheel i cant wait to get the engine up and runnin now.
Well today i sorte the diff out, changing the gaskets and fitted that, i then put a gasket on the block and put the gearbox in place, but i couldnt find the bolts anywhere so i had to take some of my spare engine, which i didnt really want to do as i was planning on re-building this once i was done... So i took the bolts off and nipped the bolts up, but i couldnt find the torque figures anywhere in the hanes.
Thats as far as i got today as i had other things to do, but if i get the chance tommorow ill get the get the flywheel casing on, and fit the flywheel
i cant wait to get the engine up and runnin now.
#498
Tomf
-
- Traders
-
- 6,440 posts
Baby Tom
Posted 25 May 2008 - 08:03 AM
Well im getting there now. I got the flywheel casingback on, i then fitted the gear thing (forgotten the name) then got the lightened flywheel, spaced it out on the backplate, so its sitting right, but some of the matal tabs have bent, so ill have to ordersome more of them before i blot theflywheel tothe backplate propperly, but i then torqued up the flywheel.
So now all i have to do it order the flywheel tabs,fit them. Then fit the head and the engine should be ready to go back in.
But ill clean up the bulkhead before i do that.
So now all i have to do it order the flywheel tabs,fit them. Then fit the head and the engine should be ready to go back in.
But ill clean up the bulkhead before i do that.
#499
Tomf
-
- Traders
-
- 6,440 posts
Baby Tom
Posted 29 May 2008 - 01:07 AM
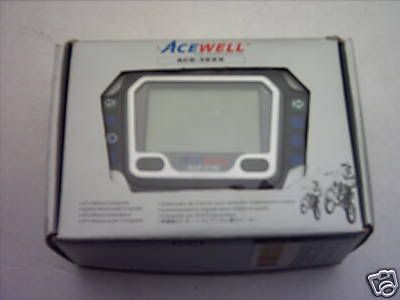
Just got a bit of an ebay bargin, i got a brand new ACEWELL ACE-37XX for £50
#500
Down&Out
-

- Traders
-
- 4,851 posts
The King Of Retro Cool
- Location: -
Posted 29 May 2008 - 03:15 PM
and chance of a guide on making fg dashboards? because im gunna be doing it 
#501
photographymatt
-

- Members
-
- 240 posts
Mini Mad
- Local Club: shropshire BMC
Posted 29 May 2008 - 03:26 PM
oh tom...that will be interesting....very groovy indeed. From the looks of it(on their website and others too)...should be too hard to fit, but thats from my limited knowledge....you willhave no worrys:-D hehe
#502
Tomf
-
- Traders
-
- 6,440 posts
Baby Tom
Posted 29 May 2008 - 03:47 PM
and chance of a guide on making fg dashboards? because im gunna be doing it
I finished the guie a few pages back, to as far as i will be going, but if you was to mass prouce the dashboard, you would cover it in relise was, then apply a gel coat, the fiberglass over that. Then once this has sent, remove this and you have a mounld.
From this you can apply relise was to the inside and then, gel coat, then fiberglass, and you have a finished dashboard that you could sell...
Hope that helps a bit.
Yea it doesnt seem to hard to get the digi dash working, im just trying to decide weather to fit it to the magnetic sensor to the pot joint or the rear break, shouldnt be to hard to sort though
#503
kcchan
-

- Members
-
- 874 posts
One Carb Or Two?
Posted 29 May 2008 - 04:21 PM
Tom, what did you use to make your plug? It looks like masking tape of some sort. Did you just tape it on? Im going to do mine soon.
#504
Tomf
-
- Traders
-
- 6,440 posts
Baby Tom
Posted 30 May 2008 - 03:02 PM
plug... what plug are we talking about?
#505
kcchan
-
- Members
-
- 874 posts
One Carb Or Two?
Posted 30 May 2008 - 07:51 PM
The stuff that you used to "fill" the dash with. You even called it a plug in the guide you made, you silly billy.
#506
Down&Out
-
- Traders
-
- 4,851 posts
The King Of Retro Cool
- Location: -
Posted 30 May 2008 - 08:25 PM
yeah it was just masking tape mate  taped to top and bottom rails and glassed over
taped to top and bottom rails and glassed over
#507
Tomf
-
- Traders
-
- 6,440 posts
Baby Tom
Posted 31 May 2008 - 09:33 AM
Yea i just used tape , you could use card to give a smoother finish to it, but as my dash was all coming forward the finish of that didnt matter...
So just either cover the hole with masking tape, or you could use card and tape this in place...
, you could use card to give a smoother finish to it, but as my dash was all coming forward the finish of that didnt matter...So just either cover the hole with masking tape, or you could use card and tape this in place...
#508
dan_w
-
- Members
-
- 152 posts
Mini Mad
- Local Club: Not yet!
Posted 03 June 2008 - 11:08 PM
Hi Tom, what a great looking Mini you have there.
I have seen a couple of pics previously but only just had a chance to read your progress thread. Seems like you like to change your mind allot lol. I am loving the subtle race look you have, it’s a similar look I am going to try and achieve. Fingers crossed.
I have seen a couple of pics previously but only just had a chance to read your progress thread. Seems like you like to change your mind allot lol. I am loving the subtle race look you have, it’s a similar look I am going to try and achieve. Fingers crossed.
#509
Tomf
-
- Traders
-
- 6,440 posts
Baby Tom
Posted 04 June 2008 - 02:01 PM
Thanks i just had a look through you project looks like its going to be nice, also i see you are in kent, where about are you? im in Canterbury.
Yea i do change my mind alot but thats the only way i can make the mini exactly how i want it
Small update, the engine is back together bar the head, so ill fit that when i get the chance and adjust the tappets then it will be ready for fitting.
Also when i fitted the diff i didnt bother changing the final drive wheel as it had the same amount of teeth, but i think i will get the diff out and change that over as the originals would have worn to suit each other.
Also i recived my machined down discs from MRA minis today and they are looking really good. I also got 4 nuckly joints so when i9 lower the mini down ill fit them at the same time, as when i fitted the hi-lows before i just used the old knuckles.
Next thing iv got to do is get the generator down to when my mini is do i can get the wire brush on my griner and clean up the bulkhead ready for painting, whilst im at it ill also do the floor i think.
Also i found in my toold box that i was give there is a pot joint splitter, which annoyed me a bit as i was only able to get one poitoint out when taking the engine out as they were hard to get to, so i had to cut the inner CV on the other side. But o well atleast now i know i have one so when i take engines out other minis i know i will be able to split the pot joint off the diff.
i just had a look through you project looks like its going to be nice, also i see you are in kent, where about are you? im in Canterbury.Yea i do change my mind alot
but thats the only way i can make the mini exactly how i want it Small update, the engine is back together bar the head, so ill fit that when i get the chance and adjust the tappets then it will be ready for fitting
.Also when i fitted the diff i didnt bother changing the final drive wheel as it had the same amount of teeth, but i think i will get the diff out and change that over as the originals would have worn to suit each other.
Also i recived my machined down discs from MRA minis today and they are looking really good. I also got 4 nuckly joints so when i9 lower the mini down ill fit them at the same time, as when i fitted the hi-lows before i just used the old knuckles.
Next thing iv got to do is get the generator down to when my mini is do i can get the wire brush on my griner and clean up the bulkhead ready for painting, whilst im at it ill also do the floor i think.
Also i found in my toold box that i was give there is a pot joint splitter, which annoyed me a bit as i was only able to get one poitoint out when taking the engine out as they were hard to get to, so i had to cut the inner CV on the other side. But o well atleast now i know i have one so when i take engines out other minis i know i will be able to split the pot joint off the diff.
Edited by Tomf, 04 June 2008 - 02:04 PM.
#510
Down&Out
-
- Traders
-
- 4,851 posts
The King Of Retro Cool
- Location: -
Posted 04 June 2008 - 03:53 PM
thats what i do lol.. im constantly changing my mind!Yea i do change my mind alot


2 user(s) are reading this topic
0 members, 2 guests, 0 anonymous users


