Jump to content


Photo
- - - - -

Re-Build And Re-Fit A Subframe


  • Please log in to reply
11 replies to this topic

#1 JonnyAlpha

JonnyAlpha

    Up Into Fourth

  • Members
  • PipPipPipPipPipPipPipPipPip
  • 2,748 posts
  • Location: North Devon
  • Local Club: Exmoor Minis

Posted 18 August 2015 - 07:48 AM

Ladies and Gents;


I am about to rebuild and refit my Subframe, does anyone have a guide or top tips that I can look at to help.


Help with things like:


1. How to replace the Handbrake Cable (Handle to Rear Brakes).

2. How much grease, what and where, Hand Brake Cable, Trunnions, Bolts moving parts etc).

3. Fitting and bleeding the brake parts (Cylinders, Pipes etc).

4. What size and grade bolts for the Wheel Arch Subframe mounts.

5. Do I put anything between the Radius Arm and the Backplate (It's separated by 3 washers, one or two of which are doubled up in lieu of a spacer that is no longer available. i.e. do I fill the gap with sealant??


Also which is easier building the Subby on the floor and then fitting it to the car or fitting the bare Subby to the car and then building it?


Any help would be mucho appreciated :-)


The Car is an Austin HLE 1000, Drum Brakes all around and single brake line from front to rear. Handbrake cable is in two pieces, single line from Handbrake to front of Subby then attaches to another cable that connects to both rear wheels.


Iv'e got Copper Grease in a small tube and Lithium Grease and a hand pull Grease Gun.


Thanks


#2 Blatherskite

Blatherskite

    Super Mini Mad

  • Members
  • PipPipPipPipPipPip
  • 501 posts
  • Location: Bærum
  • Local Club: Norsk Mini Cooper Club

Posted 18 August 2015 - 05:18 PM

Build it off the car. Access is easier, and at the end you can paint / underseal / waxoil it properly on all surfaces. If you're fitting brake lines, you can get a nice fitup easier not being underneath as well, but remember routing & connection points to the car. Brakes you need to bleed once on the car, naturally.

#3 JonnyAlpha

JonnyAlpha

    Up Into Fourth

  • Members
  • PipPipPipPipPipPipPipPipPip
  • 2,748 posts
  • Location: North Devon
  • Local Club: Exmoor Minis

Posted 20 August 2015 - 08:20 PM

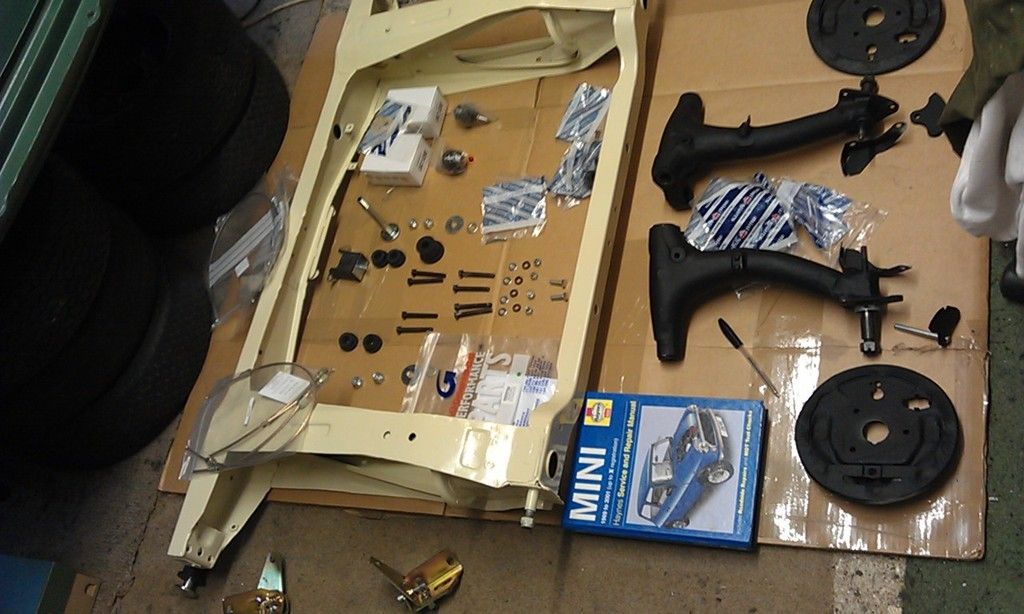
To carry on with this here are all the bits (some nuts and bolts missing) however I need some advice on putting it all back together.


IMAG0791_zps1afso65j.jpg


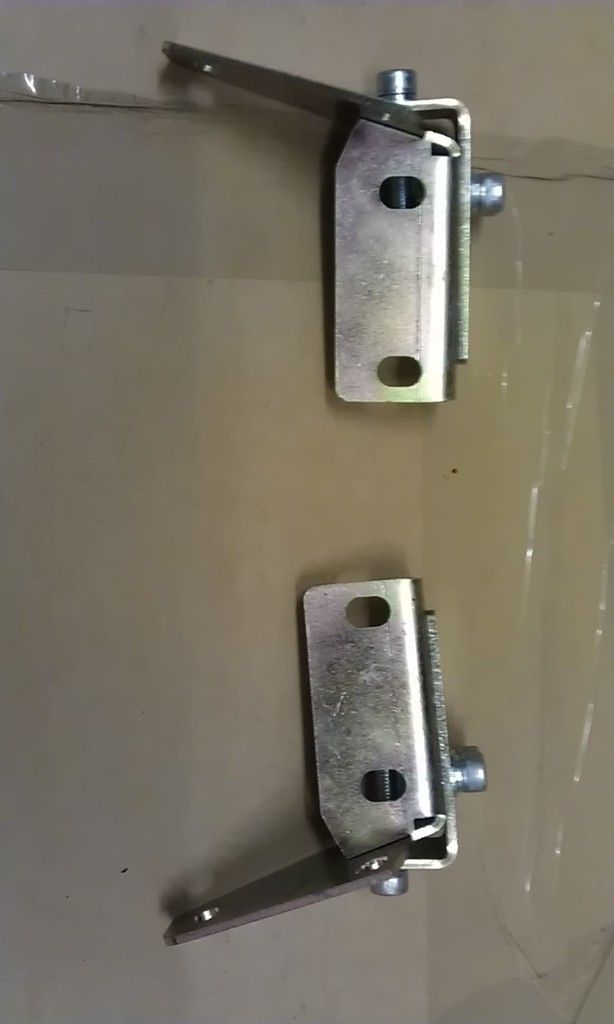
I have these adjustable Camber Brackets but have been advised that they will rust, I don't really want to paint them but could I Plasti Kote them?


IMAG0779_zpsy2ifhxim.jpg


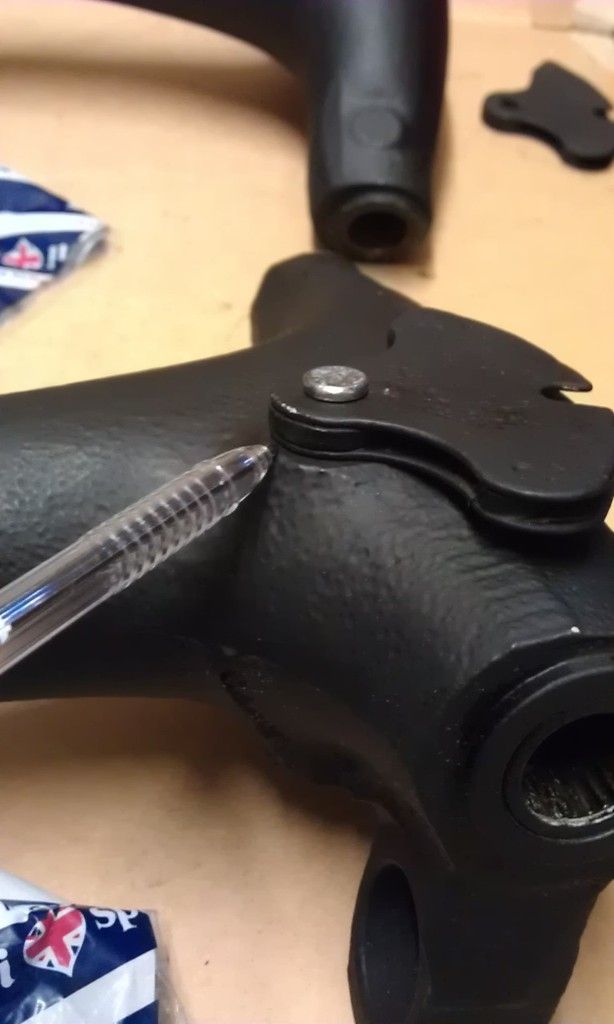
On the rear quadrants, I have new pins and the washers and split pins for the bottom but should there be a washer between the quadrant and the Radius Arm, here:


IMAG0784_zpsaxxmpoax.jpg


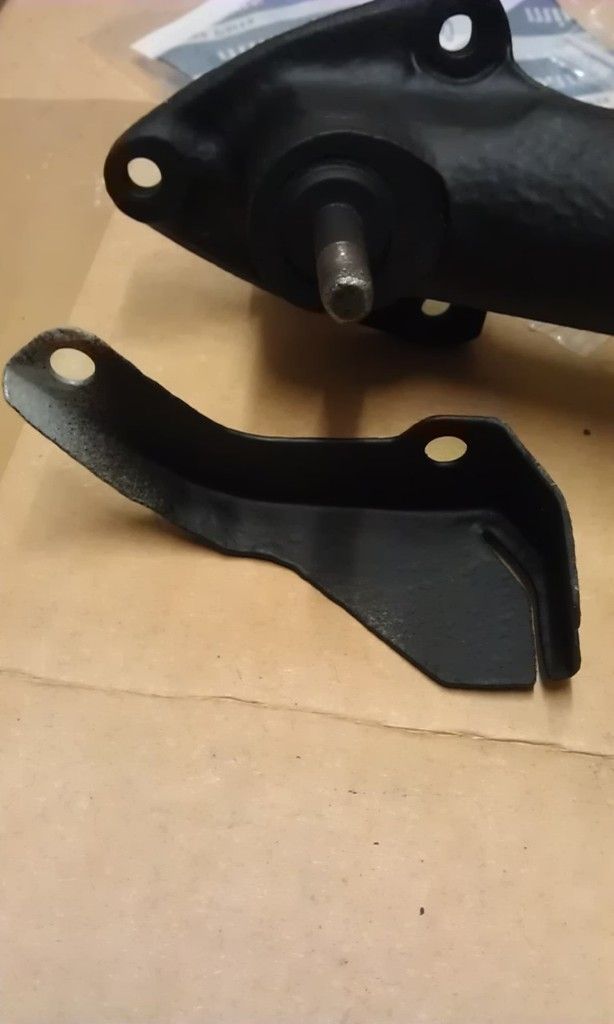
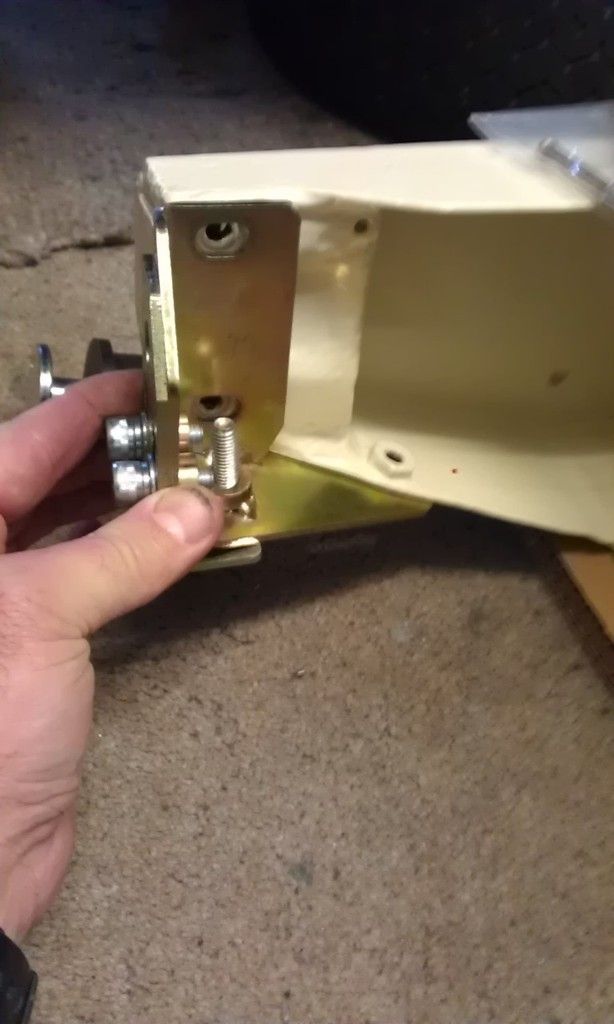
This is a picture of the Left Hand Radius Arm, this bracket fits here on the underside I think??


IMAG0785_zpswqbqu0u2.jpg


I managed to fathom out that the Camber Bracket fits here but the bolts where discarded when I stripped it all down, I have worked out from looking on the Minispares pages that they should be secured to the Subframe with 5/16 x 3/4 UNF bolts, but there is a note saying that some people use 5/16 x 1 inch, any reason why and what grade should the bolts be as I may try and get them locally tomorrow?


IMAG0789_zpspstdkile.jpg


Also any advice on bending Cupronickle or Copper Brake Pipes, without damaging them?


Thanks 


#4 Spider

Spider

    Moved Into The Garage

  • Admin
  • PipPipPipPipPipPipPipPipPipPipPip
  • 14,498 posts
  • Location: NSW
  • Local Club: South Australian Moke Club

Posted 20 August 2015 - 08:39 PM

I tend to feel that building up the rear subframe is a reasonable easy, straight forward job - hopefully that's not famous last words!


I would recommend putting something on the threads of all the bolts when fitting them up so they are much less likely to seize or rust, in fact, I just put a smear between nearly all parts, being mindful of the rubber bits. I just use chassis grease for this, but I will also say I am not UK based, so we don't have the same rust issues you guys seem to 'enjoy'.


In regards to the Handbrake Quadrant, there is no washer between the Quadrant and the Arm according to the UK Parts Book, however, if one can be fitted, I'd be doing so.


There were 1 x Flat Washer per Bolt fitted between the Handbrake Cable Bracket and the Trailing Arm, to effectively space the Bracket off the Arm by the thickness of a Washer.


#5 JonnyAlpha

JonnyAlpha

    Up Into Fourth

  • Members
  • PipPipPipPipPipPipPipPipPip
  • 2,748 posts
  • Location: North Devon
  • Local Club: Exmoor Minis

Posted 20 August 2015 - 09:50 PM


There were 1 x Flat Washer per Bolt fitted between the Handbrake Cable Bracket and the Trailing Arm, to effectively space the Bracket off the Arm by the thickness of a Washer.


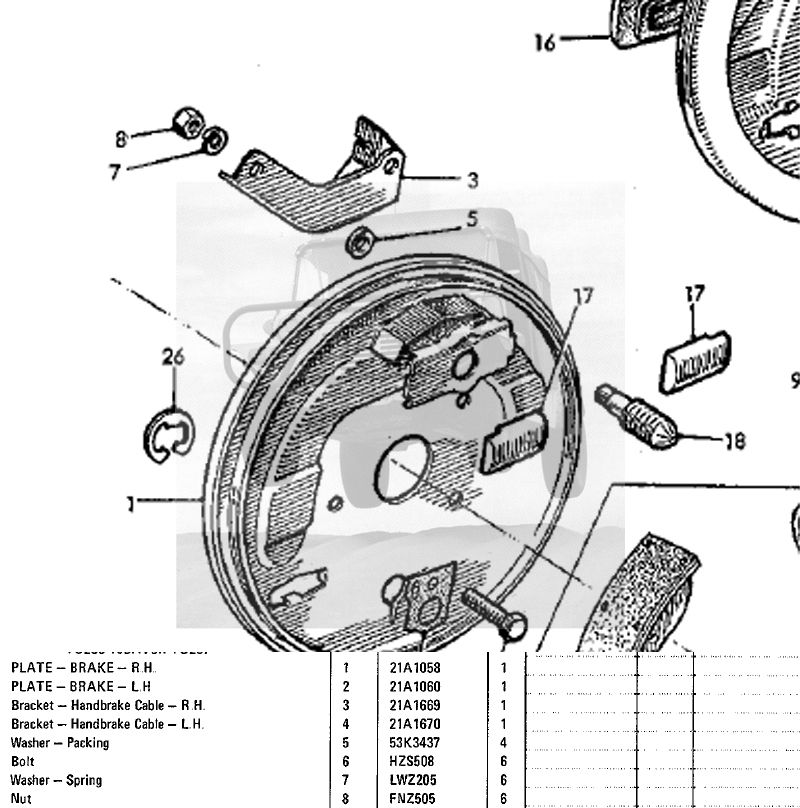
According to the Somerford catalogues here there is a 'distance piece' between the Handbrake Bracket and the Trailing Arm but only 4 per car, I think they are placed on the two bolts towards the front? I found that these are no longer available and 5/16 flat washers are used instead (2 x per bolt). I just found an email that said the spacers are fitted on the 2 x lower bolts? Not all of them?


#6 Spider

Spider

    Moved Into The Garage

  • Admin
  • PipPipPipPipPipPipPipPipPipPipPip
  • 14,498 posts
  • Location: NSW
  • Local Club: South Australian Moke Club

Posted 20 August 2015 - 10:25 PM


There were 1 x Flat Washer per Bolt fitted between the Handbrake Cable Bracket and the Trailing Arm, to effectively space the Bracket off the Arm by the thickness of a Washer.


According to the Somerford catalogues here there is a 'distance piece' between the Handbrake Bracket and the Trailing Arm but only 4 per car, I think they are placed on the two bolts towards the front? I found that these are no longer available and 5/16 flat washers are used instead (2 x per bolt). I just found an email that said the spacers are fitted on the 2 x lower bolts? Not all of them?


This is from the Factory Parts Book;-


BrakeBackingPlateAssyWM_zpscthsfazj.jpg


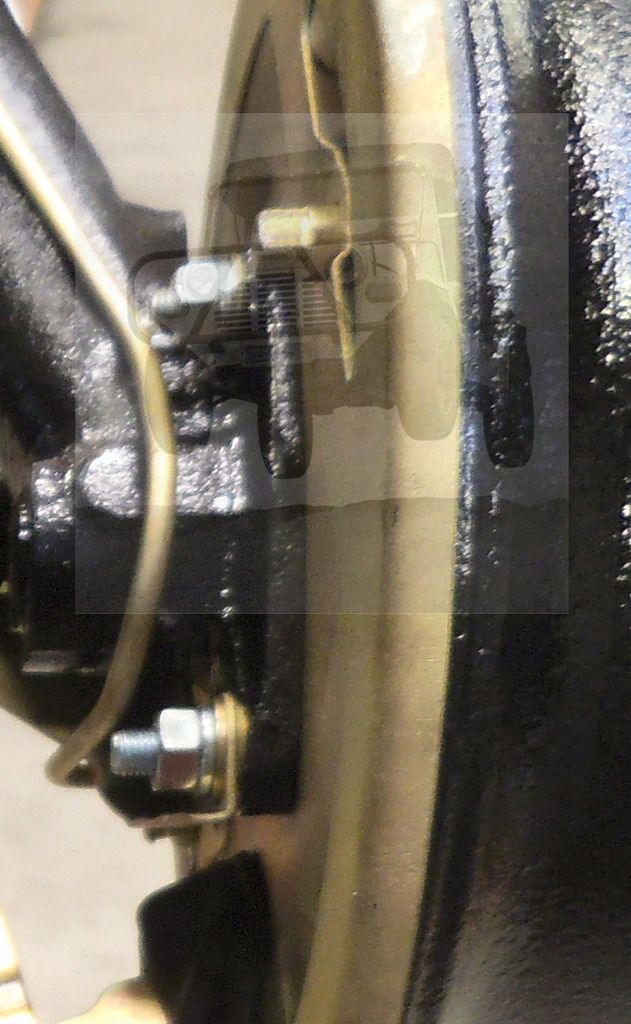
and one fitted up (sorry it's not the best picture);-


HandbrakeBrktToArmWM_zpsjvt7r1f6.jpg


#7 spiguy

spiguy

    Camshaft & Stage Two Head

  • Members
  • PipPipPipPipPipPipPipPip
  • 1,537 posts
  • Location: UnderTheCar

Posted 20 August 2015 - 11:58 PM

If you really don't want to paint bits, then I suggest you cover everything well with Bilthamber Dynax UC wax. It is a clear wax and if you take your time and build up many thin coats, it is totally transparent. Works really well too. I have it everywhere on the underside of my car, and having put it on an unpainted vent blanking plate, the metal is still shiny as new as are the bolt heads, after being on the car for many months. It's great stuff.


I put it on all exposed threads , nuts, bolts etc and it stops any corrosion taking place, but everything looks like new.


Edited by spiguy, 20 August 2015 - 11:58 PM.


#8 JonnyAlpha

JonnyAlpha

    Up Into Fourth

  • Members
  • PipPipPipPipPipPipPipPipPip
  • 2,748 posts
  • Location: North Devon
  • Local Club: Exmoor Minis

Posted 21 August 2015 - 07:33 AM


There were 1 x Flat Washer per Bolt fitted between the Handbrake Cable Bracket and the Trailing Arm, to effectively space the Bracket off the Arm by the thickness of a Washer.


According to the Somerford catalogues here there is a 'distance piece' between the Handbrake Bracket and the Trailing Arm but only 4 per car, I think they are placed on the two bolts towards the front? I found that these are no longer available and 5/16 flat washers are used instead (2 x per bolt). I just found an email that said the spacers are fitted on the 2 x lower bolts? Not all of them?


This is from the Factory Parts Book;-


BrakeBackingPlateAssyWM_zpscthsfazj.jpg


and one fitted up (sorry it's not the best picture);-


HandbrakeBrktToArmWM_zpsjvt7r1f6.jpg


Sorry Spider;


My confusion, of course the bracket is only secured on two of the bolts, so 4 5/16 washers two for each bracket will suffice :-)


#9 Spider

Spider

    Moved Into The Garage

  • Admin
  • PipPipPipPipPipPipPipPipPipPipPip
  • 14,498 posts
  • Location: NSW
  • Local Club: South Australian Moke Club

Posted 21 August 2015 - 08:03 AM

I've just looked at the Somerford's site and while it lists the same P/N it uses a different description. Yeah, only need 4  :-) 


#10 JonnyAlpha

JonnyAlpha

    Up Into Fourth

  • Members
  • PipPipPipPipPipPipPipPipPip
  • 2,748 posts
  • Location: North Devon
  • Local Club: Exmoor Minis

Posted 21 August 2015 - 12:28 PM

Picked up some nuts and bolts from Talors Fasteners but they only had 1.5 Inch :-) so i'll have to cut them down. I did find some 3/4 and 1 inch 5/16 bolts in my garage (new) but I want to make sure of the grade before I use them. 


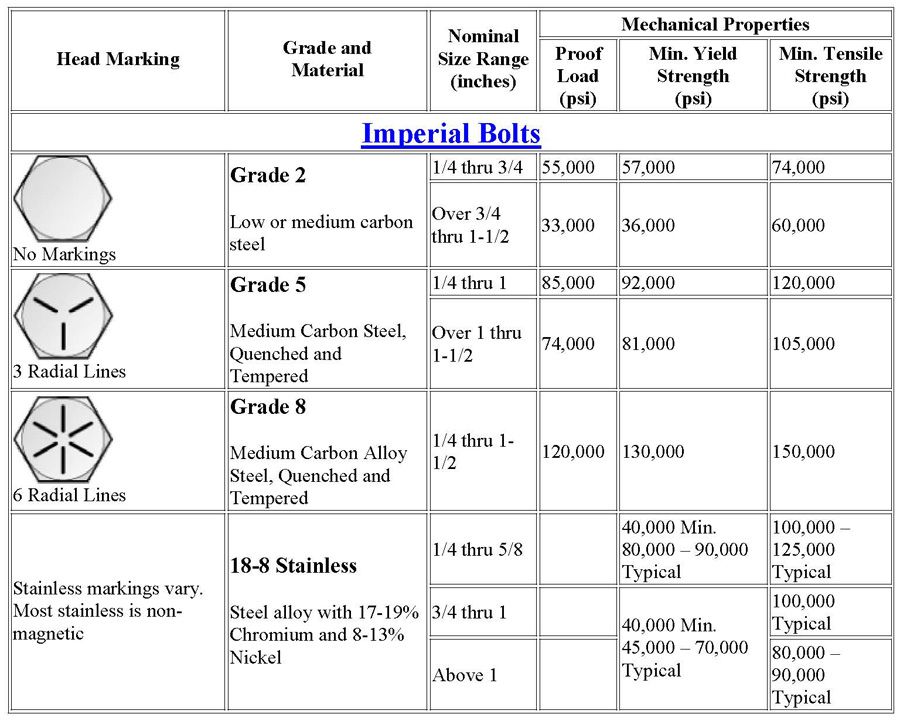
I thought I had read somewhere that the bolts used on the Subframe should be Grade 8, can someone confirm this?


When trying to identify some of the bolts in my garage I found on Google that grade 8 bolts have 6 lines on the head pointing to the centre, the ones i just bought only have 3 lines making them Grade 5. I did ask in the shop and was told that they were Grade 8.


On the head of the ones in  my garage they are marked ODB and the A underneath, a quick google search showed nothing except that these are possible low grade general usage bolts or the marking is manufacturer unique, which, unless you know the manufacturer does not help!!!


Any ideas? 


What grade are the bolts sold by Minispares here ?


Thanks


Edited by JonnyAlpha, 21 August 2015 - 12:55 PM.


#11 Spider

Spider

    Moved Into The Garage

  • Admin
  • PipPipPipPipPipPipPipPipPipPipPip
  • 14,498 posts
  • Location: NSW
  • Local Club: South Australian Moke Club

Posted 21 August 2015 - 08:33 PM

The Grade of fasteners used in the factory were a combination of Grade 5's and Grade 8's depending on what the fastener is called upon to do, but mostly you'll find Grade 5. They did this to save costs. When I purchase fasteners, I usually buy Grade 8, there's little cost difference in small quantities and then they do just about everything. Keep in mind though that the Higher Tensile Grade Bolts don't like bending and will usually break, so they are not necessarily a wise choice for a Shock Mount, though in many cases, if the fastener is tight enough, it won't bend.


I would recommend against the cutting down of fasteners, only for the reason of rust, you could always have them re-plated, however why not buy a kit from A Series Spares? I'm unsure if they have a specific rear subframe kit, but I'm sure they'll help you out. While on plating, if you have a choice of plating types, you guys in the UK would benefit from using Nickel Plated Fasteners.


Also, be aware that there are differences between Bolts and Set Screws when ordering fasteners, bolts usually only have about 1" of thread, where as set screws are threaded all the way up to the head. While it maybe tempting to purchase set screws for everything, for some items, these could be dangerous as the thread can have a cutting effect on parts, so for one example, the front tie bar to lower arm used a bolt to that the threads don't cut in to the tie bar.


On that, there are also a few fasteners throughout the car that are special and only genuine ones should be used for (the tie bar one in the above example for one).


Here's a chart you may find handy;-


BoltHeadMarkings_zpsa2d0f72e.jpg


Like nearly everything, nothing's ever straight forward.


Edited by Moke Spider, 21 August 2015 - 08:37 PM.


#12 JonnyAlpha

JonnyAlpha

    Up Into Fourth

  • Members
  • PipPipPipPipPipPipPipPipPip
  • 2,748 posts
  • Location: North Devon
  • Local Club: Exmoor Minis

Posted 21 August 2015 - 09:00 PM

The Grade of fasteners used in the factory were a combination of Grade 5's and Grade 8's depending on what the fastener is called upon to do, but mostly you'll find Grade 5. They did this to save costs. When I purchase fasteners, I usually buy Grade 8, there's little cost difference in small quantities and then they do just about everything. Keep in mind though that the Higher Tensile Grade Bolts don't like bending and will usually break, so they are not necessarily a wise choice for a Shock Mount, though in many cases, if the fastener is tight enough, it won't bend.


I would recommend against the cutting down of fasteners, only for the reason of rust, you could always have them re-plated, however why not buy a kit from A Series Spares? I'm unsure if they have a specific rear subframe kit, but I'm sure they'll help you out. While on plating, if you have a choice of plating types, you guys in the UK would benefit from using Nickel Plated Fasteners.


Also, be aware that there are differences between Bolts and Set Screws when ordering fasteners, bolts usually only have about 1" of thread, where as set screws are threaded all the way up to the head. While it maybe tempting to purchase set screws for everything, for some items, these could be dangerous as the thread can have a cutting effect on parts, so for one example, the front tie bar to lower arm used a bolt to that the threads don't cut in to the tie bar.


On that, there are also a few fasteners throughout the car that are special and only genuine ones should be used for (the tie bar one in the above example for one).


Here's a chart you may find handy;-


BoltHeadMarkings_zpsa2d0f72e.jpg


Like nearly everything, nothing's ever straight forward.

Thanks Spider, 

I had another dig around in some bags of new nuts n bolts and I found eight one inch 5/16 'Set Screws' so these will do to secure the Camber Brackets onto the Subframe.


1 user(s) are reading this topic

0 members, 1 guests, 0 anonymous users