Jump to content


Photo

Shell Preparation


  • Please log in to reply
12 replies to this topic

#1 kyle9832

kyle9832

    Speeding Along Now

  • Members
  • PipPipPipPipPip
  • 434 posts
  • Location: leicester

Posted 17 May 2015 - 07:52 PM

I am very near to completion with the rust repairs on my project, and at the moment the car is full of mismatched colours, slight surface rust and burnt paint from welding, i am just wondering what the best course of action is before painting it, should i sand the paint off and etch prime it as i go or do it a different way?

cheers:)


#2 castafiore

castafiore

    Mini Mad

  • Noobies
  • PipPipPipPip
  • 116 posts
  • Location: North West

Posted 18 May 2015 - 07:14 AM

If you are nearly finished, it might be better to complete all repairs then rub down and epoxy prime it. If the car is going to be stood a while, you could strip each area as you finish it then spot prime, with a full epoxy coat at the end (if you are planning a full strip and respray). I am using Electrox aerosol primer as I de-rust each panel. The car is outside and needs a lot of welding so I know it would be a long time before it's all done and I don't want to leave panels unprotected in the mean time.

#3 Ben_O

Ben_O

    Mill Road Garage

  • Paint Doctor
  • PipPipPipPipPipPipPipPipPipPip
  • 9,794 posts
  • Location: Isle of Wight

Posted 18 May 2015 - 08:00 AM

The main tips i would give are


If you are unsure what paint is on the car or of what is underneath it, then remove it back to metal


Always remove burnt paint right back to bare metal and feather out to surrounding paint if it is being left. never paint over the burnt paint.


Treat this stage of the prep the same as you would the final stage of prep. Make sure that every panel is smooth, correctly shaped and blemish free. Yes, High build primer will cover some imperfections but not as much as people think and if you can't loose the imperfections whilst flatting the primer, you will end up having to do spot repairs or potentially have to re primer the whole shell and start again - not ideal


And finally, always use sanding blocks of a size that is appropriate for the panel being flatted and rub down in long sweeping motions changing direction often.

A random orbital sander or sandpaper with your hand or fingers will leave all sorts of tramlines, edges and ripples, especially if there are repairs beneath the primer.


Ben


#4 Cooperman

Cooperman

    Uncle Cooperman, Voted Mr TMF 2011

  • TMF+ Member
  • PipPipPipPipPipPipPipPipPipPipPip
  • 23,276 posts
  • Location: Cambs.
  • Local Club: MCR, HAMOC, Chelmsford M.C.

Posted 18 May 2015 - 10:57 AM

To add to Ben's excellent advice, after hi-build priming on panels which 'appear' flat to the touch, blow on a witness coat in a dark gloss colour ( prefer gloss to matt for this, although matt does dry faster if time is important), then lightly sand back with an appropriate size block and some fairly fine abrasive paper which will show up the high spots. Then address these by further sanding and possibly some more coats of hi-build.

I'm doing this at present on the repaired area of an MGB's lower rear wings and it is difficult compared to the smaller panel areas on the Mini as they have double curvature and are very long - but, hey, I'm getting there!


#5 Ben_O

Ben_O

    Mill Road Garage

  • Paint Doctor
  • PipPipPipPipPipPipPipPipPipPip
  • 9,794 posts
  • Location: Isle of Wight

Posted 18 May 2015 - 11:08 AM

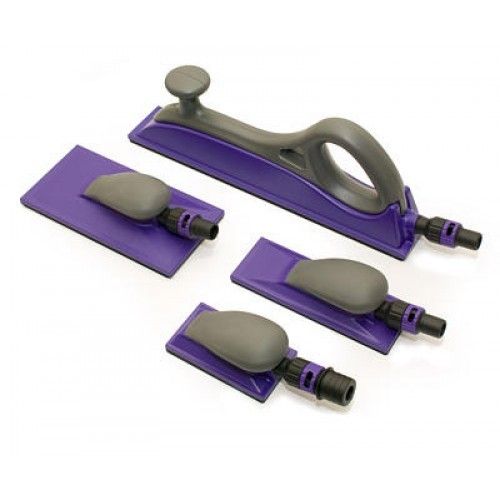
3M do a range of excellent blocks that take their hookit type sanding pads


78o-500x500_zpsa72rr2ui.jpg


They are not cheap but are the best i have used. I had a full set but they got stolen  :crazy:  :xxx:


I helped Carlos_W with his prep work and he bought the large squarer one and the 320g sanding pads and he was pleased with how much easier and quicker it made the job.


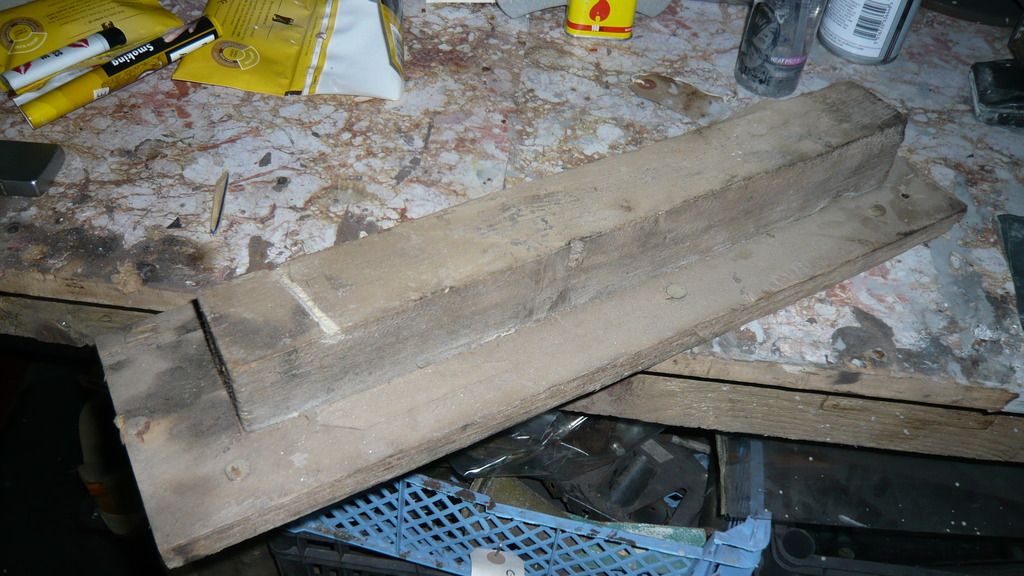
But as i said on a similar thread yesterday, you can make large sanding blocks by screwing a piece of timber to a piece of MDF to create a very good block.

If using home made blocks with wet and dry though, choose something like marine ply as your sanding bed as MDF will absorb water and swell.


here is one of my old blocks to show what i mean


P1070566_zpstrurbhzu.jpg


Prep takes a very long time to get right but it's pointless rushing it or cutting corners unless you want a poor end result that is more costly to put right.


Ben


Edited by Ben_O, 18 May 2015 - 11:08 AM.


#6 kyle9832

kyle9832

    Speeding Along Now

  • Members
  • PipPipPipPipPip
  • 434 posts
  • Location: leicester

Posted 18 May 2015 - 09:16 PM

so as I am repairing, just prime the places so they don't rust, then strip all the paint down and epoxy prime, or etch prime? then apply high build primer and apply till and sand till smooth , then give a coat of gloss to identify imperfections and then apply more high build? if this is correct thankyou very much for the help!


#7 Ben_O

Ben_O

    Mill Road Garage

  • Paint Doctor
  • PipPipPipPipPipPipPipPipPipPip
  • 9,794 posts
  • Location: Isle of Wight

Posted 18 May 2015 - 09:52 PM

an etch would be a good choice on bare metal followed by a high build primer,


You won't need to spray a coat of gloss on it though, all you need to do is spray a light misting off matt black on top of the highbuild before flatting it down. It's called a guide coat and enables you to see where any low spots or scratches might be.

As you are rubbing it down, any low spots will be identified by any areas of guide coat left behind. In some cases, you can loose the low spots by continuing to flat the area back until the guide coat is gone but in other cases, you might need to do a repair to bring the level back up.


You can apply more guide coat again once you have flatted it back and then flat again lightly just to make sure.


Guide coats can also show up any mapping or rings around repairs and if you are lucky you can flat them out keeping an eye on the guide coat. but if guide coat remains and you need to flat through the primer to loose them, you will need to re-prime and do it again.


#8 Cooperman

Cooperman

    Uncle Cooperman, Voted Mr TMF 2011

  • TMF+ Member
  • PipPipPipPipPipPipPipPipPipPipPip
  • 23,276 posts
  • Location: Cambs.
  • Local Club: MCR, HAMOC, Chelmsford M.C.

Posted 18 May 2015 - 10:06 PM

Same thing, different terminology.

I have always called it a 'witness coat' and I use already mixed gloss of any dark colour which shows up fine against the yellow hi-build.

I guess we do it the same way and it seems to work, although it is a long job to get it right.

Don't you look at those restored classic cars where the flat panels look slightly rippled when viewed in the sunlight and think 'what an amateur job'.


#9 Ben_O

Ben_O

    Mill Road Garage

  • Paint Doctor
  • PipPipPipPipPipPipPipPipPipPip
  • 9,794 posts
  • Location: Isle of Wight

Posted 18 May 2015 - 11:19 PM

Same thing, different terminology.

I have always called it a 'witness coat' and I use already mixed gloss of any dark colour which shows up fine against the yellow hi-build.

I guess we do it the same way and it seems to work, although it is a long job to get it right.

Don't you look at those restored classic cars where the flat panels look slightly rippled when viewed in the sunlight and think 'what an amateur job'.

When i trained as a panel beater, it was always referred to as a guide coat but yes it's the same thing. We also had little pots of black powder with a foam pad a bit like a powder puff and you spread the black powder over your filler or primer to give the guide/witness coat.


It is a lot of work though like you say but well worth all of the effort. There is nothing worse than having a top quality paint job and seeing ripples, rings and scratches beneath the top coat.


And yes....All the time  ;D But then i suppose most people who restore their classic come from all different walks of life and backgrounds and usually would consider that the finish was perfect to the untrained eye.


It's not unusual for me to high build a panel, guide coat it, flat it and then re prime it, guide coat it and flat it again just to make sure. A nice wash over with copious amounts of panel wipe gives the primer a good shine so you can pick out any remaining imperfections.

After all, primer is easier and cheaper to apply a few times if need be to get it right than the final paint coat. I would happily spend months on prep and intend to on my Mini 25 restoration as it is the most important stage.


Ben


#10 Tupers

Tupers

    Up Into Fourth

  • Members
  • PipPipPipPipPipPipPipPipPip
  • 4,143 posts
  • Location: Devon

Posted 18 May 2015 - 11:35 PM

I used the black powder puff style guide coat as I got given a load of them but a rattle can of black works just as well. The only plus side to the powder (aside from lack of fumes) is that you can spread it on a sand ti straight away. 

IMG_7555_zpsefdef96f.jpg


The majority of the roof was sanded with a 400MM 3M block and the edges were done with a DA disc wrapped around a rubber pad. 

IMG_7562_zps6c137021.jpg


I can't find any pictures of the finished roof but it was lovely and smooth. 


#11 Hendred

Hendred

    Speeding Along Now

  • Members
  • PipPipPipPipPip
  • 484 posts
  • Location: Cleobury Mortimer Nr Ludlow, Shropshire Name: John

Posted 19 May 2015 - 06:46 AM

Great advice here


#12 kyle9832

kyle9832

    Speeding Along Now

  • Members
  • PipPipPipPipPip
  • 434 posts
  • Location: leicester

Posted 19 May 2015 - 07:31 AM

thanks a lot for the help! il oder myself a tin of etch primer then, ive already got some black spray paint in cans...

lastly, what would be the best way to get the car to bare metal? cheers:)


#13 Carlos W

Carlos W

    Mine is purple, but I have been told that's normal

  • TMF+ Member
  • PipPipPipPipPipPipPipPipPipPipPip
  • 10,114 posts
  • Location: Sittingbourne, Kent

Posted 19 May 2015 - 08:26 AM

Just to reiterate comments, there is no real shortcuts and cutting corners will only end in tears later on. 


I really wanted to get my shell into top coat last year, but we just ran out of time. 


The 3m stuff is really good, and very easy to use. 


I'm not looking to start a debate into de-seaming but here's a picture of my car


10527276_10154426566280226_5518404650159


1 user(s) are reading this topic

0 members, 1 guests, 0 anonymous users