Jump to content


Photo
- - - - -

Keeping Another Mini Out Of The Scrappy


  • Please log in to reply
572 replies to this topic

#46 James_eaton_thewholething

James_eaton_thewholething

    One Carb Or Two?

  • Members
  • PipPipPipPipPipPipPip
  • 1,063 posts
  • Location: Manchester

Posted 27 May 2015 - 01:59 PM

I'm back off holiday and back at it. I can say I have missed it and have been looking forwards to getting back on it.

So I removed the inner wing after marking up where to drill holes

FB7A1B61-B584-4312-9FB1-E1D66BA9361D_zps

Drilled about 120 holes which took ages

364F9817-D7AC-4902-9B0B-FA1AAA4559B7_zps

Weld through primered all the flanges

image_zpsfwo5fdxr.jpg

Panel mostly welded on but ran out of wire to finish a few plug welds.

82856B8B-433D-4AA0-9F19-4D9C151381BE_zps

Test fitted the door and it fits so much better now that the door hinge panel doesn't twist. Need to pick up some more wire and finish the welds then it's on to the opposite side

#47 James_eaton_thewholething

James_eaton_thewholething

    One Carb Or Two?

  • Members
  • PipPipPipPipPipPipPip
  • 1,063 posts
  • Location: Manchester

Posted 01 June 2015 - 09:52 PM

Today I finished the the few plug welds that were required to fully finish the front panel. I then cleaned up all the welds and then covered it in zinc primer going to get started on the opposite side in the next few day although I'm still waiting for the passenger side inner wing but should get it next week.

DAEE98A9-9F71-4BA2-8DB1-A53F487119BA_zps

AB4F7C57-212F-47F8-90D6-EEAC41BAE8A2_zps

Also my dad brought me home a fire proof jump suit so I don't burn my self through my pants while welding which I keep doing lol

FB0D3A2C-A00D-45DB-A002-A6B853F843A9_zps

All for now

#48 James_eaton_thewholething

James_eaton_thewholething

    One Carb Or Two?

  • Members
  • PipPipPipPipPipPipPip
  • 1,063 posts
  • Location: Manchester

Posted 03 June 2015 - 06:09 AM

Spent a couple of hours last night cutting out the passenger inner wing, well what was left of it anyway.

531BD3DF-4A4E-436E-9711-DDE94E7251AF_zps

Once it was cut out I checked all the usual places like the inside of the crossmember it wasn't as bad as the drivers side so only a little bit of work to do.

A4B68367-7EE2-4D85-8AA2-9347C006D941_zps

9C90DC76-734D-478C-A9E6-076B702D6C63_zps

Only thing I'm probably going to have to do with the toe board on each side is add a little bit to where the floor will sit on as both corners look like it has rotted away along with the floor but nothing I'm worried about. Now a few days to spend with the misses otherwise she wouldn't support me in doing this lol

#49 James_eaton_thewholething

James_eaton_thewholething

    One Carb Or Two?

  • Members
  • PipPipPipPipPipPipPip
  • 1,063 posts
  • Location: Manchester

Posted 09 June 2015 - 02:59 PM

Managed to get a few hours in the garage the past couple of days so removed the crossmember end triangle bit, cut out some rot and replace a section of the crossmember. The passenger side wasn't as bad so only needed one section. Made a new lower part for the shock mount. Extended the top shock mount for when I do coil overs. Cut the flanges off of the lower dash rail and upper bulkhead because the needed replacing. Also removed the bonnet hinge since going to be using a fibreglass bonnet.

9D9F3429-E13F-4C68-B825-B7CB1508D725_zps

C3190A9F-1D70-4647-A332-D7684DAE2F5B_zps

9DE8CE85-8814-401A-AAF7-56917B16537D_zps

Made up the closing plate and welded that on after zinc priming the inner section and then weld priming the flanges and And back of the closing panel.
Got told today that my inner wing has finally arrived in to Moss so will pick that up next week. Should hopefully have all the flanges sorted by then so by next wednesday it should have two inner wings


Edited by James_eaton_thewholething, 20 June 2015 - 09:52 PM.


#50 James_eaton_thewholething

James_eaton_thewholething

    One Carb Or Two?

  • Members
  • PipPipPipPipPipPipPip
  • 1,063 posts
  • Location: Manchester

Posted 12 June 2015 - 08:38 PM

So decided to pick the wing up yesterday as I was passing and because I'm also moving closer to home with work so my shift patterns change and now I won't have the day off on Wednesday to do everything.

28126072-1885-46CA-9B07-1771C52B798A_zps

Here it is. Unlike the drivers side this one didn't come with captive nuts and also didn't come with the inner strenghthener but then again it was pressed out 4 years ago.
Anyway so tonight I set about making the rest of the flanges which didn't take that long

07C8E462-1147-483A-AD69-4D34C1331598_zps

13ED69A0-B5ED-4FD6-B051-E1BB868944D0_zps

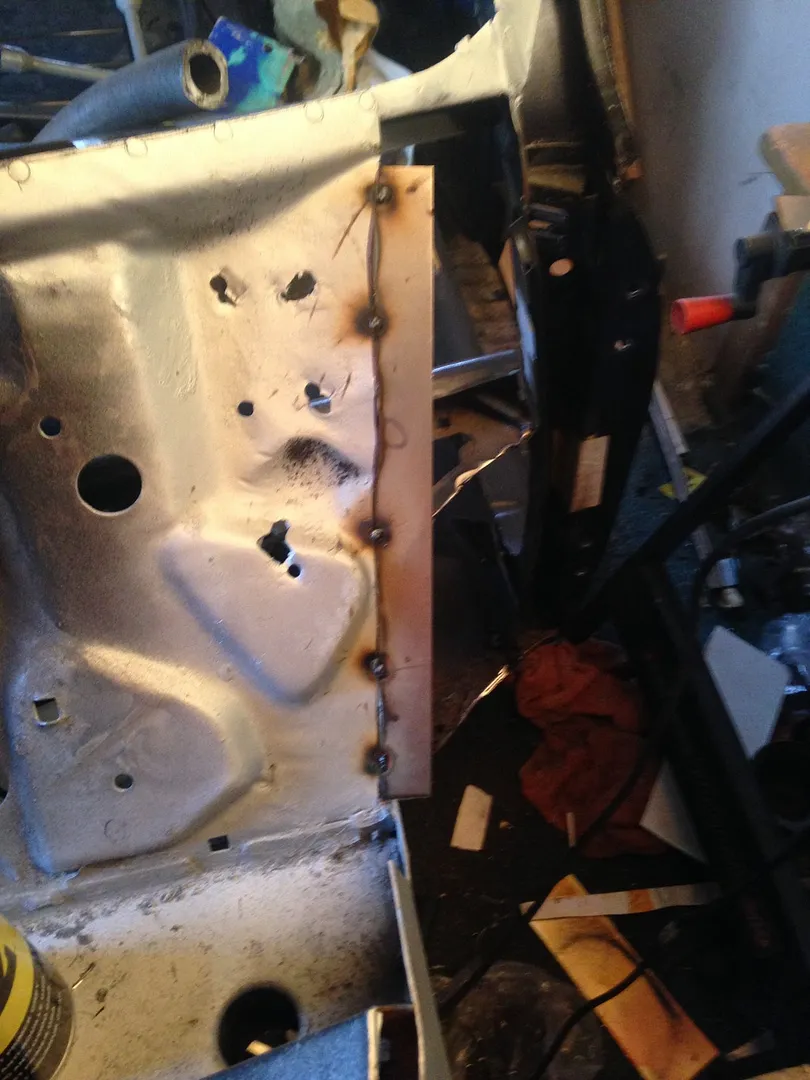
As you can see I made up an extra closing plate so that both sides are equal in thickness in that area and for added strength

8BA8146A-277E-45EE-995F-0865ACEC1DE2_zps

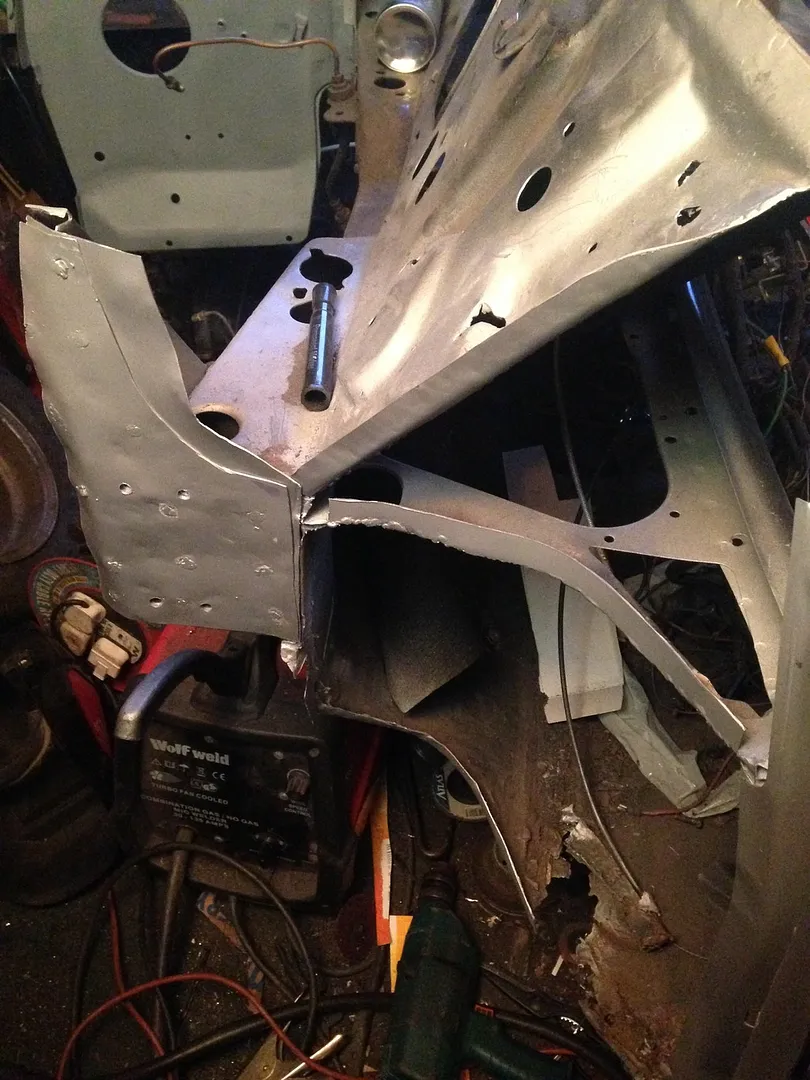
Test fitted the panel and it will need a bit of persuasion in the form of a hammer to get it to fit nicely. I was also quite surprised that the holes for the doors line up. But like the other side the holes for the bottom part of the shock mount do not but ah well cannot complain to much.
Monday night I will get this in and then once it's in its on to the good fun of replacing the floor which I cannot wait to do so that for the first time in 23years it will have a nice new floor. After that all I have left is rear quarters, rear arches, boot hinge panel, bits of the boot floor, all the closing panels and crossmember. front scuttle, wings,front panel, A panels and another door to re skin that's about it haha

#51 James_eaton_thewholething

James_eaton_thewholething

    One Carb Or Two?

  • Members
  • PipPipPipPipPipPipPip
  • 1,063 posts
  • Location: Manchester

Posted 16 June 2015 - 01:24 PM

Spent an hour last night drilling holes and persuading the panel with a hammer and then managed to get majority of the welds done only have 57 left to go.

D571F370-3010-4060-AEE1-3BDE360A238D_zps

94190BDC-0809-4D9C-B40A-7ECF9EFF55ED_zps

Good to see it with both wing in and will be finished this week.

C10F4FDF-295A-4431-B6EF-F09A64C70BF8_zps

After these welds I will finish the bulkhead repairs then set about emptying the inside of the car and prepping for floor replacement


Edited by James_eaton_thewholething, 18 June 2015 - 10:07 PM.


#52 James_eaton_thewholething

James_eaton_thewholething

    One Carb Or Two?

  • Members
  • PipPipPipPipPipPipPip
  • 1,063 posts
  • Location: Manchester

Posted 20 June 2015 - 10:01 PM

Got all the welds finished on the passenger inner wing and test fitted the door again and all is good
I then set about repairing the holes in the bulkhead buy welding them up. I also welded up any extra holes that aren't needed. Once done I give it a good rubbing down and zinc primed it all. I also modified the engine steady bracket as won't be using the standard pedal box any way.

5C2DA6D0-4E80-4552-A2DD-26E0AD7D6C86_zps

Also bought some new tools to make my life easier.

DEF15BA0-7B99-4A4D-9499-AB8ECA075E4E_zps

Found a picture of when I had rebuilt the engine and done a few mods to the car. But at least I know when it's been done this time it will look a million times better

D6F48B2D-D2C5-48ED-88D4-0500EF64C57E_zps

Also does anyone know what these brackets are for ?

B4FC53F9-9C9D-4EB7-99B7-EC8085816CC1_zps

#53 ianat43

ianat43

    Learner Driver

  • Noobies
  • PipPip
  • 10 posts
  • Location: Grimsby

Posted 21 June 2015 - 09:34 AM

Hi


Nice to see some good work going on there well done.

The brackets you mention are for mounting the CDI unit on fuel injected min's Not sure about the spi but definitely on the mpi as used on my mini 40.

Ian


#54 ianat43

ianat43

    Learner Driver

  • Noobies
  • PipPip
  • 10 posts
  • Location: Grimsby

Posted 21 June 2015 - 09:47 AM

SAM_2255_zpsearwfk52.jpg


Took a picture to explain


#55 James_eaton_thewholething

James_eaton_thewholething

    One Carb Or Two?

  • Members
  • PipPipPipPipPipPipPip
  • 1,063 posts
  • Location: Manchester

Posted 21 June 2015 - 10:05 PM

well that clears that up then haha. i stumped my friend with that question and he's been involved with minis for a very long time and he didn't know. thank you for thinking the work is good. also thank you for the picture


Edited by James_eaton_thewholething, 21 June 2015 - 10:06 PM.


#56 James_eaton_thewholething

James_eaton_thewholething

    One Carb Or Two?

  • Members
  • PipPipPipPipPipPipPip
  • 1,063 posts
  • Location: Manchester

Posted 23 June 2015 - 10:37 PM

So not much done in the past few days well nothing major anyway.

A6FA1256-2C33-4F8C-93F8-60DF45E67E35_zps

35863F5C-39AA-478D-BC16-968176FE5CF4_zps

Used the air nibbler to cut the discs out and it makes life so much easier why did I not buy one when I first started lol.

Stripped the car out completely of all wiring and bits of rubbish and tools ready to start cutting the rear bins out and taking the rear seat back to where the heel board connects and then I will go and pick up my floor panels and start with that

Edited by James_eaton_thewholething, 31 July 2016 - 02:45 PM.


#57 James_eaton_thewholething

James_eaton_thewholething

    One Carb Or Two?

  • Members
  • PipPipPipPipPipPipPip
  • 1,063 posts
  • Location: Manchester

Posted 26 June 2015 - 09:20 PM

Been playing around tonight prepping to replace the floor panel and heel board

308AB3F0-D58A-461E-AC6A-F53156F411B6_zps

Trimmed the seat base back as I'm not using rear seat anyhow and so that it gives me something to to line up the heel board and floor.

E1A8A233-6E59-41D6-9BE7-A6A9DF2E91DE_zps

D005A751-D689-425A-B66A-B3E4FCA76508_zps

Inside the bins are horrible and I'm so glad the floor is being replaced. The closing panels will also be replaced and so will the inner stiffener.
Having to wait till my dad is free with his van to go and pick up the panels then all the fun will start

#58 James_eaton_thewholething

James_eaton_thewholething

    One Carb Or Two?

  • Members
  • PipPipPipPipPipPipPip
  • 1,063 posts
  • Location: Manchester

Posted 03 July 2015 - 08:03 PM

Finally to the plunge and cut the floor out even though I don't have the new panel to go in but at the end of the day all the flanges on the toe board and on the rear seat pan are really obvious

7B4AF7C1-230B-49DA-8B6C-7FBBD12D101F_zps

48DBF40E-A469-454C-9B9E-1282F47B6952_zps

Floor was in real bad shape didn't realise how bad till I got it out. It was harder to get it out of the garage than to cut out

Going to get everything ready to just drop the floor panel in when I get paid.

Edited by James_eaton_thewholething, 31 July 2016 - 02:56 PM.


#59 James_eaton_thewholething

James_eaton_thewholething

    One Carb Or Two?

  • Members
  • PipPipPipPipPipPipPip
  • 1,063 posts
  • Location: Manchester

Posted 09 July 2015 - 10:50 PM

Been able to get a few hours in the garage over the past few days

592F9CDE-07FB-47D7-A67E-DD5C64D2F7ED_zps

Picked up a new grinder only £35 from screwfix

FE6BC585-7E77-4849-9660-057017CDBD49_zps

Made up some cad templates, made up one for making the subframe mounts stronger since I'm going to run solid mounts thought it would be a good idea to over do it

83D3A203-FDE3-43B5-A945-225345EB2AA5_zps

Welded the floor mounting points in which didn't take long

8C7ABFB2-3A96-4F12-BCE1-35E0561CE010_zps

All I've got left to do before I prep the rear seat is grind the welds back and then plug weld and slightly seam weld the stiffener in place. I'm about a week away from putting the floor in cannot wait

Edited by James_eaton_thewholething, 31 July 2016 - 03:05 PM.


#60 James_eaton_thewholething

James_eaton_thewholething

    One Carb Or Two?

  • Members
  • PipPipPipPipPipPipPip
  • 1,063 posts
  • Location: Manchester

Posted 10 July 2015 - 05:25 PM

Finished off the toe board today

E4E72AC2-5075-41D0-AA81-48FB0C001404_zps

The panel has hardly any flex in it now which is good hopefully will mean the floor won't crack

Edited by James_eaton_thewholething, 31 July 2016 - 03:06 PM.


1 user(s) are reading this topic

0 members, 1 guests, 0 anonymous users