
Alright mate. I've just bought a 1980 clubby estate with rust in very similar places to yours so I'll be using your thread here as a guide. Really impressed with your fabrication work and hope mine goes half as well as yours looks!

71 Clubman Estate
Started by
country clubman
, Nov 02 2014 06:31 PM
242 replies to this topic
#107

minimissions
-

- Members
-

- 3,427 posts
Up Into Fourth
- Location: North West
- Local Club: M.M.O.C
Posted 18 May 2016 - 05:54 AM
Not had a look of this for a while its looks great, coming along really well :)
#108
country clubman
-
- Members
-
- 206 posts
Mini Mad
- Location: Paignton
Posted 19 May 2016 - 10:42 PM
Alright mate. I've just bought a 1980 clubby estate with rust in very similar places to yours so I'll be using your thread here as a guide. Really impressed with your fabrication work and hope mine goes half as well as yours looks!
Cheers for that but, I'd take mine as a rough guide and see what over people are doing as well, as I've just been making it up as going along! But it is good to be able to see what goes where before you start cutting.
#109
country clubman
-
- Members
-
- 206 posts
Mini Mad
- Location: Paignton
Posted 19 May 2016 - 11:14 PM
Managed to do two bits of work this week both of which not 100% pleased with, but they'll be good enough when all finished.
Firstly repaired new lower companion box section in, all going well until plug welding lower part to floor and as at end of day rushing a little didn't notice that the weld started to push the box away from the floor thus leave a bigger gap than wanted and can just see some weld blobs from the outer side of the box, plus making the box bulge out a little, managed to shrink it in a little, the weld blobs can't do anything about them but after painting and carpet won't see. Plus I should have done this before fitting sill as will have burnt a little paint inside the sill, but hopefully managed to get a brush in there with the lower panel repair still off and will be waxoyling them so that should sort it.

Then the lower repair panel, started like this.
The panel looked very stretched so I had an idea to cut a slit in it so that might pull it in, problem is it pulled it in too much, bad idea. Solution after welding up the slit cut slit again in same place and put a plate behind it welded it in whilst pushing it out from behind, sorted and doesn't bounce around like a trampoline either, still not the neatest but skim of filler and will look good. Kind of good to try things but it's better when they work!

#110
Mr Frosty
-

- Noobies
-
- 140 posts
Mini Mad
- Location: Maidstone, Kent
Posted 20 May 2016 - 09:18 AM
Doesn't look that bad at all, much better results than I had with both sides of mine.
This was partly due to my lack of practice and the gas-less mig. ( workman tools jokes a side )
Found that a large flat metal block and a hammer got the shape again followed by a bit of filler and both where good to go.
Moving along nicely.
#111
country clubman
-
- Members
-
- 206 posts
Mini Mad
- Location: Paignton
Posted 20 May 2016 - 03:04 PM
Doesn't look that bad at all, much better results than I had with both sides of mine.
This was partly due to my lack of practice and the gas-less mig. ( workman tools jokes a side )
Found that a large flat metal block and a hammer got the shape again followed by a bit of filler and both where good to go.
Moving along nicely.
Well easy to get a little disheartened when one iffy job follows another, but once filler goes on should be fine and the next job I move onto will go smoother!
#112
country clubman
-
- Members
-
- 206 posts
Mini Mad
- Location: Paignton
Posted 27 May 2016 - 12:23 AM
Good to see all the clubmans at L2B, shame about Ned not good to see that hopefully he'll be saved. But back to the work this week, I tidied up the rear lower repair and a good bit of protective paint slapped on till get around to the bodywork side keep that dreaded rust bug away.

Then time to start on the front floor repair, the lower front floor wasn't as bad as the right so only needed to repair a smaller part, makes things bit quicker at making the repair panel fit.


Then managed to weld it up and clean it up.


My new favourite grinding disc, just started using them properly, flexovit megaview bit pricey but helps for speedy grinding as can see exactly what you are grinding so your sure your grinding the weld and just the weld, can pick em up on ebay about £4.

Then moved on the front of the sill the end near the door step needed repairing.


Now time to remove the front wing, as not fitted that well relatively easy to remove, as you can see pretty solid just needs a good clean up, the front headlamp plate has gone on the outer side again.
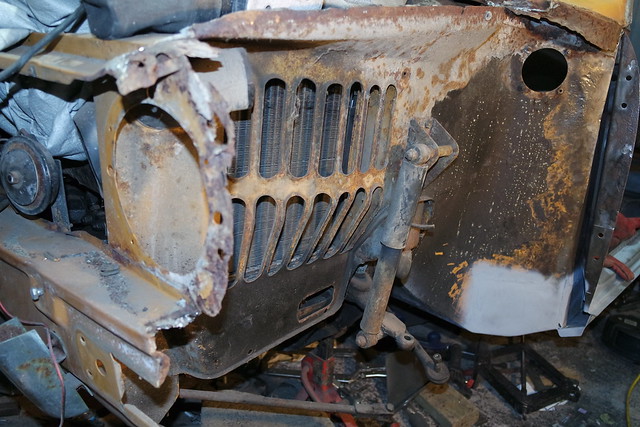
Then started on door hing plate, not as bad as the right side so just removed the flat part to the fold, so won't need to fold any metal, but behind it is solid pretty clean inside just on the strengthening panel it has a bit of rust but will clean up nicely.

Wow lot of photo's this time, that's all managed this week, school holidays again next week so won't get chance to do much next week, nearly a school holiday every month!
#113
country clubman
-
- Members
-
- 206 posts
Mini Mad
- Location: Paignton
Posted 09 June 2016 - 11:20 PM
Managed to clean up inside A post, and cut a inner hinge repair panel as can be seen on photo below.

Welded on the repair panel and welded a lip on in the same way as the oposite side, so the A panel is ready to fit and nicely aligned with the door. I did start to clean up the inner wing, just need to de rust now but seems solid and the scuttle panel on this side seem solid as well(bonus).

#114
Van13
-

- Members
-
- 314 posts
Speeding Along Now
- Location: England
- Local Club: Unknown
Posted 10 June 2016 - 06:39 AM
This little clubby is receiving some excellent workmanship keep it up, I do enjoy reading your updates even though I do not post
#115
country clubman
-
- Members
-
- 206 posts
Mini Mad
- Location: Paignton
Posted 11 June 2016 - 09:52 PM
This little clubby is receiving some excellent workmanship keep it up, I do enjoy reading your updates even though I do not post
Cheers for comment always nice to get positive feedback, but this clubby really needed some love! so hopefully the hard work now will get it lasting a few more decades to come.
#116
country clubman
-
- Members
-
- 206 posts
Mini Mad
- Location: Paignton
Posted 16 June 2016 - 10:01 PM
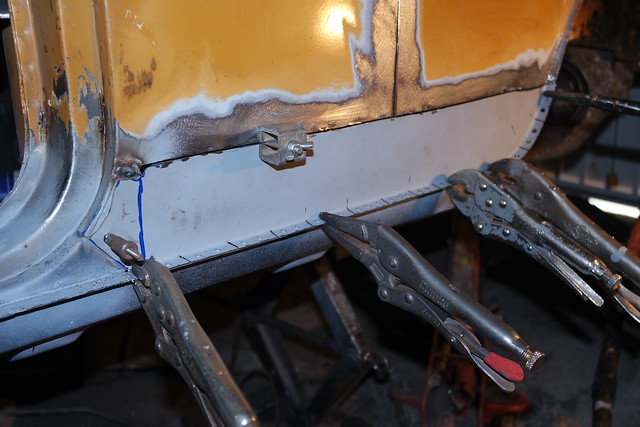
Rust been a bit stubbern on that inner wing at moment, but getting there with it. Managed to get A panel and the headlight repair panel fittted.

Yet again I had problems aligning the sidelight/indicator unit hole, but this time I knocked it into shape so it would fit better, the only way would align on this one, the upper part on the car and the lower part on the wing as pointed out with the arrow on the photo below..

But it is nice to see the wing clamped on, hopefully it will be fitted next week or be at the stage for fitting, as need to get things painted up before fitting.

#117
country clubman
-
- Members
-
- 206 posts
Mini Mad
- Location: Paignton
Posted 23 June 2016 - 11:08 PM
The wing is just about ready to fit, but still not painted up yet so not fitted yet, again been cleaning things up which takes time, but I did manage to sort the lower rear window frame, this side was more solid that other so not as much work needed.
Chopped the bottom lip off and reaveled rust underneath that need removing, photo below after little cleaning up.

Welded holes up and put drainage on corners as per other side, to save time just welded as per photo and put tabs where the frame bolts go through to keep it flat, doesn't look as good as putting the lip on but as this will be hidden under frame work and also might make drainage better.

#118
Mr Frosty
-
- Noobies
-
- 140 posts
Mini Mad
- Location: Maidstone, Kent
Posted 24 June 2016 - 10:14 AM
Looking Good!!
#119
country clubman
-
- Members
-
- 206 posts
Mini Mad
- Location: Paignton
Posted 01 July 2016 - 11:11 PM
Did more cleaning this week, doesn't feel like much progress when cleaning things up, but getting rid of the rust is needed, started on rear wheel arch, under rear end and inner roof, I'm sure everyone hates the task of removing underseal, I used a multitool to scrape as much as possible of, then some eastwood undergone and finally angle grinder with wire wheel, them multi tools can't be used for too long or you loose all sense in your hands.
But I also took off the roof brace(not sure if that's what you call it but photo below).

It was very difficult to treat the rust behind it due to the felt between that and the roof, so easiest way to treat was to remove, and supprisingly it looks like it was bare metal behind but looks rather good for bare metal over 40, but obviously some rusting there and in other places of roof so yet again more cleaning up to be done!
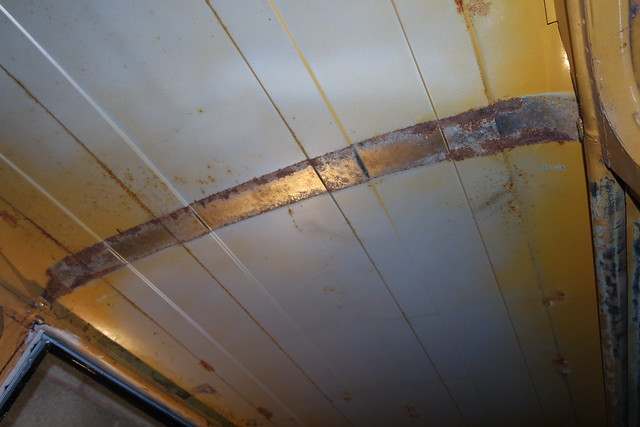
The brace bar itself is solid but bit rusty

#120
Vinay-RS
-

- Members
-
- 2,097 posts
Put's foolish ideas in peoples heads
- Location: Cape Town
Posted 02 July 2016 - 08:16 AM
Does that bracing plate get welded in? If so, maybe it was done when assembling the shell before paint and that was why there isn't any paint under it.


3 user(s) are reading this topic
0 members, 3 guests, 0 anonymous users


