Jump to content


Photo

Oversills, What They Are And Why You Want To Avoid Them


  • Please log in to reply
195 replies to this topic

#46 sonikk4

sonikk4

    Twisted Paint Polisher!!!

  • Admin
  • PipPipPipPipPipPipPipPipPipPipPip
  • 15,971 posts
  • Name: Neil
  • Location: Oxfordshire

Posted 04 November 2014 - 11:56 AM

What you have to consider is what exactly the welder has to do to fit a new inner sill correctly.


Find all of the spot welds along the inner sill to door step, the spot welds on the crossmember, the spot welds and seam weld on the front end of the sill where it attaches to the flitch and inner A post panel, that lot is easy then there is the hard part.

Now there is the companion bin, unless you have a right angled drill this is a nightmare to get to as the inner sill attaches to the inner sill stiffener and the rear heelboard, all within the companion bin. Then there are the row of spot welds that attach the bottom of the companion bin to the floor. And last but by no means least there are at least two spot welds that hide under the companion bin front mounting flange. To get to these you have to either get lucky with the drill or cut the flange off?????


Now with the outer sill off there are the following items to consider as well. Rear subframe captive nut mounting bracket and internal slinging bracket. Both spot welded together then attached to the inner sill and heelboard. Jacking point, again spot welded to the inner sill at the end of the crossmember, the fwd internal slinging bracket.


Cutting along the floor is a piece of cake. Now having done this job very recently i can see why he wants to charge £700. Expensive, yes it is but access at the back is a nightmare.


So bearing this in mind a second hand welder can be bought for approx £100 to £150, all the parts you need to fit should come to around £100, £40 for a grinder, £40 for a auto dimming mask, another £40 or so for clamps etc. So the initial outlay is still cheaper than a garage plus you will then have the kit to do it yourself.


#47 Pottrell

Pottrell

    Stage One Kit Fitted

  • Noobies
  • PipPipPip
  • 56 posts
  • Location: Bristol

Posted 04 November 2014 - 12:39 PM

What you have to consider is what exactly the welder has to do to fit a new inner sill correctly.


Find all of the spot welds along the inner sill to door step, the spot welds on the crossmember, the spot welds and seam weld on the front end of the sill where it attaches to the flitch and inner A post panel, that lot is easy then there is the hard part.

Now there is the companion bin, unless you have a right angled drill this is a nightmare to get to as the inner sill attaches to the inner sill stiffener and the rear heelboard, all within the companion bin. Then there are the row of spot welds that attach the bottom of the companion bin to the floor. And last but by no means least there are at least two spot welds that hide under the companion bin front mounting flange. To get to these you have to either get lucky with the drill or cut the flange off?????


Now with the outer sill off there are the following items to consider as well. Rear subframe captive nut mounting bracket and internal slinging bracket. Both spot welded together then attached to the inner sill and heelboard. Jacking point, again spot welded to the inner sill at the end of the crossmember, the fwd internal slinging bracket.


Cutting along the floor is a piece of cake. Now having done this job very recently i can see why he wants to charge £700. Expensive, yes it is but access at the back is a nightmare.


So bearing this in mind a second hand welder can be bought for approx £100 to £150, all the parts you need to fit should come to around £100, £40 for a grinder, £40 for a auto dimming mask, another £40 or so for clamps etc. So the initial outlay is still cheaper than a garage plus you will then have the kit to do it yourself.


Damn...  O_O


That's going to take me awhile to save up £1400.. And even then it doesn't fix my water leak, merely corrects the previous owners mistake with oversills!  :X


#48 Cooperman

Cooperman

    Uncle Cooperman, Voted Mr TMF 2011

  • TMF+ Member
  • PipPipPipPipPipPipPipPipPipPipPip
  • 23,127 posts
  • Location: Cambs.
  • Local Club: MCR, HAMOC, Chelmsford M.C.

Posted 04 November 2014 - 12:45 PM

M-Machine do a really excellent inner & outer sill sub-assembly complete with jacking point. I fitted one for the first time recently on a shall which had been fitted with oversills. It was a relatively easy job, but I had turned the shell onto its side. and cut away about the outer 6+ inches of floor. The join in the floor can't be seen now and the sills are as-original and very strong. I highly recommend this sub-assembly as it is so much simpler than doing it in several pieces.


#49 Ben_O

Ben_O

    Mill Road Garage

  • Paint Doctor
  • PipPipPipPipPipPipPipPipPipPip
  • 9,785 posts
  • Location: Isle of Wight

Posted 04 November 2014 - 12:48 PM

M-Machine do a really excellent inner & outer sill sub-assembly complete with jacking point. I fitted one for the first time recently on a shall which had been fitted with oversills. It was a relatively easy job, but I had turned the shell onto its side. and cut away about the outer 6+ inches of floor. The join in the floor can't be seen now and the sills are as-original and very strong. I highly recommend this sub-assembly as it is so much simpler than doing it in several pieces.

I wish i had done that on the drivers side on mine but too late now as i have already bought the panels.


The other advantage is that you have nice neat factory spot welds along the sill with no nasty seam welds etc and if you need a new outer sill in the future, it's much more straightforward than grinding a load of long runs of weld.


#50 Cooperman

Cooperman

    Uncle Cooperman, Voted Mr TMF 2011

  • TMF+ Member
  • PipPipPipPipPipPipPipPipPipPipPip
  • 23,127 posts
  • Location: Cambs.
  • Local Club: MCR, HAMOC, Chelmsford M.C.

Posted 04 November 2014 - 12:55 PM

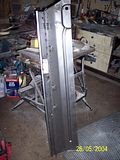
Mini-Machine sub-assembly before fitting:


th_Green850-6_zps3667a60d.jpg


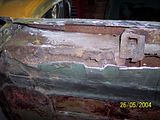
After removing oversills:


th_Green850-1_zps3c9998e1.jpg


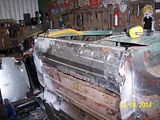
Basically fitted, but unfinished:


th_850newsill_zps6aca0d2e.jpg


#51 Pottrell

Pottrell

    Stage One Kit Fitted

  • Noobies
  • PipPipPip
  • 56 posts
  • Location: Bristol

Posted 04 November 2014 - 01:01 PM

I bought the 2x inner sill with first groove panel and 2x outer sills from M-Machine, definitely nice build. Shame it's going to be awhile until I can afford to fit them! Personally, I have no idea how to weld, nor do I have the room, or time  >_<


#52 sonikk4

sonikk4

    Twisted Paint Polisher!!!

  • Admin
  • PipPipPipPipPipPipPipPipPipPipPip
  • 15,971 posts
  • Name: Neil
  • Location: Oxfordshire

Posted 04 November 2014 - 01:08 PM

I bought the 2x inner sill with first groove panel and 2x outer sills from M-Machine, definitely nice build. Shame it's going to be awhile until I can afford to fit them! Personally, I have no idea how to weld, nor do I have the room, or time  >_<


Well the thing is if the car is not your daily driver then save the money for the tools etc. then spend whatever free time you have practising welding then go from there.


Those panels you have bought are the exact ones i fitted to Wills Mini Special


http://www.theminifo...special/page-17


Ignore that page number and just look through the thread.


#53 Pottrell

Pottrell

    Stage One Kit Fitted

  • Noobies
  • PipPipPip
  • 56 posts
  • Location: Bristol

Posted 04 November 2014 - 01:16 PM

That's the problem - It's my daily car making these sort if repairs difficult. Even getting it to the garage for a day is huge hassle - but it needs to be done I guess

Edited by Pottrell, 04 November 2014 - 01:51 PM.


#54 nick1989mini

nick1989mini

    Learner Driver

  • Noobies
  • PipPip
  • 11 posts
  • Location: Bishop Stortford
  • Local Club: Safmini

Posted 04 November 2014 - 03:24 PM

Crusty!

Attached Files

  • Attached File  rust.jpg   36.29K   47 downloads


#55 Pottrell

Pottrell

    Stage One Kit Fitted

  • Noobies
  • PipPipPip
  • 56 posts
  • Location: Bristol

Posted 04 November 2014 - 03:28 PM

How simple is it to cut the oversill off? Just a matter of cutting it off making sure not to go too far in and hitting the inner?

#56 Cooperman

Cooperman

    Uncle Cooperman, Voted Mr TMF 2011

  • TMF+ Member
  • PipPipPipPipPipPipPipPipPipPipPip
  • 23,127 posts
  • Location: Cambs.
  • Local Club: MCR, HAMOC, Chelmsford M.C.

Posted 04 November 2014 - 03:55 PM

If it has over-sills you will just end up cutting all the rust away and that will probably be outer, inner, jacking point and a bit of floor. Possibly the end of the big box-section onto which the seat brackets bolt will be slightly corroded right at the ends which is where the strength for the jacking points comes from.

With the sub-assembly being discussed you get new inner sill, outer sill, jacking point and about 6" of new floor.

Once you have learned to weld and have a decent MIG welding set, it is straightforward. The cost of the tools and equipment is far less than the labour you would be paying if you get a body-shop to do the work.

It is a bit daunting when you first start, but have confidence and we are all here to help as you go. Put up photos of any areas where you are having difficulty and we 'Mini Docs' will be along with advice and suggestions.


#57 Pottrell

Pottrell

    Stage One Kit Fitted

  • Noobies
  • PipPipPip
  • 56 posts
  • Location: Bristol

Posted 04 November 2014 - 11:10 PM

Thanks - I think it's definitely something I'll look into - for now though (at least until I move and have a bigger place to put things) I'll commit to paying my welder to do it. He's going to do both outer sills for me for £200 each. Hopefully when the oversills are taken off the inner sills just need cleaning up!


#58 nick1989mini

nick1989mini

    Learner Driver

  • Noobies
  • PipPip
  • 11 posts
  • Location: Bishop Stortford
  • Local Club: Safmini

Posted 05 November 2014 - 11:11 AM

Cooperman has hit the nail on the head with what I'm finding on mine. I'm a beginner on bodywork so can't give any advise only some experience, but on my mini the over-sills have been spot welded quite far under the floors thus covering rust up further under the floor then where the new inner sill repair panels reach, so having to put some floor panels in as well.


I played it safe before starting the job & brought new floor sections, inner sills, outer sills, flitch panels & all the brackets/straighteners which go between the inner & outer sills, also have sheet metal in case of repairs.


Its taking me an absolute age so far, spent 2 days off work & only just got up to welding in the R/H floor panel. Frustrated with progress but learning.


Its worth while getting a gas mig welder at some point as it allows you to learn welding at your own pace, which will then give you the confidence to attempt repairs.


#59 Pottrell

Pottrell

    Stage One Kit Fitted

  • Noobies
  • PipPipPip
  • 56 posts
  • Location: Bristol

Posted 05 November 2014 - 12:40 PM

Bit of a debate on a Facebook group so wondering what TMF thinks..


£200 per outer sill - Expensive or good deal? I know the welder will do a good job of it. But people elsewhere are saying that's really dear?


#60 Ben_O

Ben_O

    Mill Road Garage

  • Paint Doctor
  • PipPipPipPipPipPipPipPipPipPip
  • 9,785 posts
  • Location: Isle of Wight

Posted 05 November 2014 - 01:26 PM

Bit of a debate on a Facebook group so wondering what TMF thinks..


£200 per outer sill - Expensive or good deal? I know the welder will do a good job of it. But people elsewhere are saying that's really dear?

If the £200 covers him removing the outer sill, cleaning up the rust beneath, making any repairs, rustproofing, fitting a new sill and then priming, sealing, stone chipping and then painting, Then i think its a great price!


No offence but your facebook friends must be really cheap if the think thats alot because it is a big, horrible, nasty job and often results in loads more unforeseen work.


I would hesitate to undertake that job for £200, especially if i was supplying the materials and parts too


1 user(s) are reading this topic

0 members, 1 guests, 0 anonymous users