Jump to content


Photo

Yay, Got The Oil Temp Gauge Sorted..


  • Please log in to reply
60 replies to this topic

#1 bloke

bloke

    Mini Mad

  • Noobies
  • PipPipPipPip
  • 139 posts

Posted 10 June 2014 - 09:03 AM

Hi gang, for all of you out there that have a somewhat dead oil temperature gauge in your MPI Min, here is a solution, but you need to be a bit handy with the odd tool here and there.


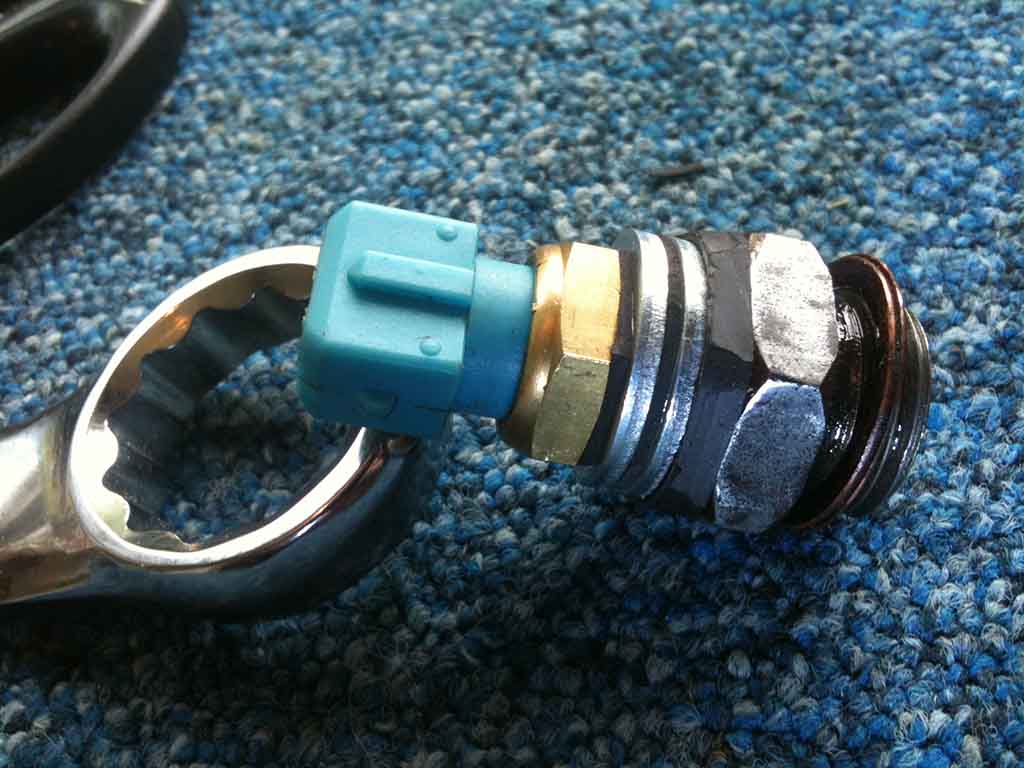
You'll need a MGF/TF sensor YCB100420 and a oil pressure cap from an old engine/junk yard.


I will probably drill and tap an adaptor from scratch, but this was just the testing stage and works fine, so it can wait.
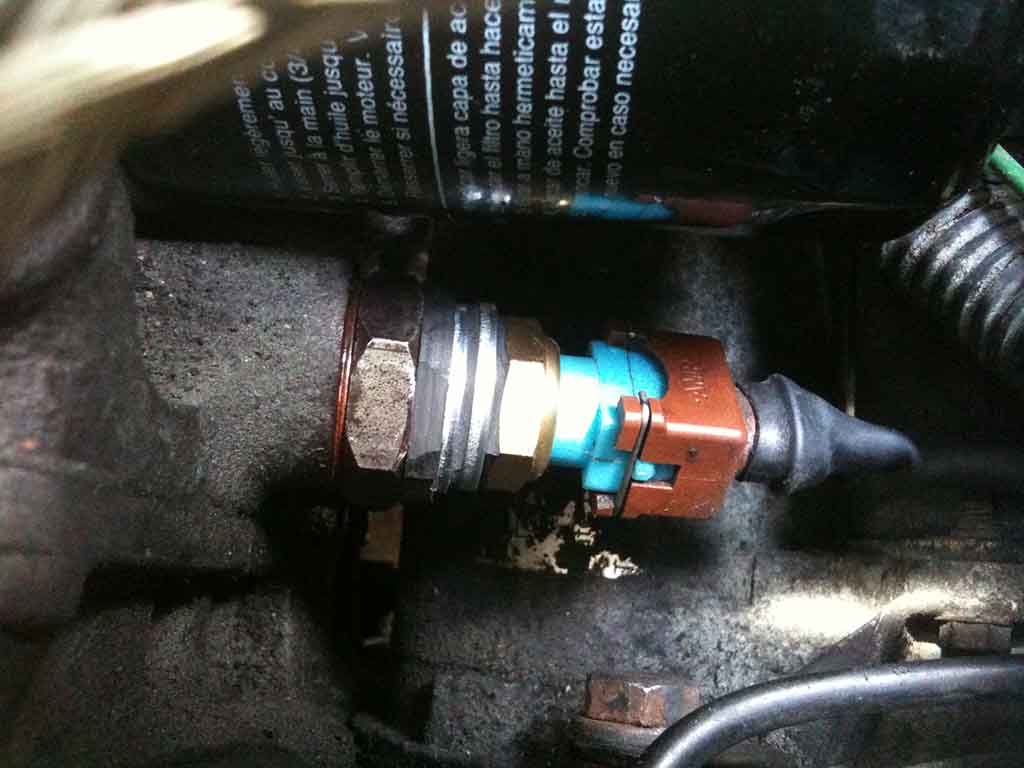
 

oil1.JPG


Here it is fitted-


oil2.JPG


I had to pack it out with a few suspension washers and rubber washers in between, as the thread on the oil pressure cap is only on the threaded part which sticks out from the end. 


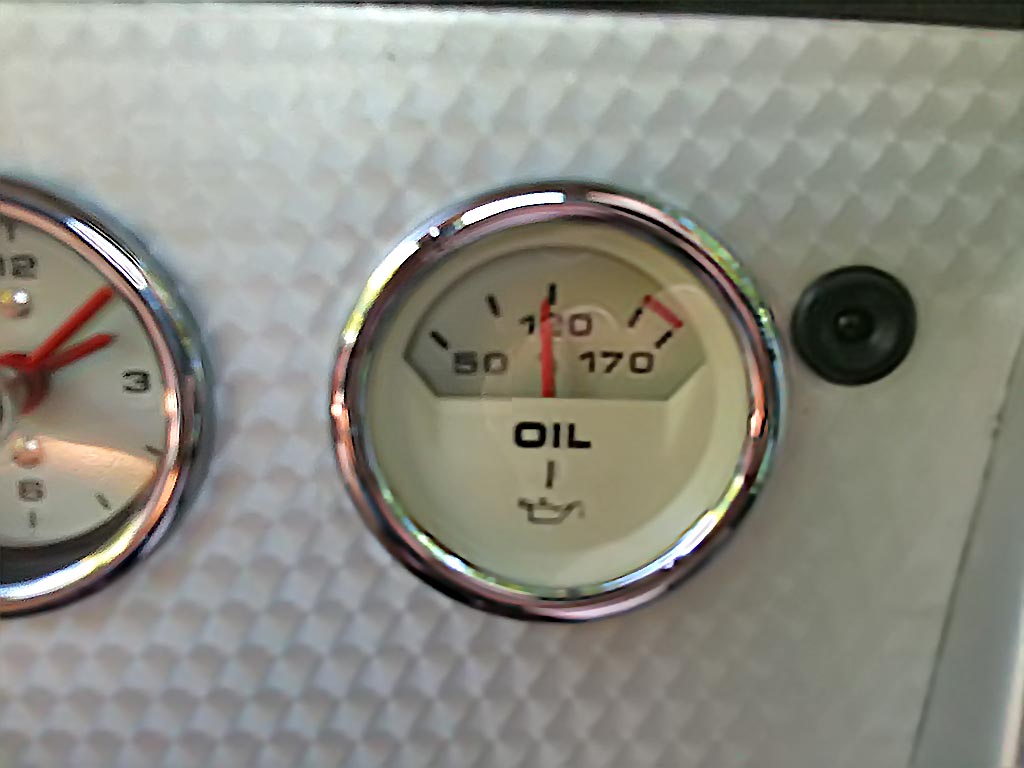
I am pleased to say that the temperature gauge now reads perfectly normal, between 50 to 80° when pootleing around, and goes up to 120° when pushed hard.


I hope this helps someone out there.


Cheers, Bloke.


#2 RedRuby

RedRuby

    One Carb Or Two?

  • Members
  • PipPipPipPipPipPipPip
  • 1,201 posts
  • Location: County Durham
  • Local Club: No

Posted 10 June 2014 - 09:30 AM

Thanks for that, it is certainly an alternative I will consider, my first thoughts were to replace with a oil pressure gauge but this would be cheaper. As a matter of interest why did you go down this route, would a new MPi oil switch not do it?

#3 brivinci

brivinci

    One Carb Or Two?

  • Members
  • PipPipPipPipPipPipPip
  • 1,152 posts
  • Location: New Jersey

Posted 10 June 2014 - 06:12 PM

From a US owner of SPi Coopers only (ie, not having many minis around) I didnt know the MPi minis had oil temp gauges. Thats fantastic! Was this an option for the three extra gauges in the center of the dash? My brothers Cooper Si has the JG dash and the three gauges across the top are oil pressure, clock and volts, with water temp being in the cluster. Also, a oil pressure warning light in the cluster.


Does the MPI have an oil pressure gauge? I would really like to have both pressure AND temp...better still if they were on the same gauge. Both seems super important to keep an eye on with these cars


#4 bloke

bloke

    Mini Mad

  • Noobies
  • PipPipPipPip
  • 139 posts

Posted 10 June 2014 - 11:00 PM

Thanks for that, it is certainly an alternative I will consider, my first thoughts were to replace with a oil pressure gauge but this would be cheaper. As a matter of interest why did you go down this route, would a new MPi oil switch not do it?

Sadly they are no longer made, if I could get my hands on an original one I would be over the moon. :-)


#5 bloke

bloke

    Mini Mad

  • Noobies
  • PipPipPipPip
  • 139 posts

Posted 10 June 2014 - 11:11 PM

From a US owner of SPi Coopers only (ie, not having many minis around) I didnt know the MPi minis had oil temp gauges. Thats fantastic! Was this an option for the three extra gauges in the center of the dash? My brothers Cooper Si has the JG dash and the three gauges across the top are oil pressure, clock and volts, with water temp being in the cluster. Also, a oil pressure warning light in the cluster.


Does the MPI have an oil pressure gauge? I would really like to have both pressure AND temp...better still if they were on the same gauge. Both seems super important to keep an eye on with these cars

Yes, John Cooper Garages had the forethought to use Smith's dials, and more useful oil pressure gauge, I guess I'm just one of those people who like to get things working that came originally with the car. :-)


As far as I know, all MPI coopers have a dashboard, either in Walnut or brushed aluminium, and the three dials, invariably however, the oil temperature gauge either reads very low or not at all, which is usually caused by oil leaking into the temperature sender and destroying the resistive sandwich inside. I did take the sender apart in an attempt to repair it but it only lasted for short while before going back to the way it was before. 


This particular sender, is the only one I have found so far that has the same temperature characteristics of the original one, and it is just a shame that it doesn't have the same size thread as the original. 


All the very best from Bloke.


#6 brivinci

brivinci

    One Carb Or Two?

  • Members
  • PipPipPipPipPipPipPip
  • 1,152 posts
  • Location: New Jersey

Posted 11 June 2014 - 05:33 PM

Thanks. I just looked at some pix and noticed the oil temp. I always assumed that was oil pressure I guess.


#7 bloke

bloke

    Mini Mad

  • Noobies
  • PipPipPipPip
  • 139 posts

Posted 11 June 2014 - 07:30 PM

A small update, for the more electronically minded, and for those who also have a Dremel, you will still need the replacement sender, but if you cut very carefully around the edge of your original sender with the Dremel, (you can see this on the blue sender in the picture) you can very carefully fish out the resistive element from the new sender, and fit it to the old one.


Making sure that you very carefully isolate the resistive element using the plastic sleeve that was in the original, assemble all the parts and clamp into end in a mini vice, and solder the ring that should still be on the neck of the connector to the main body using a soldering iron capable of about 450°. 


This alternative saves me having to go out and go the extra mile to find all the various bits and bobs making up a brass adapter for the sender. Plus it works just as well as the prototype above. 


Here is a picture.


oil3.jpg


Cheers, all the best from Bloke.


#8 fergiemike

fergiemike

    On The Road

  • Noobies
  • PipPip
  • 36 posts
  • Location: North Yorkshire

Posted 12 June 2014 - 12:31 PM

Hi

I have this gauge not working in my 98 Mpi, is there a simple way to test the gauge as I bought a replacement sender from ebay but still does not work but don't know if its the sender or the gauge.

Also when you say oil pressure cap from an old engine/junk yard do you mean from a mini or the mg? are you then drilling and taping the cap to fit the MF sender?

Thanks will be great if I can get this gauge working otherwise I was going to sway for a pressure gauge.


#9 bloke

bloke

    Mini Mad

  • Noobies
  • PipPipPipPip
  • 139 posts

Posted 12 June 2014 - 01:31 PM

Hi there, yes, to test the oil gauge itself grab an 81ohm resistor and short the terminal out to ground that is connected to the sender. The gauge should read approximately half way. 


Alternatively if you take the sender out and stick it in a cup of boiling water it should read approximately 80 to 90 ohms from the outer casing to the terminal. 


The cap is from a Mini, it doesn't matter what Mini it is they are all the same. And yes I drilled and tapped it to fit the new sender. 


The alternative of cutting the end off of the original sender does mean that the probe is further into the oil flow, in theory this should make a vast difference, however in practice it only made a few degrees difference. 


Here is a picture of the gauge working with the repaired sender. 


oil4.jpg


Sorry the picture's a bit fuzzy, it's just an iPhone picture. 


Cheers, Bloke.


Edited by bloke, 12 June 2014 - 01:32 PM.


#10 fergiemike

fergiemike

    On The Road

  • Noobies
  • PipPip
  • 36 posts
  • Location: North Yorkshire

Posted 12 June 2014 - 01:56 PM

Thanks for that I'll put this on my todo list

Don't think I dare cut the end off and solder I would be always wondering if my solder would hold would hate it to fail and lose the oil out.

I see there is another original one on ebay at the moment http://www.ebay.co.u...984.m1423.l2649

but who knows if its a working one


#11 bloke

bloke

    Mini Mad

  • Noobies
  • PipPipPipPip
  • 139 posts

Posted 12 June 2014 - 04:19 PM

Luckily it's sealed at the oil end :) you're just cutting off the connector to reach the gubbins inside. Yep I saw the one on ebay, it more than likely doesn't work, it would be a miracle to have lasted this long ;)


Shame they didn't use Smith's dials, they're not perfect, but you can still get parts for them.


#12 fergiemike

fergiemike

    On The Road

  • Noobies
  • PipPip
  • 36 posts
  • Location: North Yorkshire

Posted 12 June 2014 - 08:45 PM

going to order the mgf one tomorrow and have a go

Cheers

Have you seen my other post re the mpi cutting out? any ideas no one seems to what to give an opinion


#13 bloke

bloke

    Mini Mad

  • Noobies
  • PipPipPipPip
  • 139 posts

Posted 12 June 2014 - 10:03 PM

going to order the mgf one tomorrow and have a go

Cheers

Have you seen my other post re the mpi cutting out? any ideas no one seems to what to give an opinion

Yep, have a quick peak at your post, I've posted a somewhat rambling reply :-)


#14 fergiemike

fergiemike

    On The Road

  • Noobies
  • PipPip
  • 36 posts
  • Location: North Yorkshire

Posted 20 June 2014 - 02:52 PM

OK got the MGF sensor tried it on the gage connector and warmed it up and hey presto the gauge worked so I now know wiring and gauge are OK.

So both sensors and assembled the old one back with the with the top from the mgf one.

Only trouble is after working for a few miles the joint between them had not held. Maybe by soldering at fault wondered if there other ways to hold these together maybe some adhesive like jbweld?

Any tips?


Problem now is when it came apart I have lost the spring from the original.. Do you think it would work if I stretch the spring from the mgf one so it fits?

Thinking I should have gone for the drill and tap option but could not get hold of a pressure cap


#15 bloke

bloke

    Mini Mad

  • Noobies
  • PipPipPipPip
  • 139 posts

Posted 26 June 2014 - 09:16 PM

Yep, the spring will be fine, hope you swopped over the resistive disk at the bottom of the new sender to the old casing. :)


I found that gently clamping the whole thing cobbled together in a mini vice, allowed me to heat it up really hot (about 350 degrees) and made a good joint between the ring of metal on the connector and the base. Not too much heat escaped through the vice that way.


The replacement I made up is working really well, and would have to reach over 270 degrees to melt the solder, which hopefully the engine won't reach, as if it does, I've got bigger problems. :)


It might help to clean up the surfaces to be soldered with the Draemel, so the soldering iron and solder has a good surface to adhere to. 


The very best of luck, Bloke.


1 user(s) are reading this topic

0 members, 1 guests, 0 anonymous users