Have hankered after a BMW for a number of years now, 320d, 330d, 520d or 530d touring would be my thing however always hesitate due to rear wheel drive winter problems (I have 2 4wd cars at the minute). Some day maybe?


The Otters E30 Touring
Started by
The Otter
, Mar 26 2014 01:29 AM
63 replies to this topic
#46

surfblue
-

- Members
-

- 1,827 posts
Camshaft & Stage Two Head
- Location: Stuck in the 1980's
Posted 13 July 2014 - 10:36 AM
#47
The Otter
-
- Members
-
- 620 posts
The artist formally known as j322overthetop
- Location: Midlands
Posted 24 July 2014 - 12:18 AM
Omg, you really have been working non stop! Looks awesome mate :)
Cheers man, glad you like it  and yeah, now you know just how busy I've been on it!
Congratulations on the MOT mate
Thanks buddy, was a relief passing first time with no real problems (apart from the rad blowing up on the way home of course!)
Really like this, I'm thinking of getting a 325i Sport when insurance has settled down to use as a daily and track car.
Will be following.
Thanks! Sounds like you've got a nice little plan there, I'll have to report on what it's like as a daily when I can finally drive it legally next Friday.
Have hankered after a BMW for a number of years now, 320d, 330d, 520d or 530d touring would be my thing however always hesitate due to rear wheel drive winter problems (I have 2 4wd cars at the minute). Some day maybe?
I do like the look of a lot of cars BMW have churned out over the years, a nice diesel like you've listed is on my want list for the day I have enough money to afford a newer car of my own! Keep an eye out on this thread over the winter, I'll let you all know how many times I crash it! The skinny 'bottletop' alloys that came on the car have some good mud and snow tyres fitted, so I'll put them back on in the winter in the hope they might save me and my dignity... although of course, nothing will beat the mighty Mini for performance in the snow, I loved hooning mine round a couple of winters ago on it's skinny 145 tyres!
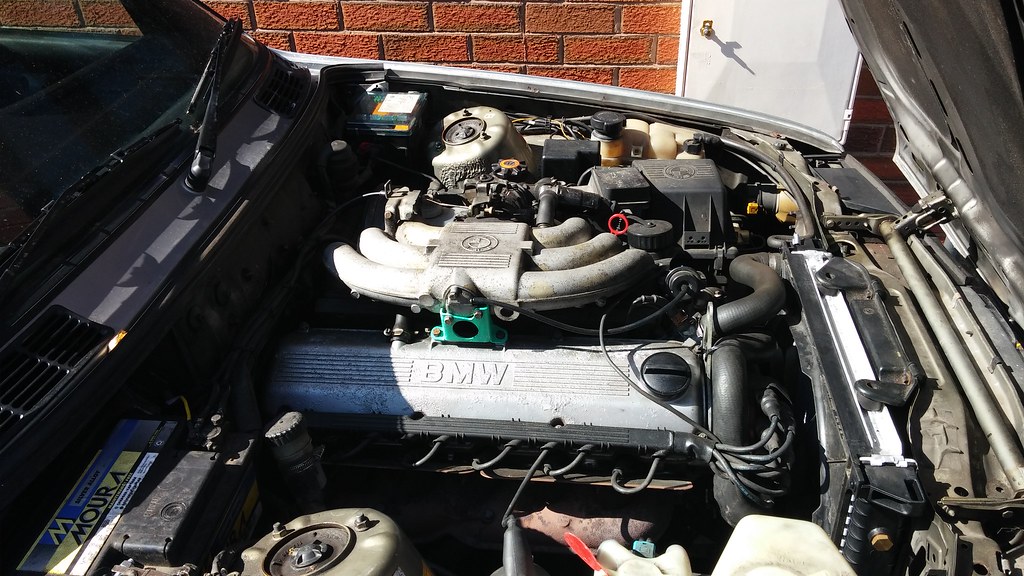
I've done a few little jobs on the E30 since it passed the MOT - first was to do an oil change and set the tappets, see if I could quieten this engine down a bit! Whilst I had the rocker cover off, I thought it would be rude not to give it a new coat of paint. Here's what I started with, a flaky silver finish that I think someone had painted on DIY sometime in the past. Also note the weirdly painted turquoise steady bracket thing... that had to be repainted too!
 20140715_164053 by svenicusminimus, on Flickr
I fancied a crinkle paint finish, so I fished out this old, old can of "velvet touch" red paint that I remembered I had somewhere. It turned out more pink than red, but this was never meant to be the final colour anyway.
 20140715_194301 by svenicusminimus, on Flickr
Once the crinkle paint had sufficient time to harden, I sprayed on a few thin coats of satin black.
 20140716_135717 by svenicusminimus, on Flickr
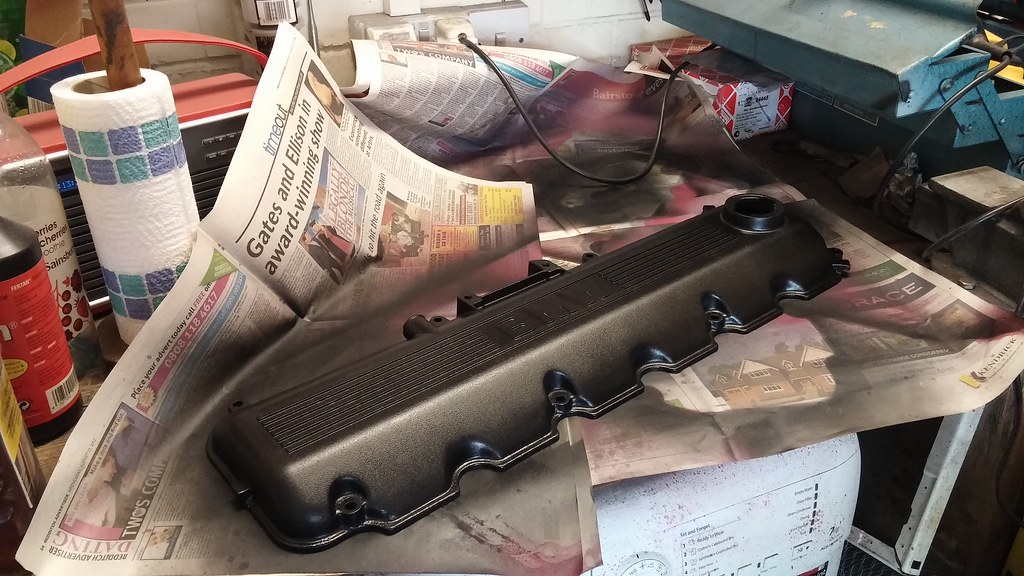
Then I carefully sanded off the paint on the raised ribs and BMW writing. I used gradually finer grades of wet'n'dry paper until I got a nice 'brushed' kind of sheen.
 20140716_165048 by svenicusminimus, on Flickr
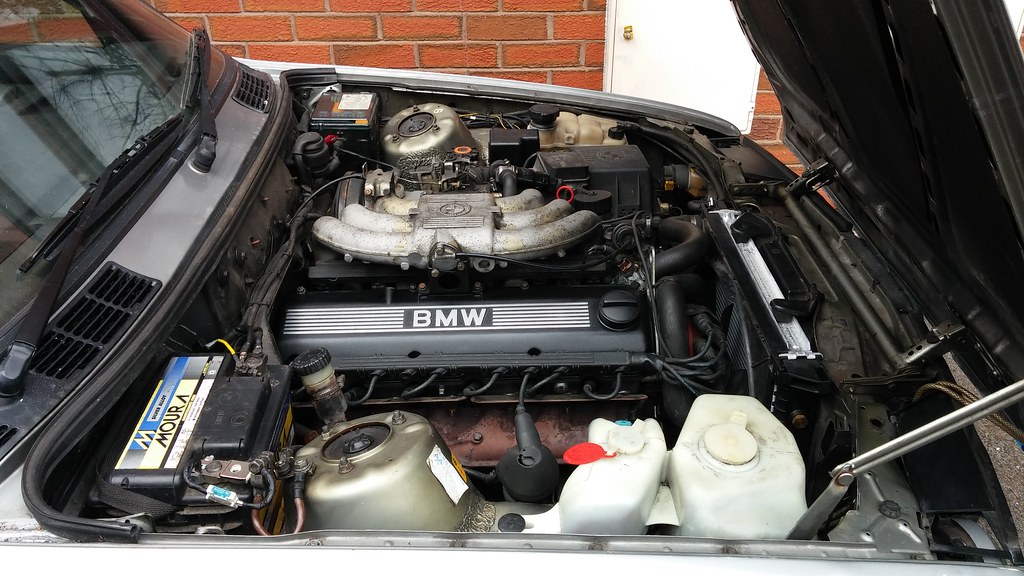
Here it is back on the engine, after the valve clearances had been adjusted of course. They didn't get any quieter if anyone was interested, despite quite a few of them being over tolerance - guess it's just a tappety old motor.
 20140716_175324 by svenicusminimus, on Flickr
Making the rocker cover look so nice made the rest of the engine bay look awful, so I've started going over bits of the engine whenever I'm at a loose end and want some mindless cleaning to do. I'd only scrubbed up the strut tower on this side of the pic at the time I took the photo, but I've done a bit more since and it's starting to look a lot nicer under there.
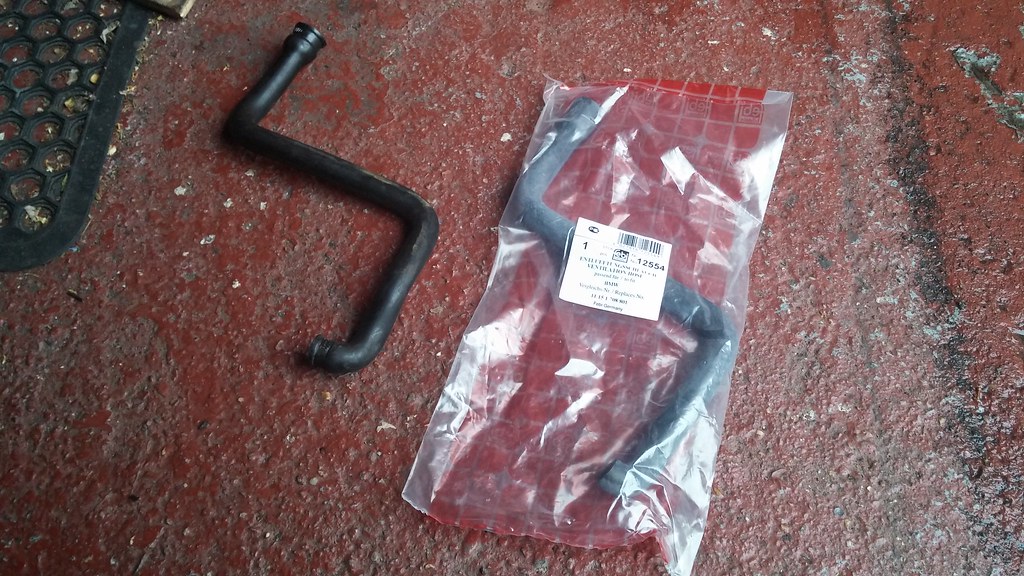
I also changed this breather hose that goes from the rocker cover to the throttle body, as it just split apart when I pulled it off to get the rocker cover out. Old one is on the left, obviously...
 20140719_112926 by svenicusminimus, on Flickr
I renewed the front brake hoses, just for peace of mind really. They weren't an issue for the MOT, but the rubber was starting to crack on them, so I guessed they were pretty old. Spanners weren't enough to get the hose unions to budge without rounding them off, so I quickly resorted to the mole grips (top and bottom of the photo).
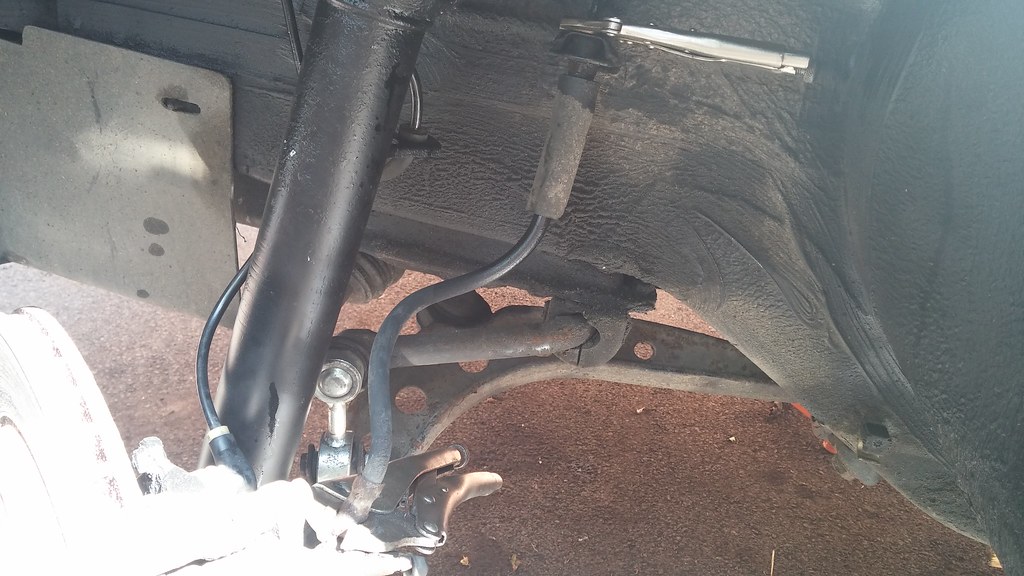 20140722_104109 by svenicusminimus, on Flickr
Once I got the unions freed off with the mole grips, it was actually pretty painless and I got the new hoses on in no time. I still had bad memories going through my head of when I had to hacksaw through the Mini's copper pipes and replace the solid lines on the front just to renew the hoses!
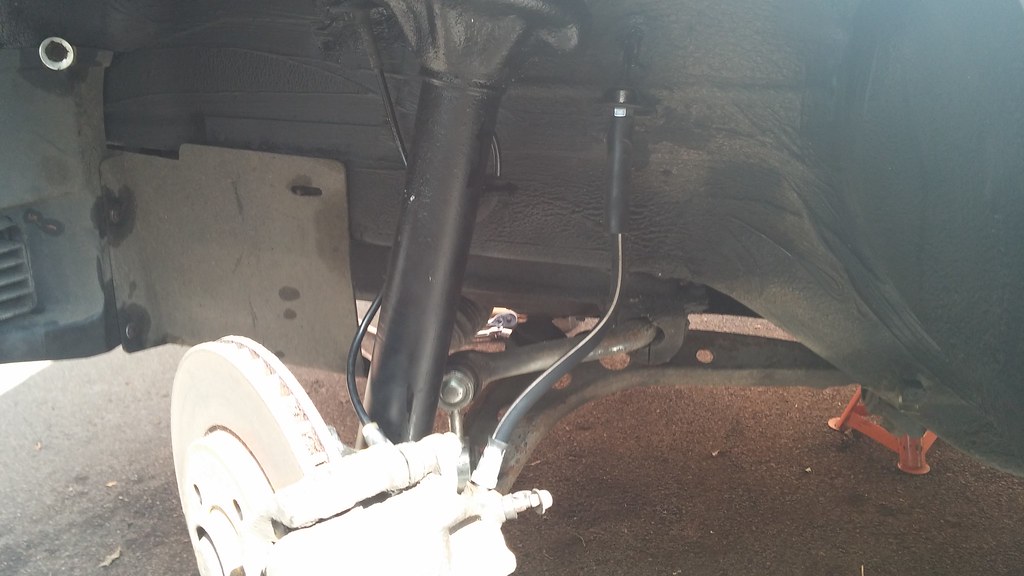 20140722_105615 by svenicusminimus, on Flickr
Here's the cracking on the old hoses.
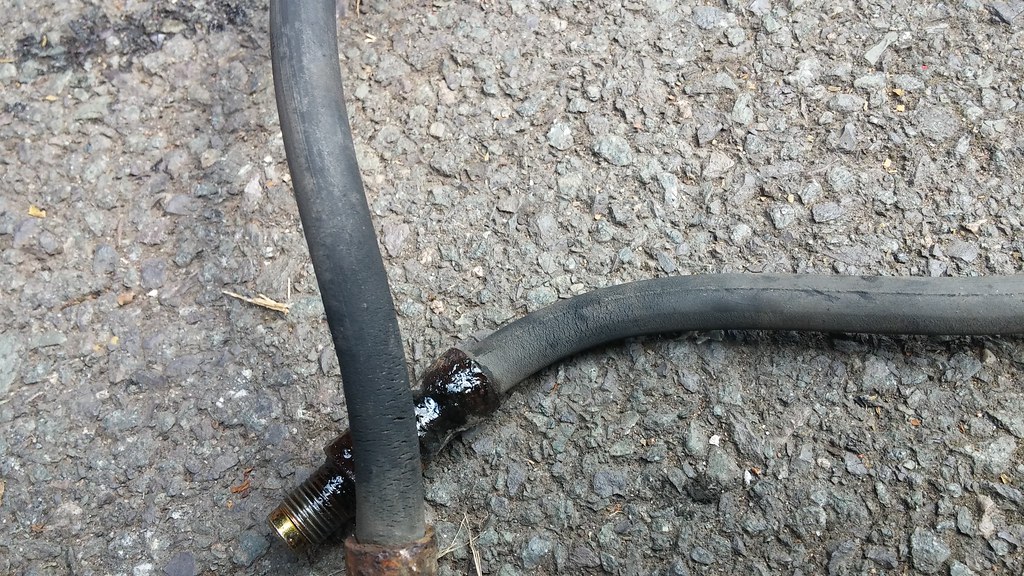 20140722_113136 by svenicusminimus, on Flickr
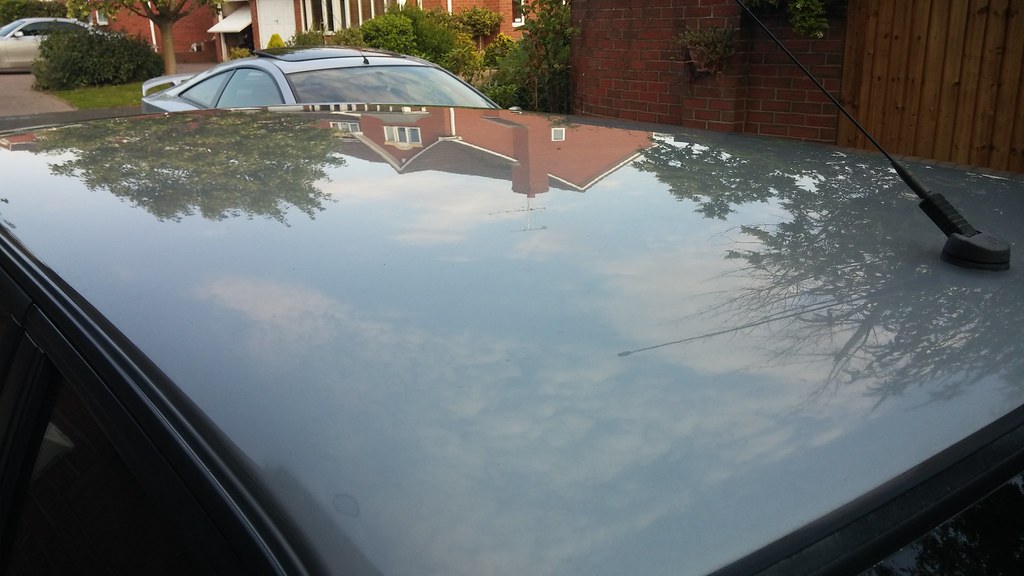
Today I had a go at making the roof a bit shinier. These scratches beneath the surface are so weird... anyway, here we are half way through the 3000 grit sanding.
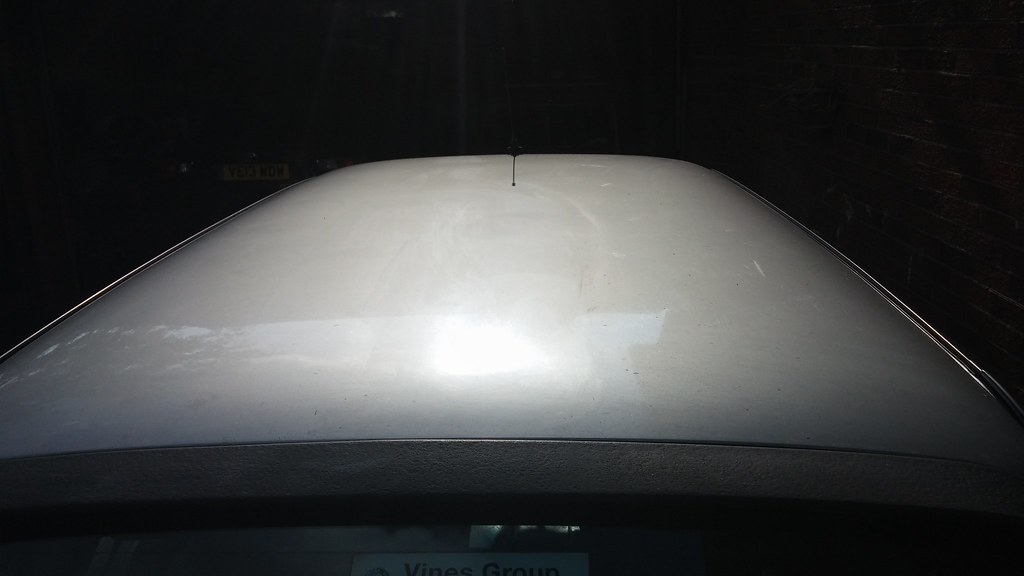 20140723_172055 by svenicusminimus, on Flickr
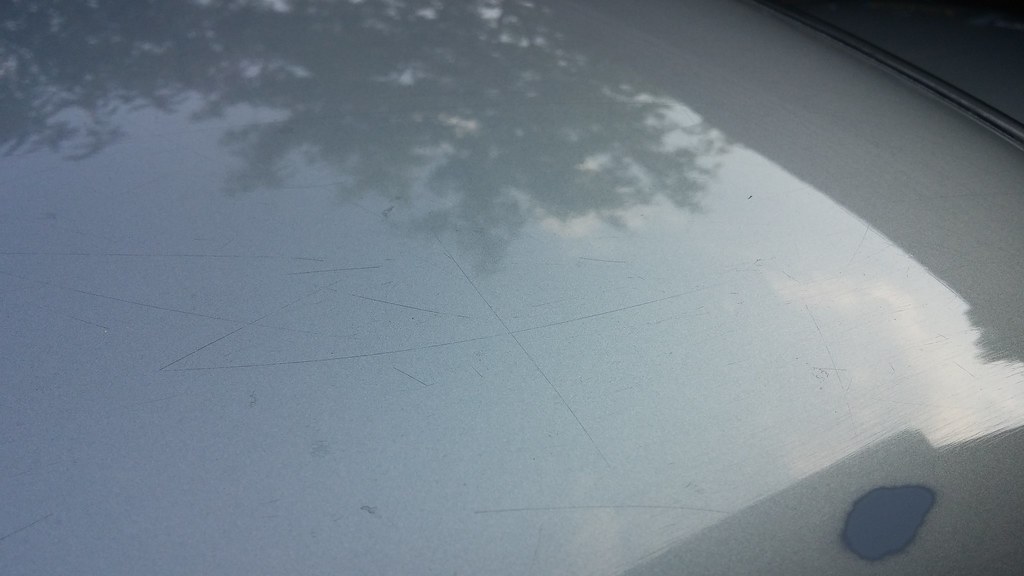
Here we are all finished, 3000 sanded, then T-cut, then some polish 
 20140723_190334 by svenicusminimus, on Flickr
Looking from the right angle, what's beneath the clearcoat can be seen... that spot of primer on the bottom corner is how I found out the scratches are more than skin deep  Just to clarify, this is AFTER all of the sanding and polishing... not much I can do about it apart from a respray, and that won't be happening any time soon!
 20140723_190356 by svenicusminimus, on Flickr
That's all up to date now, looking forward to next week when I can start driving it, especially now as we've sold the Celica I was using so now I have no car for a few days. 
Edited by The Otter, 24 July 2014 - 12:23 AM.
#48
rally515
-

- Members
-
- 3,848 posts
Up Into Fourth
- Location: ask!
Posted 24 July 2014 - 12:24 AM
That rocker cover being painted has definatly made a world of difference Otter!!! Looks like a milion dollars now  .
.
I reckon you need to get on the case of filing those casting marks of that intake next 
Cheers,
Cliff
#49
The Otter
-
- Members
-
- 620 posts
The artist formally known as j322overthetop
- Location: Midlands
Posted 02 August 2014 - 09:02 PM
That rocker cover being painted has definatly made a world of difference Otter!!! Looks like a milion dollars now
I reckon you need to get on the case of filing those casting marks of that intake next
Cheers,
Cliff
Thanks, glad you like it.  Maybe one day I'll do something with the intake manifold, it's a lot more hassle to take it off the engine than the rocker cover was, so it'll stay mostly like it is for the time being probably!
Few more things done in the past week or so. One morning, a set of new floor mats arrived. The red on them is a bit more 'in-your-face' than I was hoping for, but they'll fade over time anyway. They do match the headlining though
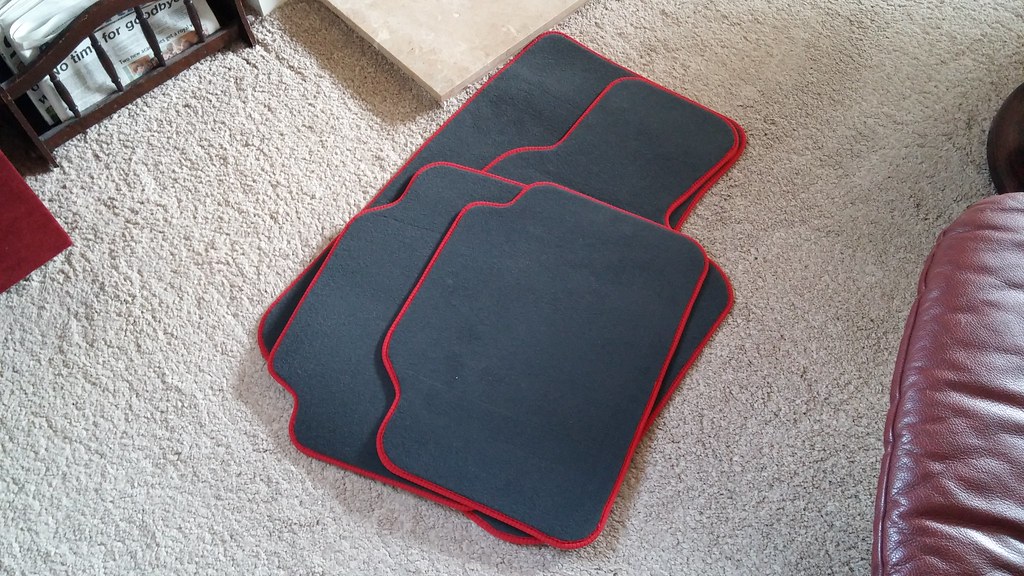 20140726_103505 by svenicusminimus, on Flickr
Here they are in the car. 20140726_103840 by svenicusminimus, on Flickr
I spent a whole afternoon making the passenger's side of the car shiny. The wing had to be 1500 grit sanded to get it flat enough, and the rest of the paintwork came up really nice on this side. There seems to be less of those 'beneath the surface' scratches on this side. 20140726_163438 by svenicusminimus, on Flickr
 20140726_163459 by svenicusminimus, on Flickr
As you can see above, I still hadn't gotten round to sorting that dent in the wheel arch. I'd sanded it back ages ago and then left it - it looked like this when I bought the car.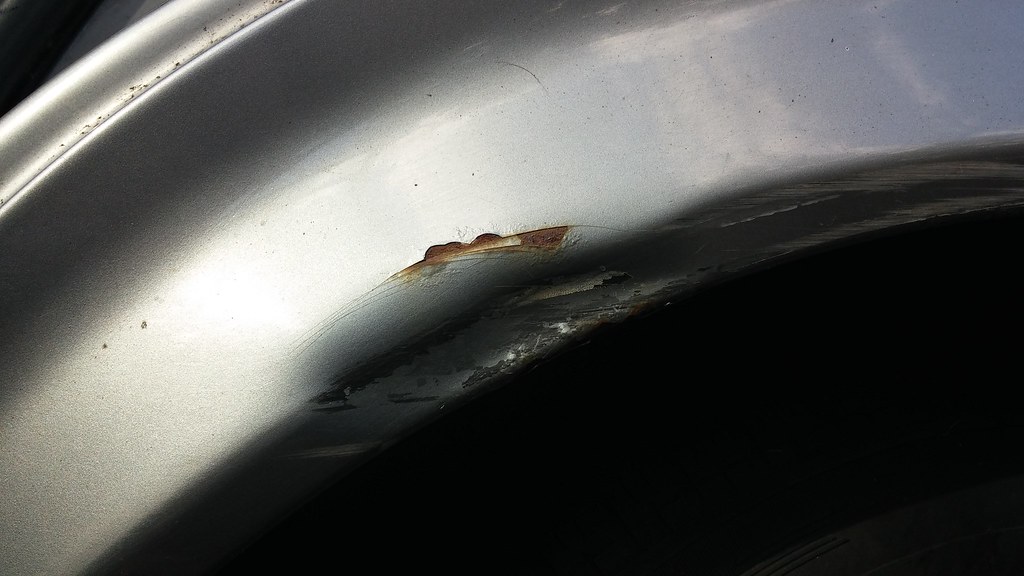 20140514_160328 by svenicusminimus, on Flickr
How it then looked for the past couple of months.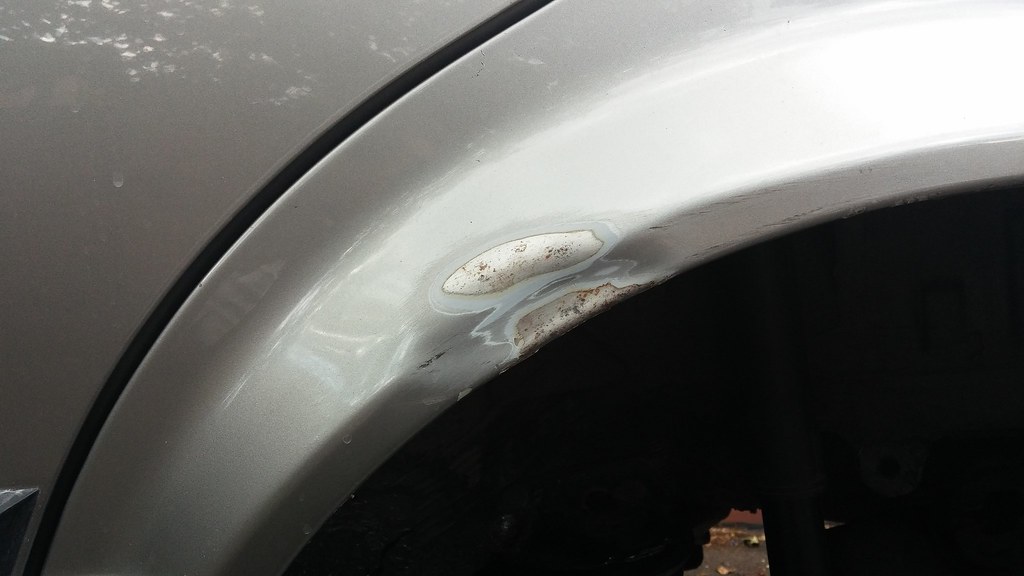 20140728_155359 by svenicusminimus, on Flickr
So I took the hammer (along with a punch and a screwdriver) to the inside of the wheel arch and managed to get the shape mostly back to where it should be. I wasn't worried about mangling the inside of the arch because it was all covered in surface rust which also needed sorting (which I have now done).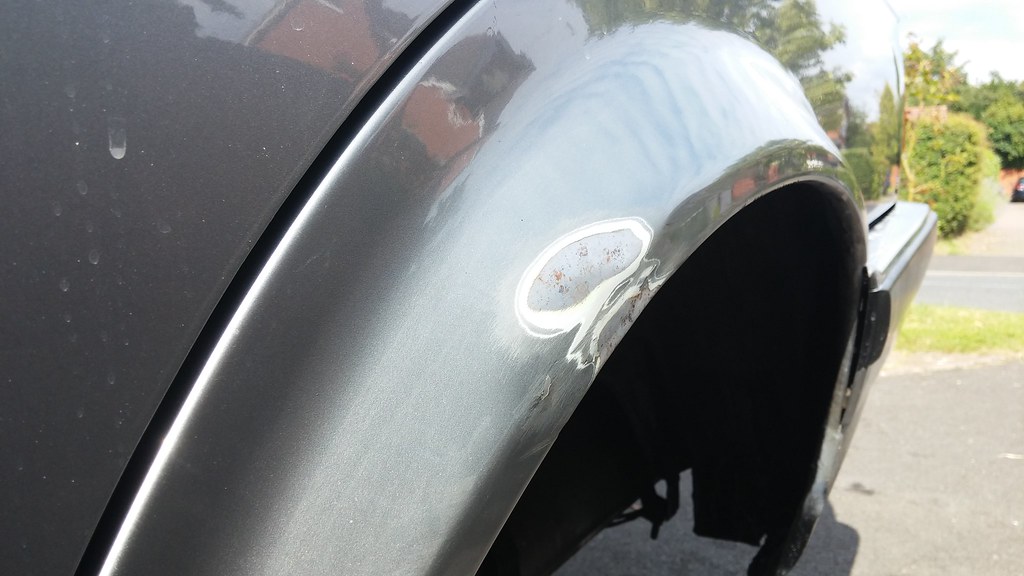 20140728_163729 by svenicusminimus, on Flickr
I forgot to take any pictures, but a couple skims of filler were added to smooth it off. I then primered over that: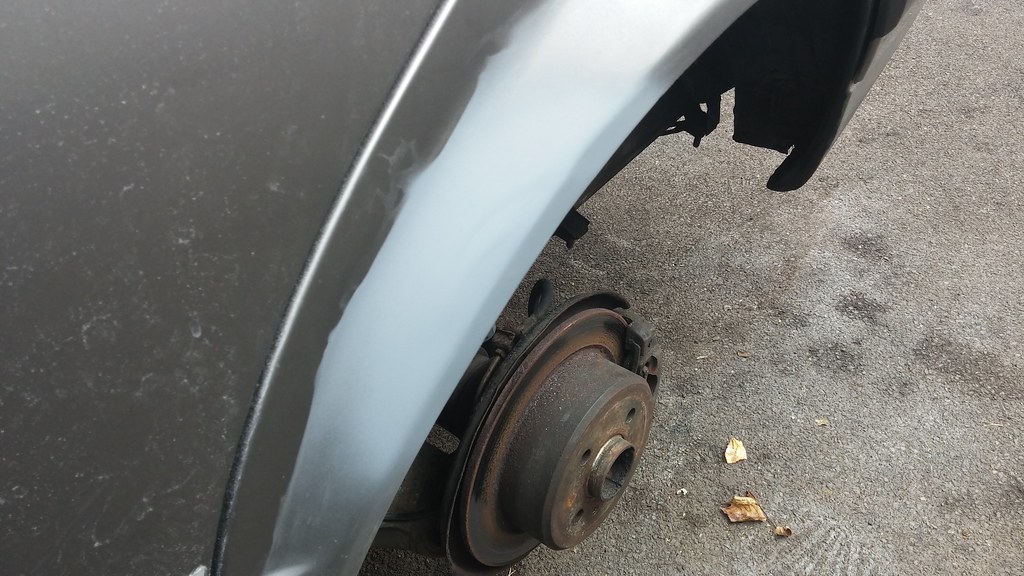 20140730_121208 by svenicusminimus, on Flickr
Then I got some colour on, but unfortunately it started raining after the third coat so it's still not finished as I didn't get any clearcoat on it.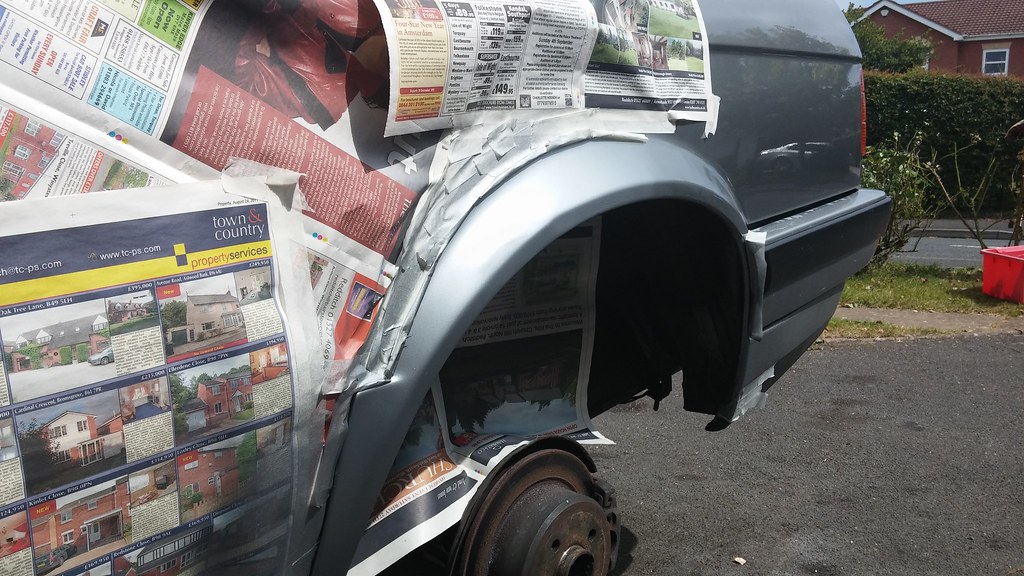 20140730_124454 by svenicusminimus, on Flickr
I ordered some cheap universal alloy wheel centre caps off ebay to try and tidy up the BBS wheels a little bit. The actual big BBS centre caps that they're meant to have are more expensive than the wheels themselves, so I'm not getting any of those (£30 each or so?). For £5, I got a set of 4 smaller plastic chrome ones that I promptly resprayed in satin black.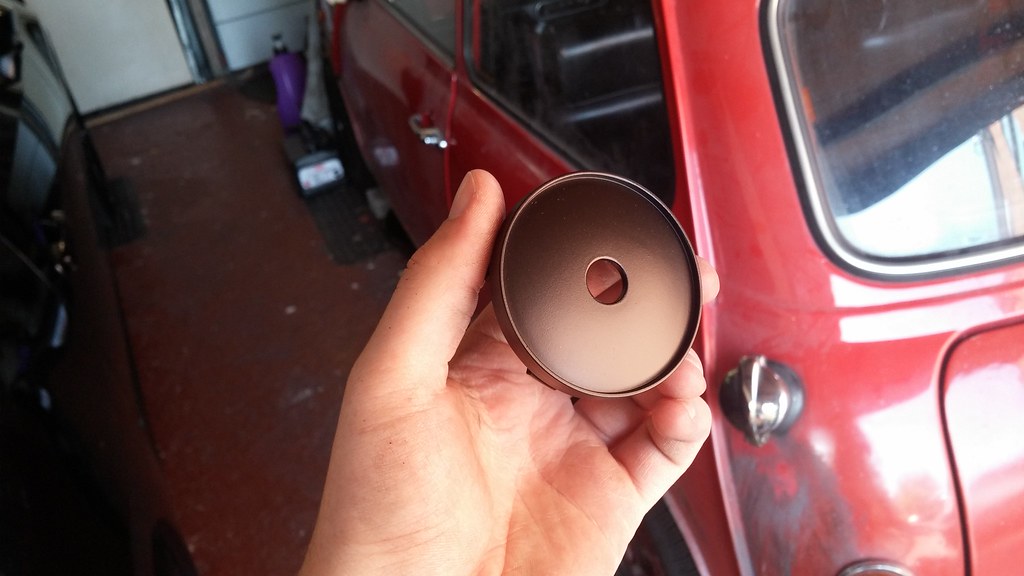 20140730_133325 by svenicusminimus, on Flickr
Unfortunately they have a hole in the middle, which I thought looked a bit pants. I would've left them satin black if there wasn't a hole, but I felt I should cover it with something, so I made use of the m-stripe vinyl that I had left from doing the bonnet. Yes, yes, there are now 5 bits of M-striping on a non-M BMW - my only justification is that this car was specced with an M-Tech steering wheel from the factory; close enough right?  20140730_133341 by svenicusminimus, on Flickr
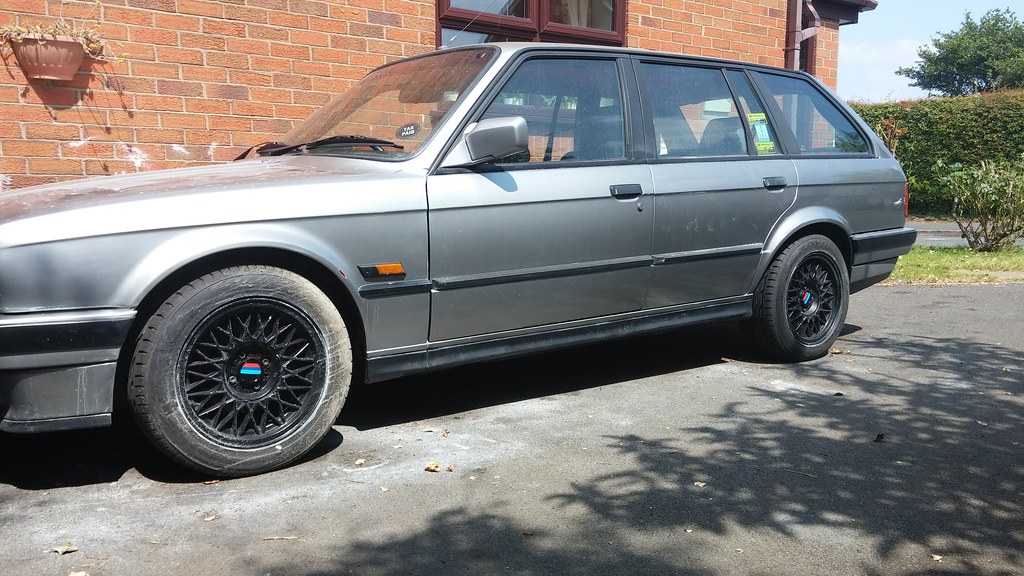 20140730_133943 by svenicusminimus, on Flickr
It hardly cost me anything to do, so it doesn't matter if I don't like them after a while, I can just pull them off or put different stickers on there or something. I kind of like it as it is for now though.
Up there ^ somewhere, I said that I was cleaning bits of the engine bay once in a while when I could be bothered. Well, one of the biggest differences I made was in cleaning the underside of the bonnet. It was all black with road dirt (I'm sure you all know what that looks like) but look at it now!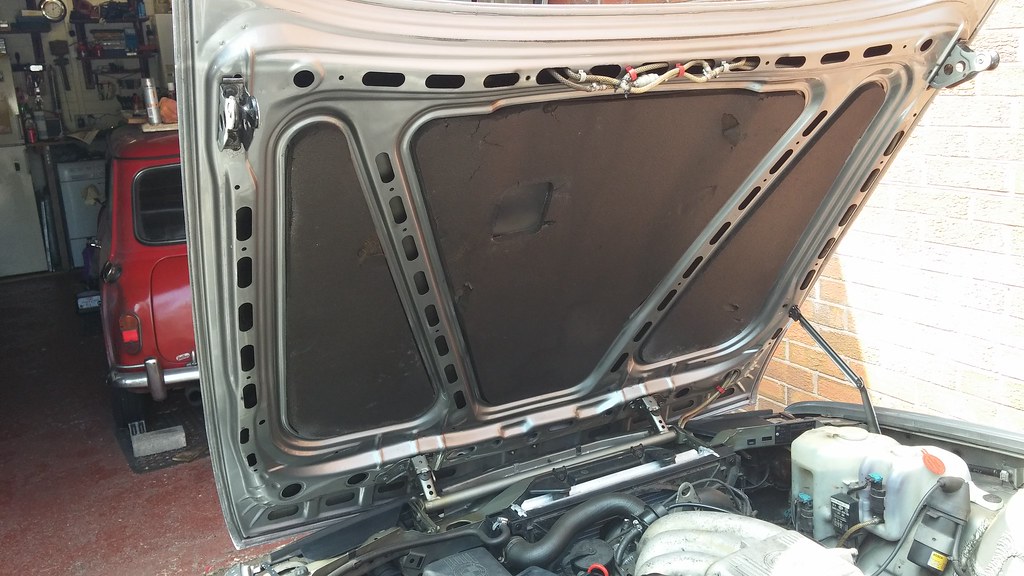 20140730_140236 by svenicusminimus, on Flickr
Now it just makes the sound deadening look bad. 
I had a little go at cleaning up the intake manifold as well. I would take it off and paint it to match the rocker cover, but I can't really be bothered to be honest as it's a lot more hassle than taking the rocker cover off. It was covered in plenty of flaky yellow stuff, so I wire brushed it off to make it look a little shinier. In case you're wondering, the yellow stuff is apparently some weird BMW protective coating (called Cosmoline) that was smothered over almost everything in the engine bay prior to shipping the car off from the factory. That's what this little blob of stuff is on the strut tower, where they put it on a bit too thick.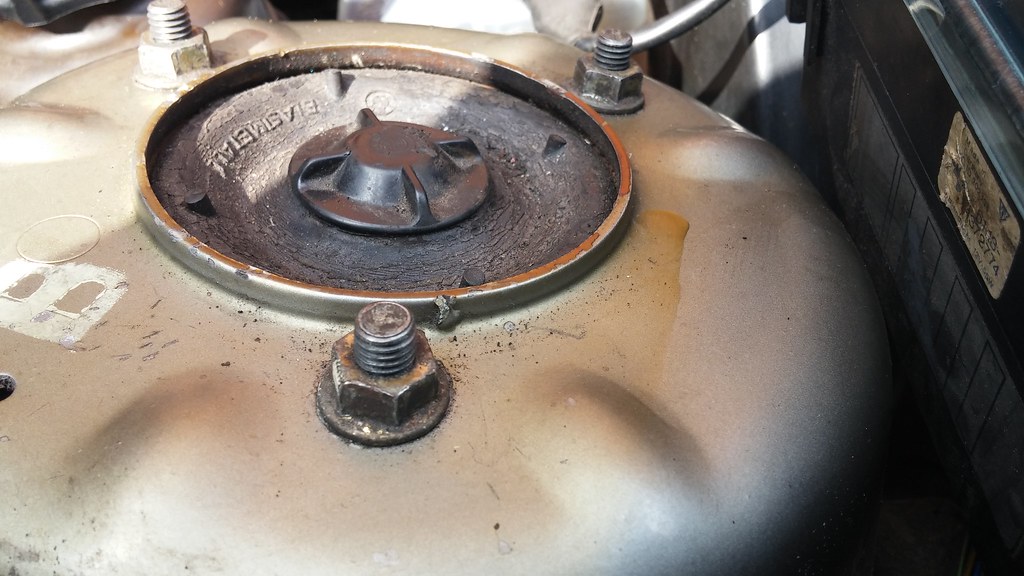 20140730_144547 by svenicusminimus, on Flickr
Anyway, the intake.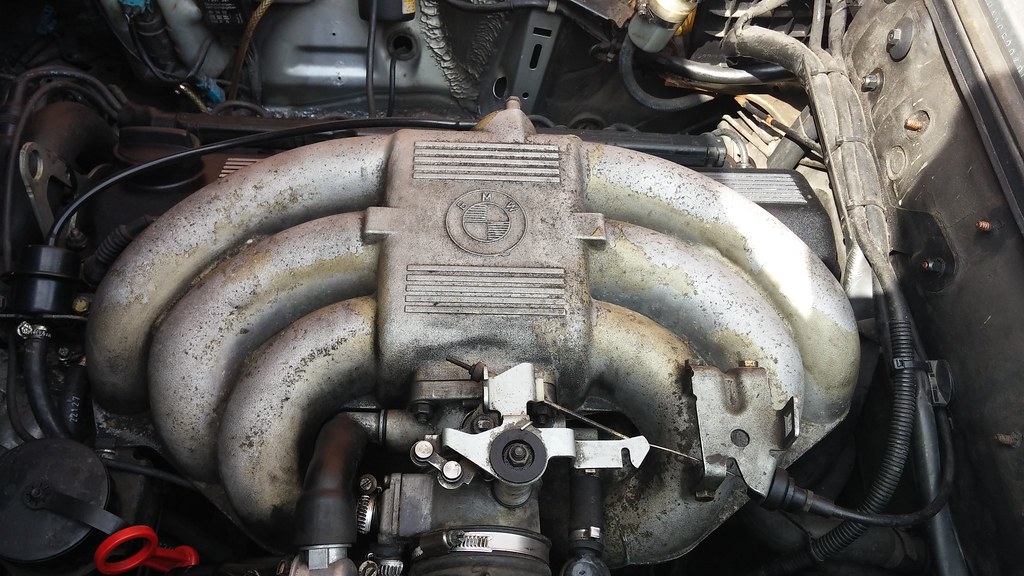 20140730_144554 by svenicusminimus, on Flickr
After a wire-brushing. 20140730_145953 by svenicusminimus, on Flickr
It's not as good as it could be, but I only did a quick job.
A package arrived in the post a few days ago. I do buy the highest quality items for my cars - this was no exception - behold, the uniquely named 'Keyless Entr System'. A worthy investment for £9.79.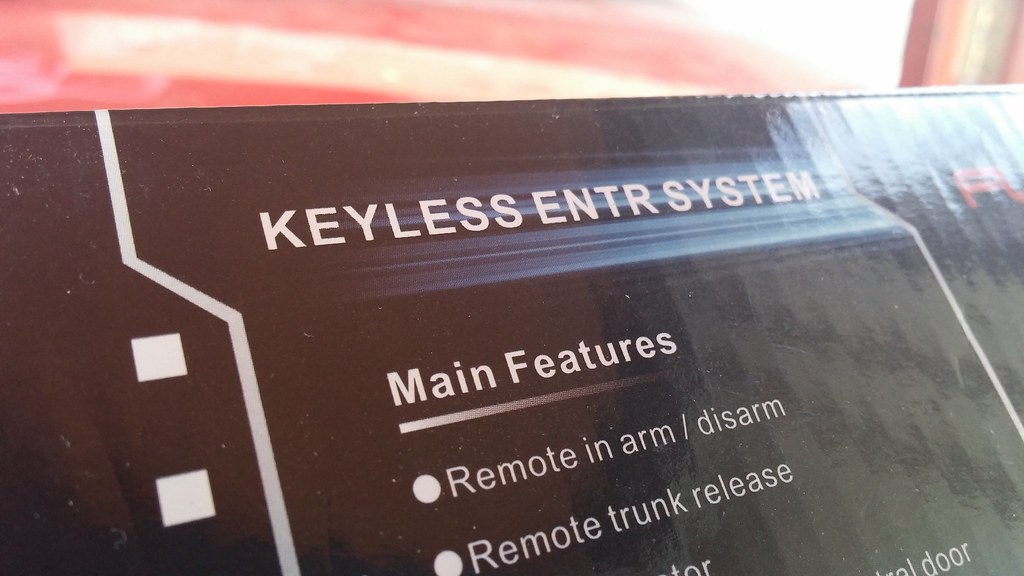 20140731_113219 by svenicusminimus, on Flickr
There was hardly any wiring to do to fit it, and some of it had already been done for me. The car must have had a full central locking alarm fitted in the past, as these butt connectors gave me the feeds I needed for the lock/unlock request wires without me having to do anything. Thanks long lost previous owner. 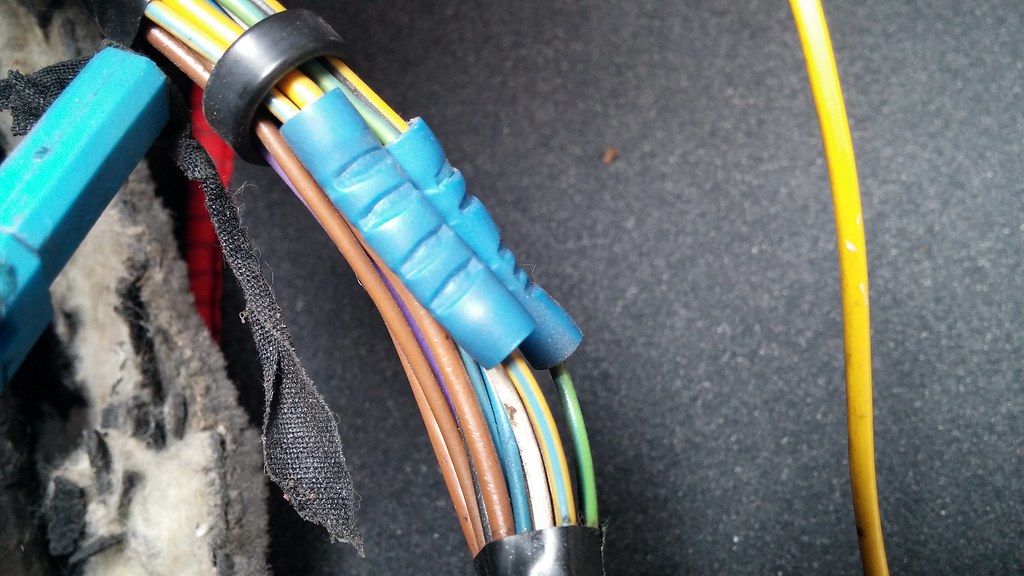 20140731_115418 by svenicusminimus, on Flickr
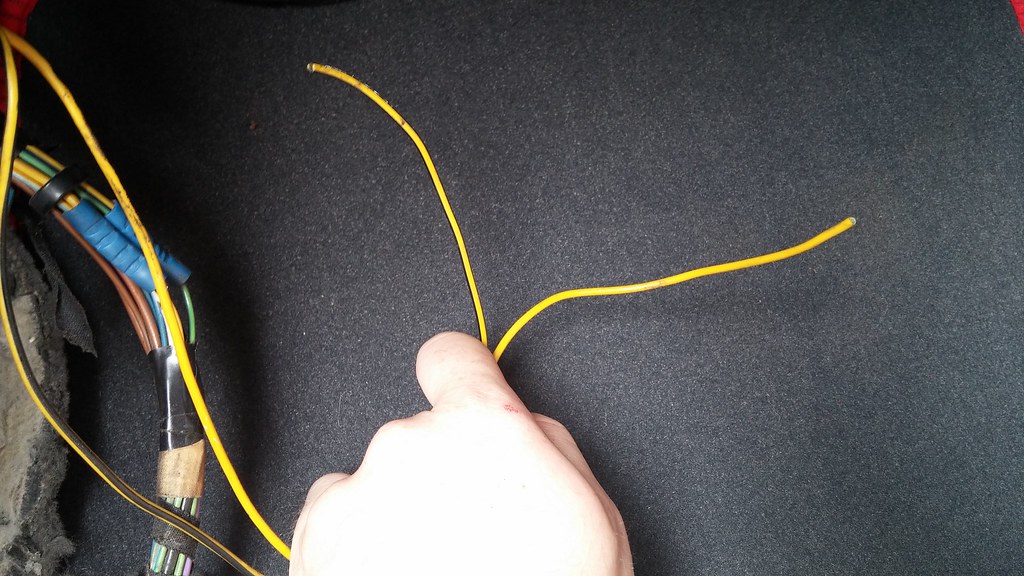 20140731_115435 by svenicusminimus, on Flickr
So now I have one of these on my key ring - snazzy. 20140731_184031 by svenicusminimus, on Flickr
That's everything up to date. The car is on the road now and I've done about 120 miles in it since midnight yesterday, and it's pretty awesome if I do say so myself. A few little niggly things to sort out, but nothing really major. It's a lot more comfy than I was imagining it would be, but that probably shows just how uncomfy the gen 7 Celica was that I had before. It also makes many sexually arousing noises from under the bonnet, and it's pretty quick and handles really nicely.
As long as nothing catastrophic goes wrong with the car in the next few days to avert my funds towards, I'll sort out the bits I need to get this E46 steering rack in within the next couple of weeks.
Cheers all 
#50
MrBounce
-

- TMF+ Member
-
- 2,643 posts
Up Into Fourth
- Location: The Manroom in Ipswich
Posted 03 August 2014 - 09:56 AM
Loving it. Good work Otter! 
#51
JackF
-
- TMF+ Member
-
- 645 posts
Super Mini Mad
- Location: West Sussex
- Local Club: NSMOC
Posted 26 December 2014 - 12:17 PM
Any updates? Miss reading this one
#52
The Otter
-
- Members
-
- 620 posts
The artist formally known as j322overthetop
- Location: Midlands
Posted 26 December 2014 - 02:20 PM
Sorry Jack, I've been occasionally updating the thread over on RetroRides but I never got round to transferring it all over here... I'll get on it now!
#53
The Otter
-
- Members
-
- 620 posts
The artist formally known as j322overthetop
- Location: Midlands
Posted 26 December 2014 - 02:28 PM
You'll have to imagine reading this lot at the time of posting - read it retrospectively to make sense of it. The first update has some great mechanical stuff going on with the steering rack, I really enjoyed writing it up.
Mid-August '14 update
Well, I've driven about 330 miles in the E30 so far, and you'll be pleased to know that nothing has gone catastrophically wrong yet. In the first couple of days I had a bit of an issue with the rear right light cluster bulbs going on strike whenever they felt like it, but a bit of contact cleaner on the light board connecting pins solved those issues. I have a feeling the driver's side front drop link is dead too, it was fine before I started driving it but a couple of years off the road is bound to bring up these sorts of issues. That and the fact the one on the passenger's side is obviously much newer, means the driver's one is probably getting on a bit... anyway, I'll sort that sometime soon. Here's a random picture to show it hasn't blown up yet.
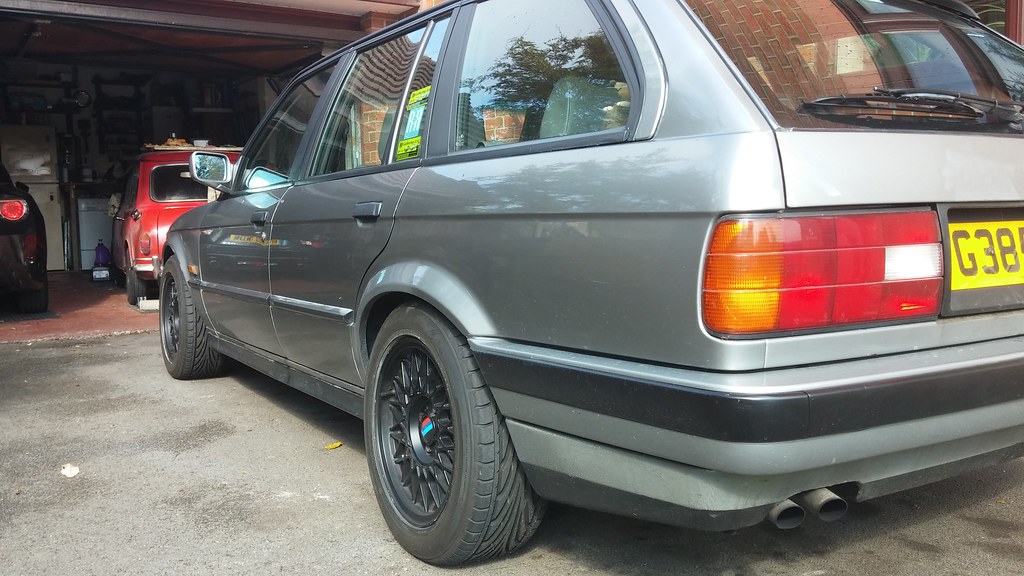 20140815_095306 by svenicusminimus, on Flickr
There was one very minor issue I wanted to try and sort, which was a very slight misfire/stumble at part throttle cruising. To me, it felt like when I was driving the Mini and the mixture was too lean on the carb - a bit of research on the interwebs found that a fairly common cause of this issue was that the injectors get gummed up over the years and then can't deliver enough fuel under light loads, so you do actually get a slightly lean mixture. So the injectors are currently away being ultrasonically cleaned and lightly refurbed with new seals and such. Took a bit of fiddling to get them out of the car, but it wasn't too bad of a job. Sent them off in the post on Friday, should be back within a week hopefully. Here's the fuel rail with one injector removed.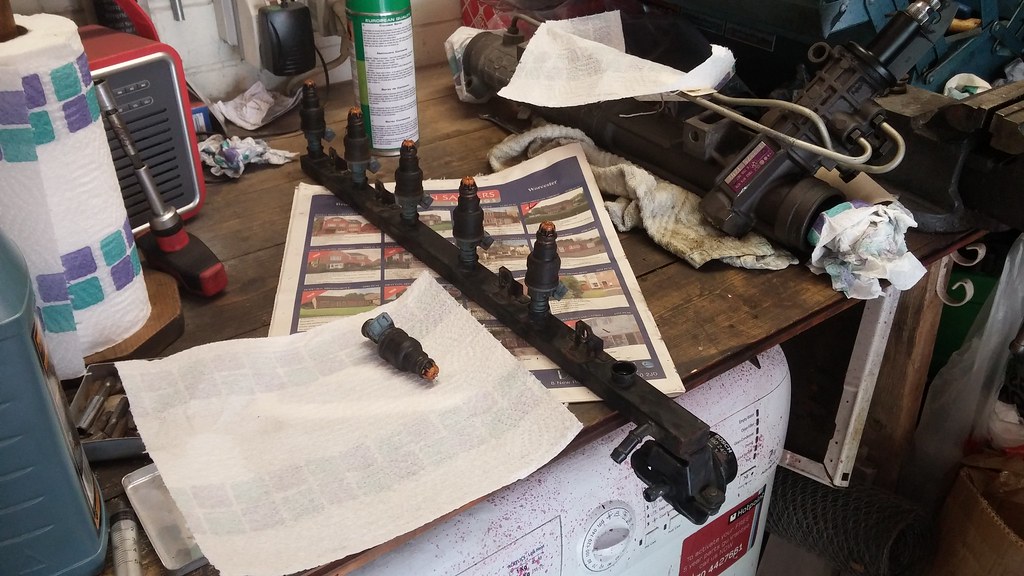 20140815_112526 by svenicusminimus, on Flickr
As nothing major had gone wrong with the car, I bought all the bits I needed for the E46 rack conversion. Whilst the injectors were away being cleaned, I figured it'd be a good time to change the steering rack, as it'd likely take me a couple of days and I might as well do it now whilst I can't drive the car anyway.
I'm fitting this new rack because it's a much faster rack than the original E30 one. A common complaint of E30's is the slowness of the steering, and to be honest I really don't like it - it's 4 turns lock to lock, and as well as being annoying I found it to be a bit dangerous when I almost crashed in to opposing traffic when trying to manoeuvre around a parked bus in a busy tight street in Birmingham somewhere. The purple tag E46 rack that I'm fitting is about 3 turns lock to lock, more like a normal car!
There are a few hurdles to overcome when fitting a later model (E36/E46) steering rack to an E30 however, and some are more annoying than others.
Firstly, probably the easiest thing to overcome is that the newer racks are not as tall the E30 racks on the mounting blocks. They have exactly the same mounting bolt spacing and bolt size, but the mounting blocks are missing about 14mm of material on the top side, when compared to the E30 rack. If you want a really neat way of getting round this, then you get a couple of spacers made up (or you machine them yourself if you've got the tools) to make up the height difference. OR if you're a bit pikey like me, you can stack a load of washers up until you get them 14mm high, then super glue them together. So, that's the first issue out the way.
Second, is the universal jointed steering linkage, that connects the column poking out of the firewall, to the input splines of the rack. The E46 rack still has the same spline pattern/size as the E30 rack, but unfortunately the design of the rack means that the original linkage is too long (by about 25mm apparently). There a few ways of getting round this, like shortening the original linkage or getting a custom linkage made for you, but there's a really neat way of doing it that was discovered about a year and a half ago (from what I can see on the E30 forums anyway), that involves using the steering linkage from a Vauxhall Corsa C, as below.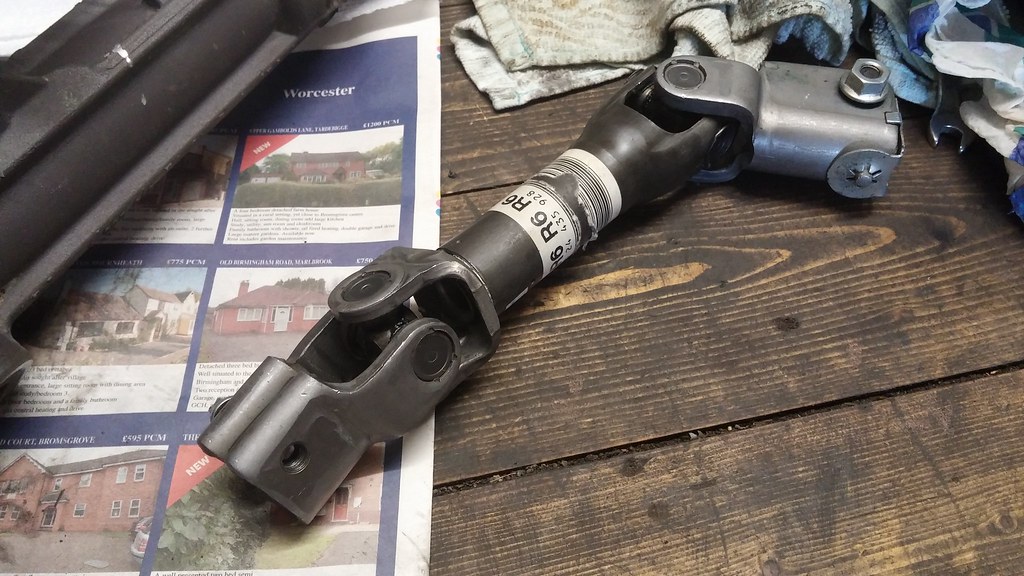 20140815_130749 by svenicusminimus, on Flickr
This linkage is exactly the right length (well, it is when we're done with it anyway), it has the right spline pattern for the E46 rack, and most importantly, it's fairly cheap (this one cost me £19 on ebay). You still need to modify it a bit, but I found it quite fun. I'll run through what I did.
First thing is that, even though the spline pattern is the same, there's a 'master' spline on the corsa linkage, which prevents it from sliding on to the E46 rack splines. You can see the flat area with a lack of splines on the far side, in the picture below. 20140815_130736 by svenicusminimus, on Flickr
The E46 rack just has continuous splines all the way round, so I either needed to file away some splines on the rack, or file away the raised area on the linkage. I chose the latter, because I'd rather hack up the cheap Vauxhall part than the more expensive BMW part. 20140815_130821 by svenicusminimus, on Flickr
Whilst I was filing away the necessary area on the inside of the linkage, I tried to give it some rough spline shapes, just because I could. It kind of worked, and seeing as the linkage was a lot softer metal than the rack shaft, I could give the linkage a few light taps with a plastic hammer to force it on to the rack shaft and make it conform to the right shape. The filed out bit is on the bottom of the circle in this photo (you can see where it dips down on the outer edge, relative to the other splines).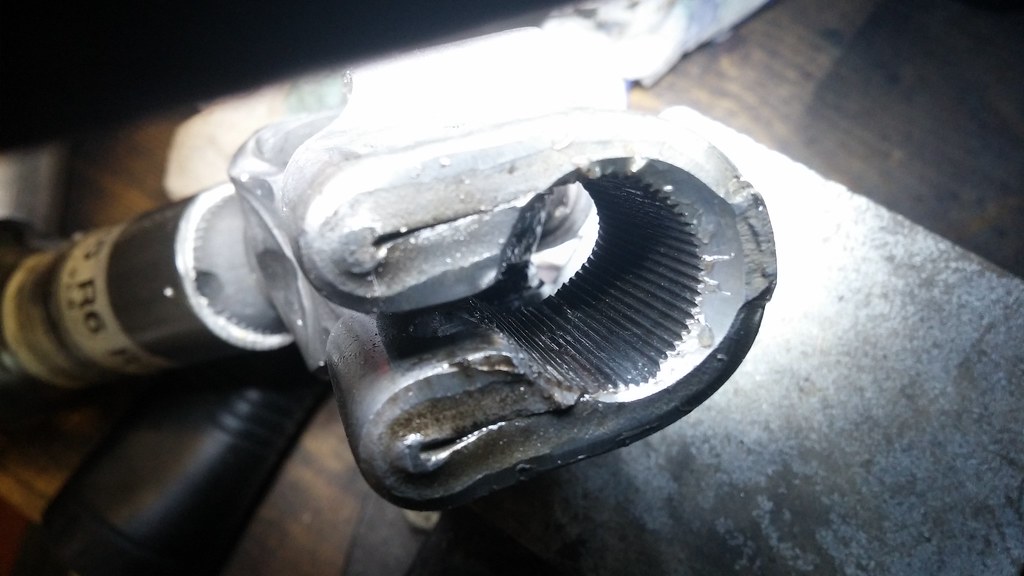 20140815_135808 by svenicusminimus, on Flickr
Once I'd gotten the linkage to slide smoothly on and off the rack, I had another issue, which was that the pinch bolt that goes through the linkage wouldn't go through, because the indent running around the rack shaft wasn't deep enough. You can see below where the hole going through the linkage is partially blocked by the rack shaft not having enough clearance on the left.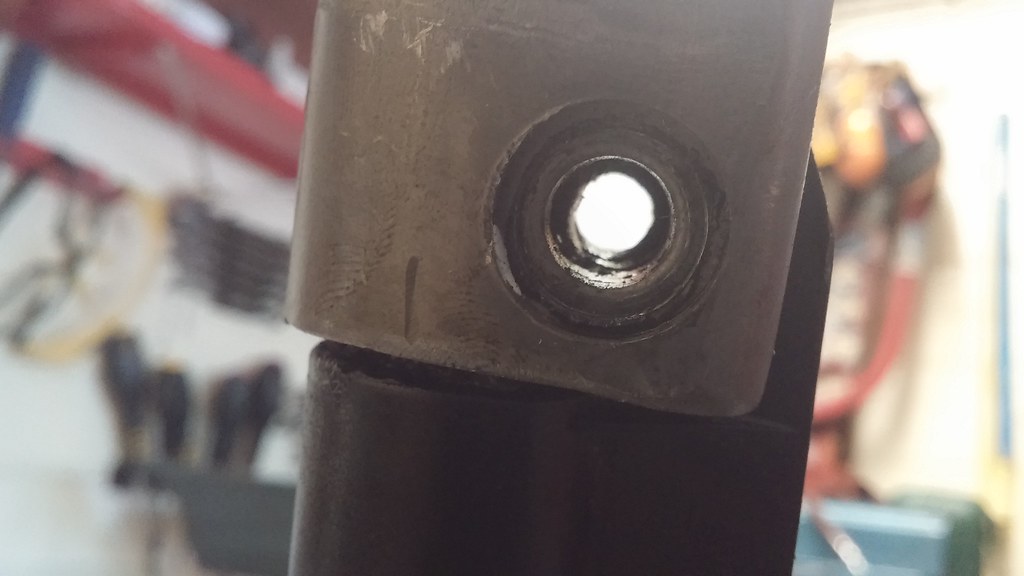 20140815_135917 by svenicusminimus, on Flickr
So, in the end, I had to file away some of the expensive BMW part away anyway... didn't take too long though.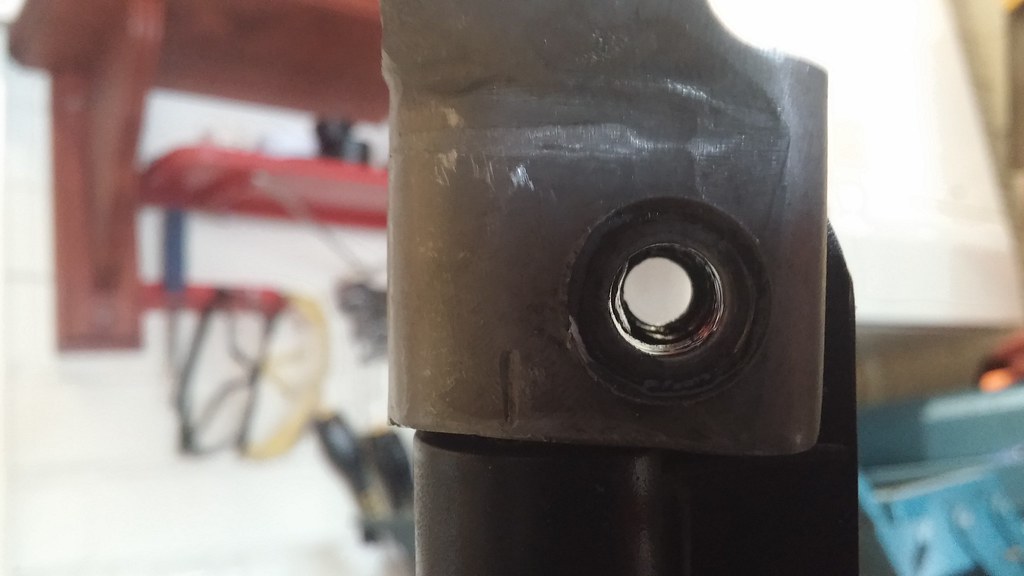 20140815_144638 by svenicusminimus, on Flickr
Linkage on and pinch bolt fitted. 20140815_144550 by svenicusminimus, on Flickr
Now, the other thing that needs modifying on the corsa linkage is that the top section, that bolts to the column, is completely wrong. The linkage section looks like this, with just two smooth flat sides to mate up with, presumably, some sort of squarish shaft on the corsa column. 20140815_130803 by svenicusminimus, on Flickr
So, what you need to do is swap the top part of the original E30 linkage on to the corsa linkage, so that you can still bolt it up to the column on the car. Here's the E30 linkage removed from the car - the bit we need is just the top section, on the left side of the picture. 20140815_165320 by svenicusminimus, on Flickr
Here's a side by side of the two linkages. The corsa linkage doesn't look much shorter overall, but the important thing to note is the distance between the actual UJ pivots. The corsa linkage is also telescopic and doesn't have a big squishy bit of rubber in the middle, which is cool! 20140815_165428 by svenicusminimus, on Flickr
The way I disassembled the UJs started with first knocking back the stakes you can see below, that act as a safety net to hold the needle roller bearings in place, and then trying to push them out using a couple of sockets and my bench vice. Knocking the stakes back allows the bearings to be pushed back out the way they came in, by using a small socket on the opposite bearing to push, and a bigger socket on the side you want removed, so it has a space to be pushed in to.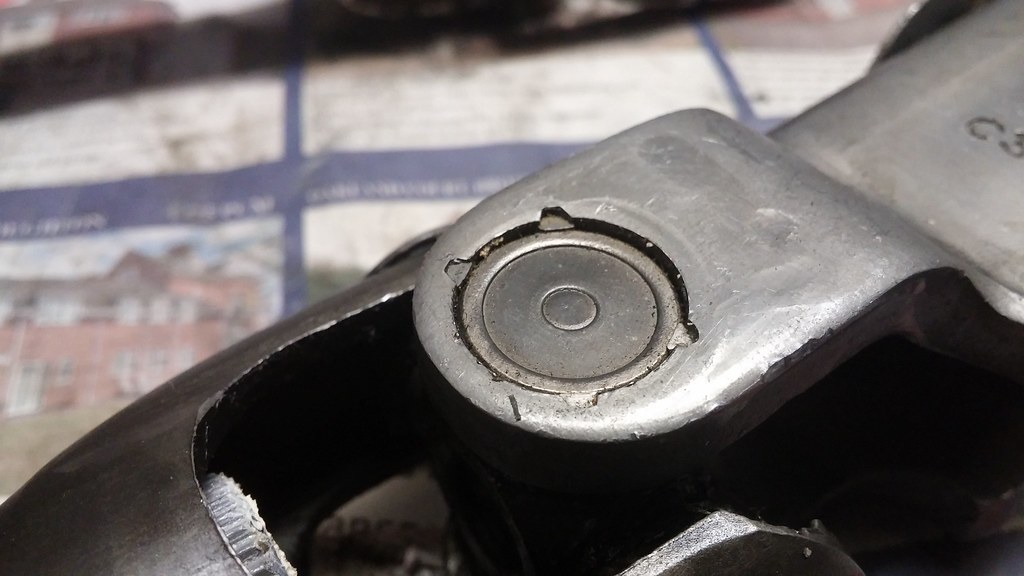 20140815_170816 by svenicusminimus, on Flickr
Here's with the stakes knocked back and this side being pushed to force the other side out.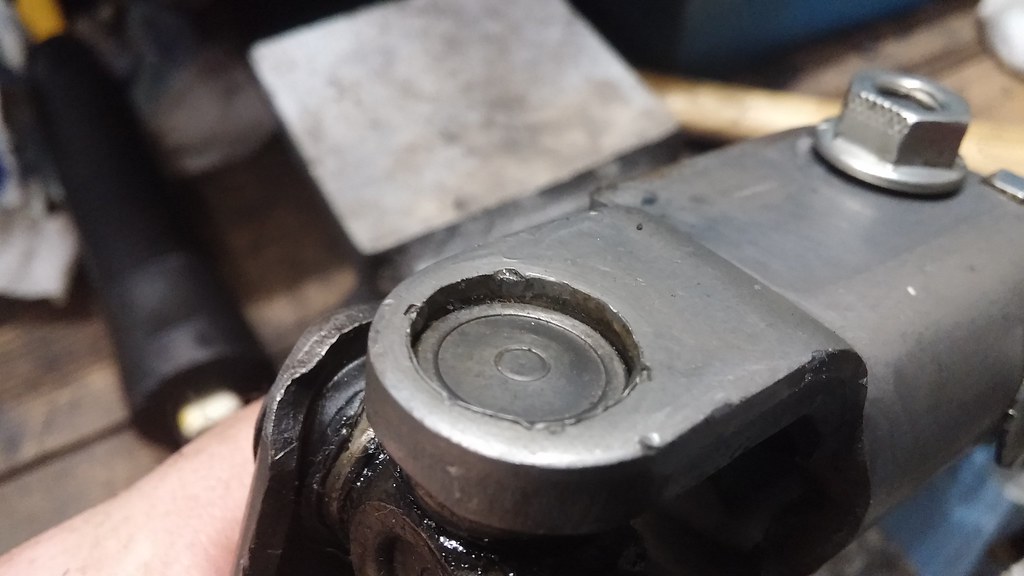 20140815_173412 by svenicusminimus, on Flickr
Then after a bit of fiddling around I ended up with this. One bearing made it out alive; the other one got very messy. I tried putting the messy one back together, but it just felt notchy and horrible after that so I decided to just use one of the bearings from the E30 linkage, as they're all exactly the same (bless the miracle of standardisation). You can also see the main part of the linkage at the top of the photo, with the un-needed top part now removed.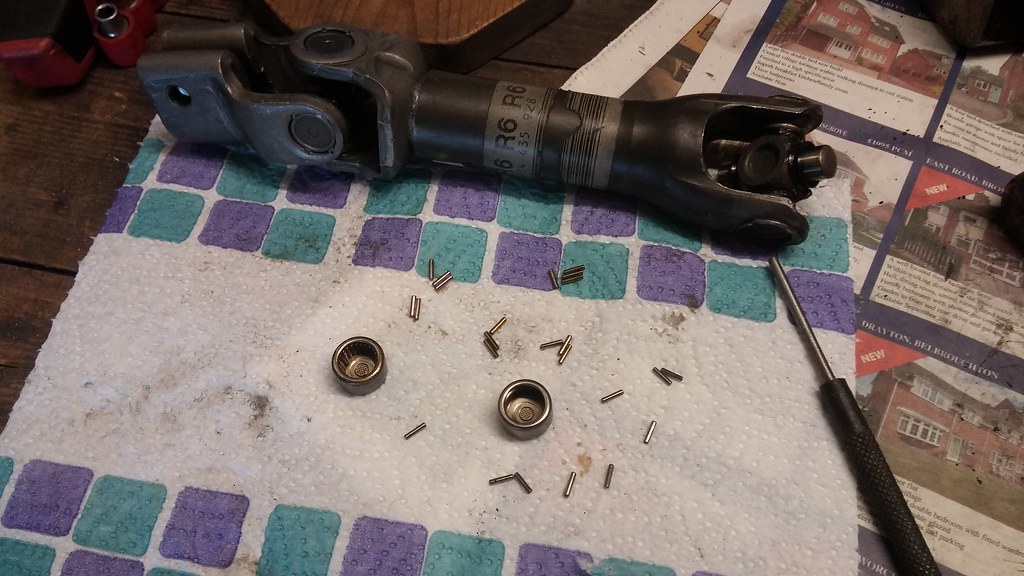 20140815_182000 by svenicusminimus, on Flickr
I then repeated this procedure on the E30 linkage, and ended up with what I needed. I managed to get this side apart whilst still leaving one of the bearings half in, so I could just pop this bit on to the corsa linkage and then press in the bearing I saved from the corsa linkage in to the empty side of this E30 top part.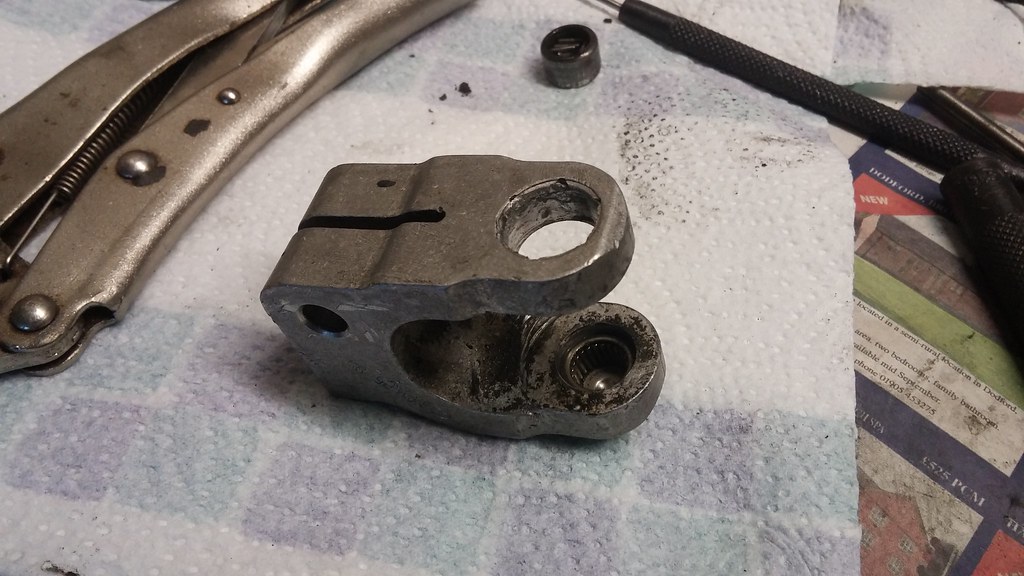 20140815_194057 by svenicusminimus, on Flickr
A bit more fiddling around with the sockets, and after using a punch to re-create those stakes that keep the bearings in, I had one complete E30-Corsa hybrid linkage. 'Twas a fun evening spent making this.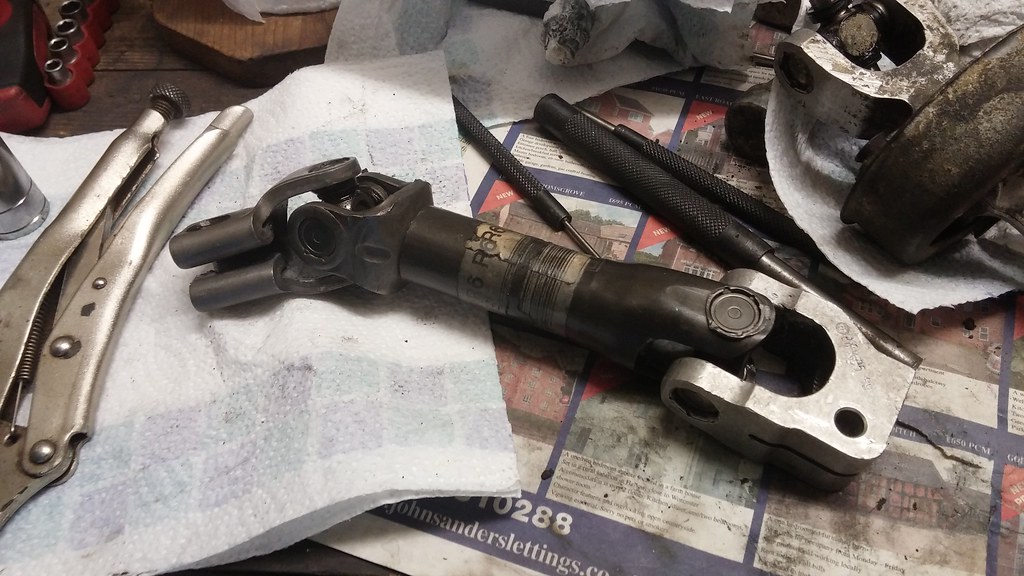 20140815_200527 by svenicusminimus, on Flickr
Now, the next issue that needs to be overcome when fitting an E36/E46 rack is that the power steering pipe unions are in a different place. They're not too far off, but easily far enough to either need new custom pipes, or if you're a bit pikey like me, bending of the old pipes with a big ring spanner, a blow torch, and a bench vice.
Another little issue that came up was that one of the banjo bolts I removed from the power steering pump end of a pipe only had one aluminium crush washer, where there should be two (one on each side of the banjo fitting). Then, funnily enough, the issue resolved itself when I removed one of the banjo bolts from the steering rack; it had three washers on it... there's the extra one I needed for the pump union then. Weird... (and yes I know I should've used new washers, but meh, if it leaks I'll just do it up tighter...)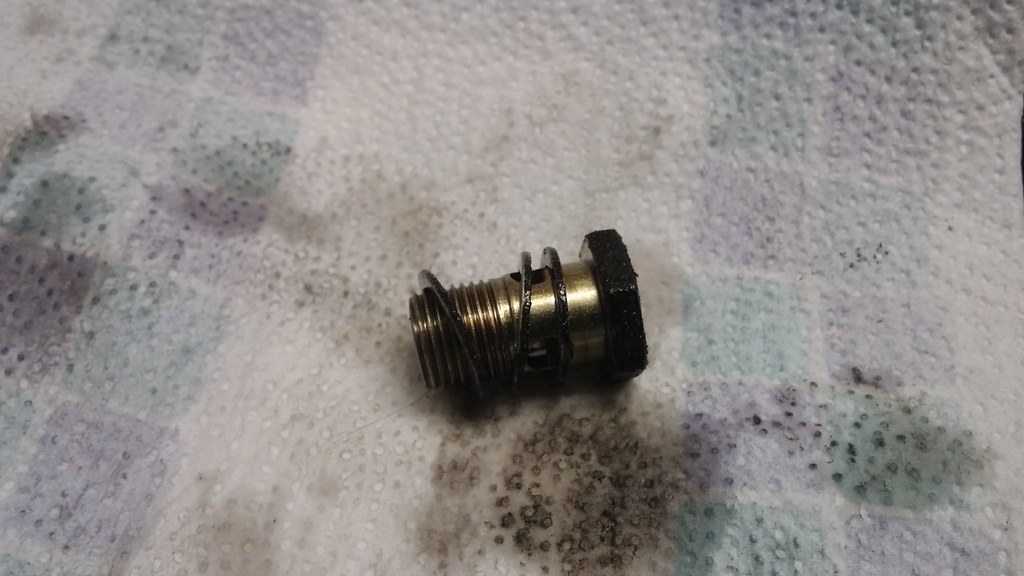 20140816_120026 by svenicusminimus, on Flickr
E30 inner track rods fit the E46 rack perfectly, so I just swapped those over as they were in good condition. Removed from the car with the correct size spanner...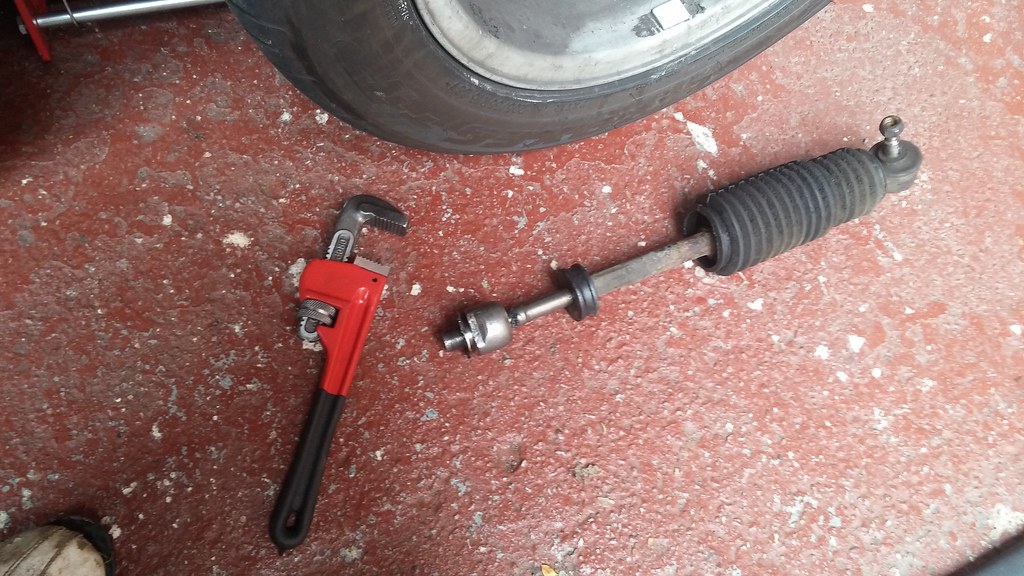 20140815_160633 by svenicusminimus, on Flickr
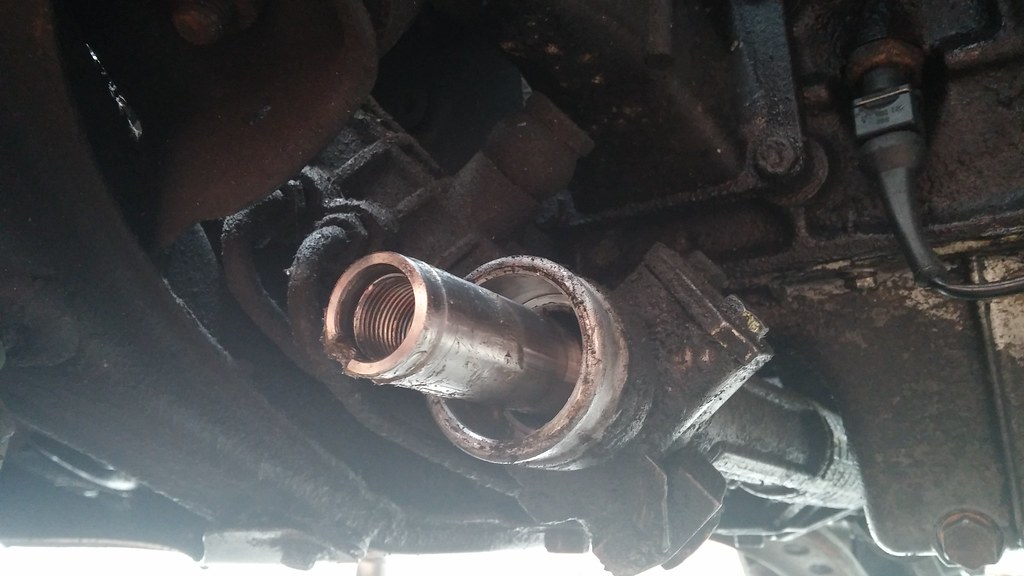 20140815_160612 by svenicusminimus, on Flickr
The E30 rack has a little notch for a locking tab to lock the inner rod in place, but the E46 rack didn't have this notch, so I just used some thread-lock instead.
With everything removed/disconnected, I pulled the old rack out of the car. Bit dirty, eh. 20140816_123353 by svenicusminimus, on Flickr
You can see above where the power steering pipe unions are, at about 90 degrees to each other on the pinion shaft part of the casing. On the E46 rack they're right above/below one another, a bit further round the rack than the outer most one on the E30 rack. So, as I said earlier, a big ring spanner, a blow torch and a bench vice were used to deface the pipes to such a point where they actually kind of fitted where they were needed. I'm not 100% confident that I haven't cracked one of them or kinked them excessively, but I'll find out when I fire the car up when the injectors are back and refitted. Here's the professionally re-worked pipes on the new rack. They needed a bit more fettling once I trial fitted everything to the car, but that was the rough shape achieved. 20140816_161211 by svenicusminimus, on Flickr
I then offered the rack up the car, and got the new hybrid linkage fitted before I bolted anything else up. You can see the telescopicness working here, with the big splines in the middle; was useful to get this bolted up tight and then not need to worry about it whilst I moved the rack around. 20140818_120526 by svenicusminimus, on Flickr
There are two sets of rack mounting holes on E30s - the front set are for manual racks, and the rear set are for power steering racks. I've seen it advised quite a few times that you should stick to this set up and make sure the new E46 rack is mounted in the correct rear holes. It took a LOT of messing around and levering to get all the pipes to move about in to the right places to allow me to force the rack back far enough to get it fitted in the rear holes, but I got there in the end! Was pretty tight though, I imagine it would all ping out like a jack-in-the-box if you removed the bolts now. 20140818_133756 by svenicusminimus, on Flickr
You can kind of see one of the washer 'spacers' here, fitted on the top side of the rack to make up the height difference. 20140818_133823 by svenicusminimus, on Flickr
With the rack firmly bolted in place, I fitted the inner/outer track rods, with new E46 gaiters that fit the rack properly. 20140818_155544 by svenicusminimus, on Flickr
With everything in the right place, the steering linkage is mighty close to the exhaust. This is a common problem due to the angle of the E36/E46 rack pinion shaft pointing towards the engine in comparison to the E30 rack. The linkage doesn't actually touch the pipe, but if it does when I'm driving then I'll need to either get new engine mounts, raise the engine up a bit or hit the downpipe with a big hammer. Or maybe all of the above... we'll see how it goes. 20140818_155710 by svenicusminimus, on Flickr
Oh yeah, and whilst I had all the power steering pipes disconnected, I pulled out the fluid reservoir and fitted new 'jubilee' clips to the hose unions, as the old 'one time use' original clips were no longer doing their job and the pipes were leaking power steering fluid all down the hoses. Hopefully it's fluid-tight now - not a great pic, but you get the idea. 20140818_161350 by svenicusminimus, on Flickr
So that's what I've been up to for the past few days, no idea if it all works yet because I wouldn't get very far down the road without any injectors. They should be back by the end of this week hopefully, then I'll see if that's cured the misfire and if I might have gained a couple of extra horses from getting them cleaned. I imagine they'll respond well to a good clean and refurb after 25 years and 107,000 miles of service, but we'll see.
I've also got a new viscous fan coupling to fit, as the temp gauge starts creeping up in traffic queues, and the rolled up newspaper test showed that the current coupling isn't locking up properly when the engine is hot, so I'll fit that in a couple of days too. The newspaper test is just pushing a rolled up paper in to the fan to see if it stops. A proper working viscous coupling would be locked up hard and would shred the newspaper, but if the coupling isn't working then the fan will just stop when you push the paper in to it.
#54
The Otter
-
- Members
-
- 620 posts
The artist formally known as j322overthetop
- Location: Midlands
Posted 26 December 2014 - 02:31 PM
Early September update
Well, the steering rack conversion is working well now after a couple of tweaks. The downpipe was hitting the new Corsa hybrid linkage whenever I turned left at more than 5mph, so I bought some taller engine mounts from Burton Power - early Escort/Capri mounts are a perfect replacement to lift the engine up a few mm. Now I can drive it as hard as I like and nothing catches - win!
I got the injectors back the day after the last update. They were a bit out of balance and down on flow capability, but they weren't really bad, as you can see below. Still, nice to know they've been done professionally.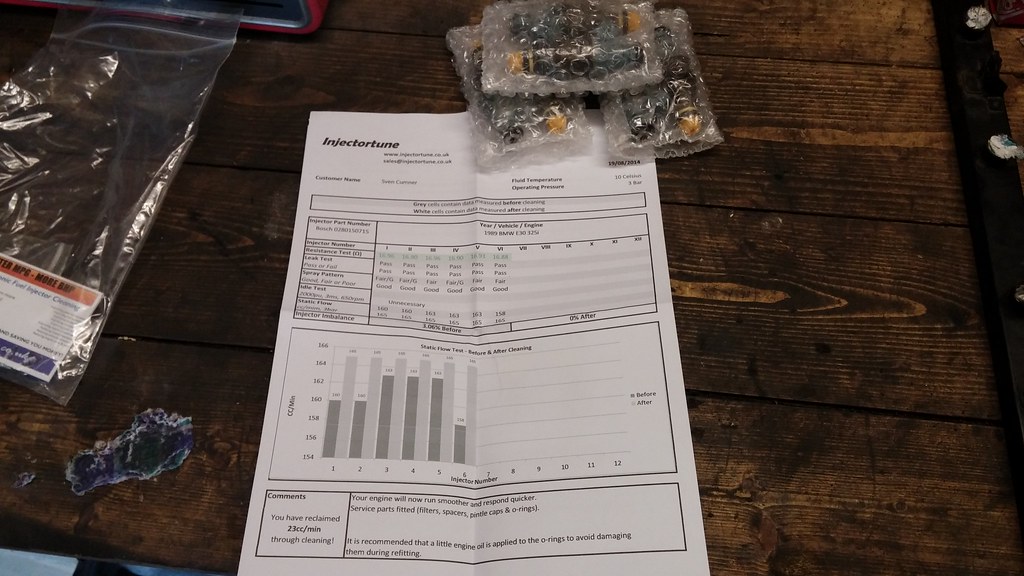 20140820_112453 by svenicusminimus, on Flickr
I can't really tell any difference to be honest, but again at least I know now that they're sorted. Whilst I was refitting the fuel rail, I noticed one of the rubber fuel hoses running through the engine bay was a bit perished so I replaced it with some new stuff I had lying around. Here's the cracking on the old hose.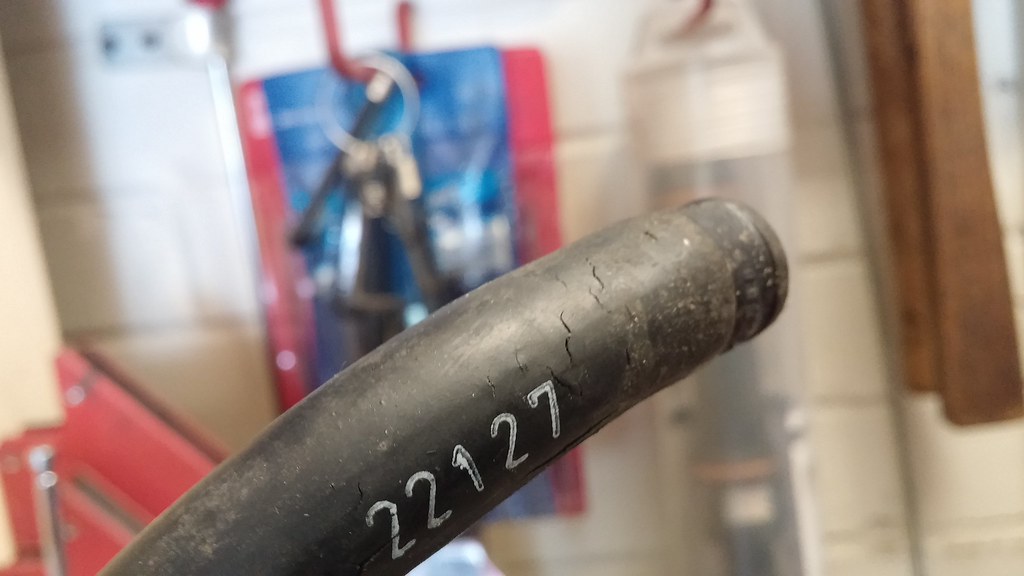 20140820_114639 by svenicusminimus, on Flickr
When I got it running again I took it straight to get the tracking done as, not surprisingly, it was now quite a way out and the wheel was all the way off to the left.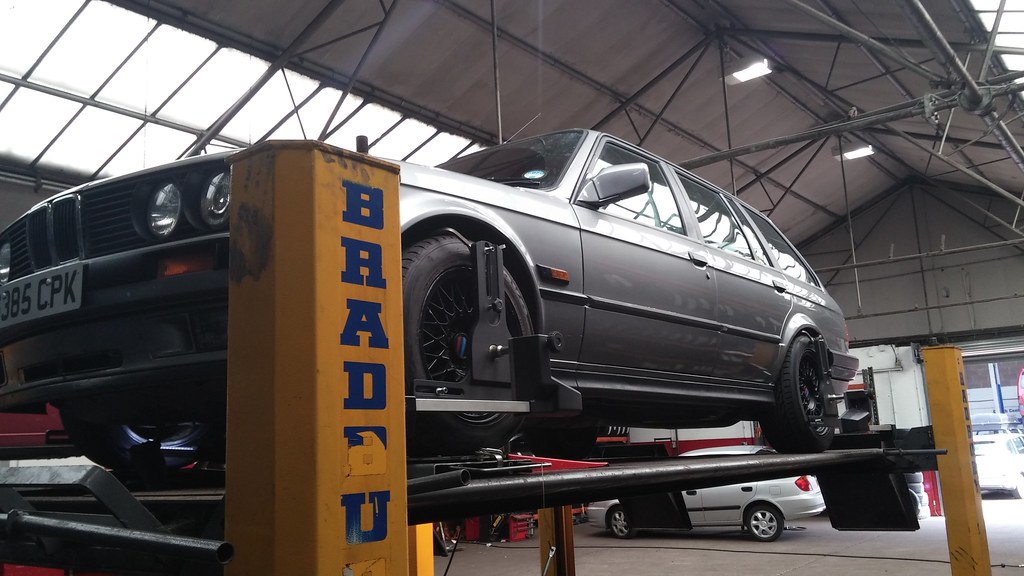 20140820_165327 by svenicusminimus, on Flickr
Drives really nice with the upgraded rack, was definitely a mod worth doing to make the steering a bit more manageable.
A couple of days after, I installed the ECU chip I bought ages ago. ECU out of the car and with the cover off.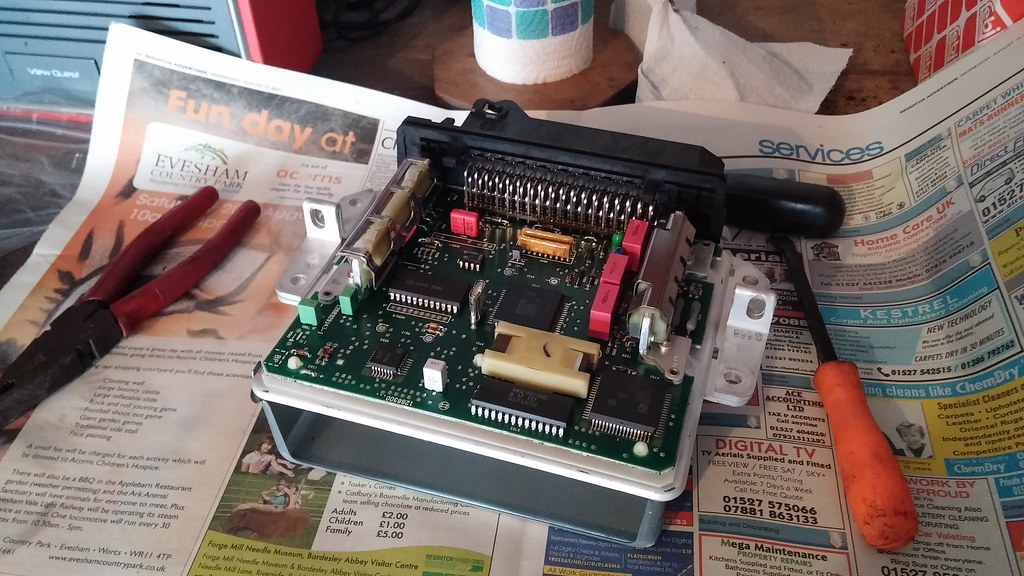 20140822_105928 by svenicusminimus, on Flickr
New chip installed.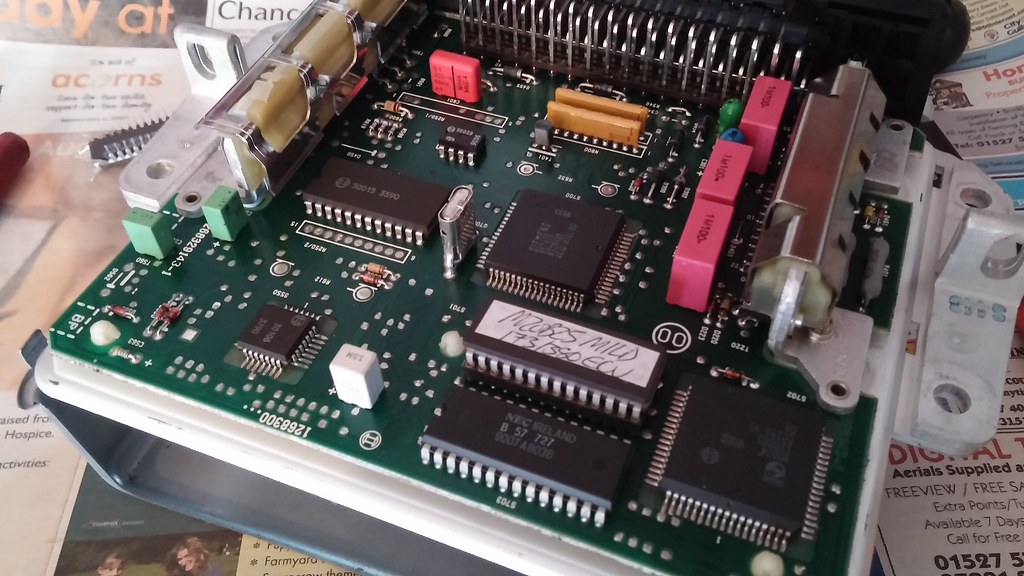 20140822_110533 by svenicusminimus, on Flickr
Again I didn't really notice a difference, but we can hope that there's been some somewhere for fuel saving or something... on the other hand, it might not be the correct chip. I am in the process of exchanging this chip for an equivalent replacement, as the rev limit isn't what it should be for the one I specified. This might be a random error and the rest of the chip is alright, but it might be the wrong chip - we'll see in a few days hopefully.
During the viscous fan coupling swap. This was definitely worth doing, the car never goes over the middle of the gauge now, even creeping along in long traffic jams it stays cool. Spot on.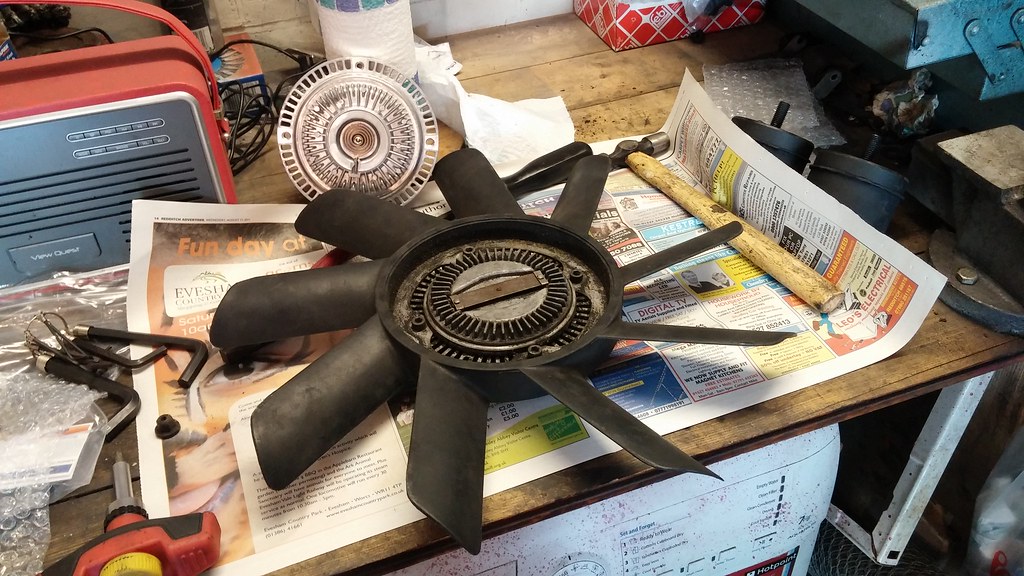 20140822_113531 by svenicusminimus, on Flickr
A few days before the gathering I thought I should try and tidy the paintwork up a bit more. There was still loads of nasty overspray on this side of the bonnet, so I spent a while sanding it all off and then polishing it up. Can't believe how nice this bonnet looks now, compared to when I got the car. 20140827_142535 by svenicusminimus, on Flickr
I also got a bit of old sponge and used it to dab some colour match paint over a few bad areas of paint on the wing, where it had rubbed through to the primer/red underneath. Turned out much better than I thought it would... granted, the wings still look pretty bad, but you have to get closer now to notice!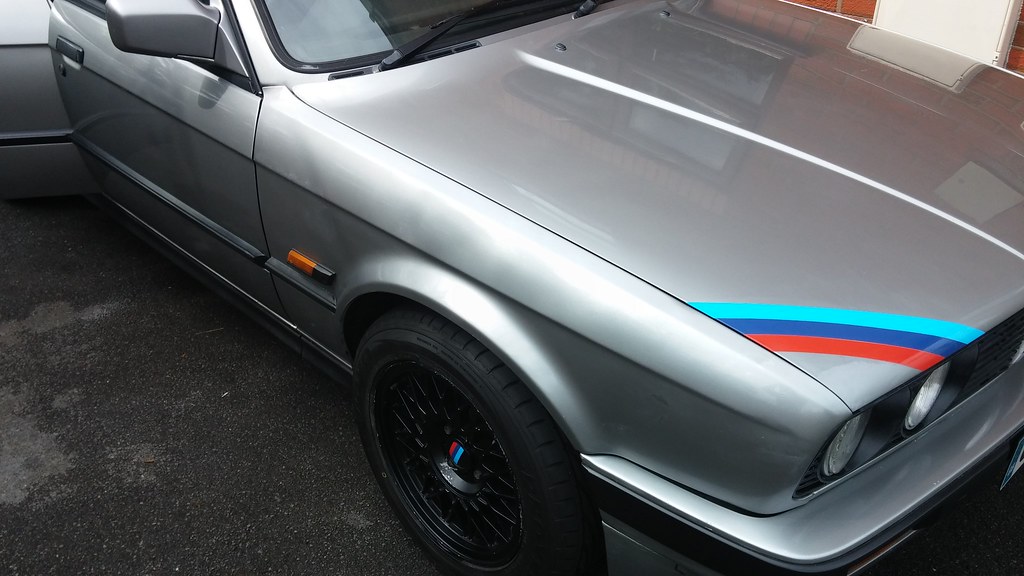 20140827_142542 by svenicusminimus, on Flickr
I also finally got round to polishing up the rear driver's quarter, as this was about the only part of the car I hadn't done yet. Came up really nice! I also resprayed half of the tailgate too, where I'd previously done that little patch to cover up the rust repair. Blended in quite well. 20140827_142558 by svenicusminimus, on Flickr
I also got round to fitting these plastic sill caps for the rear door openings. The tabs that hold them on on the front edge had snapped off, so they sat like this and just fell off if you touched them. 20140827_142617 by svenicusminimus, on Flickr
So I drilled a hole through in to the broken plastic clip still stuck in the car, then bunged in a self tapping screw. Not the neatest of jobs, but nobody'll notice! 20140827_145756 by svenicusminimus, on Flickr
I spotted these front speaker covers/kick panels fairly cheap on ebay, so I bought them to replace the hacked up ones that were in the car. 20140901_104921 by svenicusminimus, on Flickr
Whilst I had the passengers cover off, and whilst I had lots of time, I took the glovebox area apart again and spent a few hours making up a headlight buzzer warning thing to let me know that I've left the lights on when I open the door. A £2 buzzer off ebay, an old relay I had lying around, and plenty of wires tapping in to things and it was done. I ended up swapping the relay for one with internal diodes in it's circuitry, as there was some funny things going on sending power back through the buzzer and grounding through the lights when they weren't on and the doors were closed...
Buzzzzzzzzz. There's some sticky foam between the buzzer/relay so it doesn't make any rattly noises. It works though, which is nice! 20140901_113722 by svenicusminimus, on Flickr
Replacement cover in place. 20140901_182328 by svenicusminimus, on Flickr
The car made it to the Retro Rides Gathering and back without any issues, but it's only a 25 mile drive for me so hardly a challenge! Some of you may have noticed it on the Area 52 stand on the Sunday - felt like a bit of a cheat, it looked so boring and standard next to everyone elses awesome cars  Kind of hard to match a slammed series 1 Land Rover though... at least it got me a parking spot right next to the hill climb
Whilst I was there, I bought a sticker to put in the window. When I got the E30, I peeled off all the random old window stickers around the car, apart from the ones on this window. Nice to keep the history of where it's been I thought. 20140902_160301 by svenicusminimus, on Flickr
I wanted to rearrange things before I put the new sticker on though. It looks to me like the rrg10 sticker was put there first, then the big RR sticker, then the rrg11 one. To make it a bit neater, I peeled off the big RR sticker and then peeled off and moved down the rrg11 sticker. I was a bit worried I'd ruin it peeling it off, but it actually worked really nicely. So after I'd done that I put the new rrg14 sticker on the top and then moved the big RR sticker to the rear driver's side window. 20140902_163012 by svenicusminimus, on Flickr
 20140902_163021 by svenicusminimus, on Flickr
and there we go, all up to date again. I've got new front drop links coming in the post, and I still need to repaint the front lower valance area. There's always another job left on the list 
#55
The Otter
-
- Members
-
- 620 posts
The artist formally known as j322overthetop
- Location: Midlands
Posted 26 December 2014 - 02:35 PM
Mid-September update
So it turns out that I had been sent the wrong ECU chip, I'd been given a more aggressive one with a lower rev limit. A simple switcheroo with the seller and I now have the right chip in there, feels exactly how it should and I have a higher rev limit to keep me happy. Hopefully the last time I pull the ECU apart. 20140904_112628 by svenicusminimus, on Flickr
I repainted the front valance and the lower bumper section (beneath the black strip). It was pretty manky underneath the bumper and looked like it suffered some nice stone chip damage over the years. It does look a bit more untidy here because the oil cooler grille is out, but you get the idea. The lower part of the actual bumper I resprayed because there were quite a few little chips and imperfections that I'd sanded down a while ago, hence the white spot at the top right.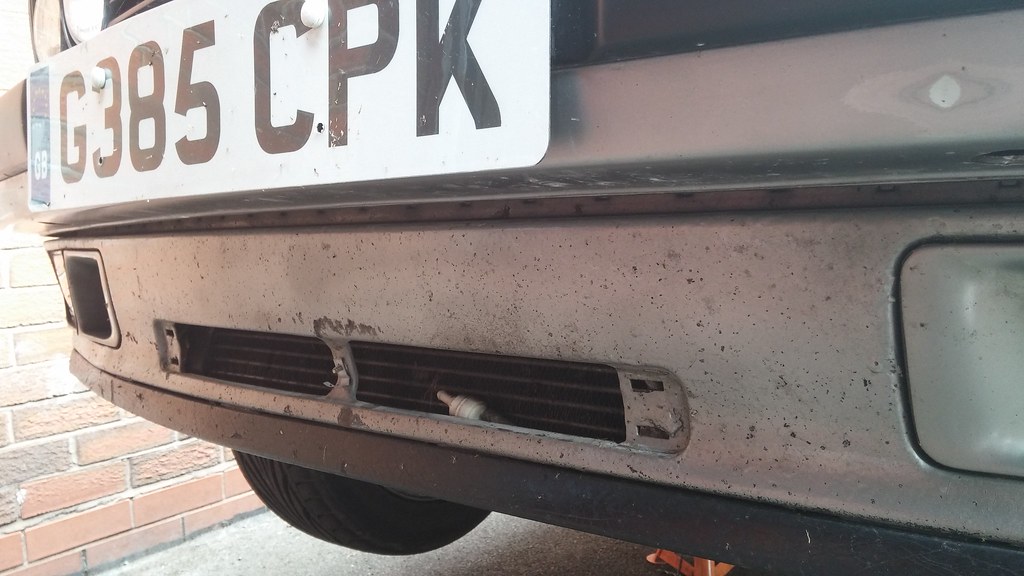 20140904_125037 by svenicusminimus, on Flickr
I didn't do a "proper" job on it, I just roughly sanded down the worst bits and decided to live with a bit of a rough, pimpled surface for the new paint. Looked a lot better when I was done anyway - I didn't bother masking off the lower plastic lip spoiler, I just figured I'd spray that black a few days after (which I did, below...) 20140904_160408 by svenicusminimus, on Flickr
Here's with the lower lip sprayed black. 20140911_105929 by svenicusminimus, on Flickr
 20140911_105942 by svenicusminimus, on Flickr
I had the car up in the air then because I was changing the front ARB drop links - here's the driver's side one that had pretty crumbly rubber holding it in place.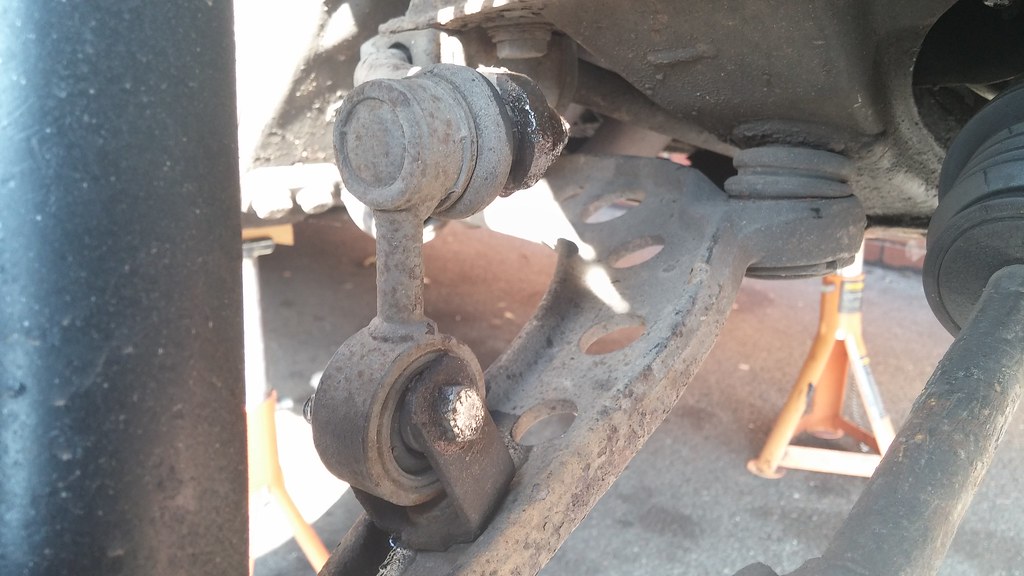 20140911_095520 by svenicusminimus, on Flickr
The replacements links I bought are, funnily enough, meant for the rear of an early 2000's Mondeo estate. Someone on the E30zone somehow found out that they were the perfect size and design to replace the original E30 links, and they're better than the E30 ones because, as you can see, they're ball jointed as opposed to fixed rubber mounted. These Lemforder ones were a bit more expensive than E30 equivalents, but they should last a long time and they're just a nice improvement to make. 20140911_095552 by svenicusminimus, on Flickr
In place on the car - no mods needed, they just bolt straight in.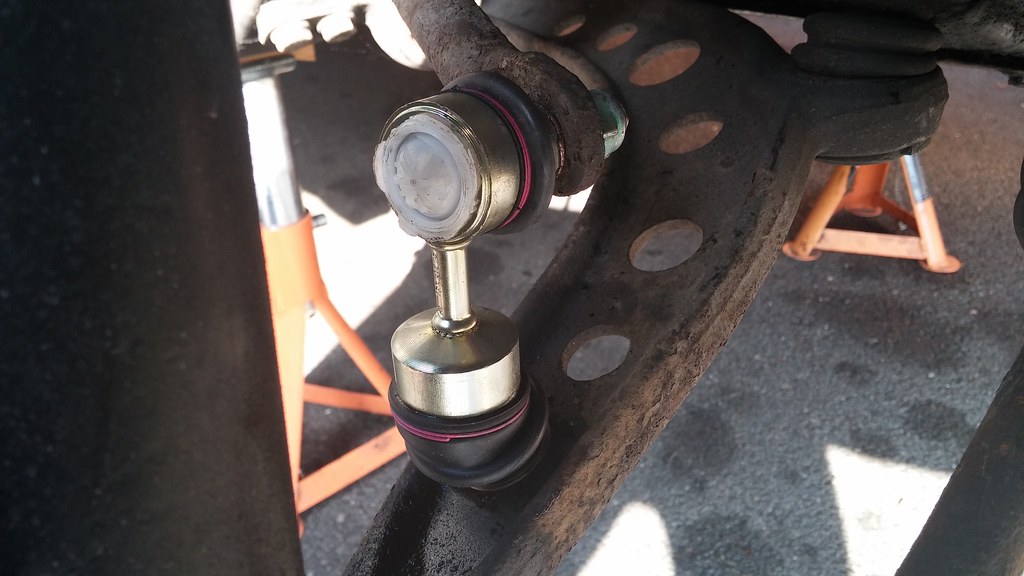 20140911_100915 by svenicusminimus, on Flickr
Looking neater and neater. Now I think the number plate looks bad... 20140911_160212 by svenicusminimus, on Flickr
I also repainted a few little bits in the engine bay. First was the bracket that holds the clutch fluid reservoir in place - I didn't take any before shots, but it was pretty rusty. Here it is nice and black.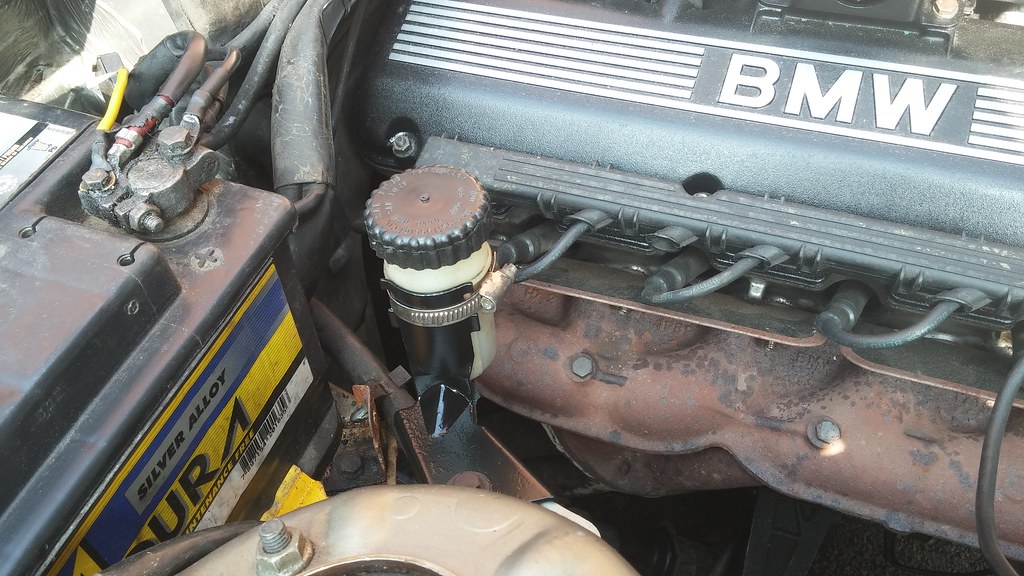 20140916_112608 by svenicusminimus, on Flickr
Then I pulled the battery out to sort out the battery tray area. Thankfully it was all just surface rust, so it didn't take too much prep. 20140916_114025 by svenicusminimus, on Flickr
These couple of brackets from the battery tray I resprayed in satin black too.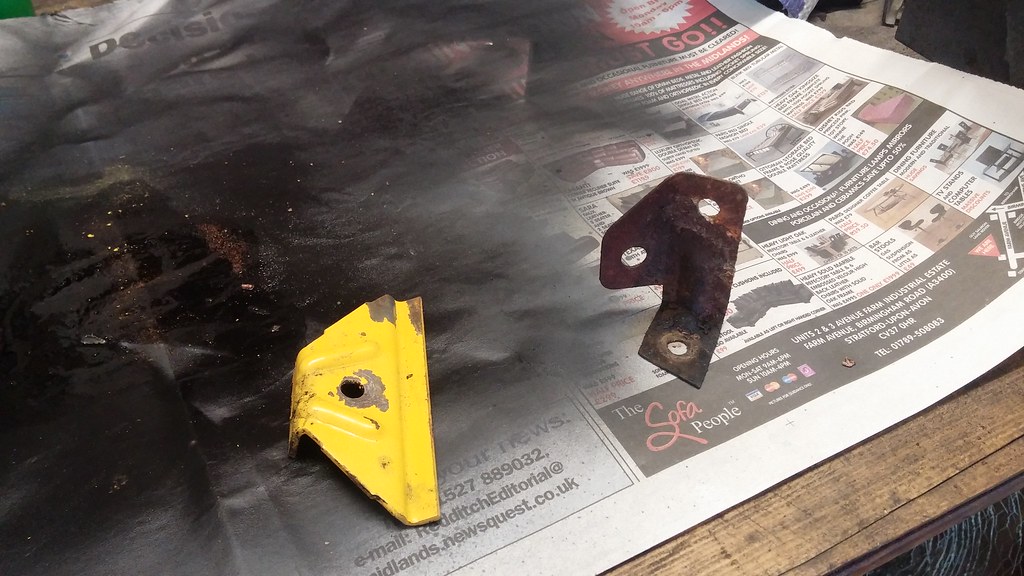 20140916_120242 by svenicusminimus, on Flickr
Silvered up.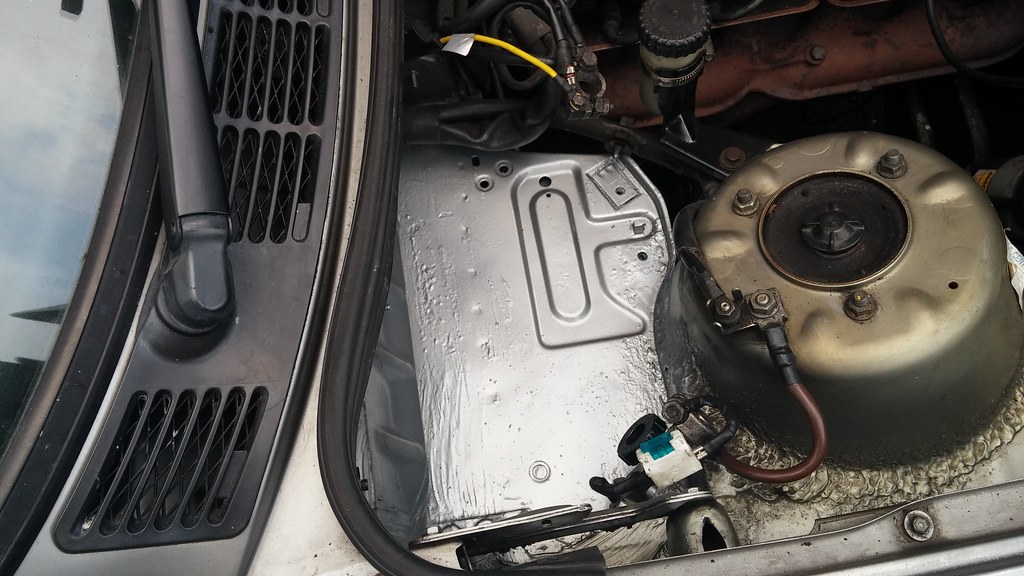 20140916_173839 by svenicusminimus, on Flickr
Here's those couple of brackets.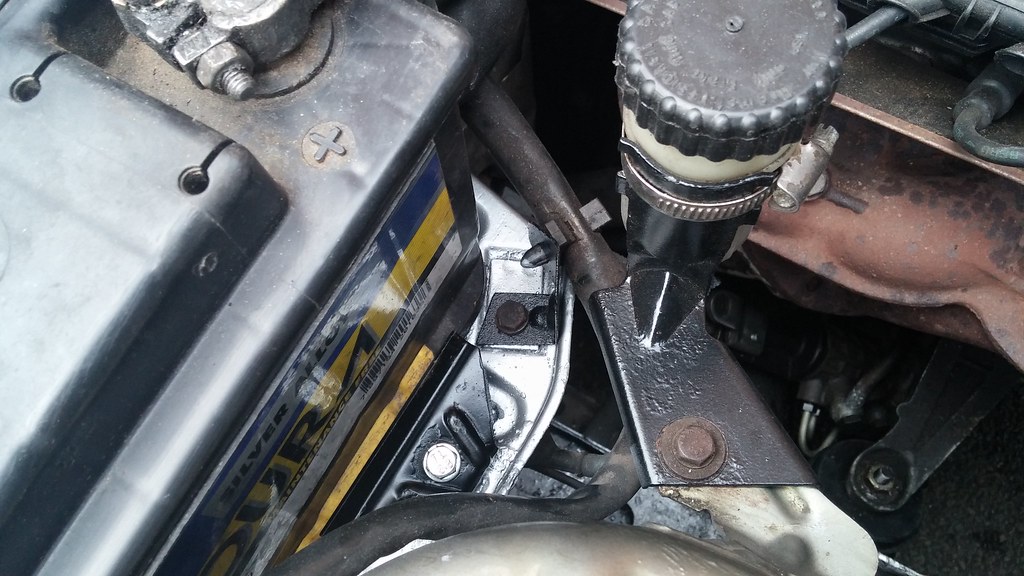 20140916_175126 by svenicusminimus, on Flickr
Much neater; also less multicoloured.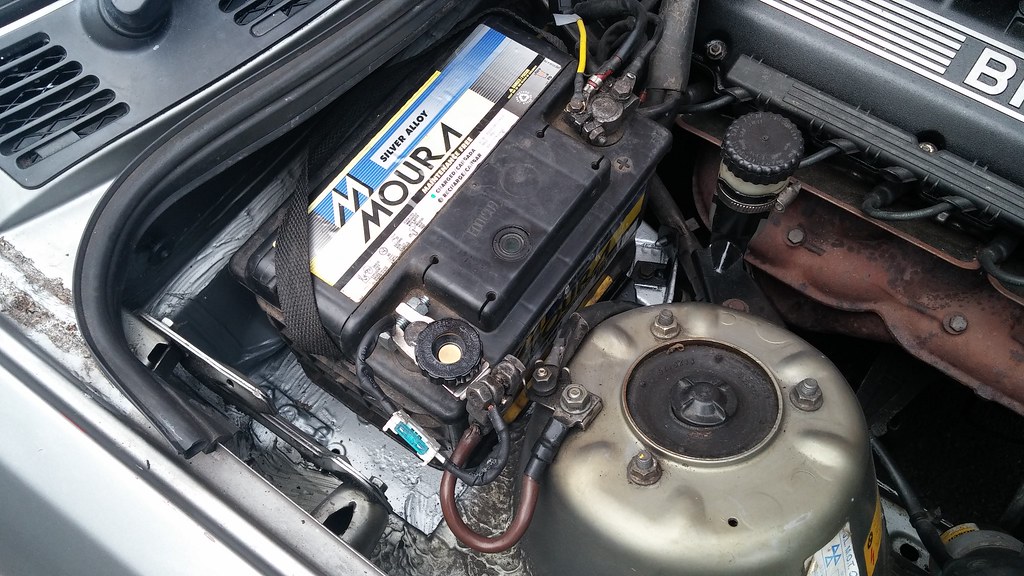 20140916_175134 by svenicusminimus, on Flickr
That's all up to date now - haven't got much else planned, I really need to try and sort out the rust on the inner bottom edge of the passenger's door, but apart from that I think I'm set. Oh, I do still need to buy a new heater fan and resistor switch, I might want those for winter.
#56
The Otter
-
- Members
-
- 620 posts
The artist formally known as j322overthetop
- Location: Midlands
Posted 26 December 2014 - 02:48 PM
Last update to catch up on now, only from a few days ago. After the last one I had the first term of uni to think about, so not much happened for about 3 months, but the E30 whisked me around the place without any real issues - who says old cars are unreliable?! Fuel economy has been between about 22mpg (proper hooning it everywhere) and 28mpg (cruising 60 on the motorway), so I pretty reliably get 25mpg average. Anyway, read on to see where the car's up to now...
20th December update
I haven't yet done either the door bottom or the fan stuff... Only being able to use the maximum fan setting hasn't bothered me, so I haven't bothered changing anything. I've just been too lazy/forgetful to sort the door bottom.
I've done quite a few other things with the car over the past few months though, just updating now as I'm off uni for Christmas and have some spare time for this sort of thing again!
Not long after the last update, I changed the gearbox oil and diff oil. I had no idea how old either were, so thought I should give them a change whilst I had the time. The drain plugs on the gearbox and the diff took quite a pounding to unstick themselves, so they were either done up really tight last time the oils were changed, or they hadn't been changed in a long time. In any case, the fuzzy gearbox plug didn't look too healthy!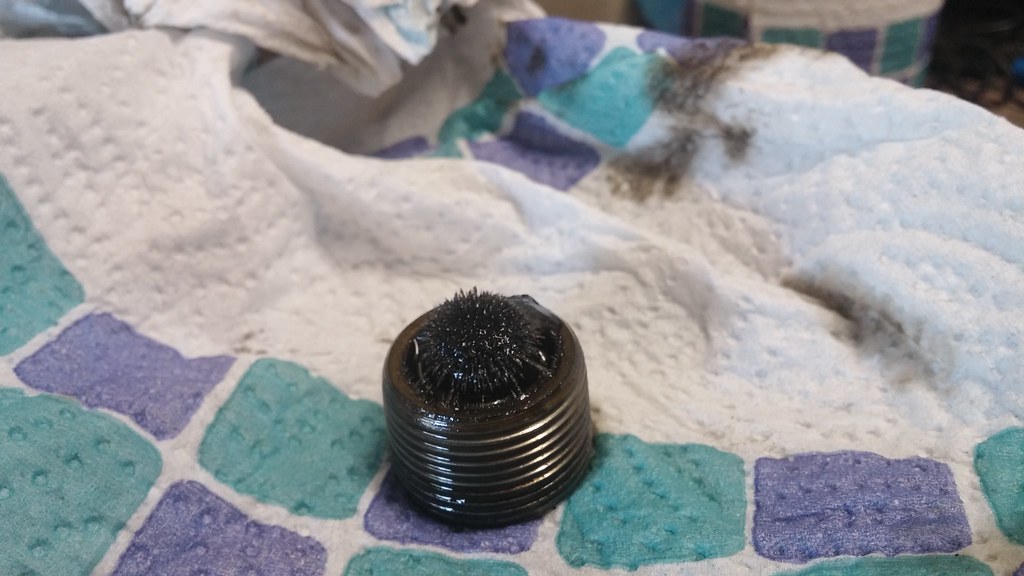 20140927_134108 by svenicusminimus, on Flickr
The oil that came out the gearbox was certainly darker than the stuff that came out the diff, but I don't think either were that bad. Gearbox was probably a bit overdue though. I filled them back up with my trusty gearbox oil garden sprayer pump doo-dad. Just pour the oil in, pump it up, put the nozzle in the fill hole and press the trigger.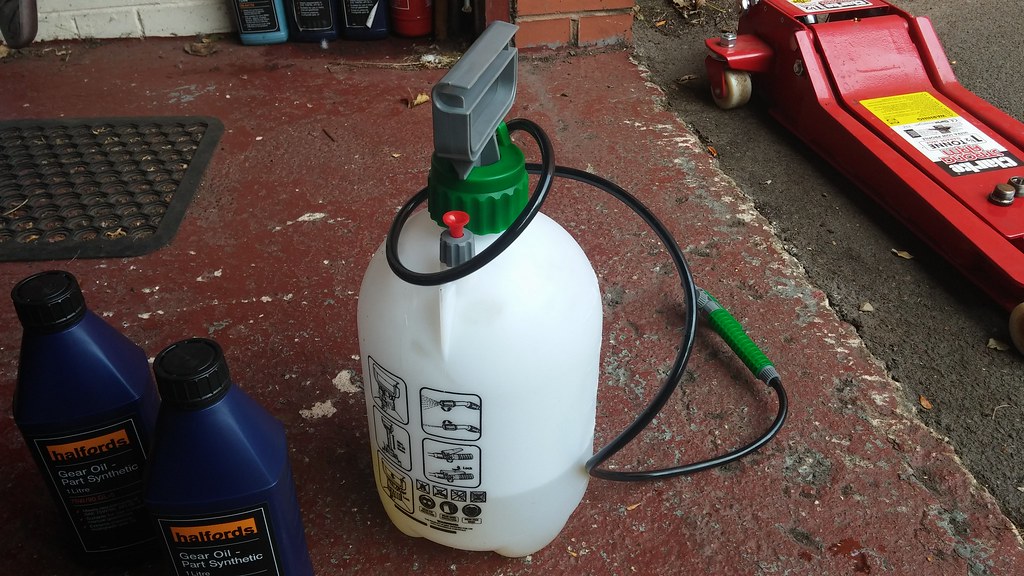 20140927_135128 by svenicusminimus, on Flickr
Here's the diff oil being done - so much easier than trying to squeeze it in straight from the bottle!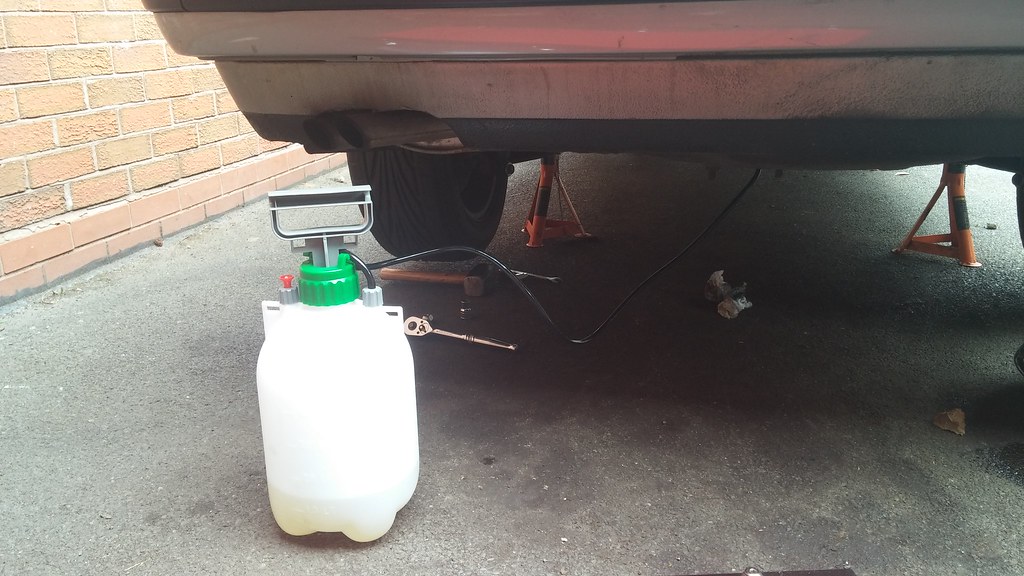 20140927_135738 by svenicusminimus, on Flickr
Changing the oils made the gearbox feel a little smoother, but not much difference really. Nice to know they've been done though.
I took this pic of me parked next to a gorgeous GTV at the NEC sometime back in September. No real reason, I just wanted a pic of the Alfa 
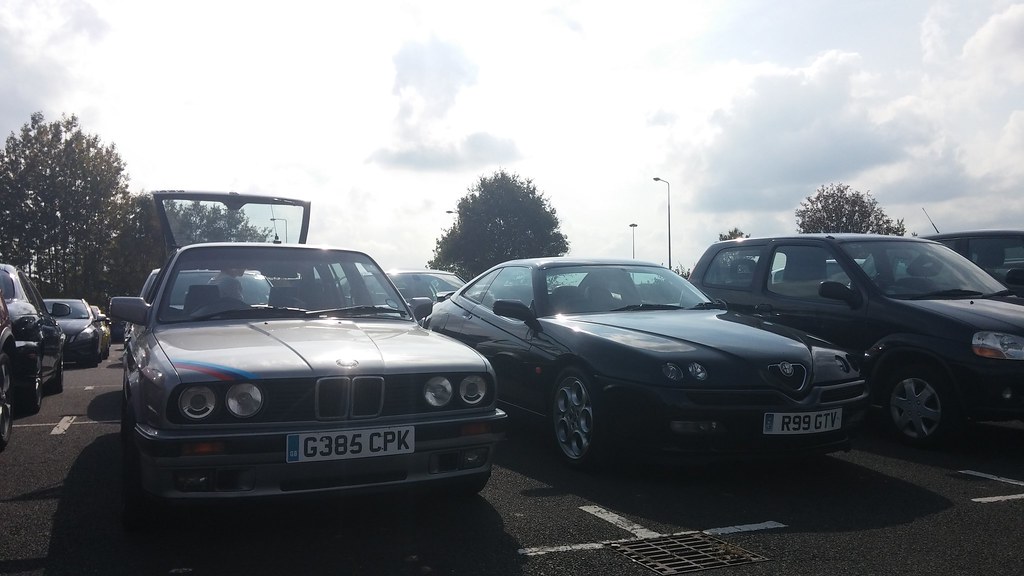 20140928_125958 by svenicusminimus, on Flickr
Doing my once-in-a-while general checkups on the car revealed that the front driver's wheel bearing was going. It had a tiny bit of play in it back when I was fixing the car up over the summer, but it wasn't bad enough to warrant me doing anything at the time. After a couple months driving, you could tell the play was getting more pronounced and there was a droning noise coming in to the car from it. So, a new bearing was ordered and delivered.  20141010_120115 by svenicusminimus, on Flickr
Upon closer inspection, I may have found the reason the old bearing died - the grease cap was missing 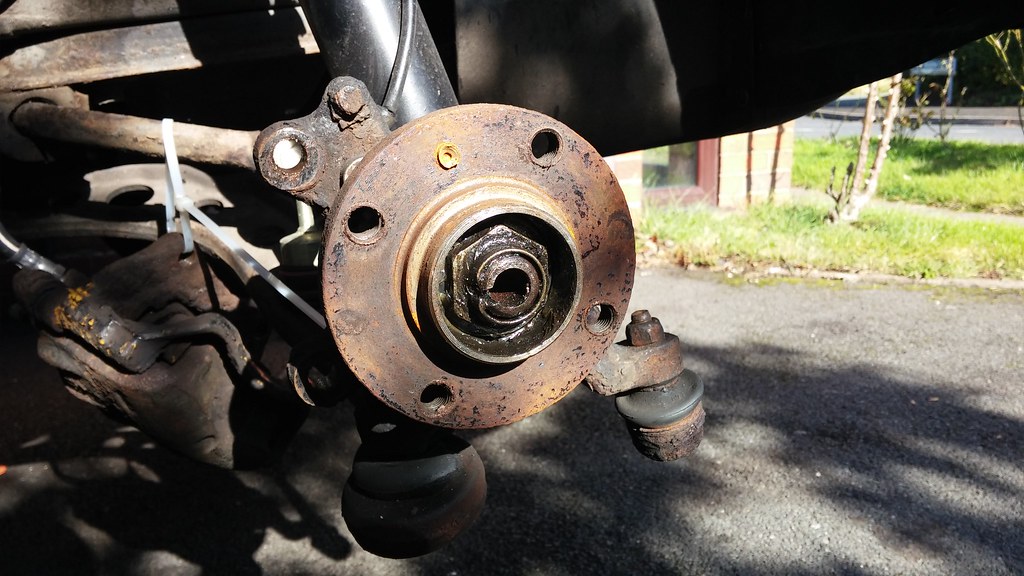 20141010_121724 by svenicusminimus, on Flickr
I forgot to take a pic of the new bearing assembly, it was really shiny... but it's all rusty now, so never mind!
Back in November, I got the chance to take the car to a dyno at Castle Combe, as part of some uni work we were doing on emissions stuff (hence it didn't cost me anything!). Had to get up pretty early for it, snapped this nice shot before I set off. 20141113_070846 by svenicusminimus, on Flickr
Here she is strapped on to the rollers. As we had some spare time, we all got a power run done on our cars, courtesy of the uni of course. A diesel Renault Scenic and a 1.2 VW Polo weren't the most interesting cars to watch on the dyno, but the E30 sounded sexual as usual and looked as good as ever. 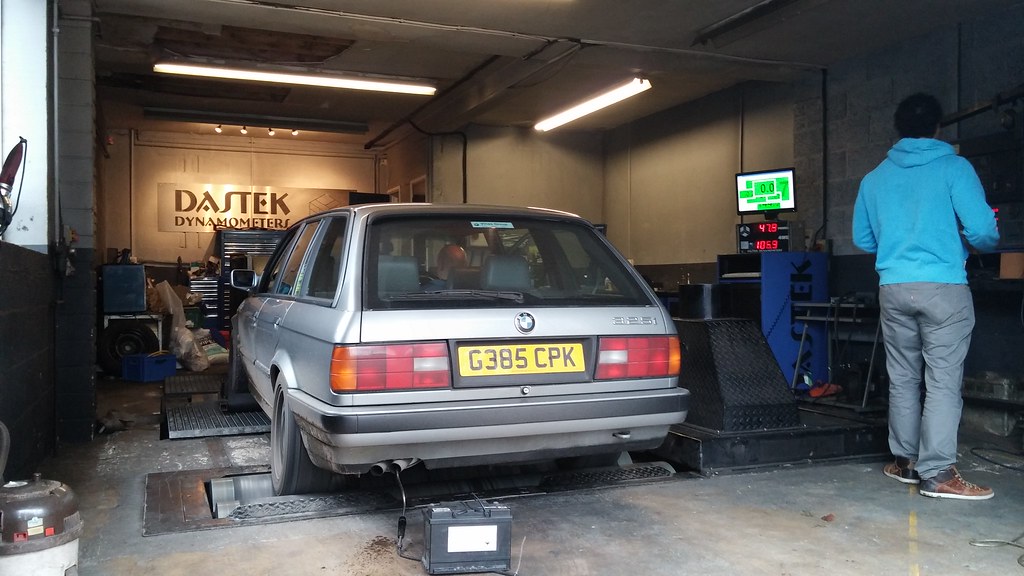 20141113_103612 by svenicusminimus, on Flickr
Made 160bhp at the crank - enough for me right now.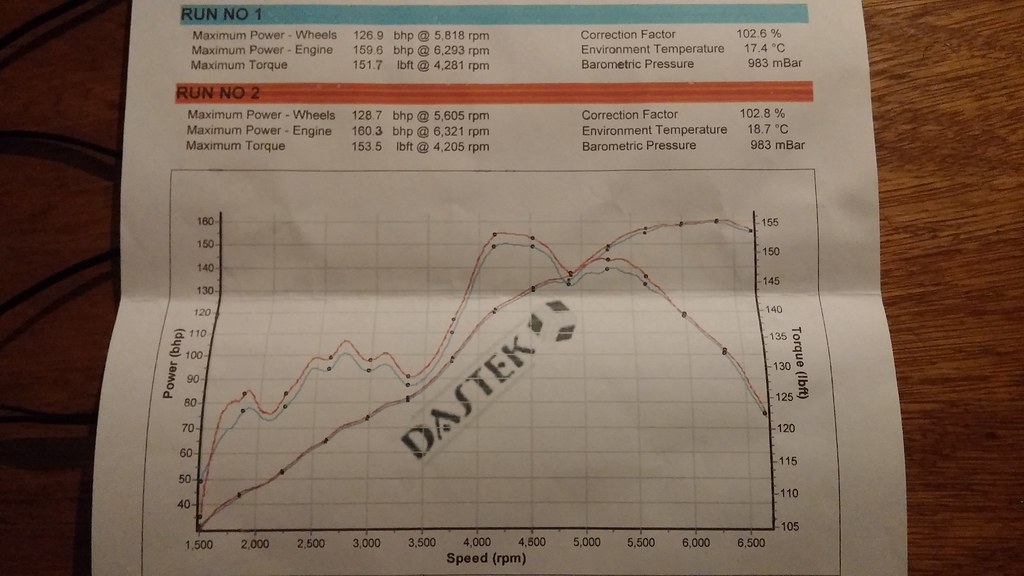 20141116_001859 by svenicusminimus, on Flickr
After I got back home from uni the other day, I went to Halfords and picked up a few bits and pieces to keep me busy. First thing I wanted to do was change the front number plate, so I got a new one made up. I had some strange hatred towards the old one... the print quality wasn't very good, the GB sign bit wasn't done right (and I don't like them anyway), and there were no manufacturers details so it was "technically" illegal. Yes I know I'd be very unlikely to get done for it, but at least it was another reason to get a new plate. Oh and there were extra holes drilled on the bottom half where someone had mounted it wrong sometime in the past and the changed their mind. Here's the old one: 20141217_120154 by svenicusminimus, on Flickr
and the new one: 20141217_123853 by svenicusminimus, on Flickr
I also picked up a bulb for the fog light that had stopped working. 20141217_122540 by svenicusminimus, on Flickr
 20141217_123143 by svenicusminimus, on Flickr
I did an oil change a couple of days ago, the 2500 mile old stuff that came out was really black and didn't smell very nice, so I reckon it might need another couple of short oil change intervals before it's as clean as it should be in the engine.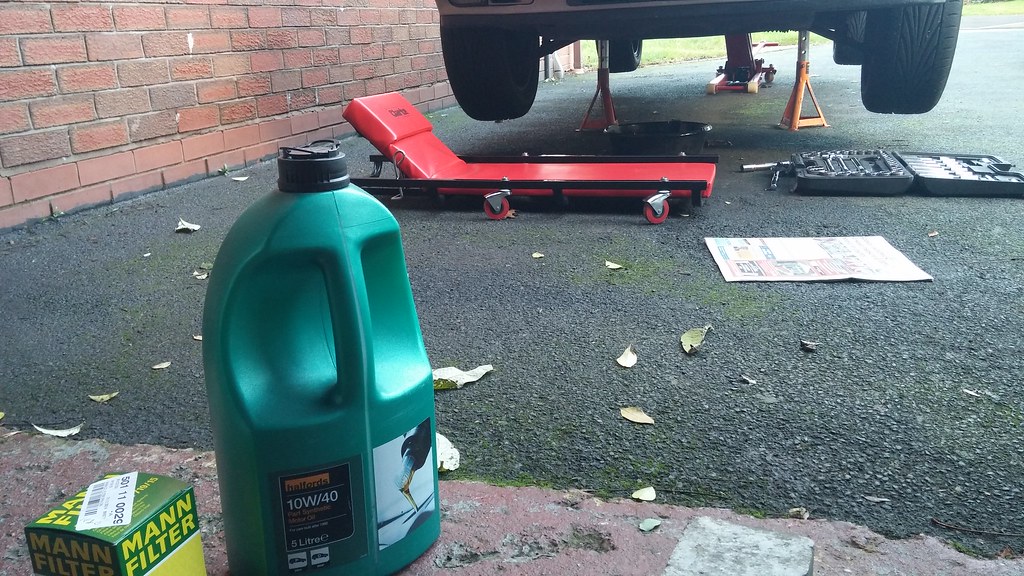 20141219_140351 by svenicusminimus, on Flickr
Over the past few days I've been painting up my winter wheels. They're the bottletops that the car came with when I bought it, they've still got their Serbian mud and snow tyres fitted so I thought I'd make use of them over winter! Here's what they looked like after a good clean. Kind of hard to tell, but the second wheel from the right was actually white, whilst the others were silver.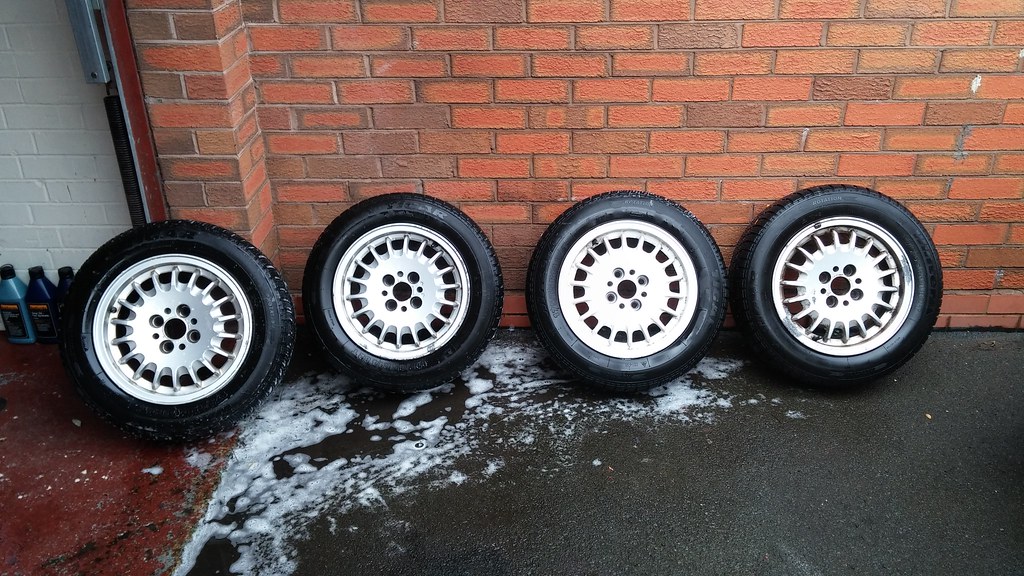 20141217_132619 by svenicusminimus, on Flickr
All the wheels were pretty rough; kerbing, general random gouges, lots of alloy corrosion and flaky paint, so I thought I'd try and do something a bit interesting with them. Hence they now look like this: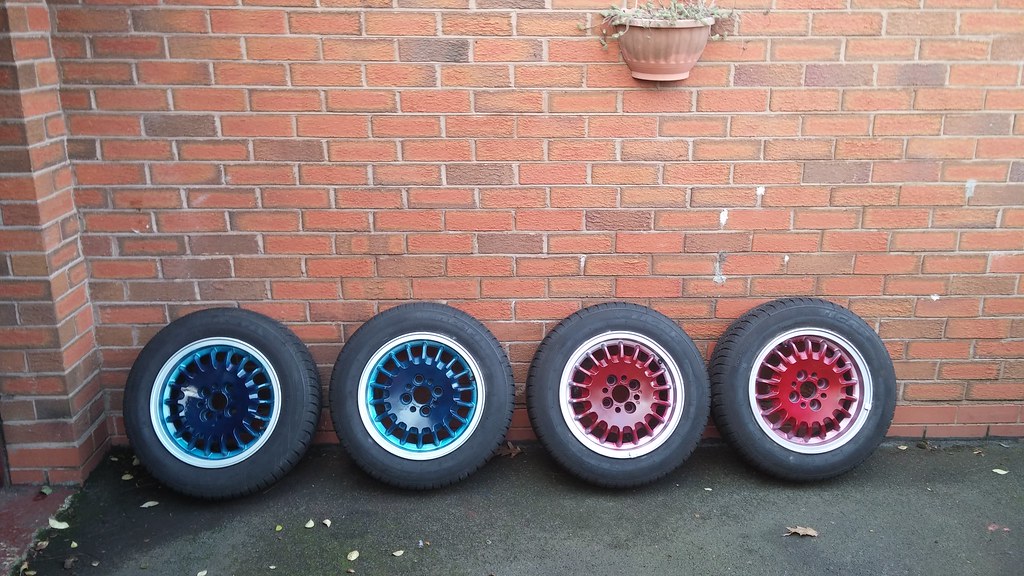 20141220_135241 by svenicusminimus, on Flickr
The tyres are directional, so red goes on the left side of the car, blue on the right. As the wheels are a pretty complex shape, I didn't bother trying to mask the lips to paint the colours in the centre, so I tried my best to get a sort of faded-in thing going on.
I gave the car a good clean today and popped the newly painted old wheels on. Doesn't look too bad I reckon. 20141220_154654 by svenicusminimus, on Flickr
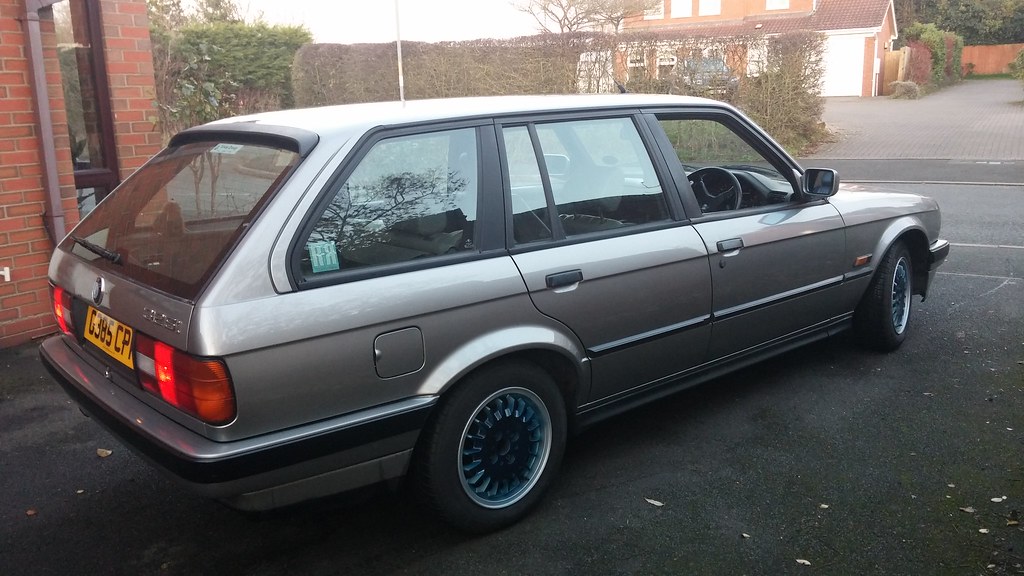 20141220_154707 by svenicusminimus, on Flickr
Now let's hope we get some snow so I can test them out!
Oh yeah, and I also had to get a new battery the other day as the old one perished and left me stranded at my girlfriends house. The Halfords recommended one is bigger and beefier than the one that was in there before, and it's a perfect snug fit in the tray. Nicely done Halfords... 20141220_194031 by svenicusminimus, on Flickr
That's all up to date now, I'll probably check back in in a few months and update with whatever goes on over the next term of uni. I'll try harder to update both threads at the same time from now on so you TMFers aren't left hanging again - apologies!
Cheers and Merry Christmas everybody
#57
The Otter
-
- Members
-
- 620 posts
The artist formally known as j322overthetop
- Location: Midlands
Posted 26 December 2014 - 02:54 PM
Also, the other day I made a little video - some of you may remember the "This is why you drive a classic Mini" one I made a couple of years ago. Well, I figured it'd be fun to make a "This is why you drive a BMW E30 325i" video as well.
Enjoy
#58
MattMiniS96
-

- Members
-
- 196 posts
Half pint guy in a half pint car
Posted 29 December 2014 - 04:48 PM
Sweet sounding motor, bet your pleased!
#59
myredmini
-

- Members
-
- 3,211 posts
My Mummy Says It's OK
- Name: Dan
- Location: Teesside
- Local Club: BOG MOG
Posted 29 December 2014 - 05:21 PM
Wow that video had me on the edge of my seat 
#60
acme15
-

- Noobies
-
- 3 posts
Starting My Mini Up
- Location: Sussex
Posted 27 March 2017 - 03:47 PM
How is she going? I have read through all of this with great interest. I got mine a couple of months ago. :) 


1 user(s) are reading this topic
0 members, 1 guests, 0 anonymous users


