Oh yeah, here's a little video that I could only make after the engine could keep it's coolant in and not overheat 


The artist formally known as j322overthetop

Posted 06 May 2014 - 02:54 PM
Oh yeah, here's a little video that I could only make after the engine could keep it's coolant in and not overheat
The artist formally known as j322overthetop
Posted 06 May 2014 - 05:41 PM
After I'd poked a bit harder at the rust and given it a going over with a flap wheel on the outside, the damage was as follows.

A lot bigger than the initial 10p sized hole I poked, but at least it was all flat (relatively) and just one bend to put in. So, I cut out a sensible-ish hole shape to make up a repair patch for.
Then the patch was made from a cardboard template, on yet another pizza box...
Annoyingly, I had picked the windiest day ever to do the welding. That's my excuse this time anyway! Plugged the hole quite nicely though.

Roughly ground down the welds before a bit of zinc-primer and underseal.
The patch doesn't quite follow the contour of the rest of the valance, but meh, I doubt you'd notice unless you really looked for it!
As you can see from above, I also got the rear bumper off to remove the towbar and cover over the holes that remained from the mounting bolts (which I identified were at least one source of rain water coming in to form the puddles in the bins).
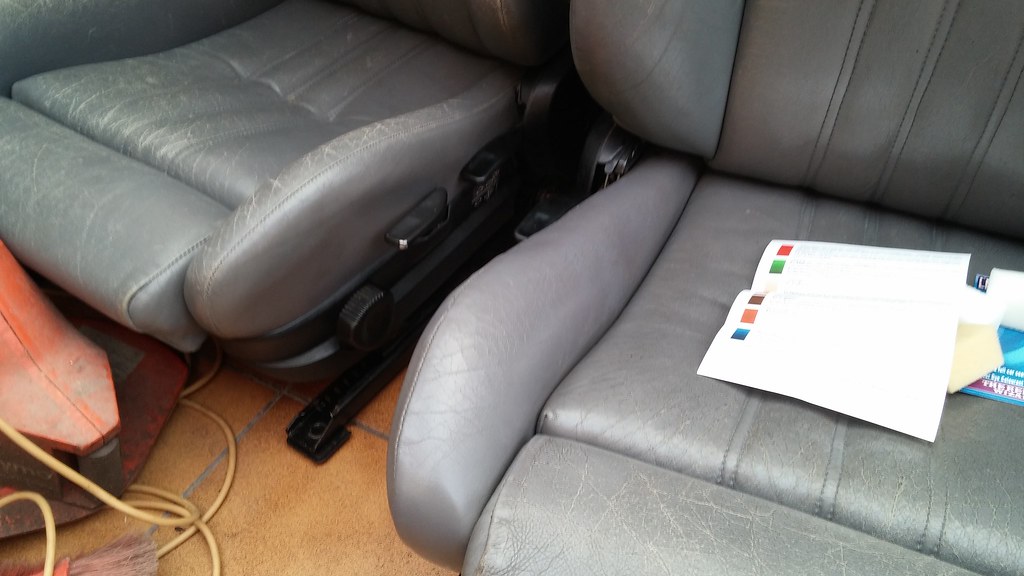
It got dark by the time I got the bumper back on and the car back on the ground, and the next day I re-fitted all the boot carpet bits and then spent most of the day fitting the leather seats and doorcards, just in the rear. I'm pretty happy with how tidy the rear half of the interior looks now! I've also sourced the door pin and handle surround that were missing from the drivers door, along with the two plastic seat back panels that were missing from the cheapo sports interior I snagged.
Here's a couple of shots of the leather in the rear. Took me quite a while to work out how the backrests came out, obviously the Haynes telling me to "pull up sharply" wasn't quite all I had to do... silly book of lies, why do I still trust it?! Cleaned the new seats up before they went in, and I vacuumed the carpet under the seats whilst everything was out.

I also cleaned all round the doors and door shuts before I put the cards on. Even though the interior came with door cards, I actually went and bought and another set from central London, just to use the grey door furniture (there was only black furniture on the cards that came with the interior) and the rear cards, as these ones I've now fitted don't have the cut-out for the electric window switch like the other ones do. The only downside is that this second set of cards I got were fake leather, as opposed to the real stuff, so the rear cards in the car are only fake leather. Not that anyone would really notice of course...
Here's the boot all back together, looking a lot tidier than when I got the car. You can also see here the headrests on the rear seats from the interior I bought. It seems to be a fairly desirable upgrade to install rear headrests, which is nice to know. I'll hardly ever have anyone in the back though, so I might take them out if they block my view out too much...
Whilst I was out taking those pics, the postman dropped off the door lock pin thingy, so I could cover up the dangerous pokey bit of metal coming out of the drivers door.

Don't know when I'll get round to fitting the front cards and seats, but I want to get the driver's seat repaired first as the stitching has come apart on the outside seam on the outer lower bolster.
Edited by The Otter, 06 May 2014 - 05:44 PM.
Mill Road Garage

Posted 07 May 2014 - 10:48 PM
I didn't like this at first but i'm starting to see it's potential now.
I do like a good thread about fixing up a rough car and enjoyed the Bx thread.
Will start keeping up with this now.
Cheeers
Ben
The artist formally known as j322overthetop
Posted 09 May 2014 - 07:57 PM
Cheers Ben, there's plenty more roughness to be smoothed out yet, so should be a load more updates throughout the summer 
A couple of weeks ago I decided that I'd try and wet sand the artwork off the bonnet. If the paint work underneath was ruined then I wouldn't have lost anything; but if the paintwork was good then it'd save me buying a new bonnet or repsraying this one! So, I got about half way through one day before I got bored and did something else. For a couple of days I had a VW hover-bus on the bonnet.

Whilst I was there and flatting back the orange peely paint on the wing and drivers door, I noticed that the front edge of the door didn't quite look right...
Mmm, filler... seems there was a hefty dent on the front edge of the door that also caused the frame to go a bit banana'd - which explains why the back edge of the door doesn't sit properly in relation to the rear door.
So, from that I decided to be on the look out for a new door! This one was full of filler, half rattle-canned (not very well either...), and rusty on the bottom.
After I got bored of sanding the bonnet, I decided to have a go at turning off the dash inspection lights. I started with this, only one green light (as far as I know the green lights act as a sort of countdown to oil change/inspection time), and the inspection light 'on':

So, following advice from the internet, I made a fused jumper wire and connected the couple of appropriate pins on the big diagnostic socket under the bonnet, then turned the ignition on for 10 secs.
This proved mostly successful, as the inspection light went away and I had four out of five green lights. I've turned the ignition on a few times over the past few days and I sometimes get four and sometimes get all five lights, so I assume there's a loose connection somewhere. Not really that bothered though, I'll be checking this thing over far more often than the dash tells me to!
I finished removing the artwork from the bonnet over the next few days, and found that there was a big section of the front corner that had been rattle canned in a close-ish match silver. I decided to sand this off as well to see what else was underneath - strangely enough, 90% of the paint under the rattle can patch was fine. The only bit of bad paintwork underneath was on the very corner, which looked like it had some rust removed as there was a bit of filler and a patch of bare metal. You can kind of see it in this pic, but the bonnet was still wet so it's not very clear.
Basically, it just ended in me having to re-spray this little patch (currently still in primer). A lot better than I was expecting due to the large amount of other stuff that had been plastered over the bonnet! Still a way to go with flatting back and polishing out all the scratches I've put in to the bonnet getting the artwork off. Think I'm going to invest in a DA first, my hands still hurt days later from all that sanding....
I won't be able to get a decent enough colour match blended in to make me happy, so my current plan is to do something I didn't want to do to this car... put some stickers on it. Even worse, I'm planning on putting some M-stripes on a non-M car, which usually just annoys me (although this car does have a factory fit M-tech steering wheel, so I can find some justification in that). I'm going to try and put some stripes on the corner of the bonnet to separate the re-sprayed patch and the rest of the bonnet, in the hope that nobody will notice it's two slightly different colours.
At the weekend, the postman delivered two grey sports seat back panels. The seats I bought for the car came like this:
One had a black panel and one had nothing at all. The two replacements aren't exactly the same colour, but it's close enough and better than having nothing.
The seats need a strip down and some repairs to weld broken things back in place, so I'll be doing that sometime soon before fitting them - along with getting the driver's lower bolster repaired.
Couple of days later I took a trip in to Birmingham to see a guy that was breaking a 325 Touring exactly like mine. I came away with a few things - firstly was the factory emergency jack, wheel chock, and wheel brace, which were missing from my car.
I also got a few clips to hold in the rear panel in the boot, as 4 out of the 6 were missing on mine.
The rubber window weather strips were very crusty on my car, with the front passenger side one falling apart pretty catastrophically. So, I got a set of said weather strips in almost perfect condition, and the corresponding cover trims in case I bend mine. There are only three strips/panels here because the other ones are still fitted to the replacement door I also bought... The top bit of trim in the pic below is the missing piece from the bottom edge of the window on the tailgate.
The main thing I went there for was the replacement drivers door!

It's been resprayed at some point, so it doesn't exactly match the colour of my car, and it's got a few little scrapes and some rust on the bottom inside lip, but it's a lot better than the original door. Not too bad for only £40 anyway.
Next update on door rust repair and fitment coming soon...
Mill Road Garage
Posted 10 May 2014 - 05:06 AM
Great update.
Coming on well mate
The artist formally known as j322overthetop
Posted 11 May 2014 - 11:53 PM
This was the rust I had to deal with on the bottom edge of the door.
Firstly I peeled off all of the seam sealer that was loose - ended up going quite a long way along the door.
Then wire wheeled off what I could. There's still rust in the actual seam, in the fold of the outer skin, but hopefully I've delayed it's progression with the next step...
Which was to liberally soak the area in some rust treatment stuff, which you can kind of see in this photo. I also cleaned out the inside cavity of the door and plastered the inside part of the skin seam with the rust treatment.
That photo above also shows the window regulator from the car fitted in to the replacement door, along with the glass from my car, as the glass that came with the door had the number plate of the donor vehicle etched in to it and was a bit more scratched than mine.
Back to the rust - after a couple of days to let the rust treatment settle in, I put a few coats of zinc primer over the top and then tried my best to squidge some seam sealer along the edge.
I also scraped back/rust treated/painted this little section of the back side of the mirror mount, as this was breaking out with a good few rust scabs.
Once the seam sealer had dried, I put a few top coats of some colour "matched" paint I picked up from the previous owner, along with some clearcoat over the top of that. The matched colour is actually pretty far off being matched, it's too 'silvery', but it's close enough for the underside of the door where nobody will ever look... looks a lot better than before anyway. Hopefully the rust stays at bay for a while now I've done this...

I also cleaned up and painted the jack I bought at the same as the door.


Whilst I had the painting stuff out I finally got round to finishing off the rust repairs on the tailgate.

Going to leave it a couple of weeks and then try my best to blend in the patch on the top left that you can see there...
I also fitted the lower finishing strip for the window. Oddly, it was about an inch and a half too short, so I decided to fill up the gaps on the ends with a bit of windscreen sealant.
Then I cleaned up and put back on the number plate mounting/surround panel thingy. I gave it a coat of boiled linseed oil to bring out the colour again.
So then, fitting the door. First thing I had to do, obviously, was get the old door off. Unplugged the wiring loom from the pillar, nice and easy. Then found that the circlip that should be holding in the dowel pin on the door stay catch was missing... not too much of an issue, I just fashioned something similar to a circlip for when it went back together. Not sure how necessary it is anyway seeing as the pin was still there even though the circlip had gone walkies.

Then I was ready to undo the two bolts that hold the hinge halves together. At first, I thought the bottom one was almost all the way wound out and I was lucky to catch it there - but no. It was a bolt that was twice as long as it needed to be and too small with a different thread, so I could just pull it out... I assume someone just hammered it in and hoped for the best. At least the top bolt was still there and correct!
So, just like the missing water pump bolt, I found a replacement for the lower hinge, the right size and thread but a bit too long.
So, hacksaw and file again...
This is why you keep random old nuts and bolts - you never know when they might come in handy
Beach buggy style...
On with the new one!
I was kind of surprised that it went on perfectly first time and didn't need any adjustment on the hinges! Just bolted on and clunked solidly shut. Guess that shows how good the quality control was at BMW - I'm more used to Minis where sometimes you won't believe a panel came off an identical car due to the bad fitment. 
On with the ancillaries - job done.
I also fitted the grey doorcard as part of my very gradual interior swap, but didn't think it was worth a picture yet without the front seats in.
That's all for now! Thanks for reading
Super Mini Mad

Posted 07 July 2014 - 06:37 PM
Hey any more updates is she on the road yet?
Will.

Mill Road Garage
Posted 07 July 2014 - 06:56 PM
Hey any more updates is she on the road yet?
Will.
I was wondering this earlier!
The artist formally known as j322overthetop
Posted 08 July 2014 - 11:17 AM
Terribly sorry chaps, I've completely neglected this thread and have just been updating the original RetroRides one. I'll copy and paste the last couple of months progress in the next few updates! There's a lot to get through, so please bear with me 
May 10, 2014
I've now stripped down the sports seats and am in the process of reassembling them.
The passenger seat frame and mechanisms were still in perfect condition, so I used that one as a template to see how the driver's seat should be repaired. With the backrest removed, you can see how the backrest is attached to the base - a bolt on each side through captive nuts on these very small, flimsy L-shape brackets. As you might expect, the passenger's seat hasn't seen as much use as the driver's seat, so these brackets are still in one piece. However, it's common for them to snap through heavy use, which is what had happened to my driver's seat along with one of the brackets being completely missing.
So, this is what the passenger seat looked like with the backrest removed.
Following advice from the internet, I put a big fillet of weld on the inside edge of the brackets to give them some more strength and hopefully to stop them from ever snapping.

What prompted me to look for damage to the seat frames was that the other day I decided to have a play around with the seats, and the driver's one went a bit wonky when I tried to recline it...
So, pulling the backrest off the driver's seat yielded this handful of stuff that shouldn't be there.
Some lovely metallic snot in there... I actually pulled out quite a bit more of that awful welding, which just flaked off with a pair of pliers.
As I mentioned, the seat base was missing one bracket completely, and the other one was snapped, as per the pic below (snapped bit sitting on the seat).
Luckily, the snapped bit was snot welded to the inside of the backrest for no apparent reason, so I pulled it off with some pliers and welded it back where it should be.
I added a bit more weld after that photo ^ to try and give it more strength.
I then set about making another bracket for the other side, obviously using the existing one as a template. So, I first cut the shape from a thick steel bracket (ignore the random hole, it was just there in the bracket I found...)
Then I drilled a hole in the right place and welded a nut on the inside.
Then I welded it to the seat base bracket.
So, that was the seat base all sorted, but there was also damage to the backrest frame that I had to deal with. The pointy bits of the top of the seat base brackets slot in to a hole on each side of the backrest to keep it in position. These slots are what you can see just to the right of the centre in the photo below, formed by the outer edge of the frame and a little beam running up the inside of the frame.
Now, to get some more angles on that slot, it shows how the little outer beam thingy there hasn't fared well with the flexing of the seat.

The other side of the backrest was still just about attached, but there was heavy cracking evident, along with two completely useless blobs of weld in the middle of the little beam.
It was pretty tight to get the welder in there, and I had to be careful not to burn off the foam, but I managed to get the snapped one re-attached (I think...) along with trying to strengthen the un-snapped one.

I then gave everything a coat of paint and let it dry for the night.
The next day, I set about disassembling the driver's seat base so I could remove the ripped bolster (which you can see above) and take it to be repaired.
The knob for the knee support adjustment at the front of the seat had obviously been broken before and glued back in place. It took a hell of a lot of force to pull it off once I realised I couldn't get away with leaving it where it was...
I finally got the leather off the foam in the end, after much faffing about with all the hooks and hog rings holding it in place. As you can see, the foam now has a bit of a hole in it from the wear through the bolster, so I'll try and fill that with some more foam before it goes back together. The leather cover is currently at a local upholsterers and I'll hopefully be picking it up on Monday. It's not just the stitching that's come apart, but the actual leather has ripped along the seam, so hopefully the upholsterer can still make something good from it...
Now I've got this big pile of seat bits to remember how to put back together again once I get the bolster cover back.
Also, the other day I went to Bucklands scrapyard for a wander round with a couple of mates. I didn't go there with the intention of buying anything, but whilst looking round the cars I had an idea to find a fold out cupholder assembly from something to put in the E30. Eventually I found this piece of wonderous engineering, suitably lifted from a BMW E39 Touring 


A quick mock-up shows that it'll fit perfectly at the top of this little cubby hole, I just need to find some way of mounting it! Pretty chuffed it fits so well, only cost me £3 too.
May 12, 2014
The speakers I ordered off the interwebs turned up a couple of days ago, so yesterday I set about installing them and then trying to figure out the stereo wiring.
First thing I did was install the rear speakers.
Then I went up front to sort out the wiring and put the front speakers in. Luckily BMW provides you with this nice 'accessory socket' under the dash, in which all the optional extras (such as electric windows, heated seats, etc) are plugged in to. The stereo power loom comes from here (it's the white plug on the top row), with the appropriate wires for the permanent live, switched live, and ground.
Whilst I was there, I finally discovered where that big yellow/green wire went. When I got the car, it was just laying around loose in the boot. I'd assumed it was something to do with the speakers, but the factory speaker wiring was still in place, and there wasn't anywhere obvious it was supposed to go. As you can see from above, it went the length of the car and connected in to something on the accessory socket via the use of a chocolate block, which turned out to be something to do with the central locking loom (according to a diagram I found on the internet anyway, hence why I knew what one the stereo plug was). I have literally no idea why it was there, and disconnecting it did nothing, so I just pulled it out of the car and moved on!

Back to the stereo wiring, for some reason the switched live was cut and taped off about halfway along the loom towards the stereo position, and there was just the permanent live and the ground available. 
So, I lengthened the switched live wire, crimped on some connectors and then connected everything up to the stereo harness. Thankfully it all works as it should! The stereo (left over from the BX) powers up, and all speakers are getting a signal. I've ordered an ISO plug to wire all the loose speaker wires in to, then I can neatly plug that in to the stereo harness and I'll be sorted for the major bit of the stereo/speaker install.
Some day I'll find a position for the compact sub I've got left over from the BX and then run the wires for that. In fact, I'll probably run the wires for that when I've got the carpet out to check the floorpan, when I've got the front seats removed, for when I'll be swapping in the sports seats...
Whilst I was tidying up wiring, I thought I'd have a look at these crusty old ultrasonic sensors from an ancient alarm install. Although, that being said, maybe they were just put there as a deterrent... there's no other evidence of an alarm install that I've found yet...
Basically, they both just ran down behind the A-pillar trim and went nowhere, with cut off wires tucked up behind the dash. At least that meant they were easy to pull out and throw in the bin!
I've also just had this delivered to me, an upgraded ECU EPROM chip to give me a bit more power, fuel economy, and throttle repsonse.
Normally I wouldn't trust such suspiciously perfect claims, but they've had plenty of good reviews over on the E30 Zone forum, so thought I might as well get one! I won't be fitting it for a while, I kind of want to see what the car is like standard first, so I can see how much of an improvement the chip makes and to be able to appreciate the investment!
The artist formally known as j322overthetop
Posted 08 July 2014 - 11:19 AM
May 15, 2014
I pulled out the front seats and carpet the other day, and have been doing plenty of jobs in the mean time, so will have quite a bit to update with here.
I thought this was cool, under the front seats are the exits of these heater tubes, to blow air in to the rear of the car. I guess this is a pretty normal feature on more modern cars, but the only other car I've taken the carpet out of was my Mini, so this probably impressed me more than it should've done!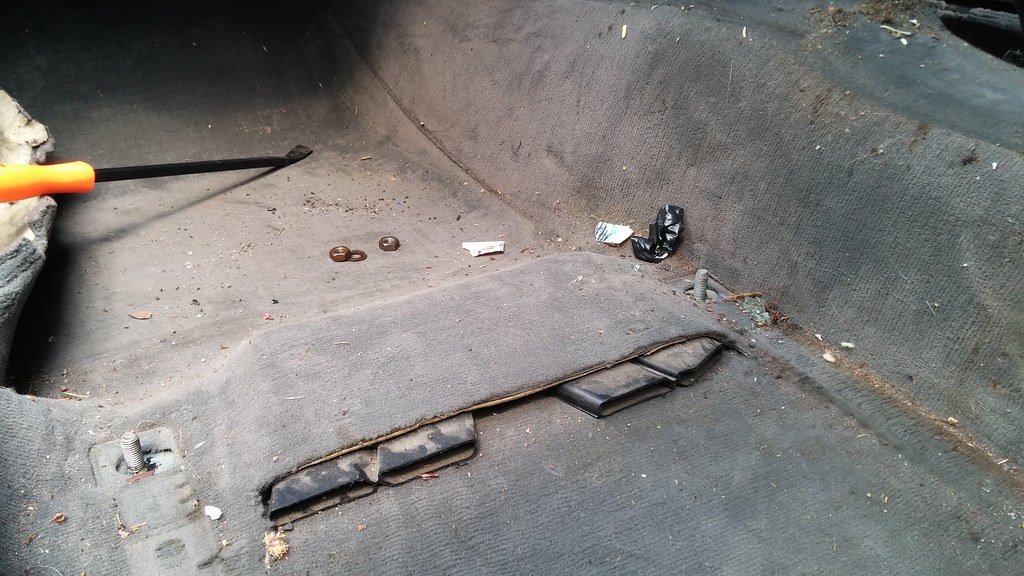
As you can see above, the carpet was pretty filthy, and there were still a few bits of glass lying around from when the passenger window was smashed when car was broken in to, before my ownership. I found a few bits of glass in the window runner channels as well actually, I was wondering why the passenger window was making such a horrible scraping noise when it was lowered and raised!
The driver's side carpet had a few tasty morsels for me.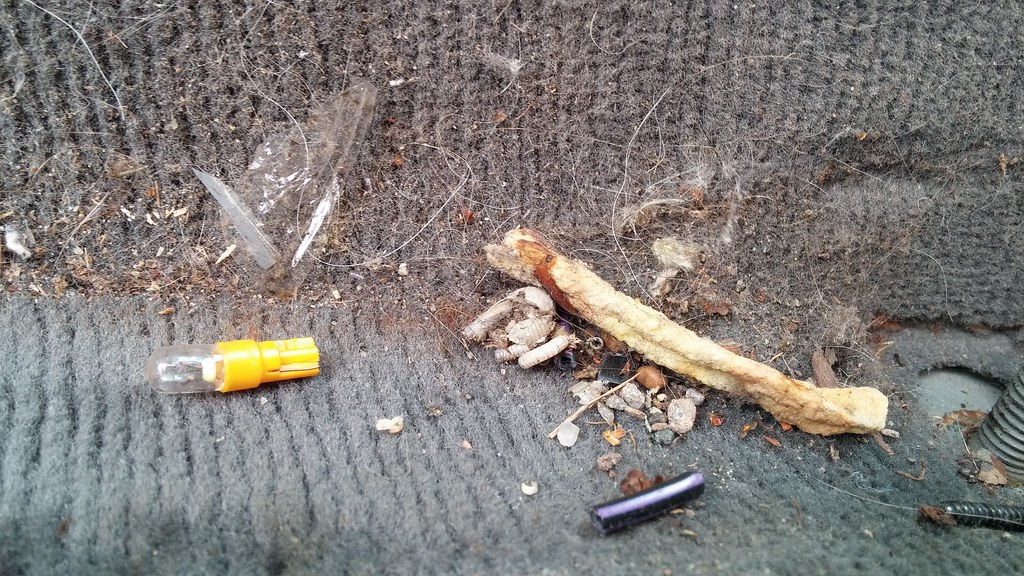
Here's a photo of the ingenious quick release throttle pedal. Think I'll be changing to a black one when it goes back together, make it a bit less conspicous.
The passenger floor pan was very wet, the carpet was pouring water out from the foam as I removed it.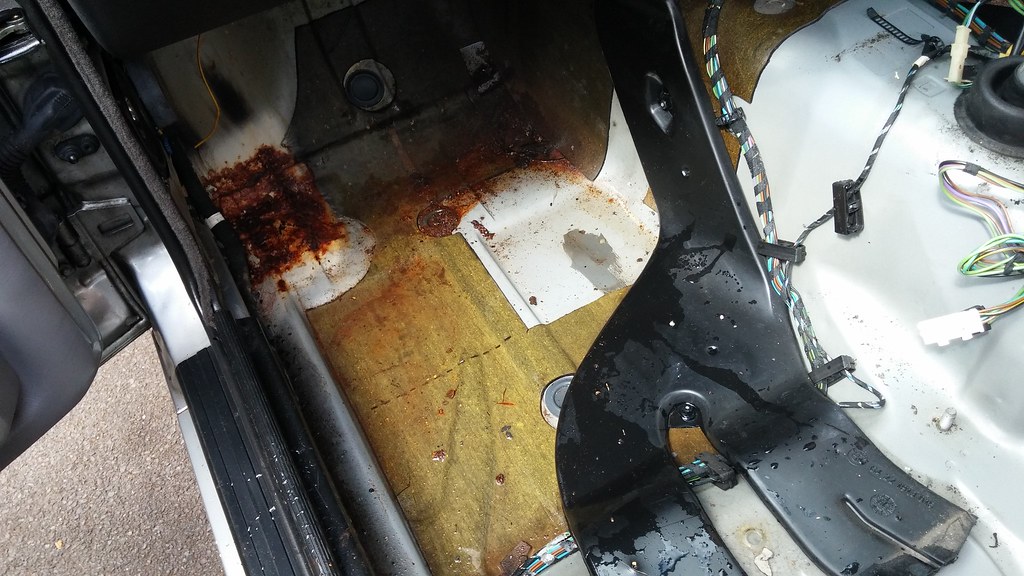
Here's a close up of the crusty bit. Bit horrid...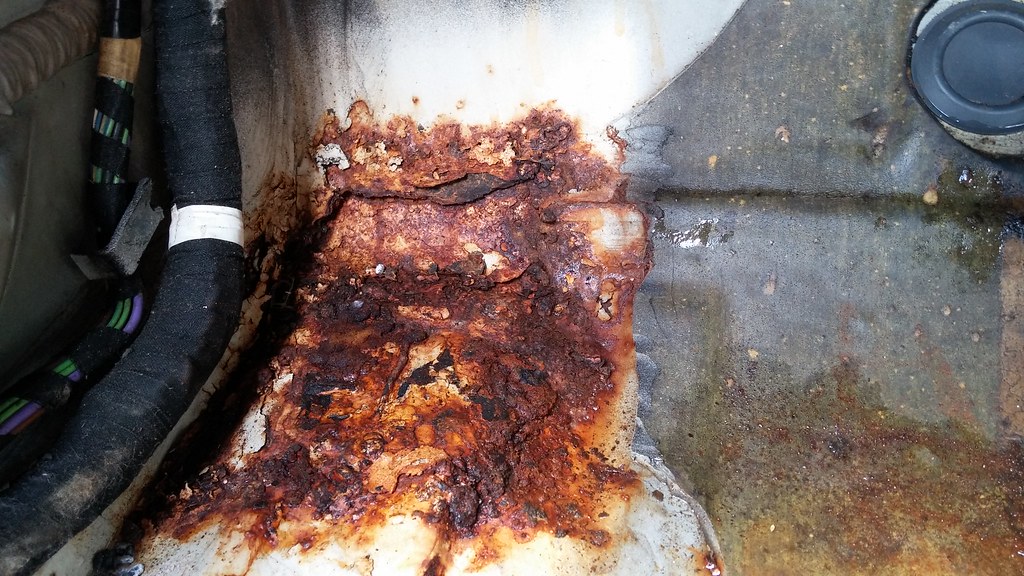
Here's the driver's side, which has been patched over before, but not had the rot actually cut out. The patch has been welded in alright though and it's still solid, so I didn't bother doing anything with this side apart from a bit of paint.
After a bit of hammering and prodding at the passenger's side, it was obvious that this wasn't as solid!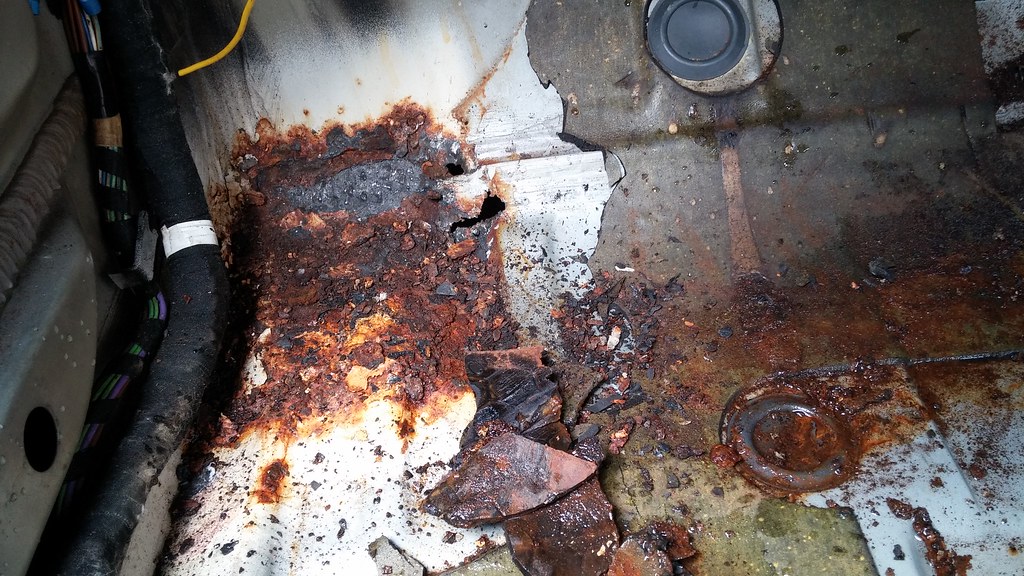
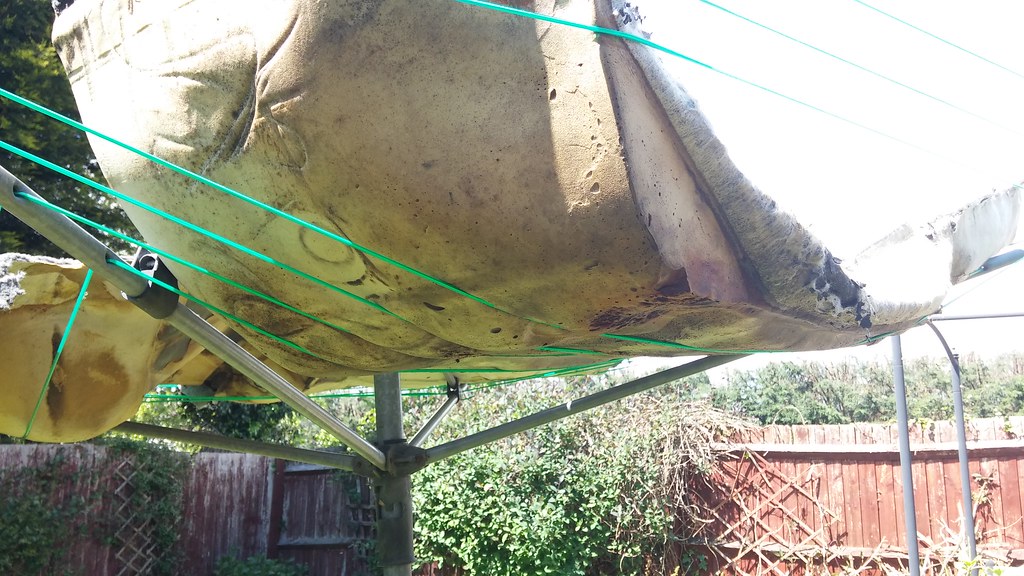
After that I thought I'd better put the carpet somewhere to dry out. I went out to it throughout the next couple of days, squeezing it and rollering the underside with a bit of pipe to squish the water out; there was a lot in there.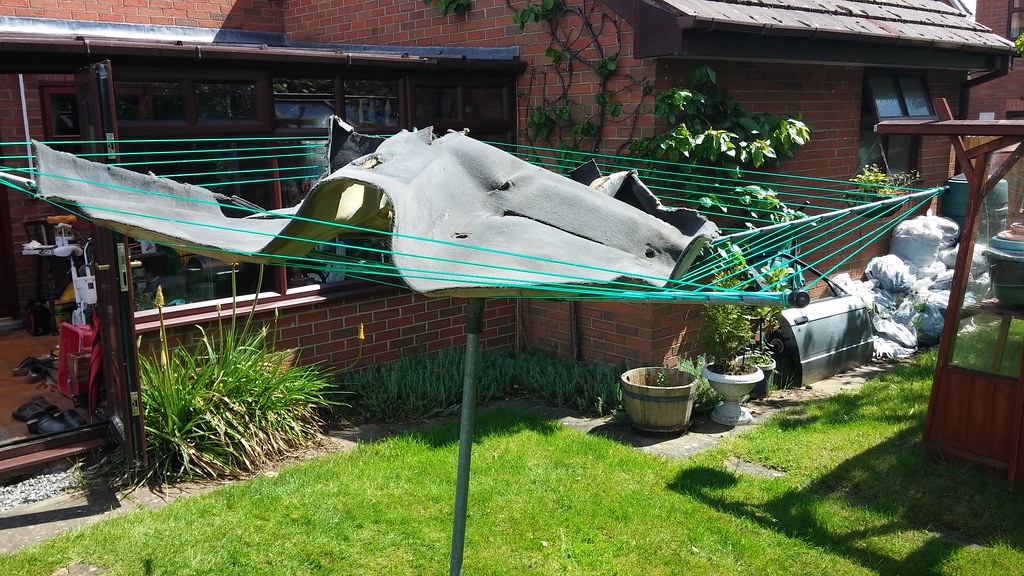
I then went and cut out a patch from the rusty floorpan to weld up again. In retrospect, I really should have cut the whole front corner section out, as it was awful to weld to and thinner than it should have been on the rusty bit, but I only realised just how bad it was when I kept blowing holes through it!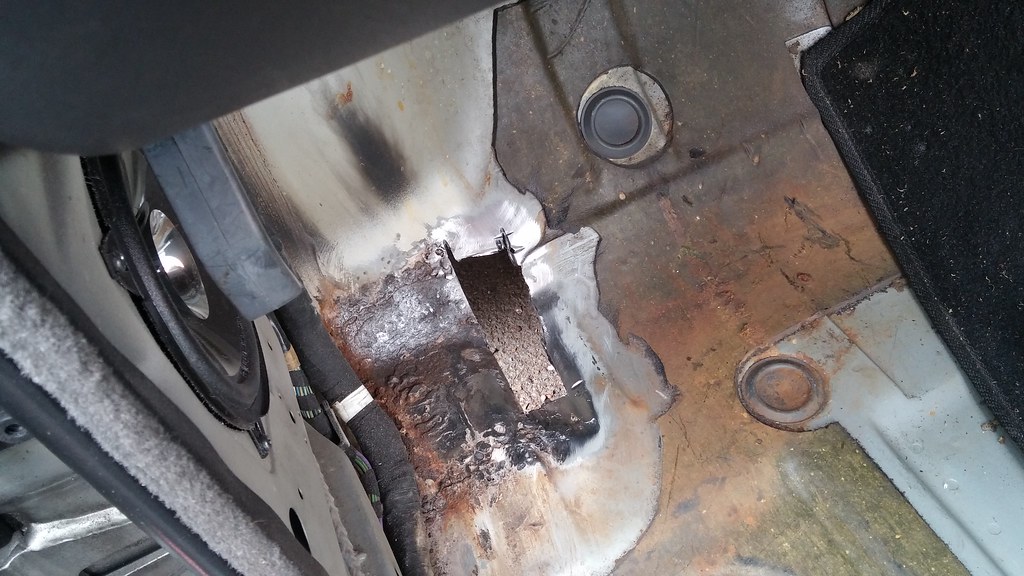
Plugged the hole.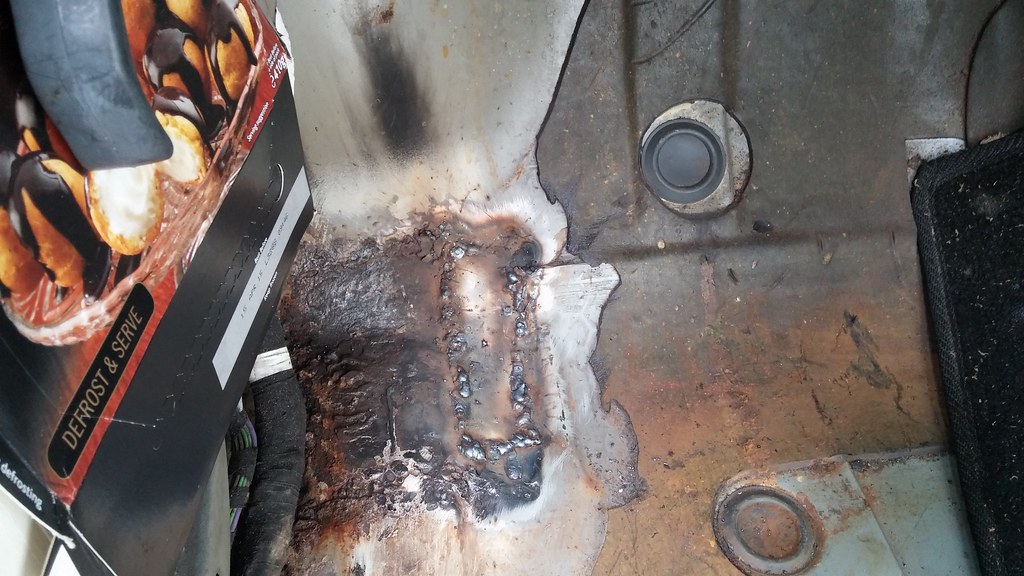
I've since put some zinc primer and seal sealer on both sides and will put some topcoat/underseal on sometime soon.
I then moved round to the front of the car to do a few things, first of which was to try and pop/hammer out the dent in the drivers side wing.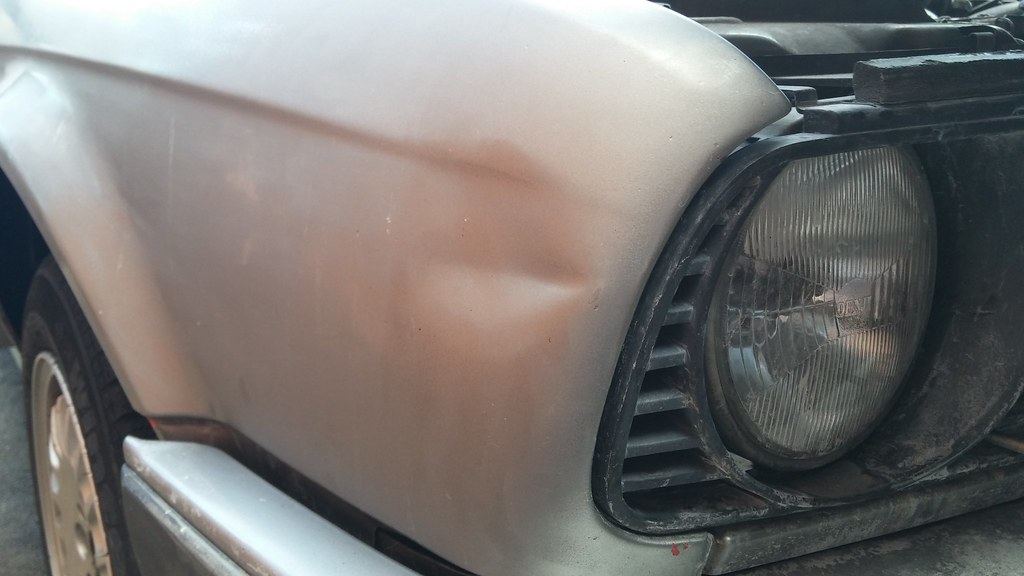
Whatever caused the dent likely caused this mounting tab to pop out as well, which is why the wing wasn't sitting properly against the front panel.
I got it mostly out, it's a bit ripply but I'd say it's less noticeable than before. I was also only using a hard plastic hammer, which wouldn't have helped...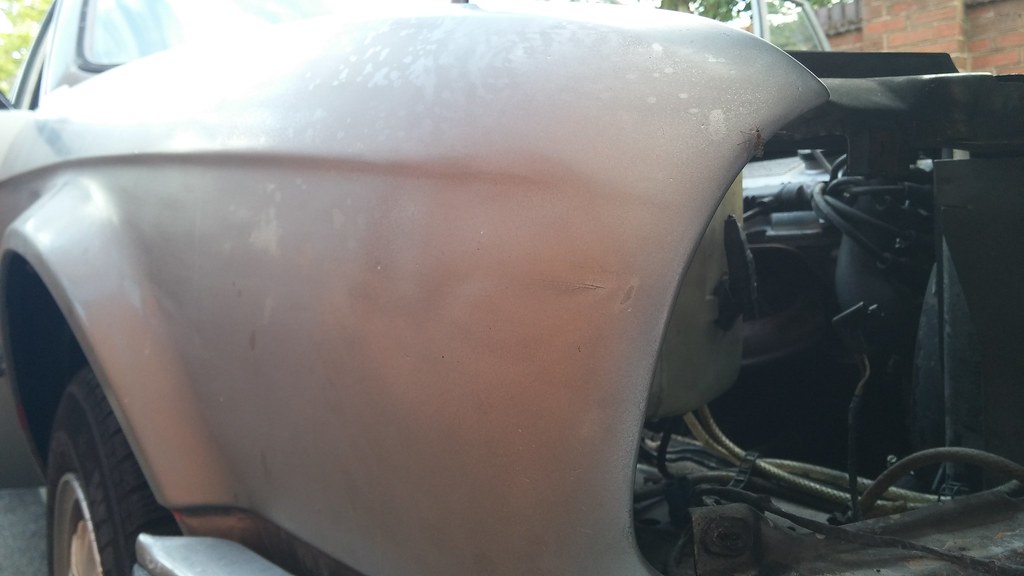
The headlights I had to pull out on that side were the ones that aren't supposed to be there, they aren't even a matched set (as in the dipped lamp is a different brand to the full beam lamp). You can tell that they weren't meant to fit, because the wiring to the dipped lamp wasn't exactly factory.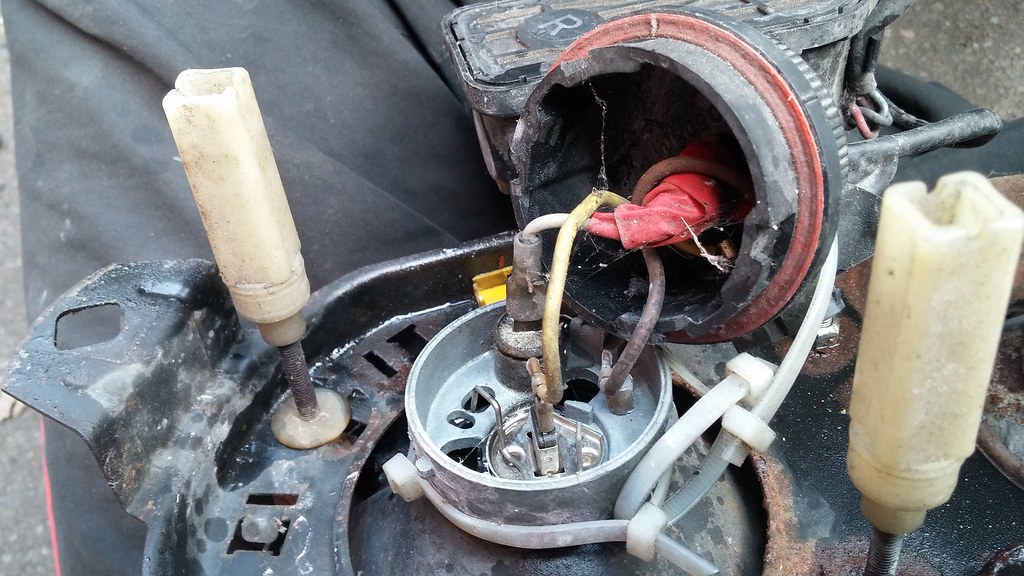
Here's the old, mismatched unit next to the cheap replacement original Bosch smiley lights to match the other side of the car. There's a chip/small crack in the full beam lamp, which has let condensation inside and fogged up the inside of that lense. I'll get the lense off some day and sort it out, which I might be doing to smoke the lights sometime anyway.
Another reason why the replacement lights were cheap were because of this broken adjuster. However, there is just about enough material left there for the metal ball to snap in to the plastic, so it still works fine but can be pulled out of the adjuster very easily. If it causes a problem in future then I'll do something about it, but for now it can stay as it is.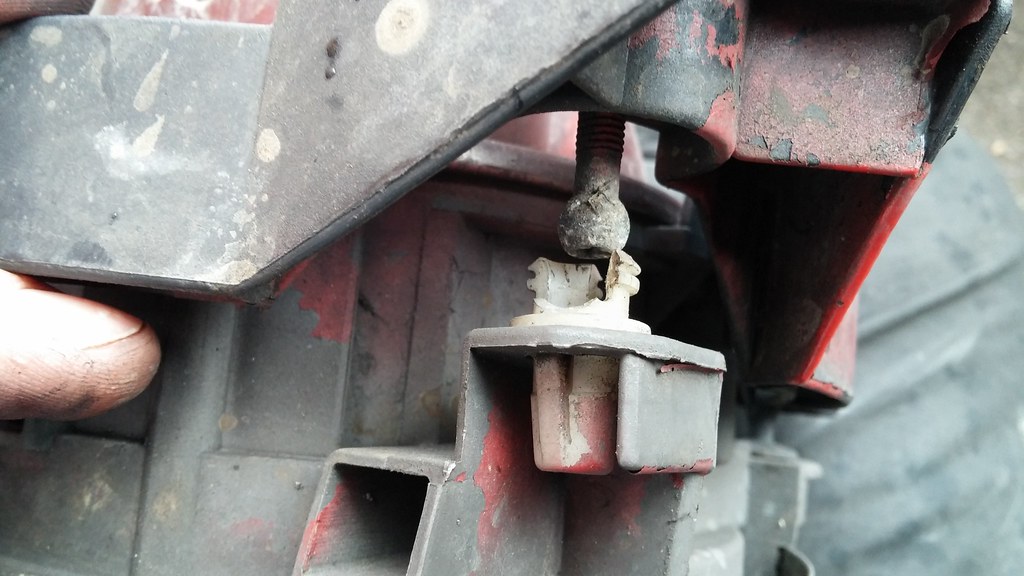
Here's a shot of the wing once I got it bent back in to shape. It was sitting to high on the top edge, so the wing was much higher than the bonnet, so I had to bend the whole thing downwards from the top edge to make it set better and to bring the front lower mounting tab in to position for me to be able to screw it in place.
Much better than it was:
Testing out the unit to see if all the bulbs work - success! Matching headlights 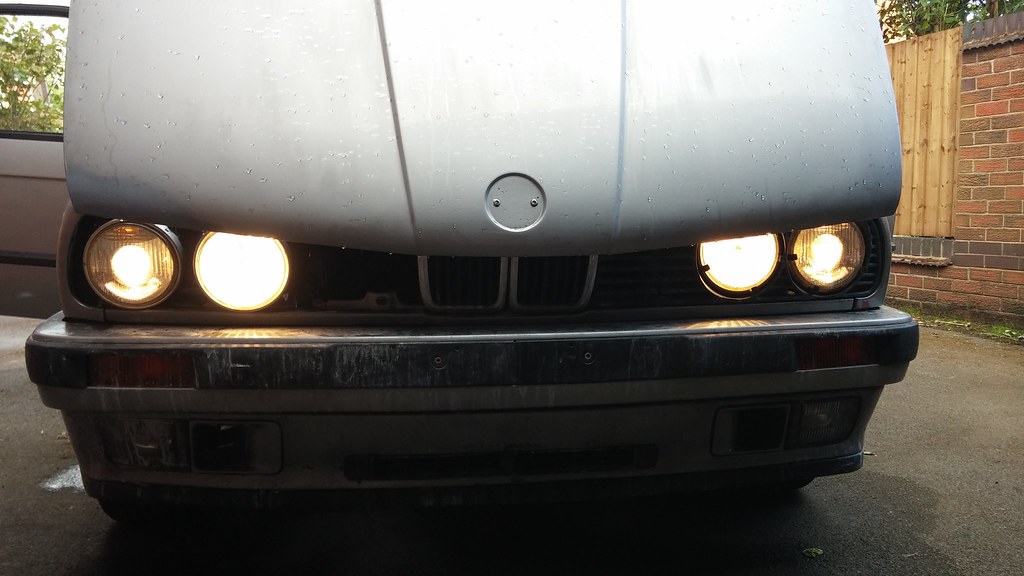
Edited by The Otter, 08 July 2014 - 11:20 AM.
The artist formally known as j322overthetop
Posted 08 July 2014 - 11:20 AM
May 16, 2014
After I fitted the replacement light on the driver's side, I thought I'd remove what's left of the headlamp wash/wipe system, which my car had fitted from the factory. Over the years, the wiper blades have gone missing, the washer pipework has been blocked off, and one of the motors has seized up. People pay a lot of money for these headlamp washer bits, and I don't really feel the need to fork out the necessary dosh to fix up the system on the car. So, I took the remaining bits off and can hopefully sell them on for a decent amount 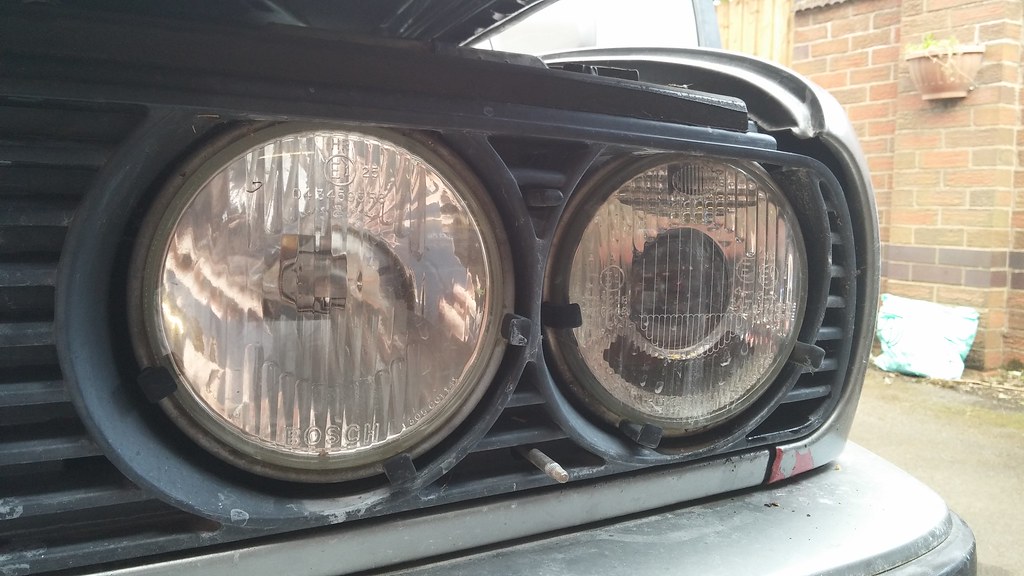 20140513_183354 by svenicusminimus, on Flickr
You can see on the unmolested passengers side lights, that the trim rings have little black stops on them, so that the little wipers have a reference point and don't fling off the edge of the lights. There are also the pointy metal spindles that were poking out of the grill, which is the drive from the wiper motor that would power the wipers. There are also the little squirter jets poking out between the lights on the top. I could pull out the motors and the jets and that was that, but I wanted to keep the washer spec trim rings in one piece. Luckily, the ordinary trim rings from the mismatched pair of lights were a direct swap with the washer spec rings, so I've now got a few desirable bits I can hopefully sell on ebay. The working passengers side wiper motor should sell well, as they usually seize up (like the driver's side one has!).
There we go, all uncluttered and matching side to side now.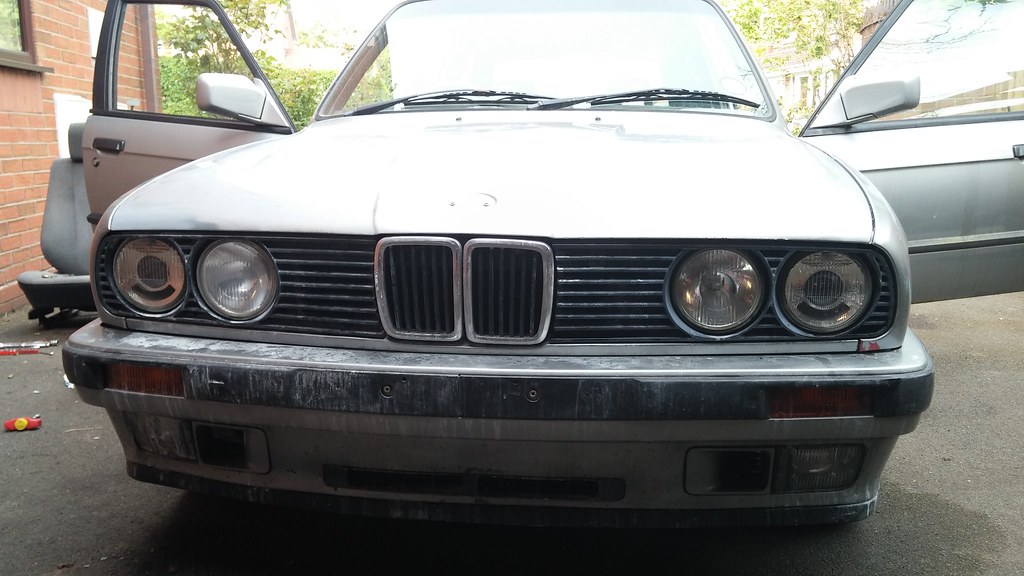 20140513_185630 by svenicusminimus, on Flickr
This arrived in the post, so I've put that in and now all the speaker wiring is neatly sorted for the stereo.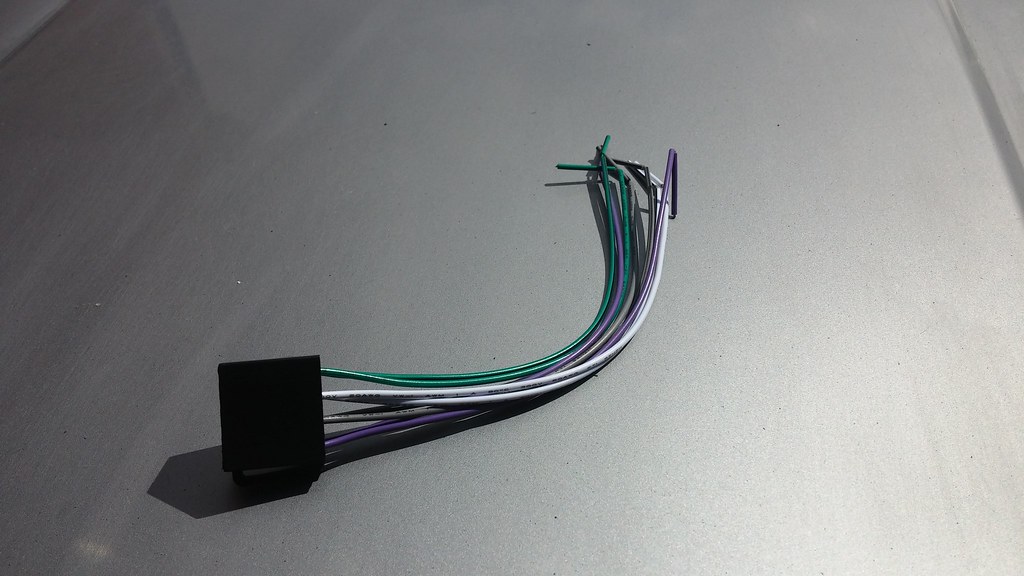 20140514_120342 by svenicusminimus, on Flickr
After I sorted the speakers, I got all the subwoofer wiring in place to run to the boot of the car. It's so much easier doing this sort of thing with the carpet out! Yellow wire on the right comes straight from the battery.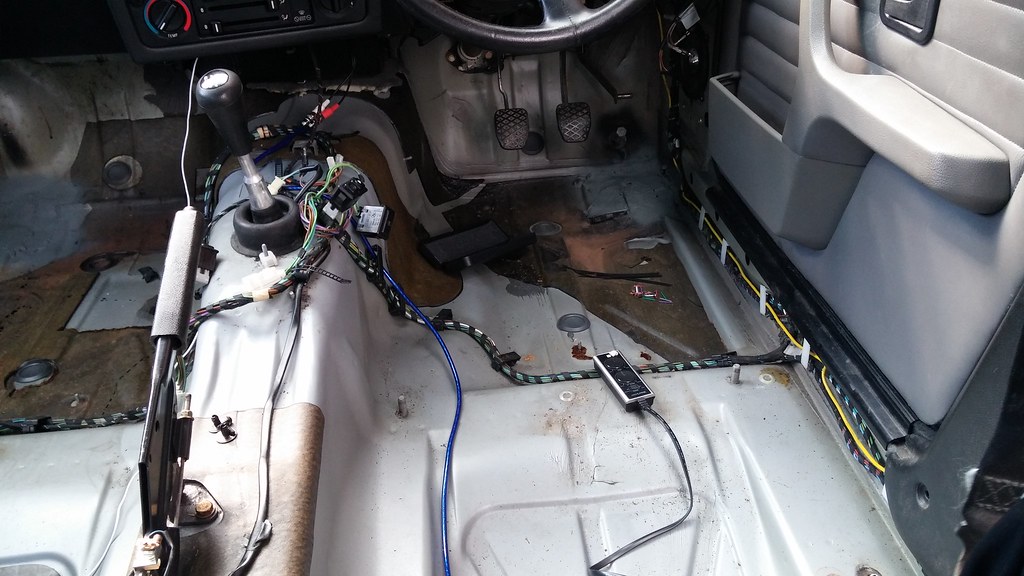 20140514_154447 by svenicusminimus, on Flickr
Here's where the sub is going to live; it's only plonked in there for now, I'll fit it properly in to the plastic liner panel whenever I get the carpet and seats back in. Nice to have a stow-away place to put it so it doesn't intrude in to the boot space.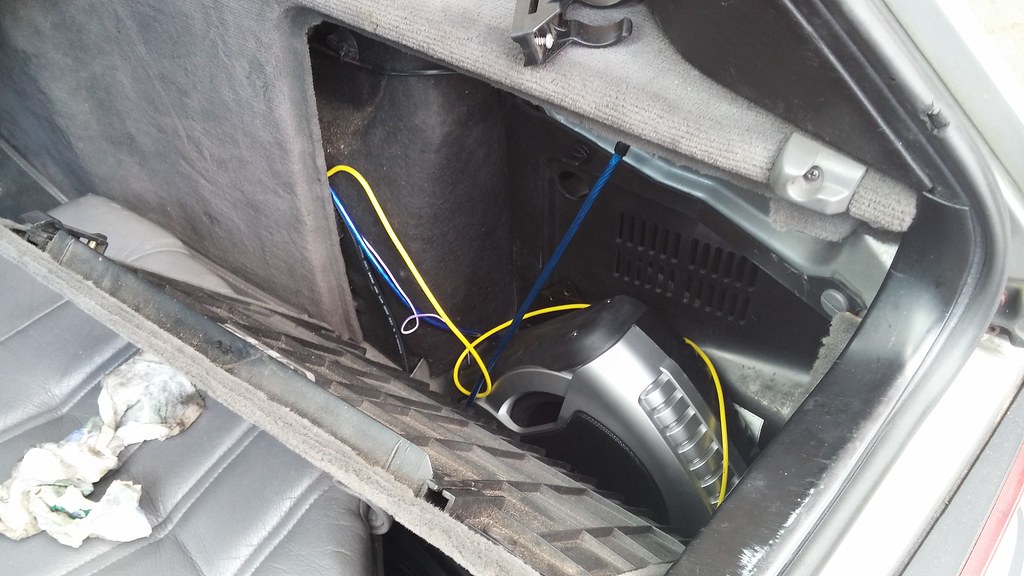 20140514_154509 by svenicusminimus, on Flickr
Whilst I had the car in the middle of the drive, it gave me a chance to take a better look at the passengers side of the car. This fairly meaty dent on the rear arch will need sorting soon, but again I'll leave that for when the interior is finished. There's a scuff from the incident all the way down the rear door on that side too, but it looks like it'll polish out. There's also a lot of rust surface rust on the lip of that arch, along with another hole I managed to poke through on the rear of the arch, so I'll need to get the wheel off this corner sometime and spend a day sorting it all out!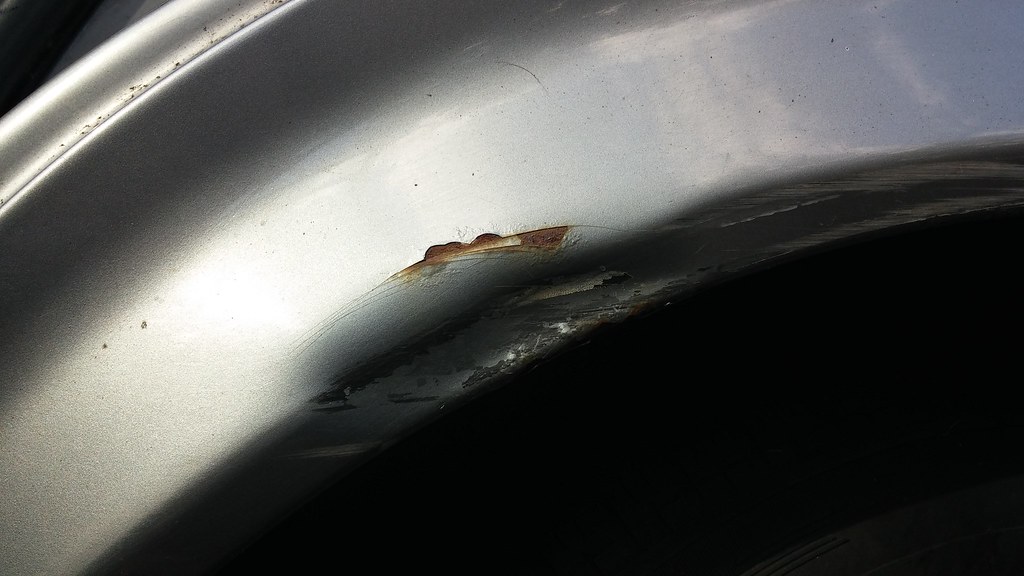 20140514_160328 by svenicusminimus, on Flickr
I finally got round to putting the driver's sport seat back together, because I was waiting on some foam to arrive so I could patch up the big hole that had been worn through from the damage on the bolster.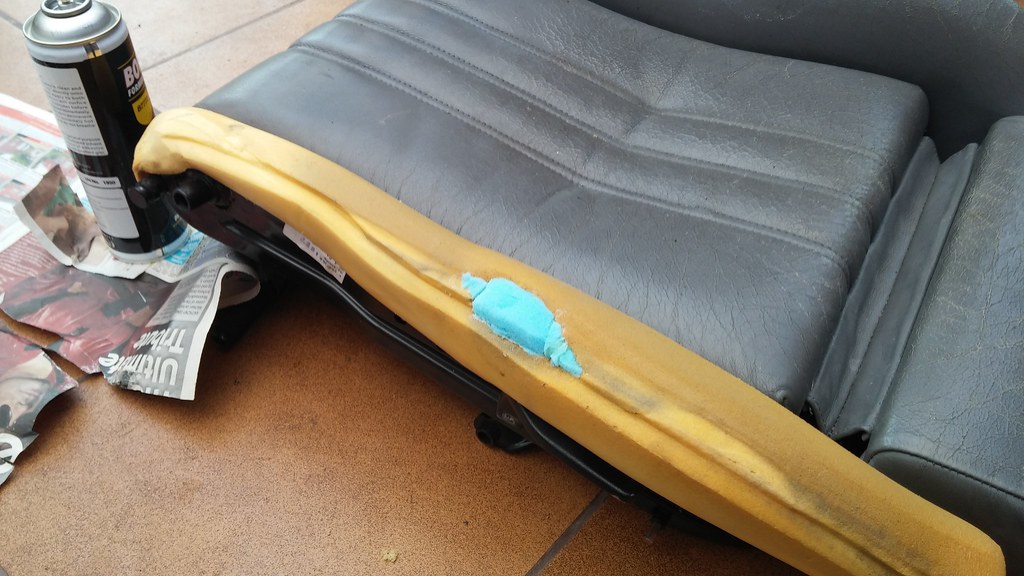 20140515_120441 by svenicusminimus, on Flickr
Then, just as I was about to get the repaired bolster back on, I noticed a bit of damage on the rear mounting for the backrest hinge on the outer side.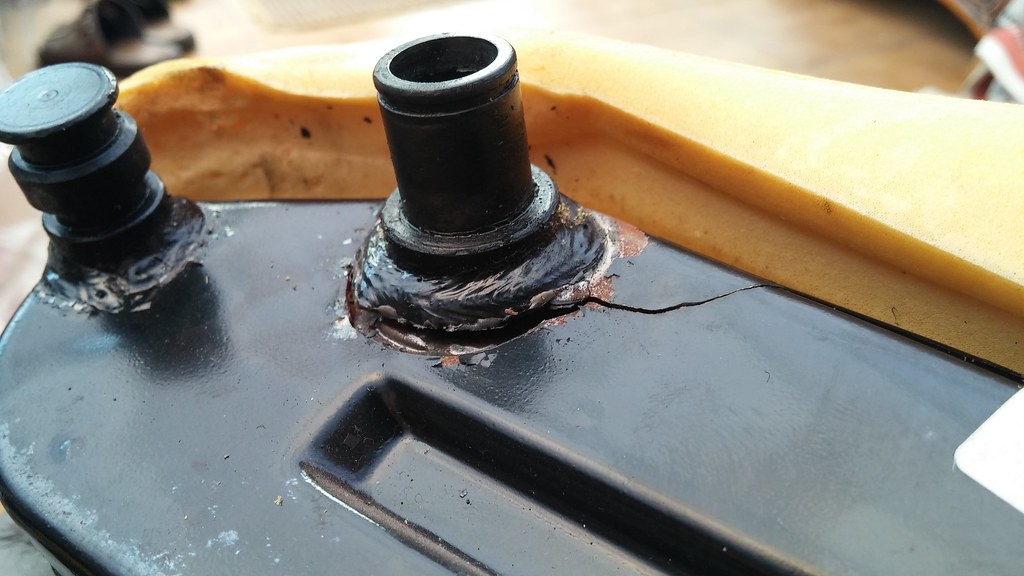 20140515_121200 by svenicusminimus, on Flickr
I say a 'bit' of damage, but the crack went almost all the way round and the thing had almost completely sheared off! I can't believe how much welding I've had to do to this seat, good thing it was a cheap interior...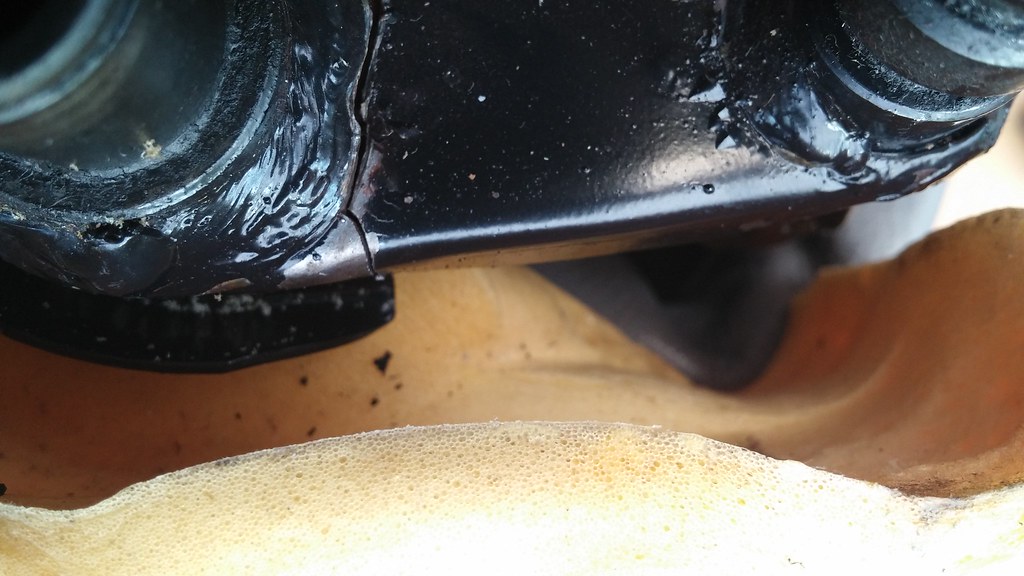 20140515_121227 by svenicusminimus, on Flickr
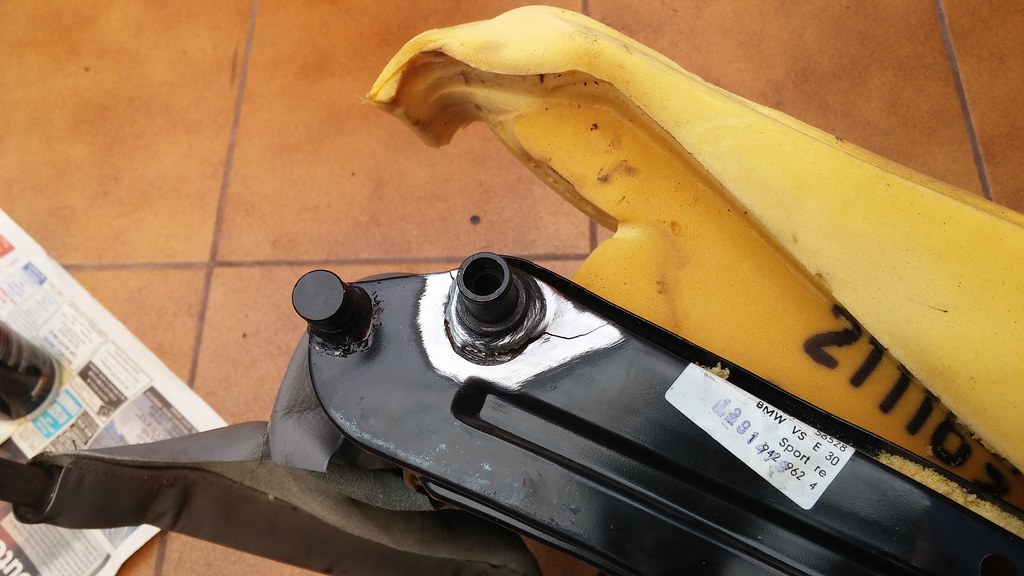 20140515_122001 by svenicusminimus, on Flickr
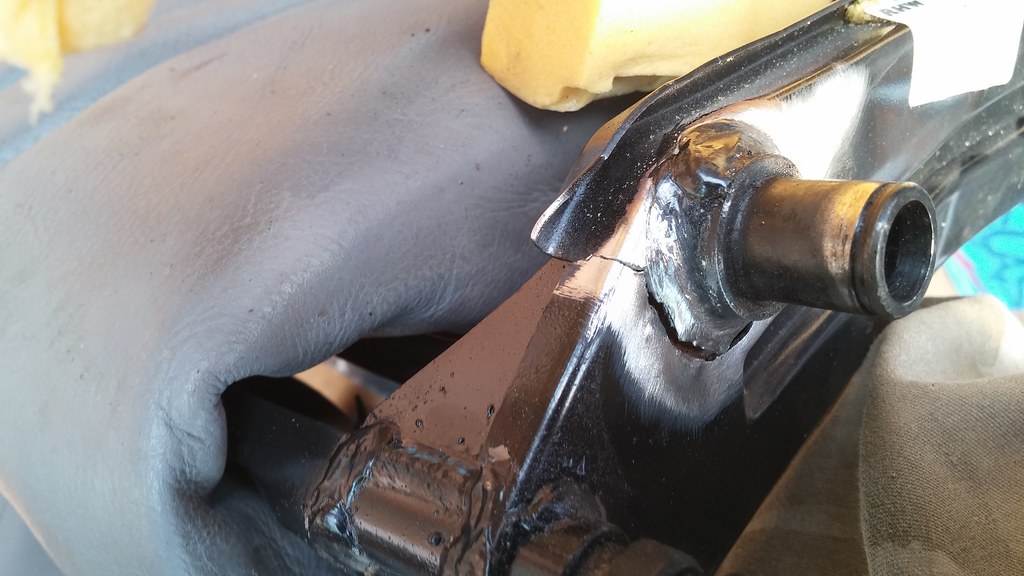 20140515_122018 by svenicusminimus, on Flickr
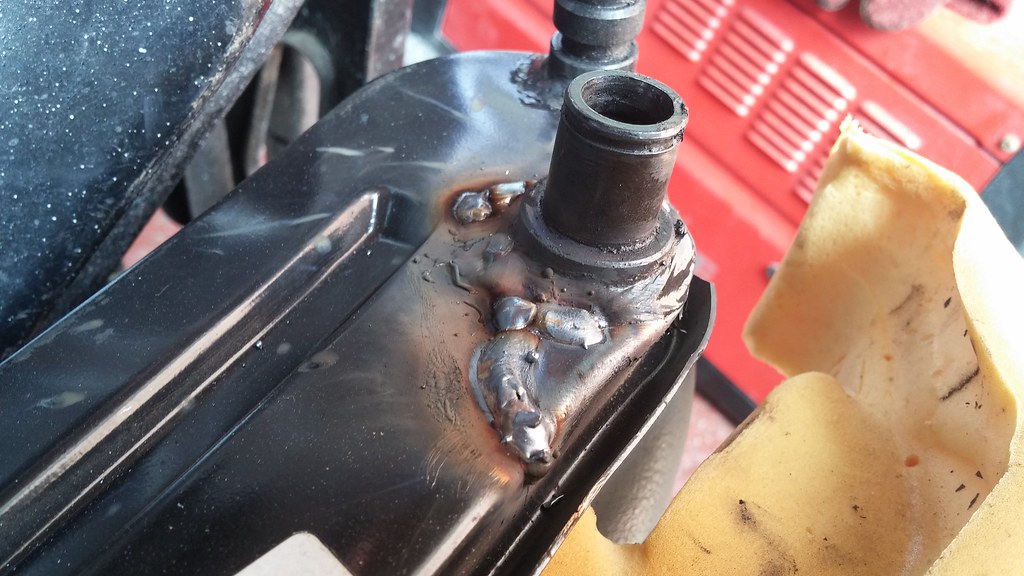 20140515_123542 by svenicusminimus, on Flickr
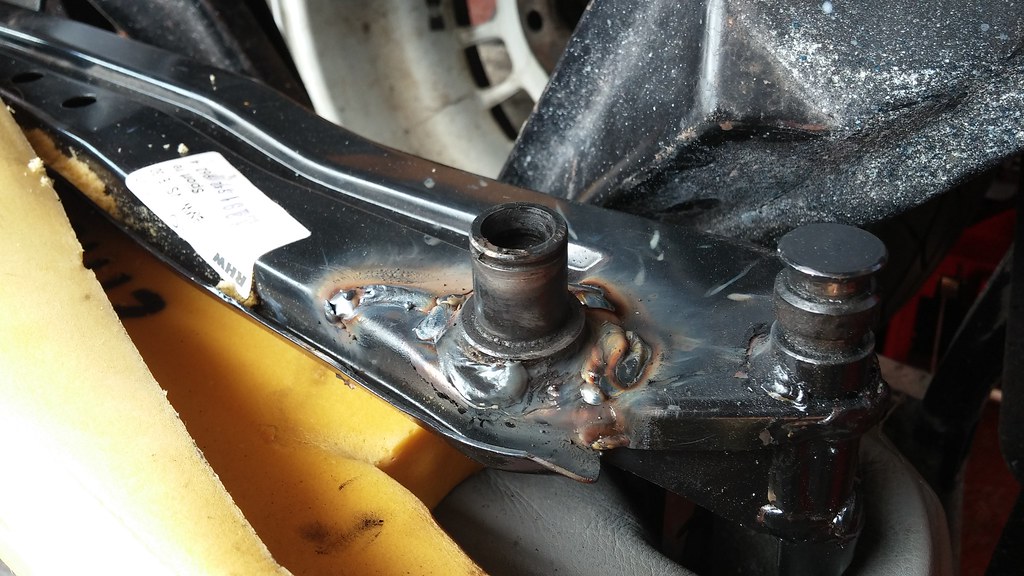 20140515_123553 by svenicusminimus, on Flickr
 20140515_124524 by svenicusminimus, on Flickr
THEN! After I had got the bolster cover back on, I found MORE broken-ness on the front edge. This bar should be flat against the bottom front rail, and obviously it should be welded in place, but it was completely cracked off so the front of the bolster was completely loose. 20140515_134845 by svenicusminimus, on Flickr
This is the other side, which is what it should look like.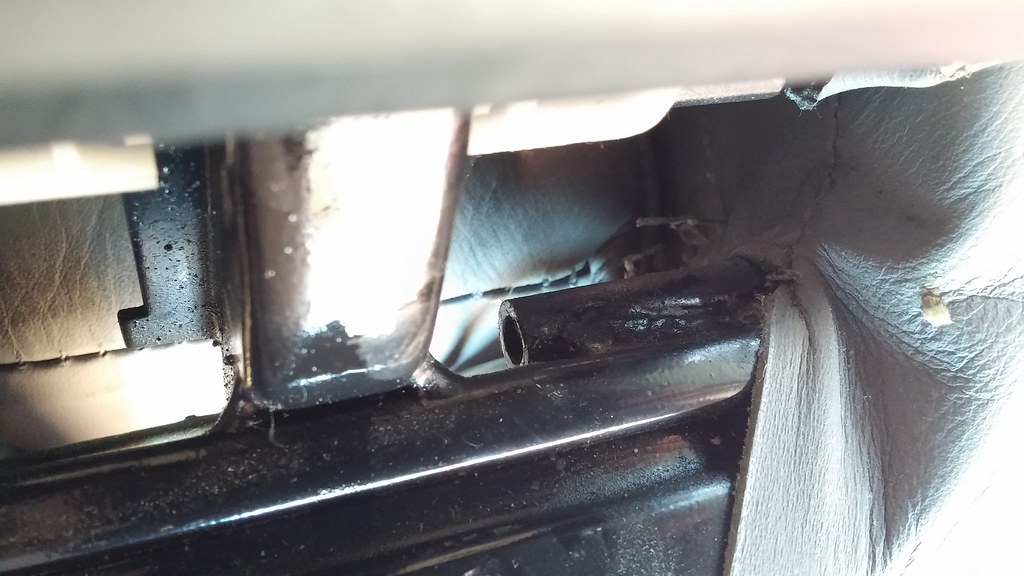 20140515_134855 by svenicusminimus, on Flickr
I don't know how easy it is to tell from the photos, but that round bit of bar was a thick piece of steel, and it had obviously bent a long way out of shape before it snapped off. I couldn't bend it back, so the best I could do was mole grip it down so it brought the bolster back in to line, and then fill up the gap from the frame to the bent bar with weld. That bar will be under a lot of tension now, but hopefully the amount of weld I put in will hold it in place!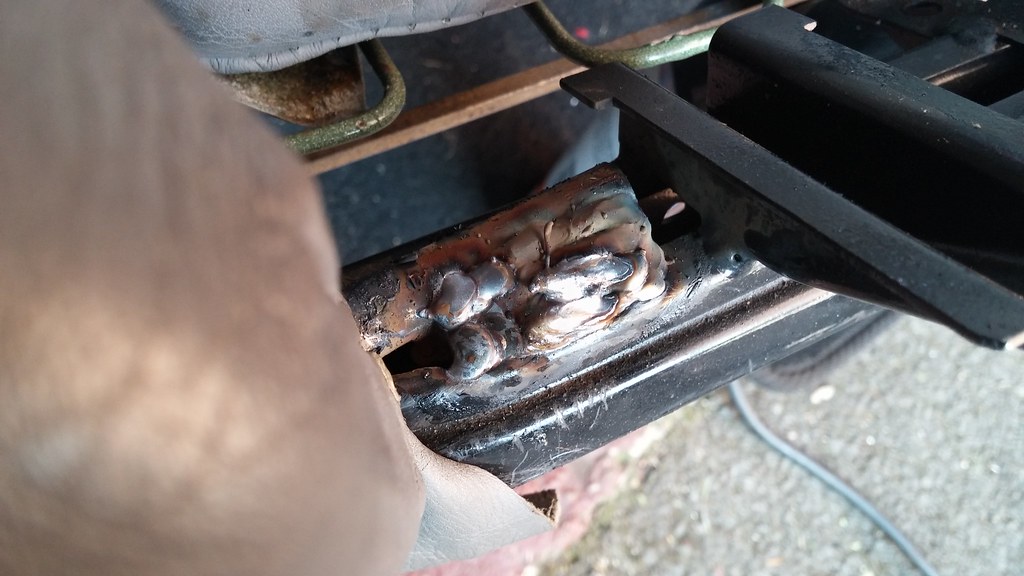 20140515_141419 by svenicusminimus, on Flickr
So, there we go, after a stupendous amount of welding to the driver's seat, I finally have a pair of (hopefully) solid sports seats. Looking quite smart now I think, with the correct rear panels/covers fitted here as well. 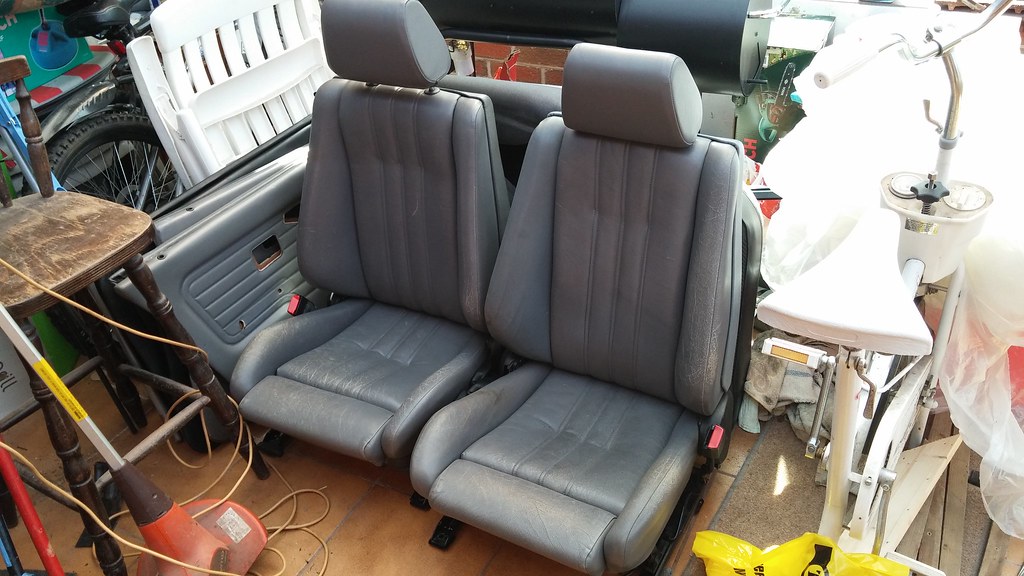 20140515_155604 by svenicusminimus, on Flickr
The repair to the bolster (which only cost me £10 by the way) had shifted the leather around a bit, and now there was a very thin, almost worn through, bit right on the top edge of the bolster, where I'll be sliding over whenever I get in and out of the car. There were also a few small holes here where the old stitching passed through.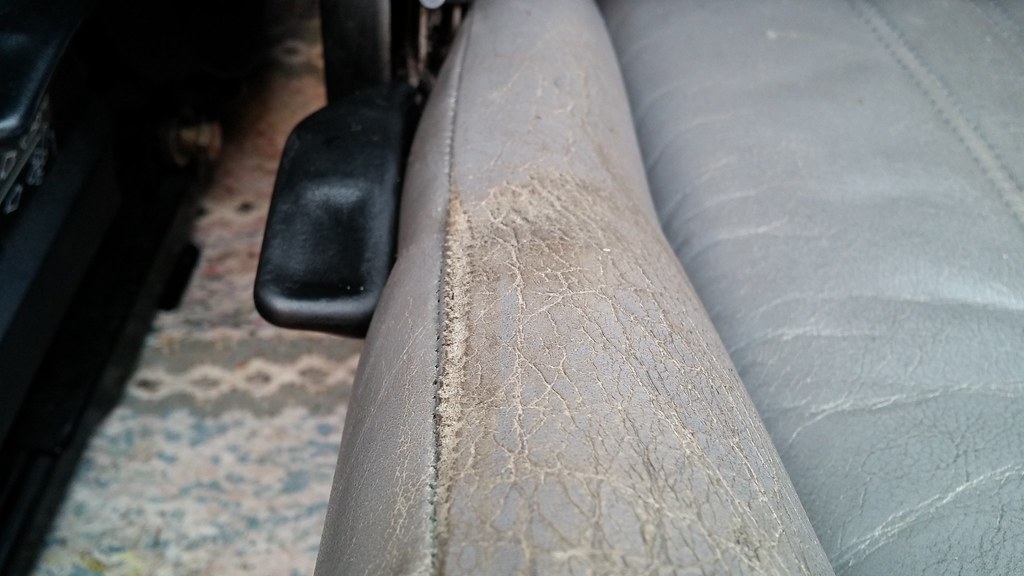 20140515_164327 by svenicusminimus, on Flickr
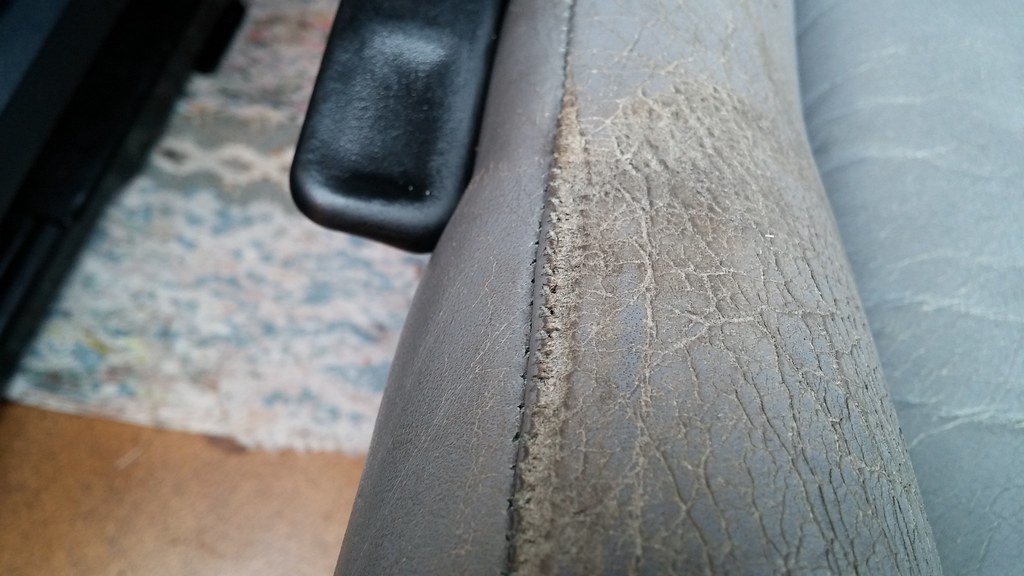 20140515_164353 by svenicusminimus, on Flickr
So, even if it isn't a permanent fix, I decided to use some leather filler to try and smooth over the worn ridge and try to give that edge some protection.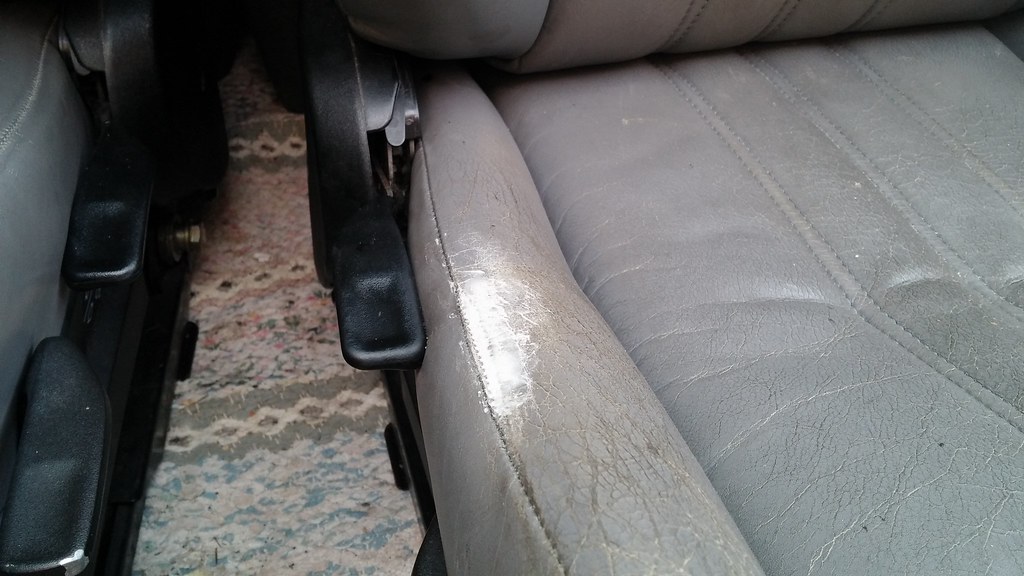 20140515_170526 by svenicusminimus, on Flickr
I then spent AGES fiddling around with the leather dye set I bought, to try and re-dye that bolster to blend in the filler repair. It's not quite a perfect match, but it's close enough for now and I can always have another go at dying it a closer colour sometime in the future. Looks a lot better than a big rip in the stitching anyway. 
 20140515_175613 by svenicusminimus, on Flickr
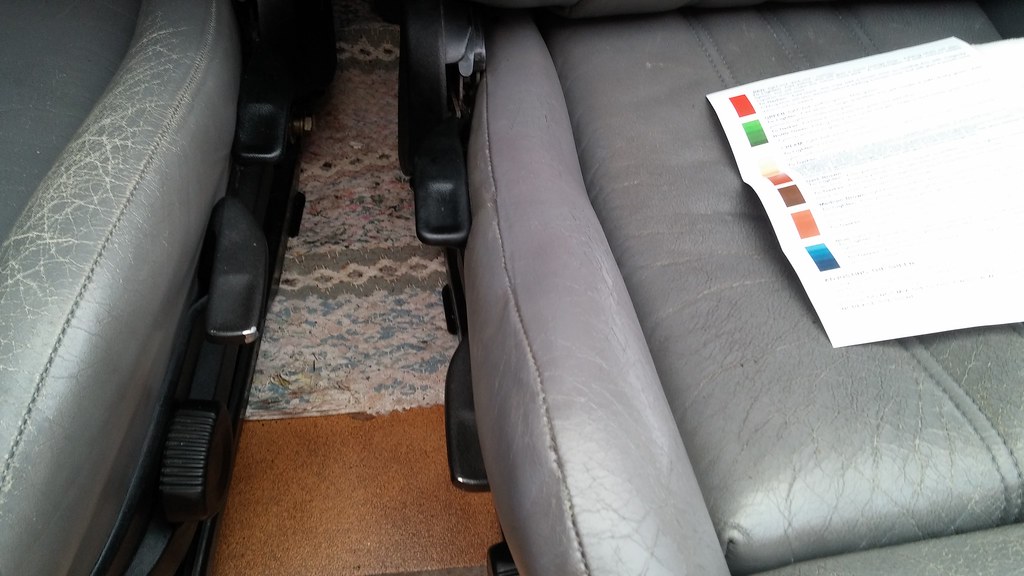 20140515_175619 by svenicusminimus, on Flickr
That's all for now, I should be getting the carpet and seats in early next week. I think the carpet might be dry by then...
The artist formally known as j322overthetop
Posted 08 July 2014 - 11:26 AM
May 20, 2014
I got the carpet back in today, and whilst re-fitting the lower centre console bits, I thought I'd have a go at fitting that cupholder mechanism I bought from the scrappy.
After a bit of a think, I just went with some simple L brackets, screwed in to the lower part of the console. It was much easier to have something attached to the bottom of the cupholder assembly, and it was easier to take the lower bit of the console in and out, to check my progress as I went.
This is the finished article from below - it's not "neat" but all the rough bits will never be seen, so there's no point making it any neater! 20140520_155622 by svenicusminimus, on Flickr
I had to cut a bit out of the back of the console to give me enough clearance to set the mechanism in flush with the main centre console panel. 20140520_155653 by svenicusminimus, on Flickr
Here it is from the top. There's only just enough room between the top of those screws and the base of the swingy outy bit, but it clears fine and still works as it should. 20140520_155636 by svenicusminimus, on Flickr
In that shot above, you can also see the burn marks left from a previous owner's smoking habit! At least I'm assuming that's what caused all those little blisters in the plastic.
I just went out now and took a couple of shots of the cupholders installed in the car. 20140520_211015 by svenicusminimus, on Flickr
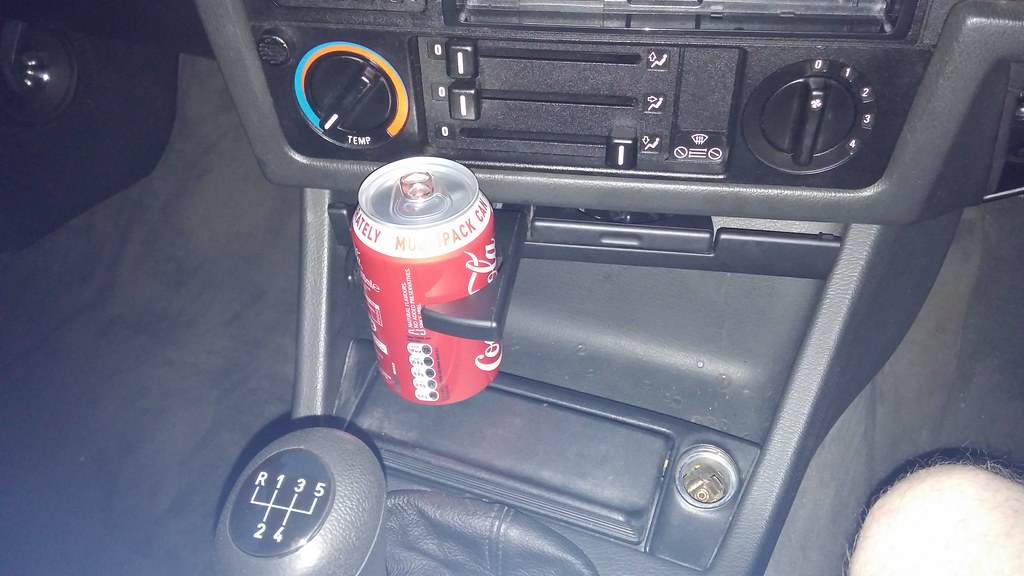 20140520_210923 by svenicusminimus, on Flickr
I couldn't get them sitting in 'quite' as flush as I wanted to, as that meant the unit was angled upwards and all the heater controls got in the way of putting any drinks in! So I had to bend/move the brackets around to angle the unit down a bit.
I gave the carpet a good clean up before it went back in. Here's a shot of pretty much everything, bar the seats, in place. First time I've had the speaker/kick panels screwed in, shame they've been hacked about to remove the grille in front of the speaker, but they still look alright.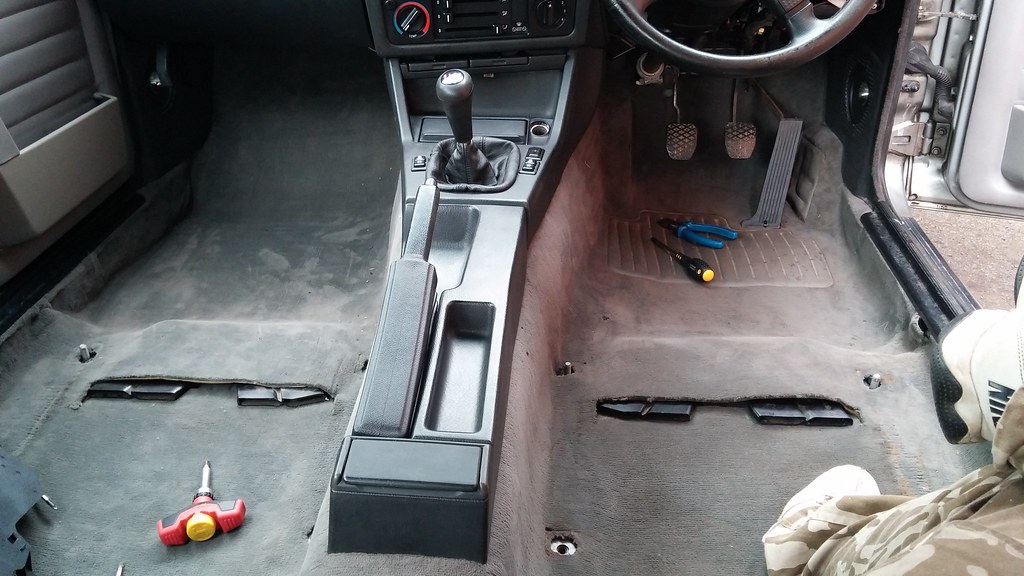 20140520_162709 by svenicusminimus, on Flickr
Then I bolted the seats in and had a play around with all the adjustment knobs and handles on them! Didn't know a seat could be moved around in so many different directions...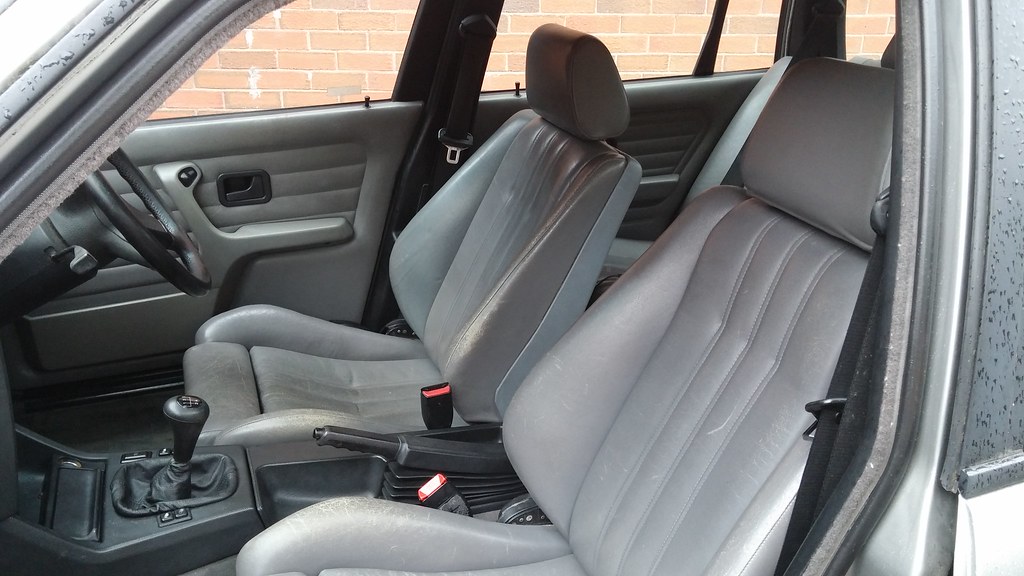 20140520_173412 by svenicusminimus, on Flickr
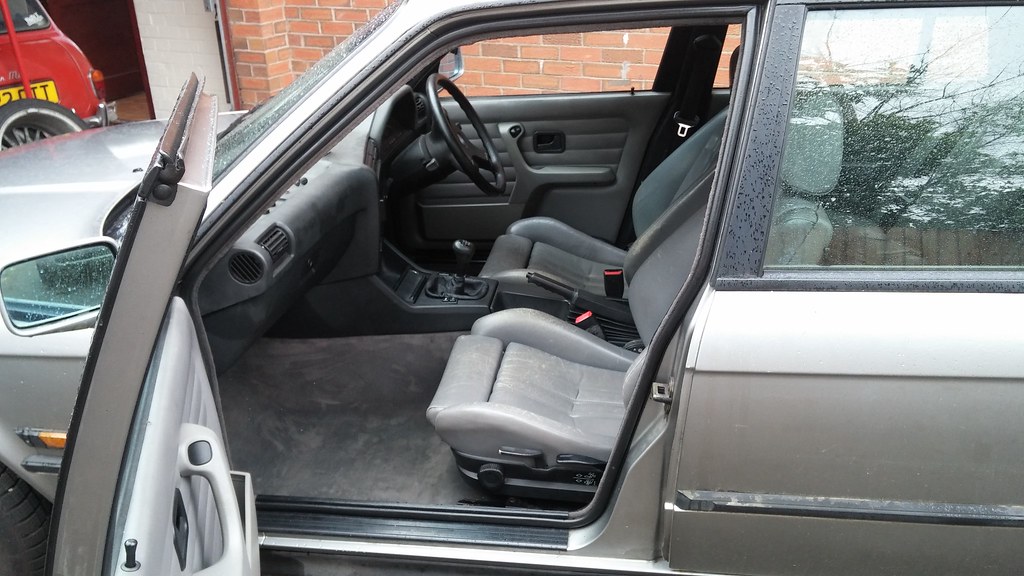 20140520_173417 by svenicusminimus, on Flickr
Looking tidy in here now I reckon  20140520_173511 by svenicusminimus, on Flickr
Next job I think, will be the headlining...
The artist formally known as j322overthetop
Posted 08 July 2014 - 11:30 AM
May 27, 2014
Ok, screw the headlining...
Just so you all know, this thread is pretty much going to just be pictures of rusty holes being cut out and welded up for quite a long time now... I've been doing a bit of poking with the screwdriver, and, well, it's not pretty... let's just say that it's a good thing I have plenty of time on my hands, and my own welder. I'm going to need them.
Let's go back a couple of days. After I got back from a day down in Brizzle to visit Area 52 (where, incidentally, I picked up a spare headlight and the missing driver's wheel arch liner from the previous owner!), I thought I'd check out the passenger's side footwell to see how wet it was, after all the rain we had over the previous couple of days. I found that it was very wet, which spurred me on to do things properly and actually find and fix whatever was causing all that rainwater to enter the cabin (before it completely ruined all my hard work drying the carpet out!).
The water was obviously running down from somewhere up towards the windscreen, but I didn't know exactly where, or why. I expected rust somewhere, and hoped it wasn't too far up behind the dash. I pulled the glovebox assembly out completely, peeled back and ripped off a bit of the sound deadening stuff that went up the flitch panel, to uncover this rather sizeable hole at the top edge. 20140525_111019 by svenicusminimus, on Flickr
 20140525_111042 by svenicusminimus, on Flickr
It was a bit difficult to photograph from the inside due to all the wiring, and it took me a surprisingly long time to find that it was located here on the outside! I automatically assumed it was farther up, in the engine bay somewhere, but it was actually at the back edge of the wheel arch. 20140525_111058 by svenicusminimus, on Flickr
That ^ soon became this...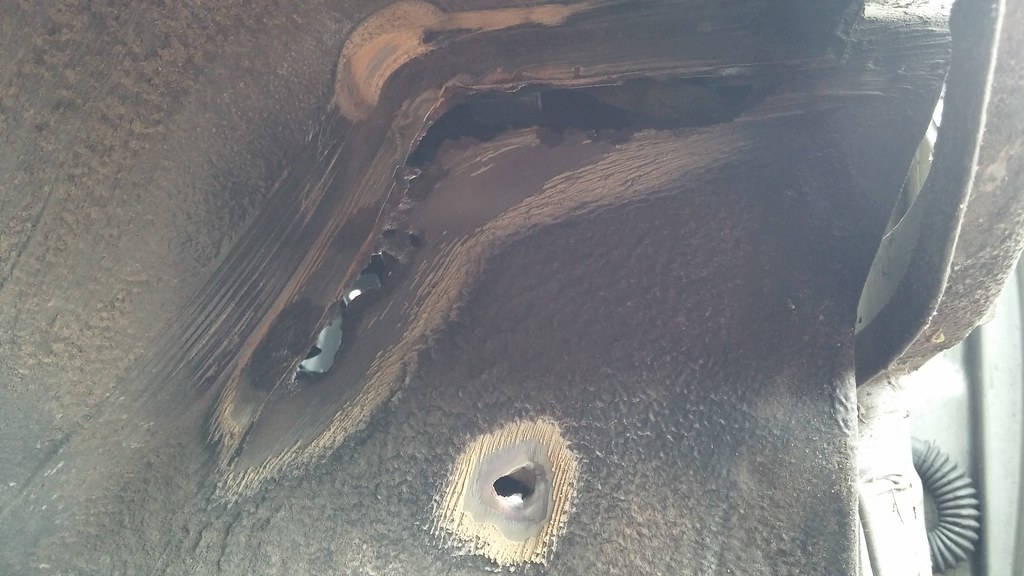 20140525_165520 by svenicusminimus, on Flickr
The small lower hole was caused by the sound deadening (the bit I ripped off) being completely sodden and rotting the steel from the inside out...
Whilst I was in the wheel arch, I thought I'd have a proper poke around everywhere else. I first found this, a rotten mounting point for the ABS and Brake pad warning light wiring steady bracket thing. It's apparently a common rust trap, I assume due to there being three layers of steel here.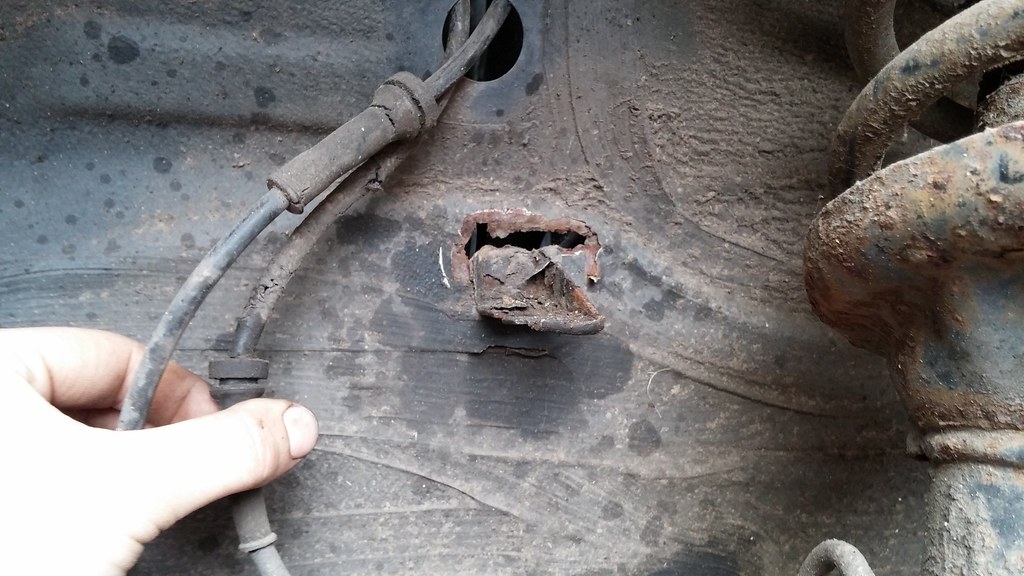 20140525_165539 by svenicusminimus, on Flickr
It didn't take much effort to pull the bracket off...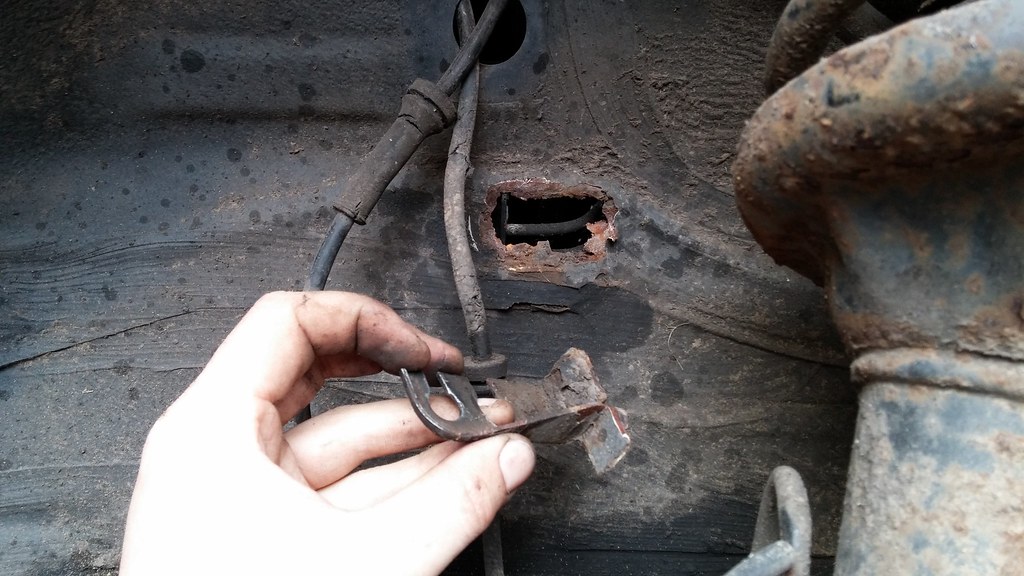 20140525_165624 by svenicusminimus, on Flickr
Then there's the front edge of the arch.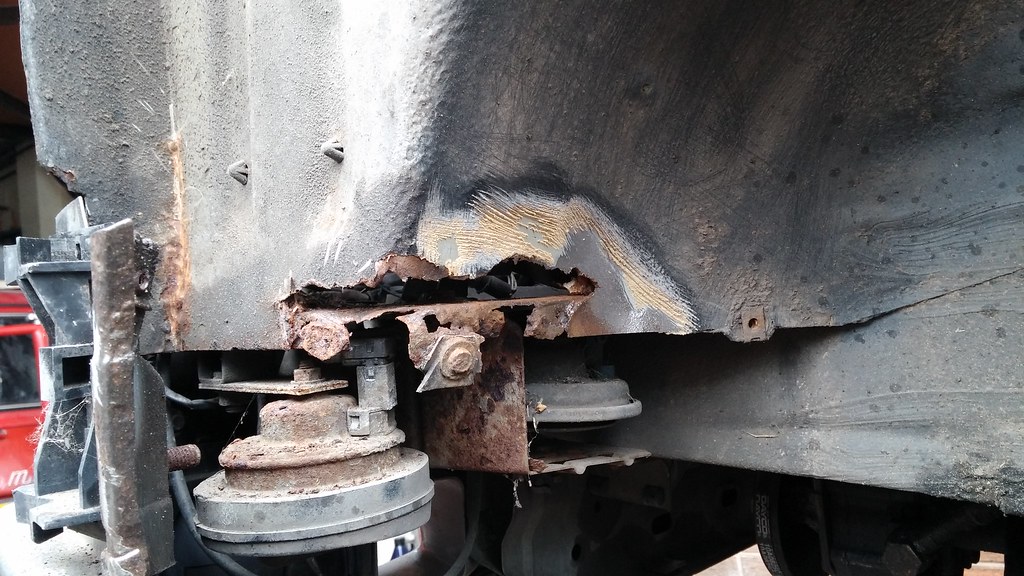 20140525_165633 by svenicusminimus, on Flickr
There was a bit of surface rust up the edge of the front valance here, but no holes thankfully.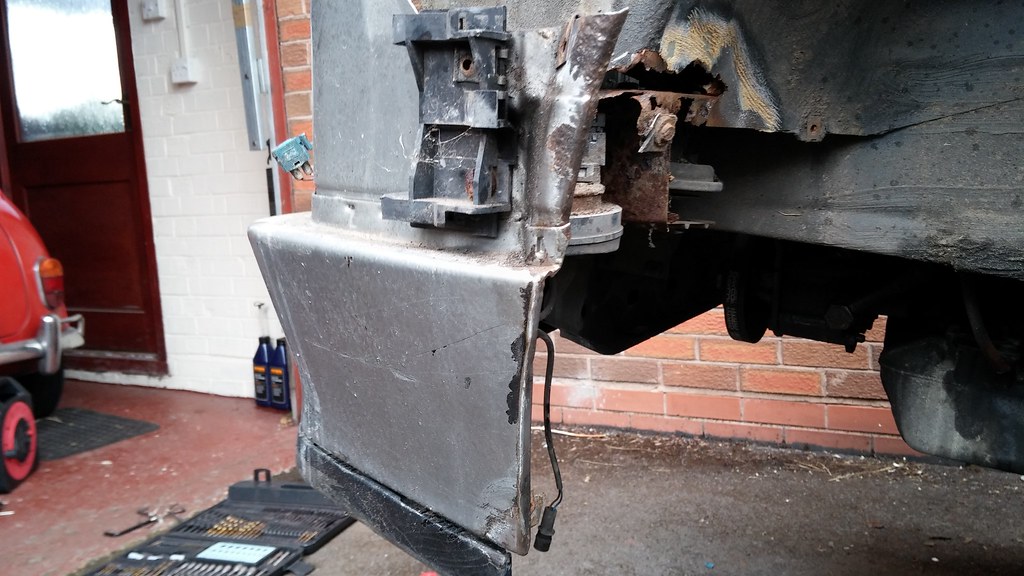 20140525_165642 by svenicusminimus, on Flickr
I pulled out the suspension strut to give me better access to the rot.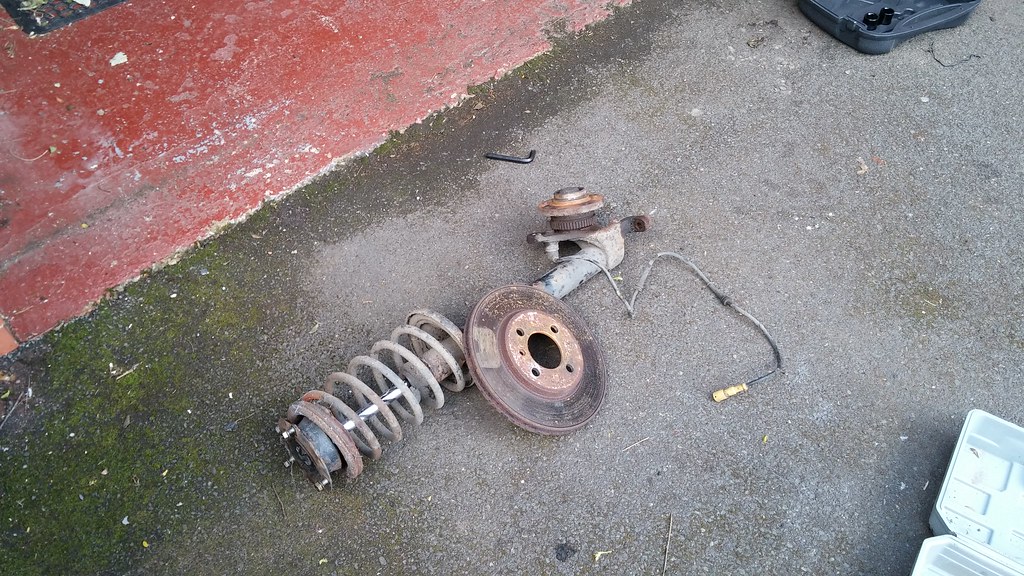 20140525_175436 by svenicusminimus, on Flickr
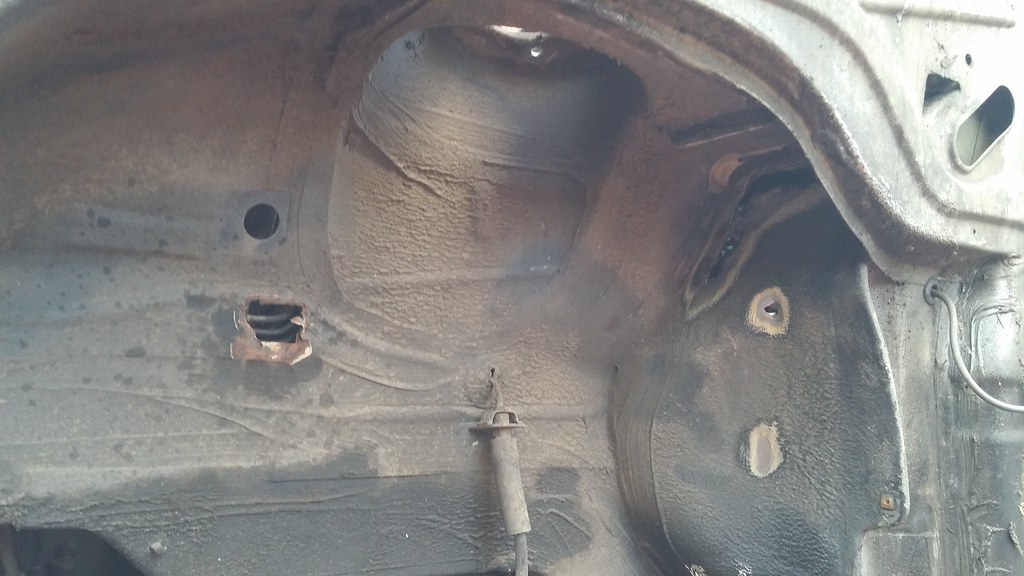 20140525_175458 by svenicusminimus, on Flickr
Yesterday I got this patch in, which was important for me to get done first so that no more rain water made it's way in to soak in to my carpet! I'd just like to make it clear here that I do actually cut out the old rot and butt weld in patches to the resulting hole - I don't put plates over the top, as obviously they wouldn't last nearly as long as these kind of butt-weld repairs hopefully will.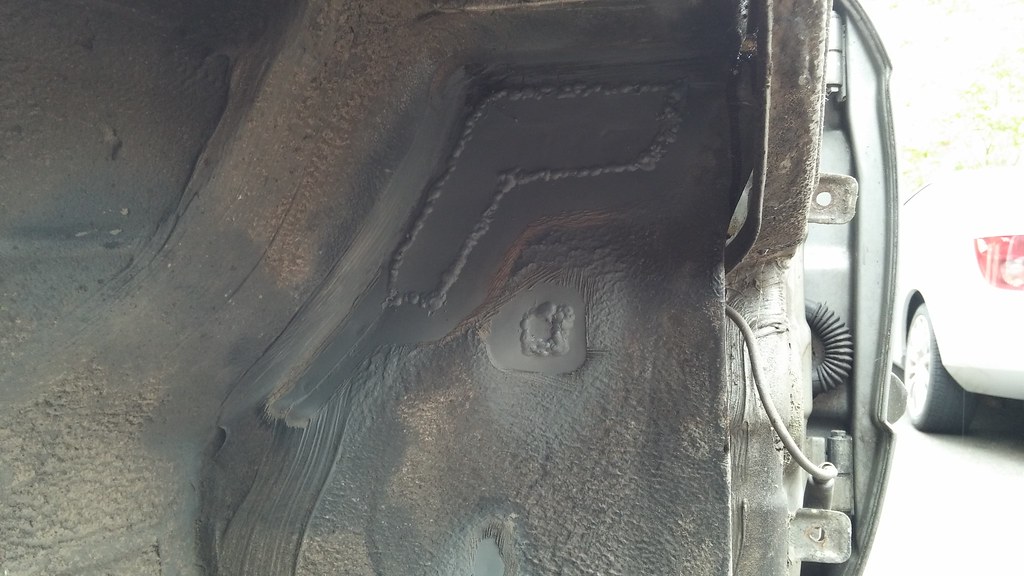 20140526_123253 by svenicusminimus, on Flickr
Then today I got on with the small patch where that ABS wiring bracket had been pulled off. First of all I cut out the frilly bits. 20140527_115408 by svenicusminimus, on Flickr
Then I had to remove the remains of the old metal off the back face of the bracket. 20140527_115425 by svenicusminimus, on Flickr
After I did that, I made up a patch the right size for the hole, and then cut out a section of it so that I could turn the bracket in to a part of the patch. The idea behind this was to turn it in to a single skin area, rather than having the bracket spot welded over the top of two layers of metal like it was from the factory. 20140527_141157 by svenicusminimus, on Flickr
 20140527_141214 by svenicusminimus, on Flickr
Buzzed that together.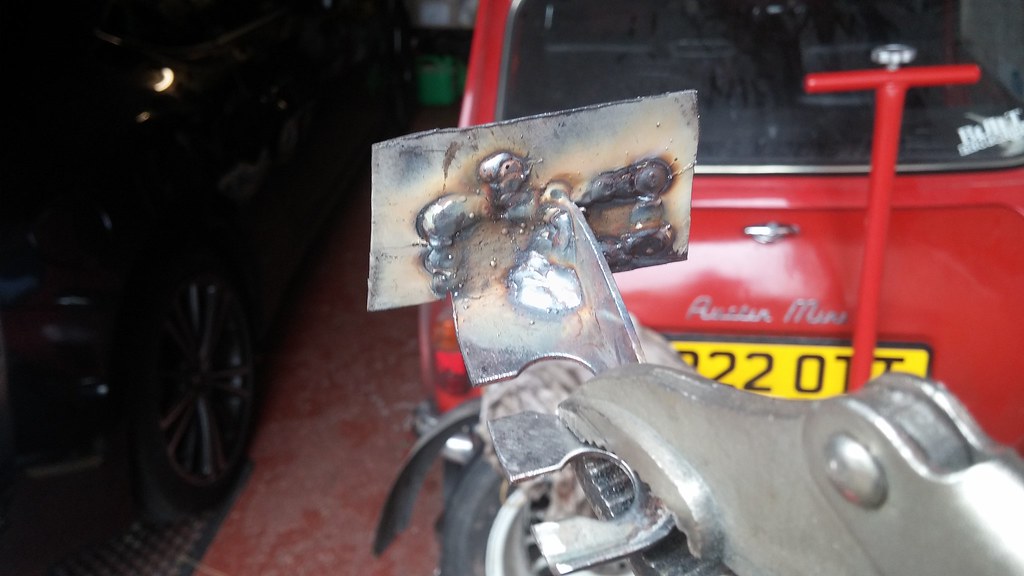 20140527_143038 by svenicusminimus, on Flickr
Then popped it on to the car.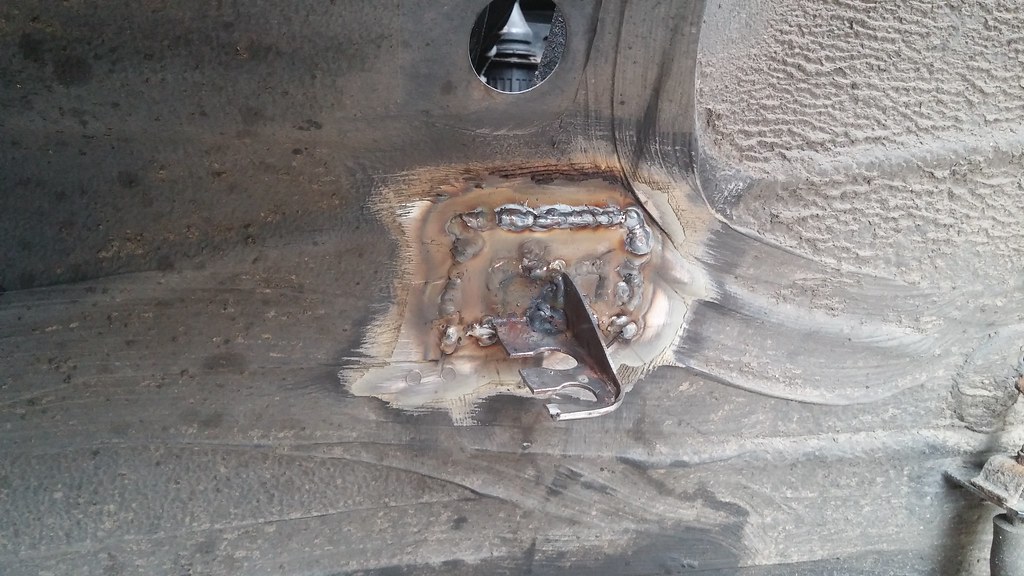 20140527_145036 by svenicusminimus, on Flickr
That's two out of three patches down!
After this, I decided to have a proper poke around the rest of the car... if the front inner wing area was this bad, what else might I find? Quite a lot, as it happens. Quite a lot of air where there should be metal, that is.
So, let's go on a little walk around the car, starting from the passenger's side door. I pulled off the big plastic sill covers to have a look under them.
This is the jacking point at the front of the passenger sill. A bit crusty, but I couldn't manage to poke a hole in it thankfully.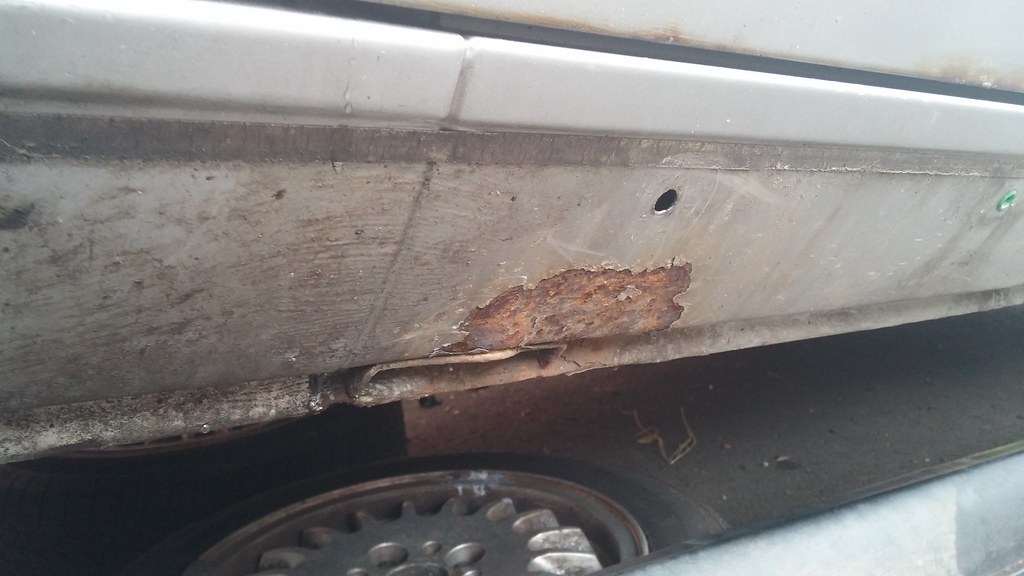 20140527_160038 by svenicusminimus, on Flickr
Same couldn't be said for this point about midway along the sill. This is worse than it looks and actually goes up the inside of the inner sill area, so I'll need to cut out a big patch of the outer sill just to get access to the inner bit to weld that up.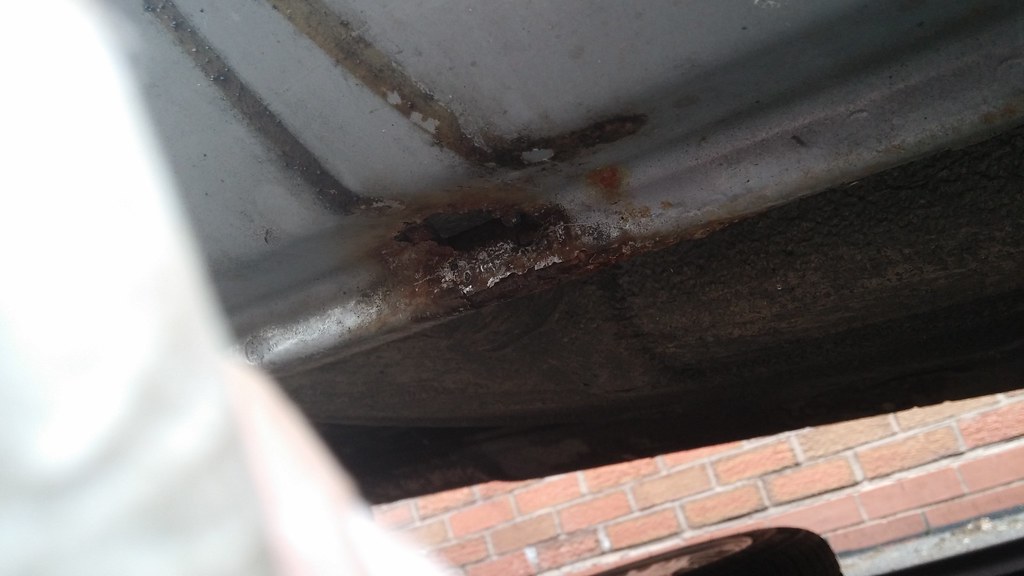 20140527_160048 by svenicusminimus, on Flickr
This is the rear jacking point on this side - poked a hole in this one with a bit of force.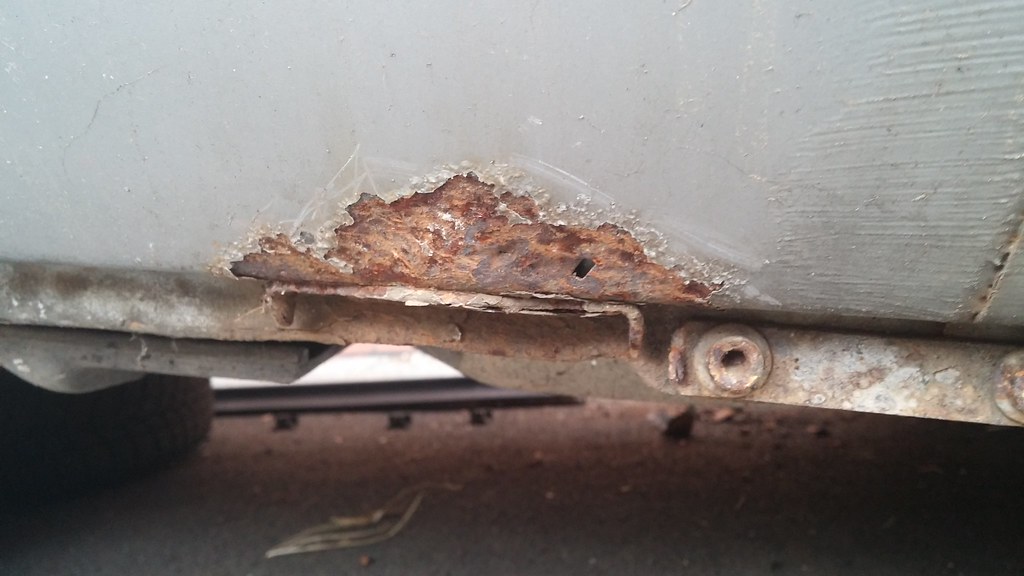 20140527_160055 by svenicusminimus, on Flickr
Right, now we come to the back edge of the sill, viewed from inside the rear wheel arch.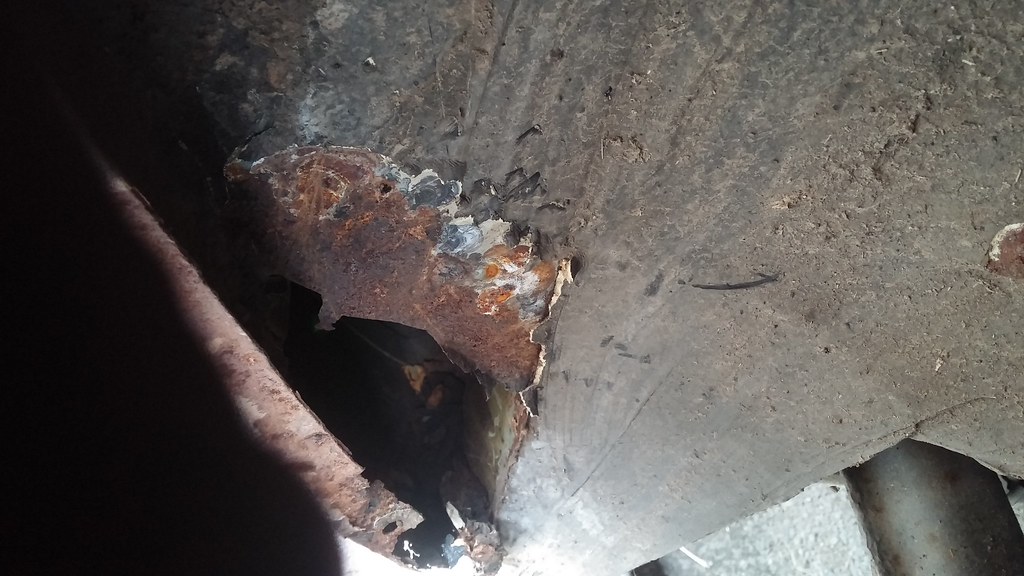 20140527_160118 by svenicusminimus, on Flickr
That hole is just about big enough to get your hand in. I was starting to feel dizzy by this point, and we aren't even finished with the left hand side of the car yet.
This is the rear of the wheel arch, a hole going in to the storage bin in to the boot. I swear I checked this about a month and a half ago and it was fine... 20140527_160149 by svenicusminimus, on Flickr
Now, moving round to the right hand side of the car, is this lovely new opening, surrounding some pipes that I don't know the function of yet. Should probably find out if it's petrol or not before I get welding around them...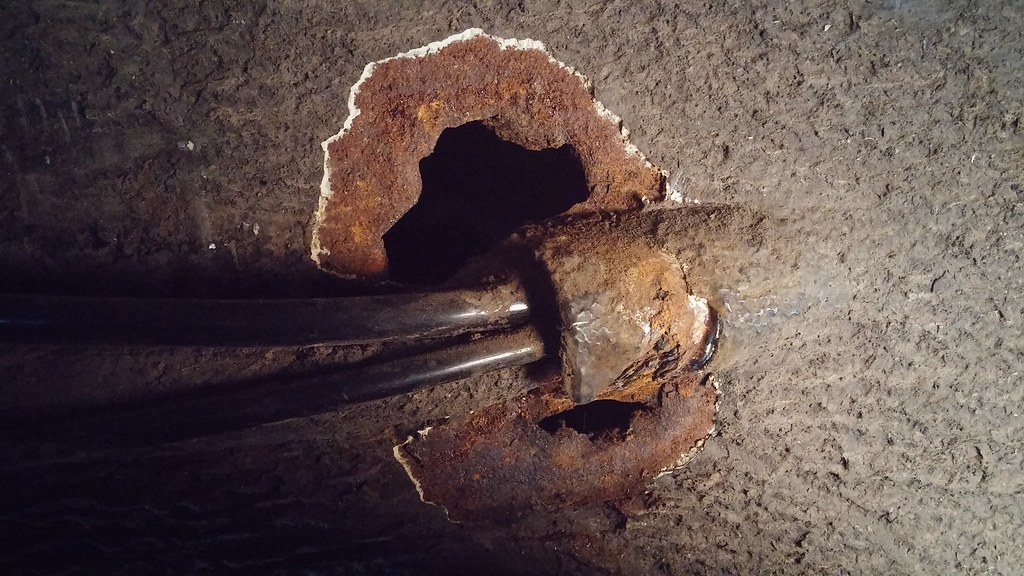 20140527_160207 by svenicusminimus, on Flickr
This next one looks familiar... ahh, another hand sized hole in the rear of this sill as well! Lovely, at least it's consistent side to side.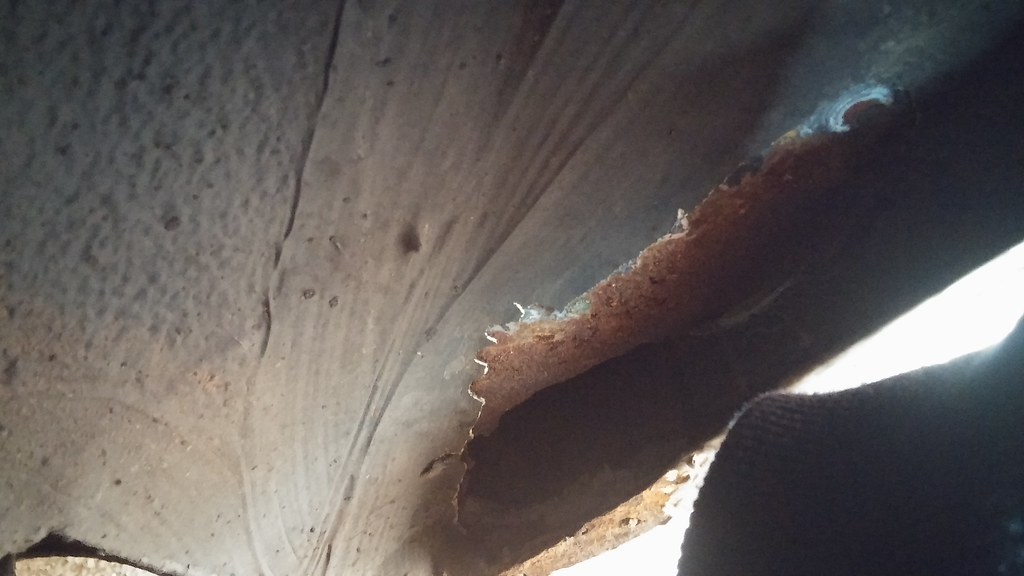 20140527_160236 by svenicusminimus, on Flickr
Huzzah, something's been repaired before! This is the rear jacking point on the driver's side, and despite it looking like hell, it actually seems solid. Probably wasn't done all that long ago.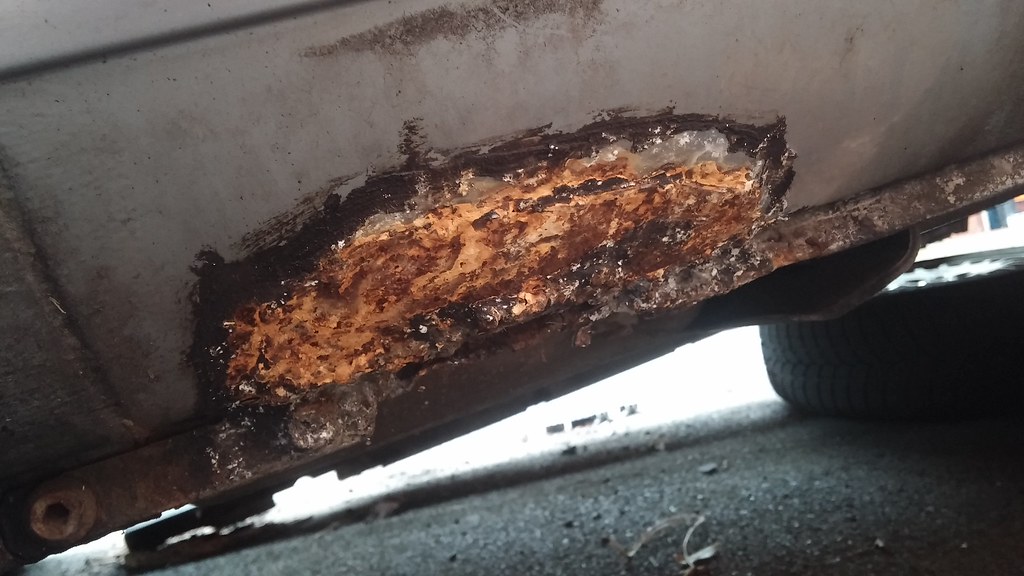 20140527_160247 by svenicusminimus, on Flickr
Here's the front jacking point, which seems much like the other side's front jacking point - flakey but solid enough not to be able to poke a hole in.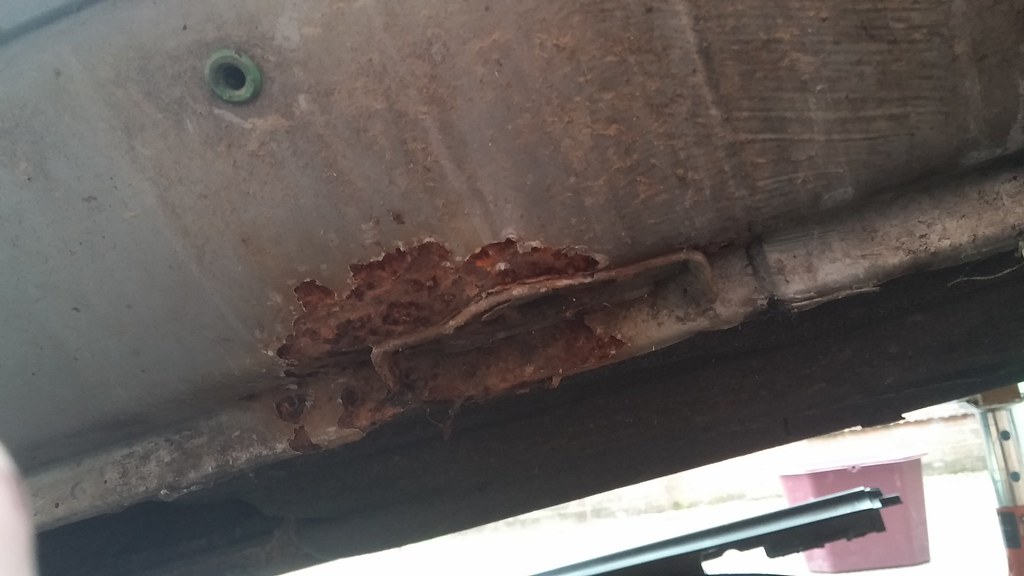 20140527_160324 by svenicusminimus, on Flickr
Then there's the front edge of the wheel arch, which is almost identical to the other side. This car likes to rot evenly on both sides it would seem...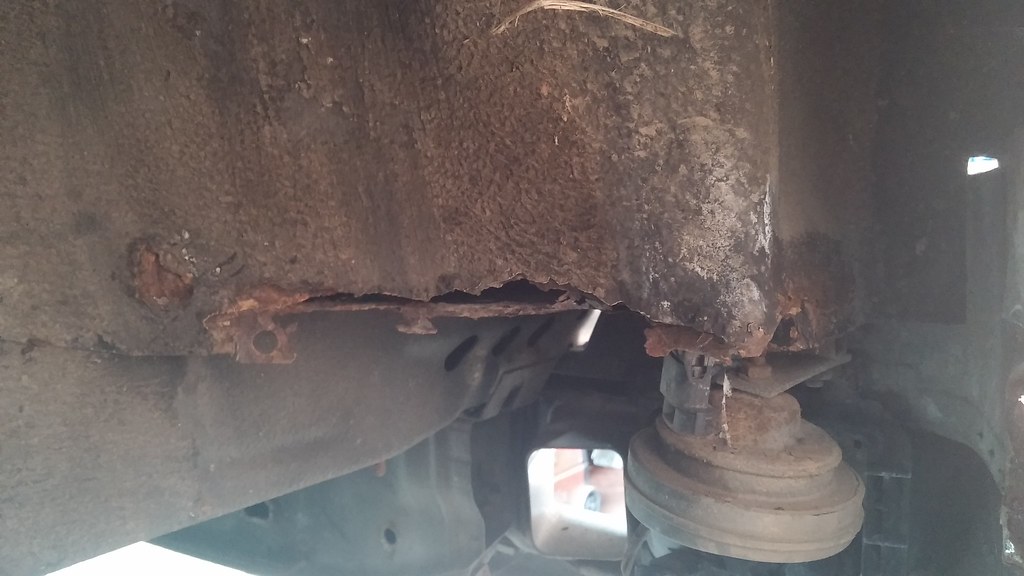 20140527_160336 by svenicusminimus, on Flickr
Then there's this, which isn't quite like the other side. The other side was just surface rust, this is, well, there's no surface left to rust.  20140527_160404 by svenicusminimus, on Flickr
So yeah... seems like I've accidentally bought a very well disguised German colander.
Funny that, I could have swore I bought a car...
The artist formally known as j322overthetop
Posted 08 July 2014 - 11:35 AM
May 30, 2014
Here's an update of the past few days progress. I finished off the front wheel arch with this patch on the front edge. I didn't actually weld it underneath, but left that whole edge open to let the water out that would normally just collect there (and rot the panel out, like had been done already...). 20140528_171517 by svenicusminimus, on Flickr
Working backwards from here, I ended up cutting out the rusty patch around the front jacking point, as I just about managed to get a hole in it with the knot wheel on the grinder. 20140528_171528 by svenicusminimus, on Flickr
Here's a better look at the rot in the middle of the sill, that I said was worse because it goes up the inner sill. This is also why I need to remove that fuel pipe - I don't fancy grinding and welding that close to a crusty old fuel pipe! Which reminds me, I'll probably put new lines back in, due to that crustiness... 20140528_171625 by svenicusminimus, on Flickr
To get better access to the hidden rot, I cut myself a flap in the outer sill (which was almost completely fine apart from the very bottom edge). 20140528_173110 by svenicusminimus, on Flickr
What lays within...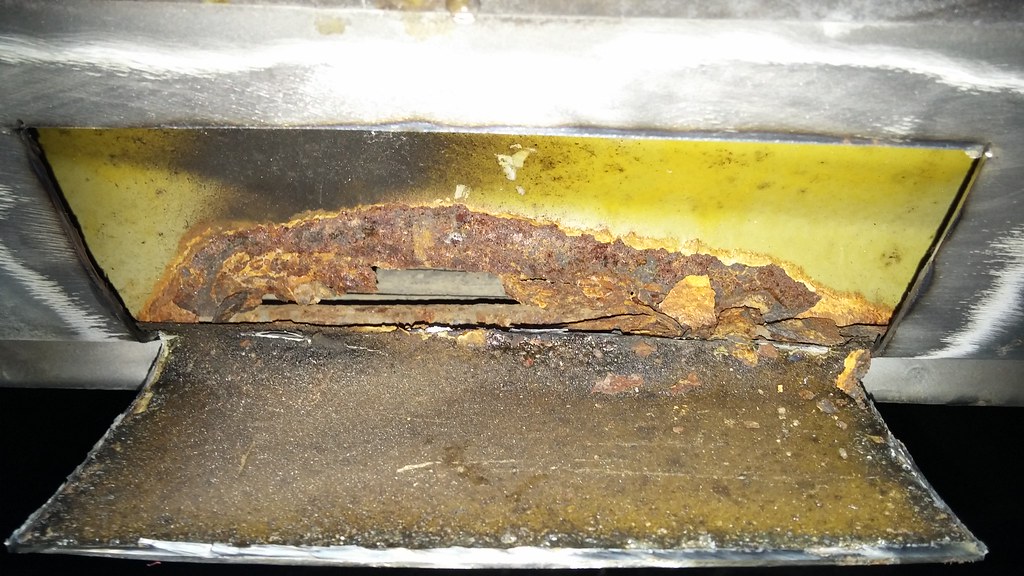 20140528_173203 by svenicusminimus, on Flickr
I'll be dropping the tank and doing that bit next week.
Now here's the patch cut out from around the rear jacking point.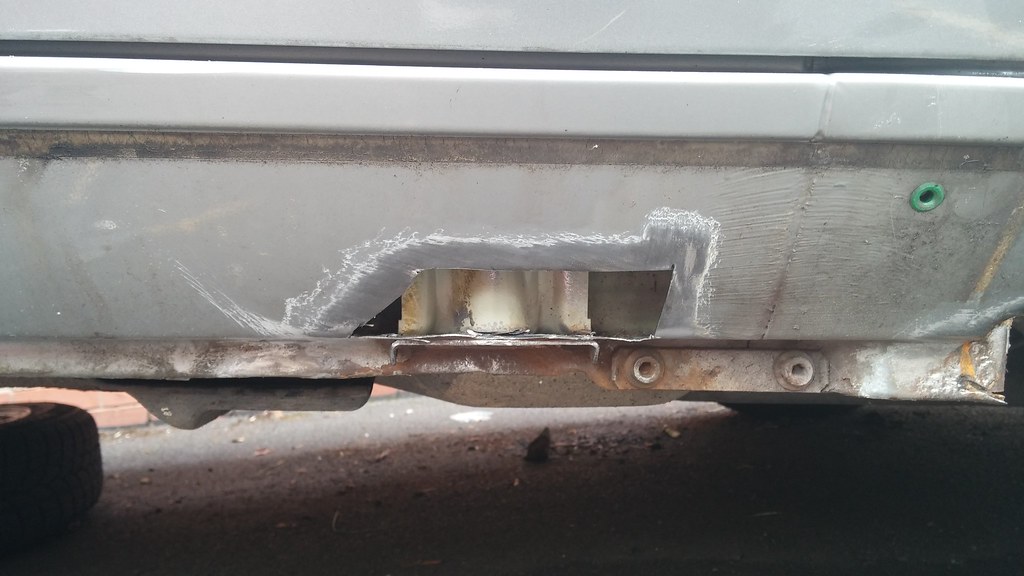 20140529_141350 by svenicusminimus, on Flickr
The two jacking point patches were nice and simple, so I got those done pretty quickly. It might be kind of hard to tell, but they are both welded up in the photo below.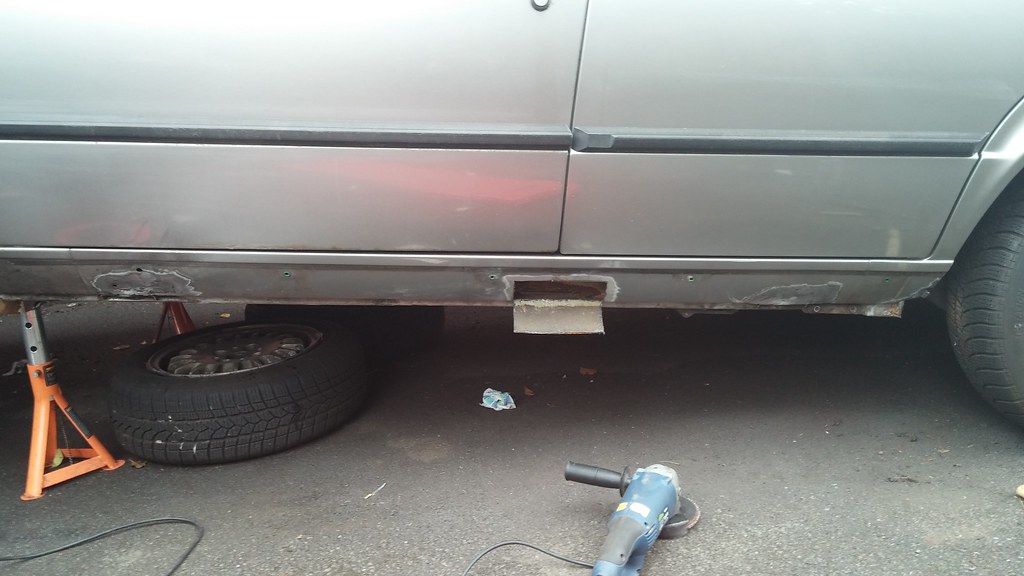 20140529_153412 by svenicusminimus, on Flickr
I put the front wing back on this morning, but yesterday I spent a bit of time tidying up the inner surface, because it looked like this.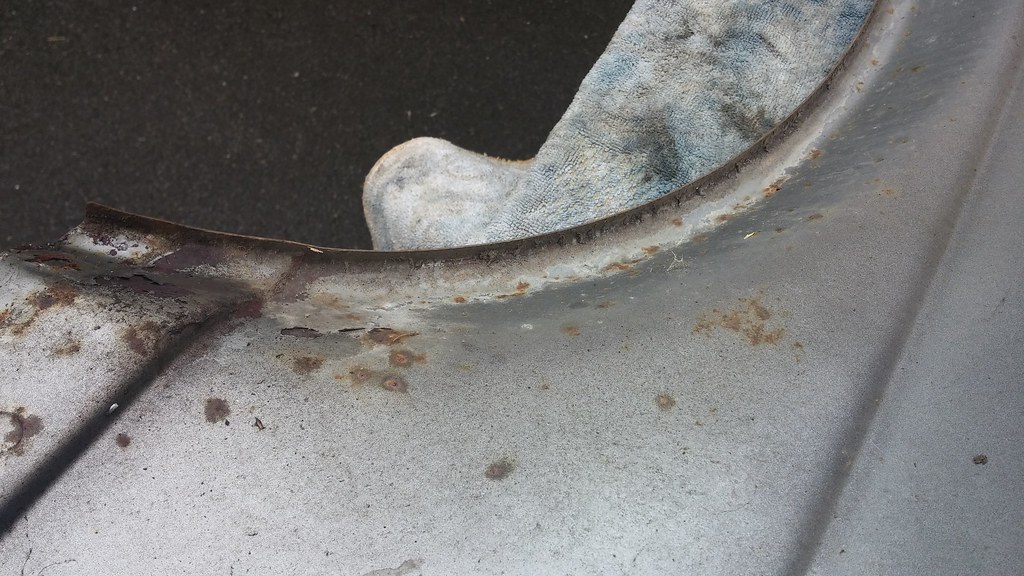 20140529_120300 by svenicusminimus, on Flickr
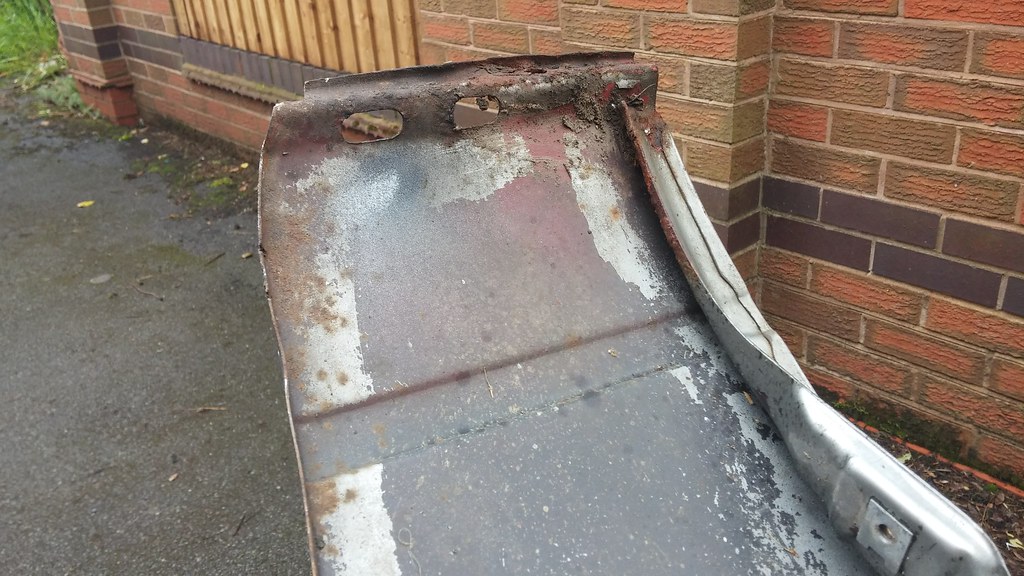 20140529_120307 by svenicusminimus, on Flickr
After a wire-wheeling and primering. 20140529_160354 by svenicusminimus, on Flickr
On with a bit of stonechip. 20140529_163246 by svenicusminimus, on Flickr
Today I got on with doing the bits around the front edge of the rear wheel arch. This is what I ended up with when I cut out what I could.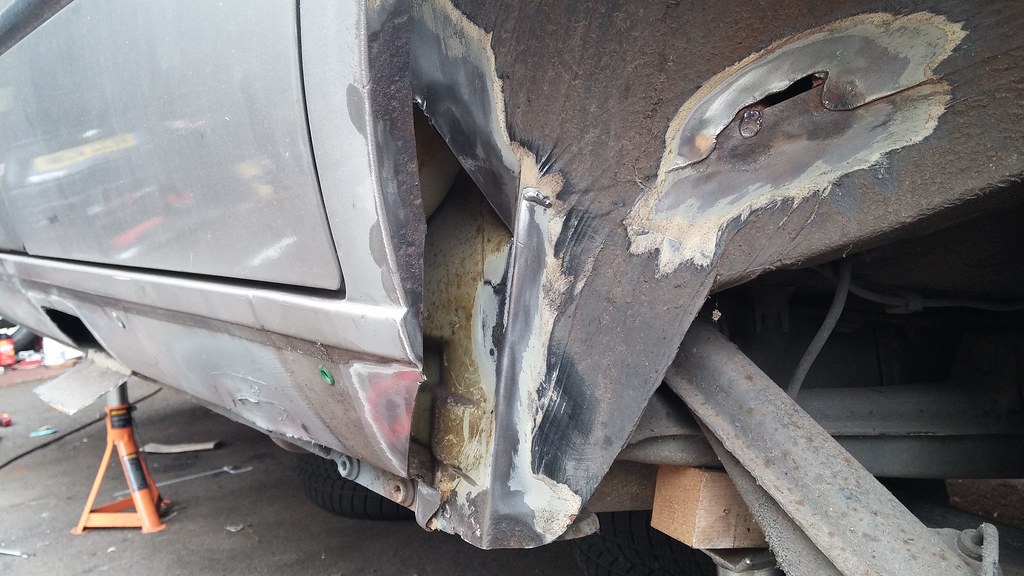 20140530_144303 by svenicusminimus, on Flickr
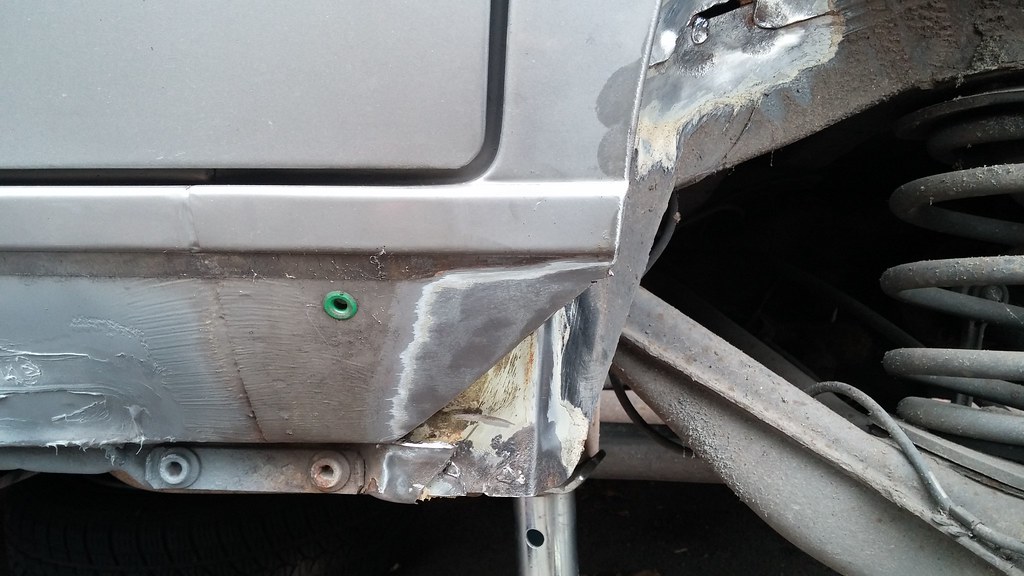 20140530_144310 by svenicusminimus, on Flickr
I worked out I could do the end of the sill in two pieces. One would be a big flat piece to blank off the end of the sill, and then I'd have to make a bit more a complicated one (for my standards anyway) for the arch bottom/outer sill edge. Started off making a nice cardboard template (as per usual) to find the right shape for the complicated bit first.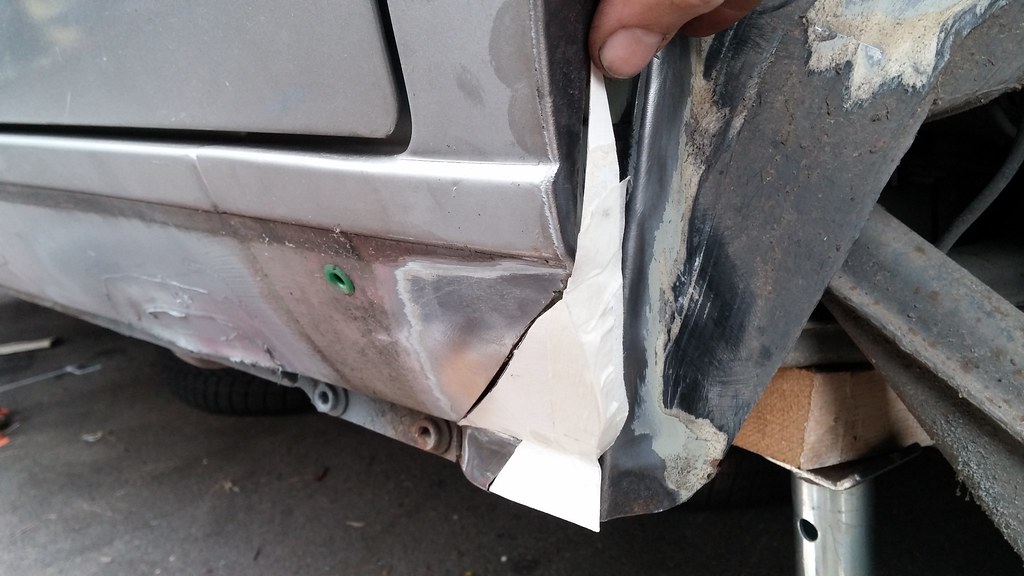 20140530_150511 by svenicusminimus, on Flickr
Then a big flat one for the gaping hole at the rear of the sill.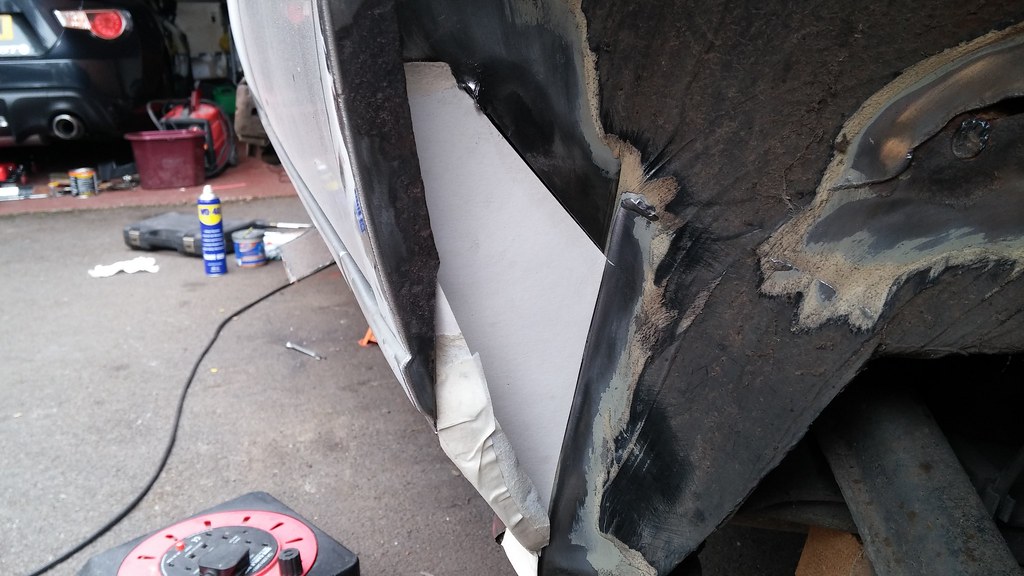 20140530_151609 by svenicusminimus, on Flickr
Couple of hours later I had this - doesn't look very neat, but it gets the job done. If the arch lip looks THAT bad when it's all back together, I might get a bit of filler on there just to smooth it out, but I doubt anyone would really notice anyway.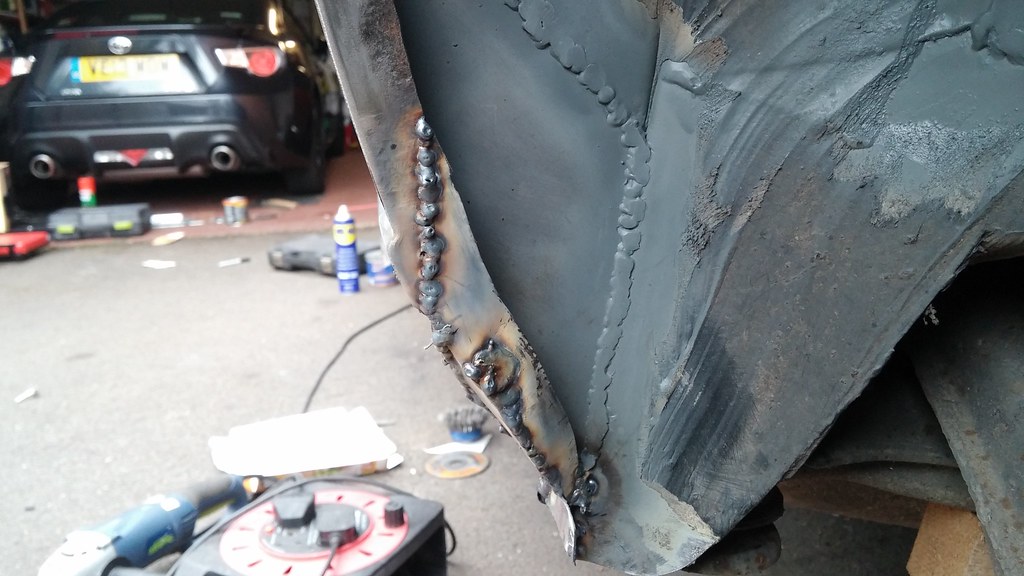 20140530_181312 by svenicusminimus, on Flickr
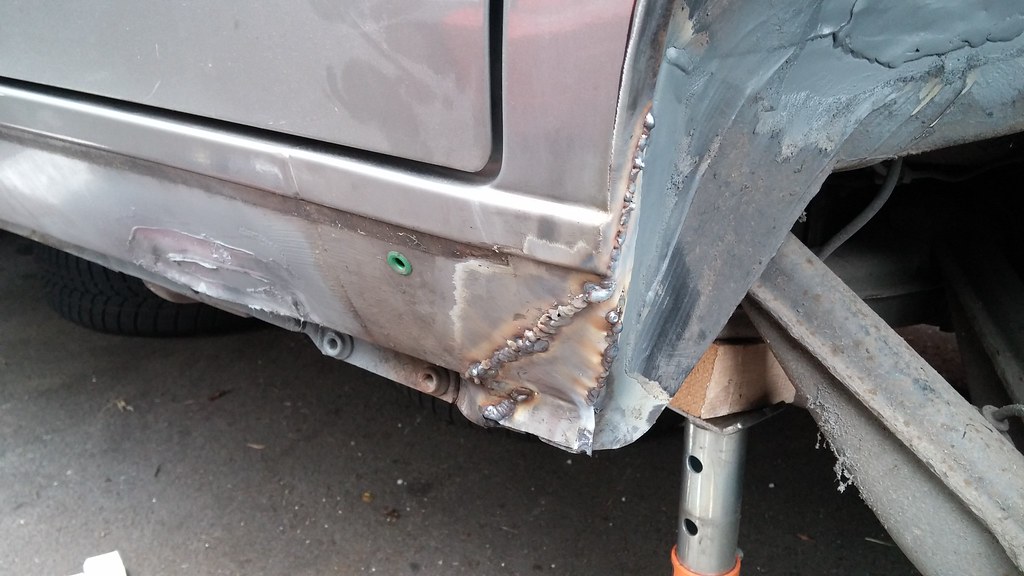 20140530_181340 by svenicusminimus, on Flickr
After I'd ground down the welds a bit.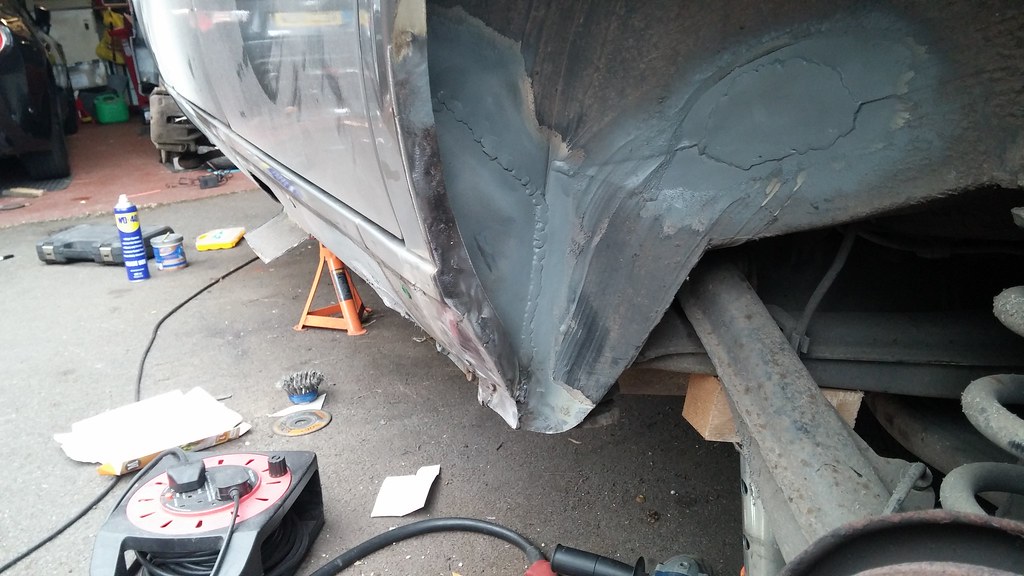 20140530_182149 by svenicusminimus, on Flickr
So, that's where I'm up to now. I think I'll finish off the rear arch next (hole on the rear side going in to the bin in the boot), then I'll look at dropping the tank/fuel lines and sorting out the inner sill bit on this side, and then that'll be the left hand side of the car sorted!
Only one more equally as bad side to go... 
The artist formally known as j322overthetop
Posted 08 July 2014 - 11:37 AM
June 11, 2014
Right, I got that hole welded up at the back of the passenger's side wheel arch last week. 20140605_154040 by svenicusminimus, on Flickr
After that I was ready to move the car the other way round so that I could get on with pulling the fuel tank out and welding up the driver's side of the car. I still had the big hole in the middle of the passenger's sill, but I needed to move a fuel line out of the way first, which I didn't want to do before I got the tank out. To get the tank out, you need to take off the exhaust and then the prop - fun fun fun!
So, after moving the car round and getting it back up in the air again, I went to undo the wheel nuts on the rear driver's wheel and found that it was just spinning round and round, making awful noises and catching occasionally, despite the handbrake being on tight... I think I found the source of the awful grinding noise I'd been hearing on the little drives up and down my road! I pulled the disc off and low and behold, the majority of the handbrake components fell out on to the floor...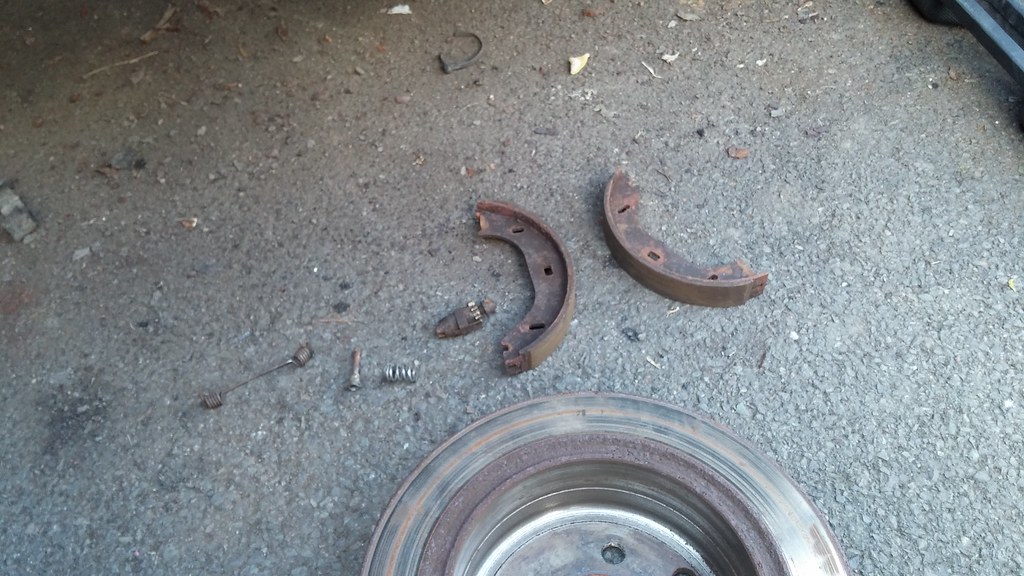 20140605_173521 by svenicusminimus, on Flickr
So if that side had literally fallen apart, the other side probably wasn't too far away from doing the same. Turns out I was right, along with the shoes on that side being somewhat "used".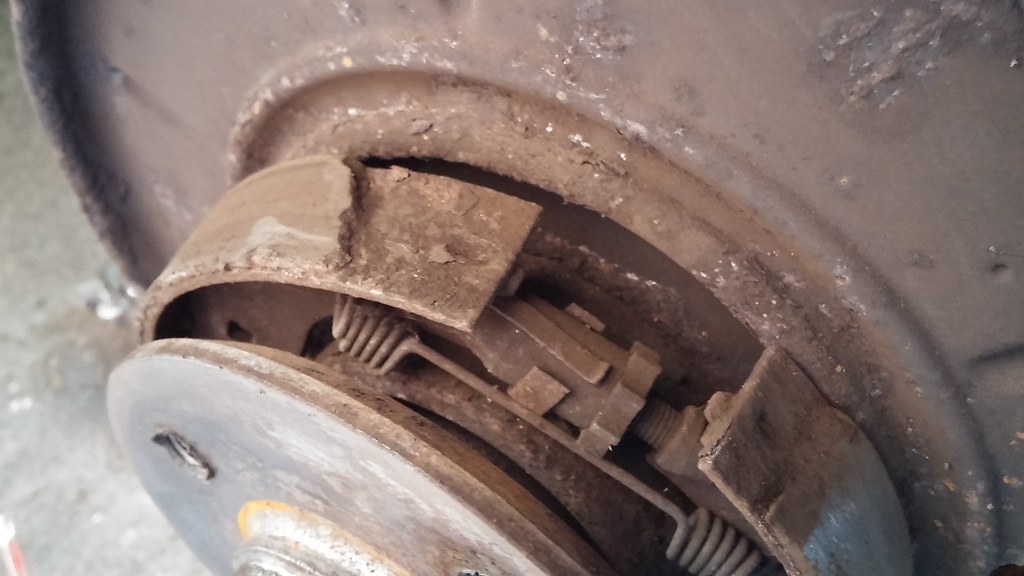 20140605_174640 by svenicusminimus, on Flickr
One of the retaining springs/pins was having a good time sitting at the bottom of the drum.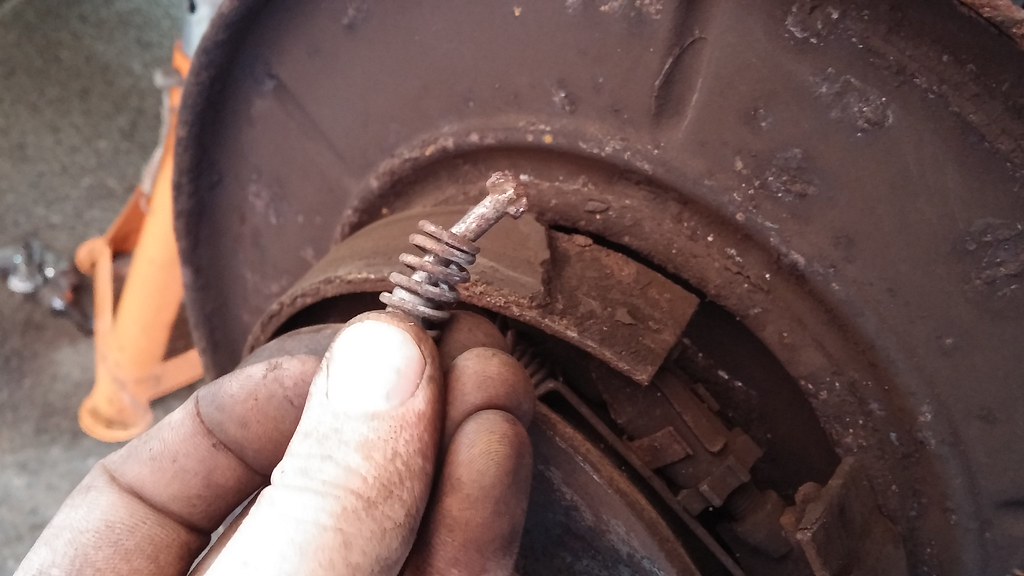 20140605_174659 by svenicusminimus, on Flickr
Thankfully, the previous owner had already bought the springs and pins needed to replace what was there and knackered. I'm sure he told me about the handbrake being dodgy, I probably just forgot...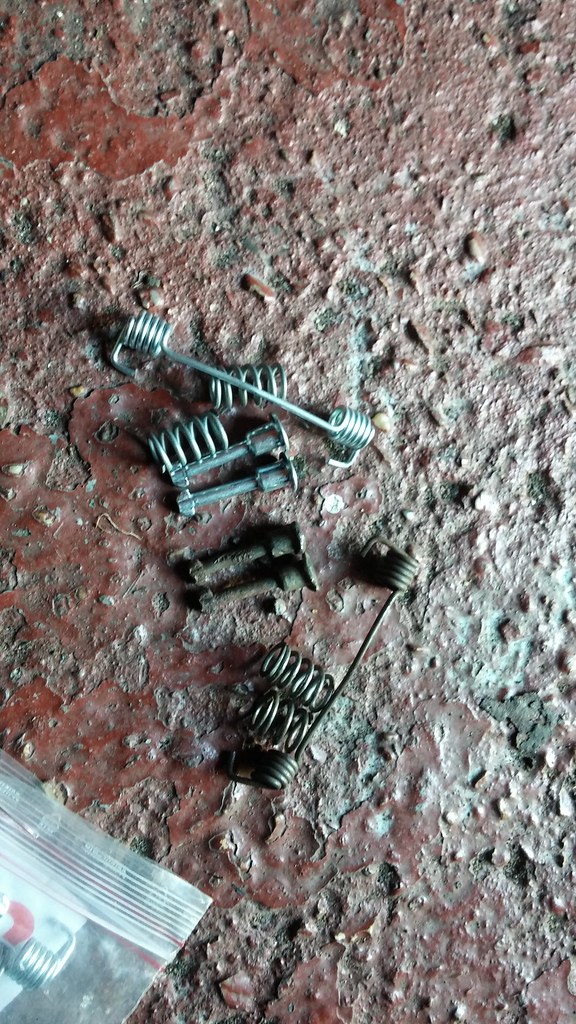 20140605_180512 by svenicusminimus, on Flickr
Seems that new springs and pins won't quite solve the problem though - the slotted holes that the pins are meant to sit in have rusted and gone a bit too 'round' to actually hold the pin in. I'll try my best to repair these backplates when I start putting the back end back together, can't be that hard to make it work again with a bit of welding to make some new slots.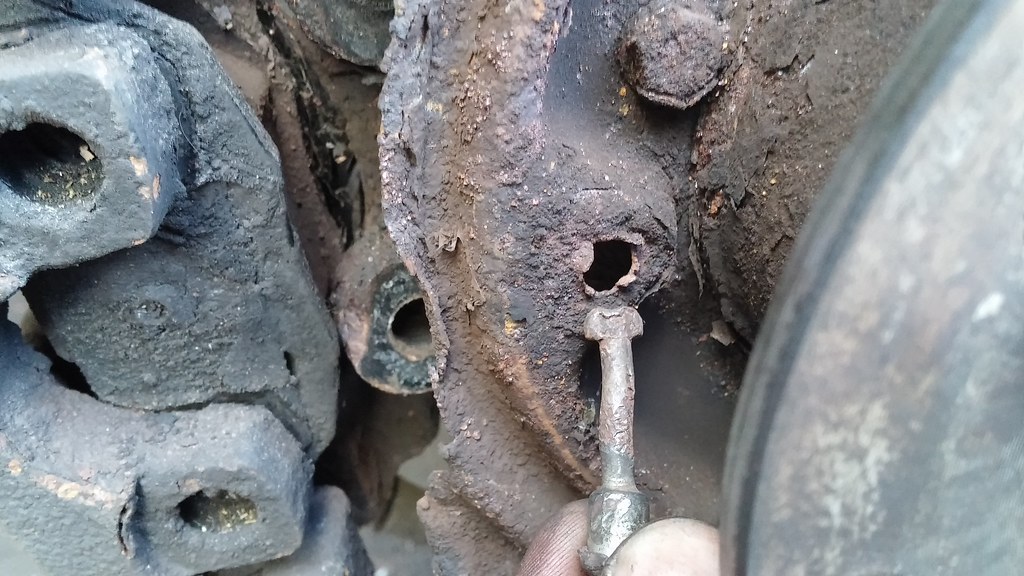 20140605_180804 by svenicusminimus, on Flickr
The outer rear exhaust box hanger was pretty nasty, so I bought a replacement.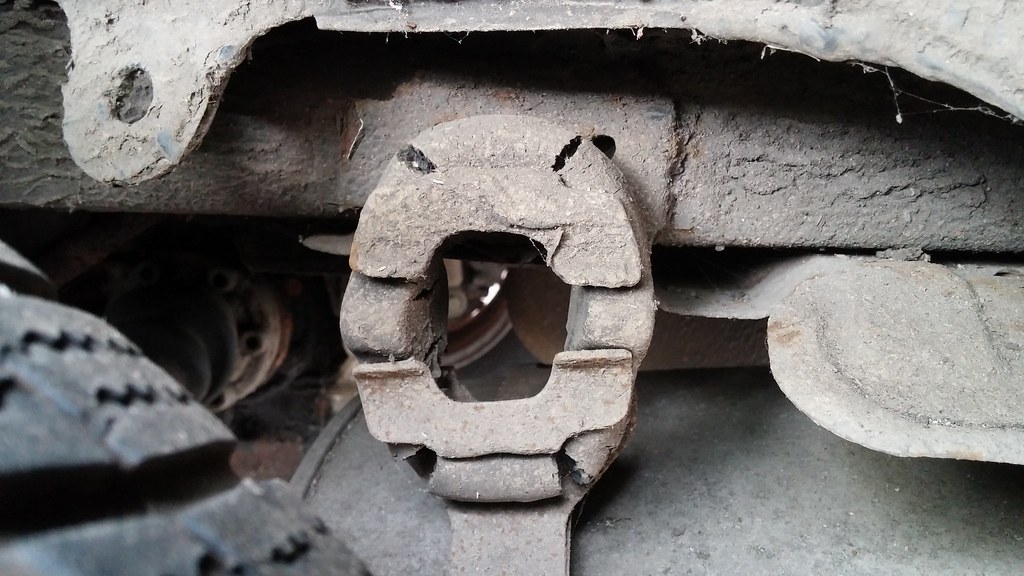 20140605_115313 by svenicusminimus, on Flickr
 20140605_183055 by svenicusminimus, on Flickr
Turns out this is where the exhaust blow was coming from - the centre box is a bit crusty. I'll try and weld this up as well if I can, I've spent too much money on this car to be able to afford a new exhaust section!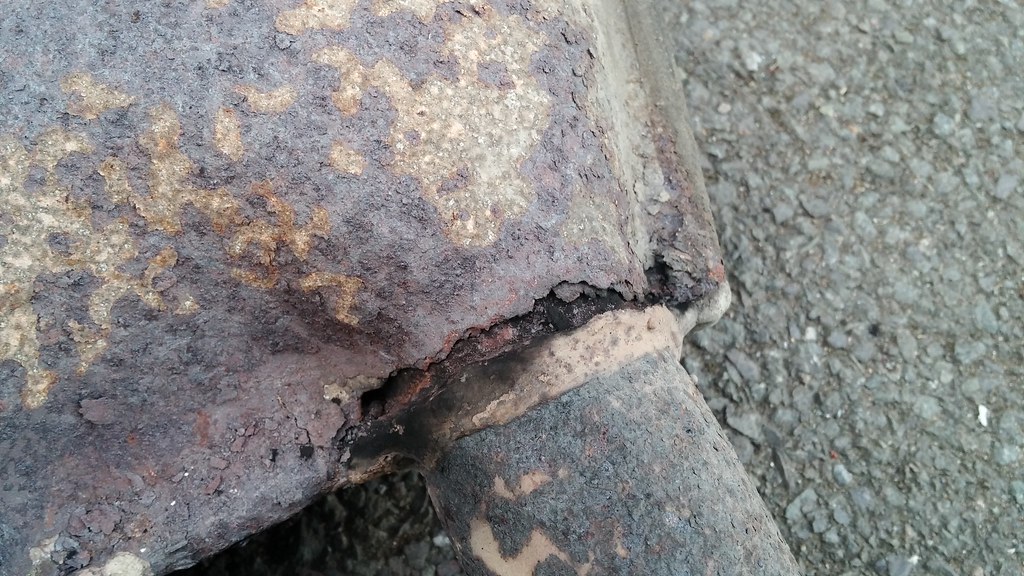 20140605_202952 by svenicusminimus, on Flickr
Now, you may remember that I said I found petrol droplets on the bottom of the fuel tank. Thankfully (I think...) it wasn't due to corrosion, but rather that someone had run over something very sharp and pointy in the past and managed to rupture the tank. The damage had been chemical metal repaired, but it was seeping a tiny amount of petrol out of the repaired area. This air deflector plate that sits on the front edge of the tank shows a big scar from the incident.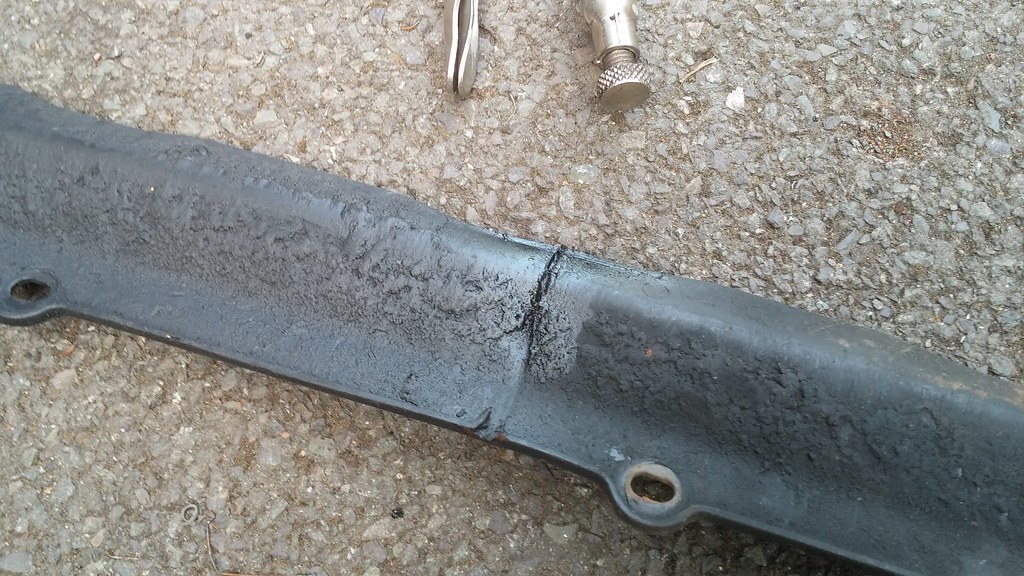 20140606_165315 by svenicusminimus, on Flickr
Here's the chemical metal blob over the damage.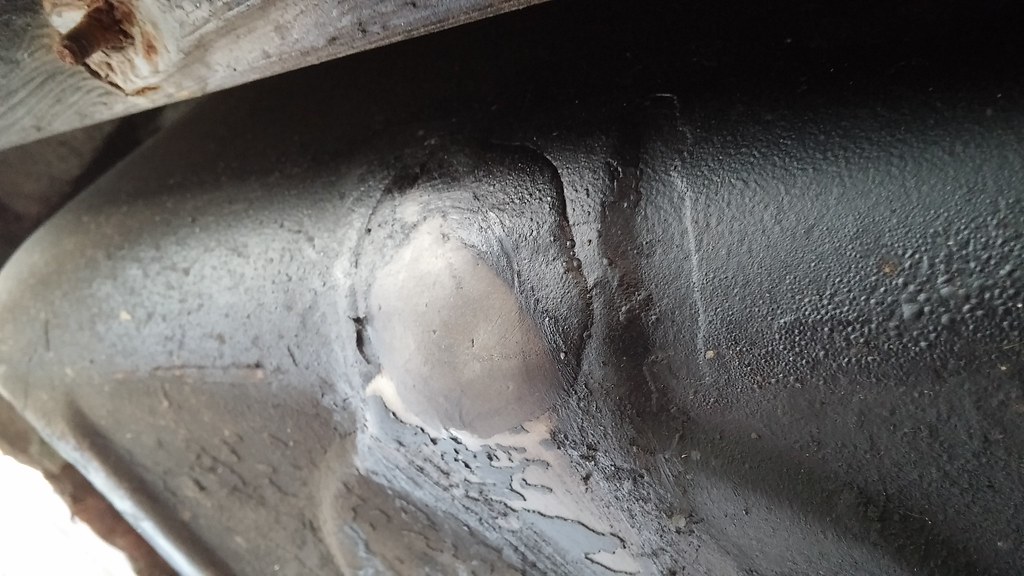 20140606_165343 by svenicusminimus, on Flickr
So, naturally, to repair the damage to the damage repair, I slapped on a load more chemical metal once I finally got the tank out. 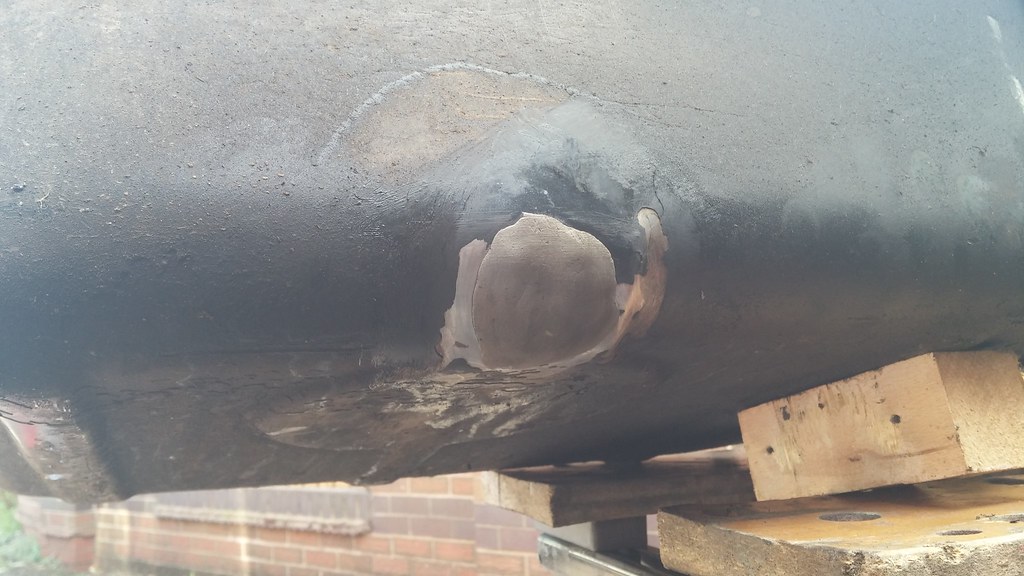 20140609_160825 by svenicusminimus, on Flickr
Whilst I was undoing all the fuel line connections, I managed to snap this one pretty easily...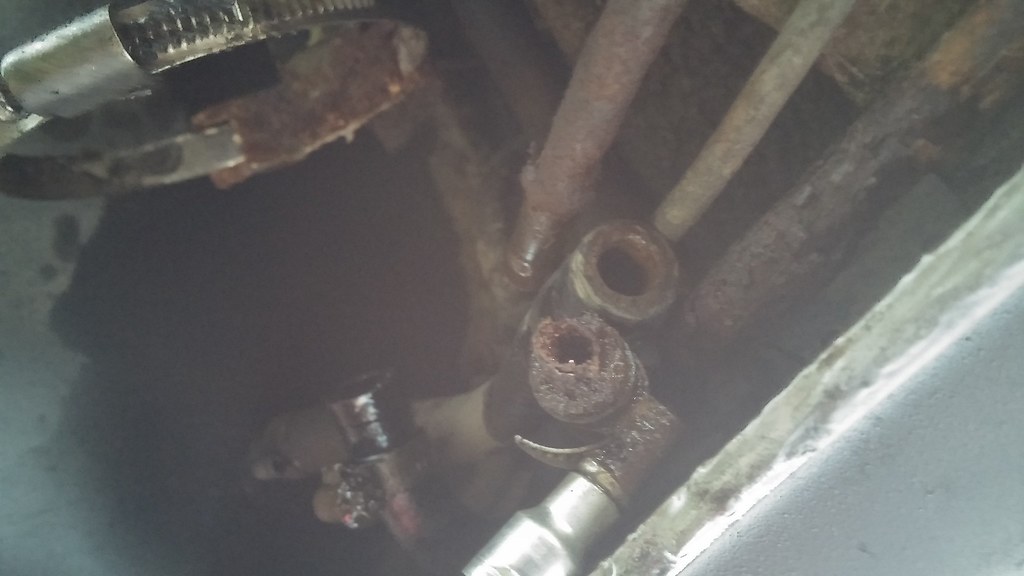 20140606_175331 by svenicusminimus, on Flickr
That was the line I needed to remove to do the welding on the passengers sill, it was really crusty all the way along so I'd already bought some replacement fuel line. Only problem is, once I got round to pulling the line off and worked my way to the engine bay, I found that this line didn't even connect to anything... so after I asked a question on the E30Zone, I found that the line would have run from the carbon canister (fitted to the later cars as a last ditch attempt to bring emissions down) back to the overflow/vent tank that sits up in the rear wheel arch. So basically, the line is, and always has been, completely redundant. Oh well, at least I've got some new fuel line stored away for the future... 20140609_133444 by svenicusminimus, on Flickr
I'm good at cluttering up the place with car parts... 20140606_181116 by svenicusminimus, on Flickr
One 63 litre fuel tank.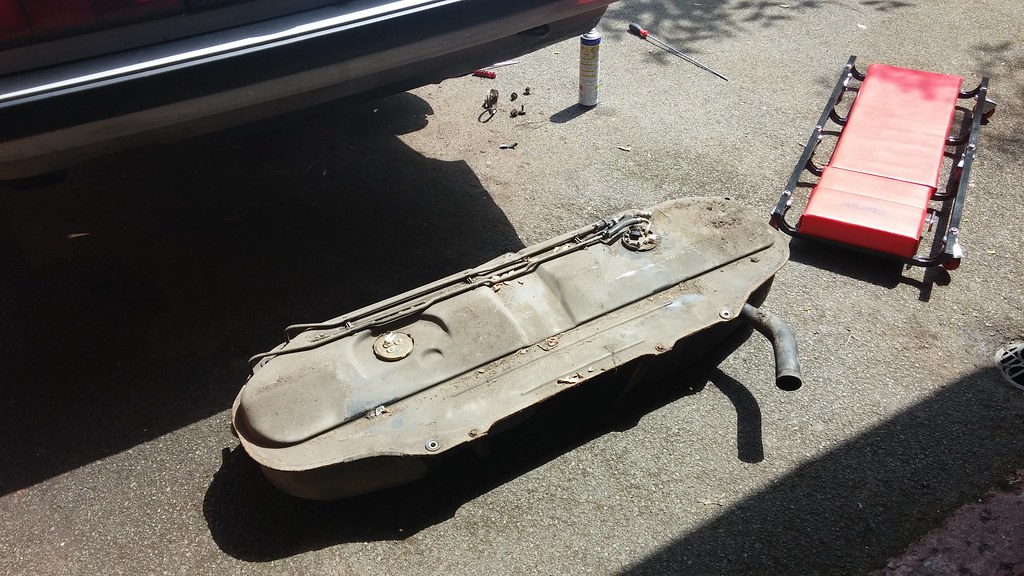 20140609_122924 by svenicusminimus, on Flickr
E30 tanks seem to be known for rotting off at the filler neck. I was worried this is what had happened to mine when I found the petrol on the bottom of the tank. Turns out that I caught the filler neck just in time, it's pretty rusty and there might be the tiniest of pinholes on the top edge... nothing a bit more chemical metal can't fix though 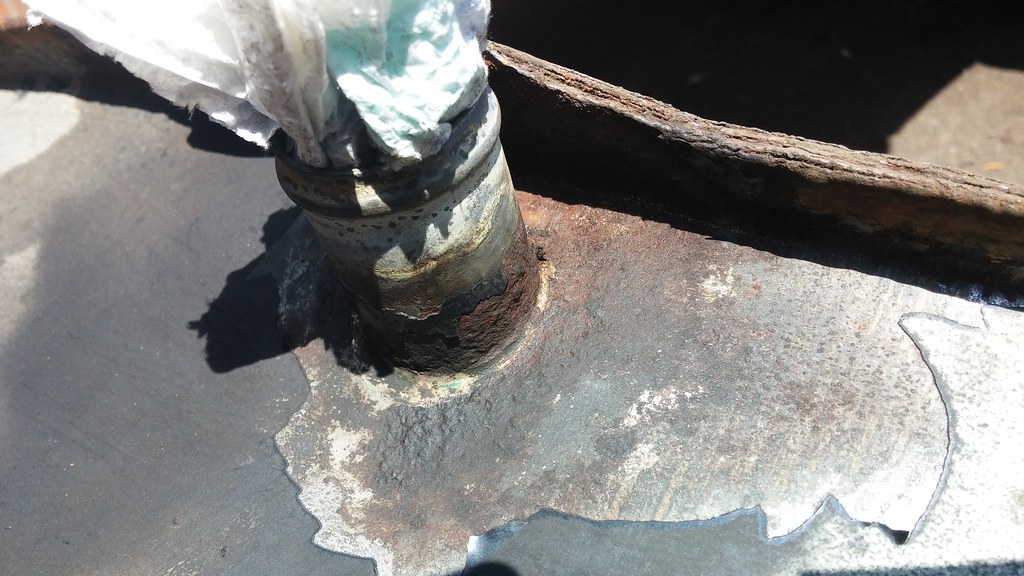 20140609_124251 by svenicusminimus, on Flickr
Now that I had that fuel line out, I could get on with welding up that inner sill bit on the passengers side, and then that side would be done! This was the best I could manage cutting out the rot with the grinder - I really need to get a Dremel some day...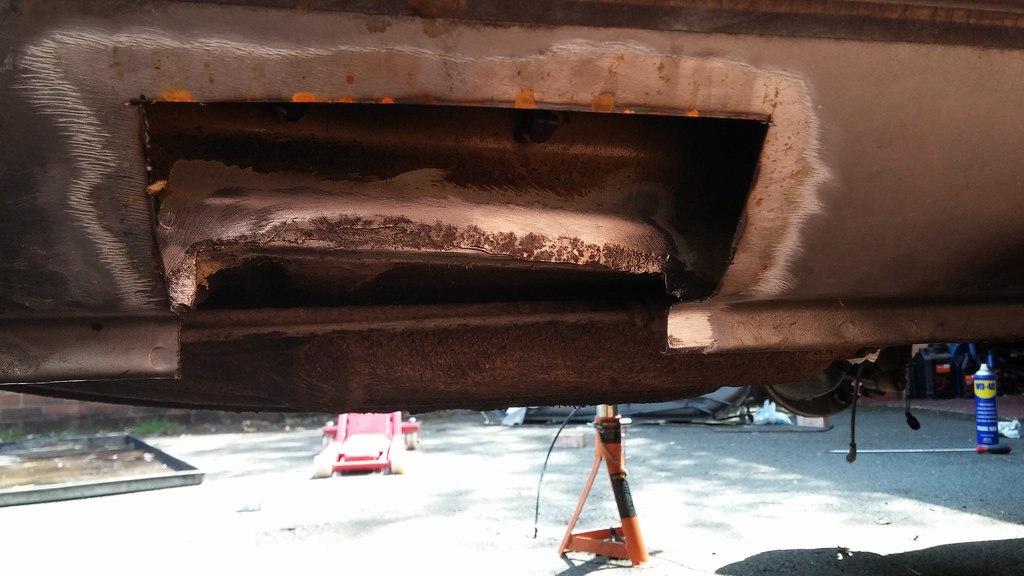 20140609_144034 by svenicusminimus, on Flickr
Now I had this flap from the outer sill to repair before I welded it back on.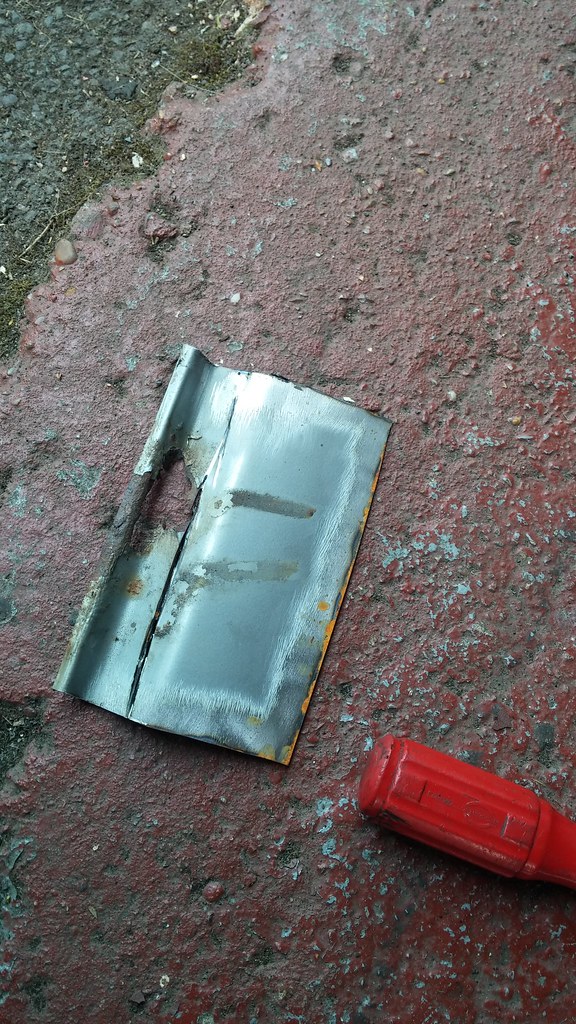 20140609_144047 by svenicusminimus, on Flickr
So I cut the bottom of it off and made a new piece to go on, complete with holes for a bit of plug welding.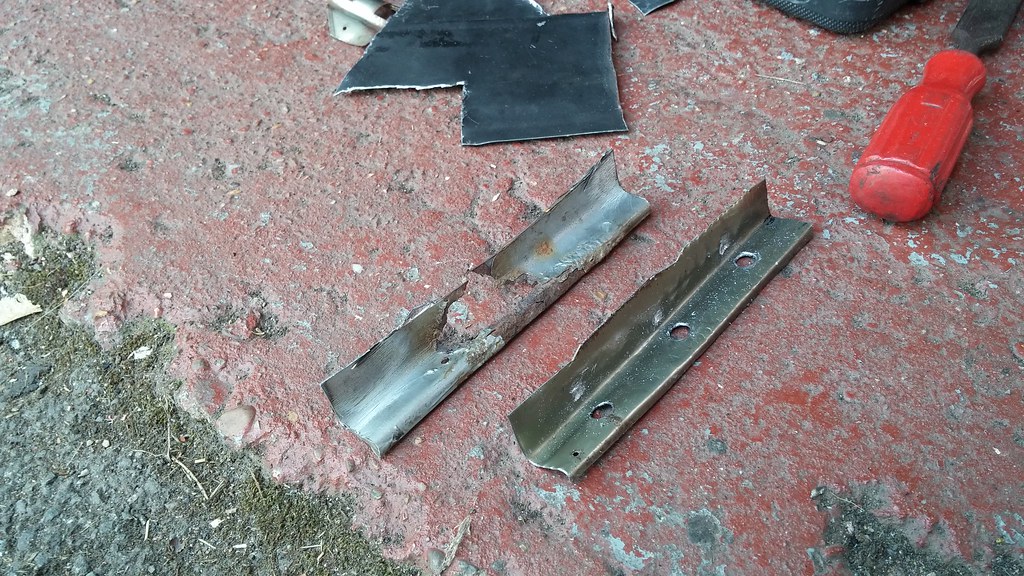 20140609_164034 by svenicusminimus, on Flickr
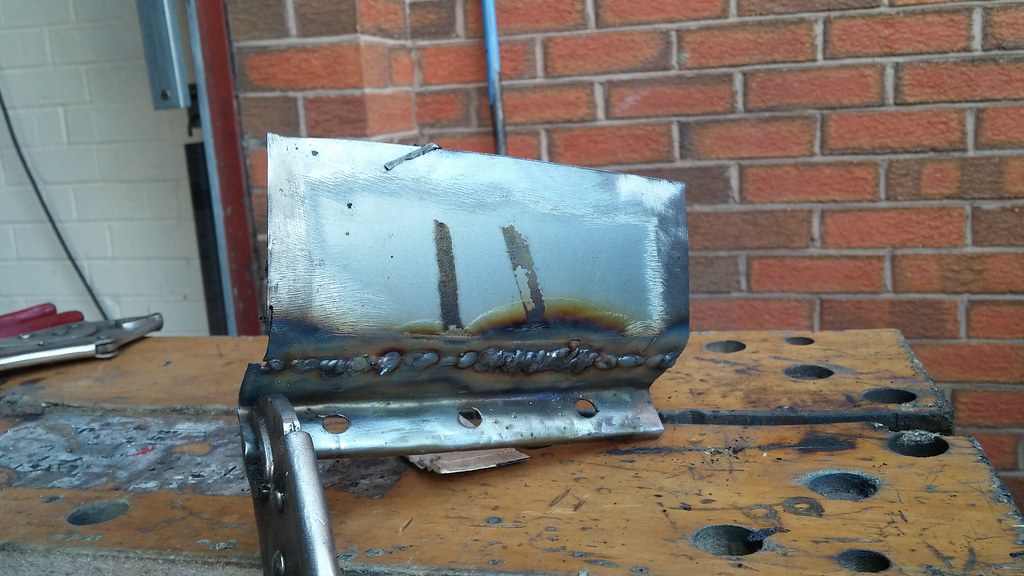 20140609_172610 by svenicusminimus, on Flickr
I made a simple flat piece to rebuild the vertical inner sill bit. 20140609_175437 by svenicusminimus, on Flickr
Then I put the newly repaired outer sill piece back in place. 20140609_182425 by svenicusminimus, on Flickr
Doing that lot was a bit tight with only a couple of feet between the car and the wall!
Then after I'd finished that off, it rained a lot. You can just about see in this photo that I'd taken out the spring and damper on this side, ready to repair the rot I'd found in this arch.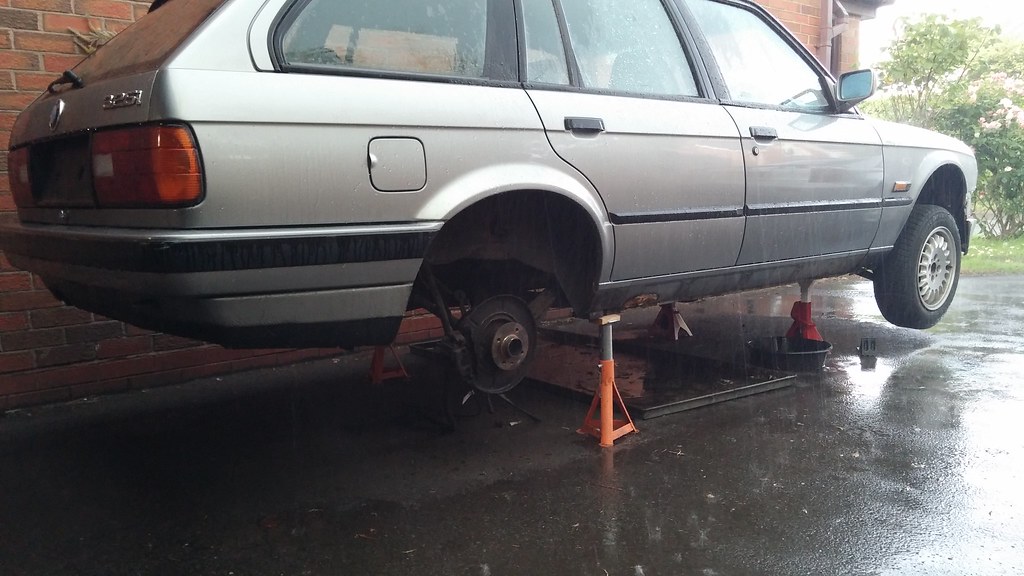 20140609_195512 by svenicusminimus, on Flickr
The next morning, I had some goodies arrive in the post - some lowering springs, new shocks, and an upgraded steering rack from an E46 (this won't be fitted for a while yet, I've got plenty more important things to be doing first). I'll get the suspension fitted soon when the welding is all done and I finally start putting the thing back together!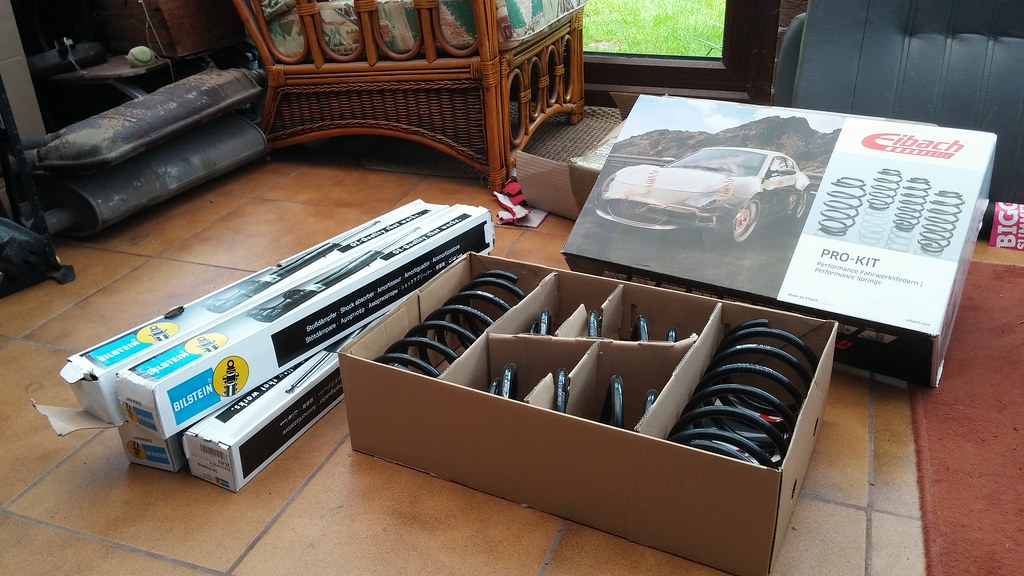 20140610_103126 by svenicusminimus, on Flickr
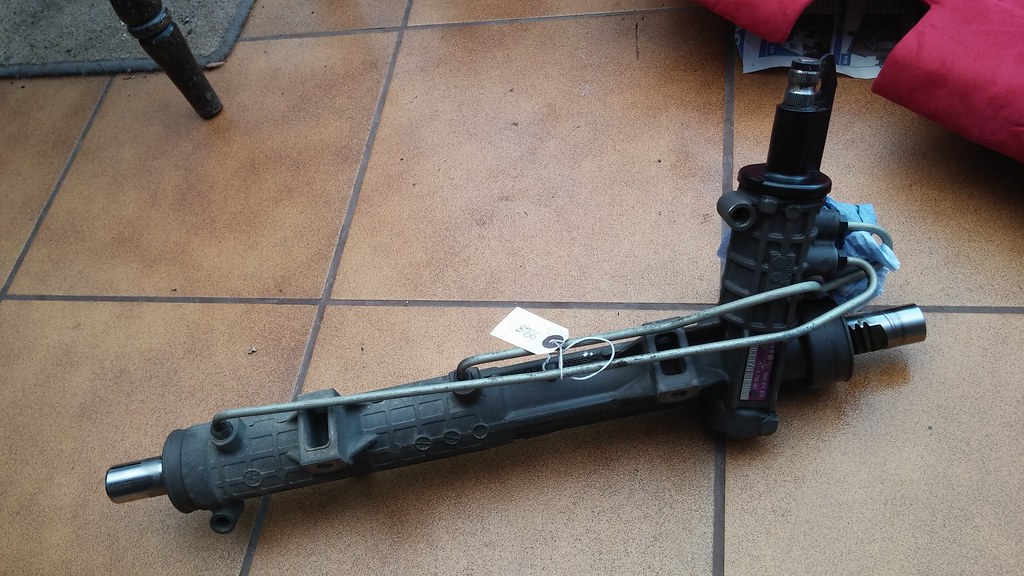 20140609_113308 by svenicusminimus, on Flickr
Here's the important bit, that it's a purple tag 067 rack.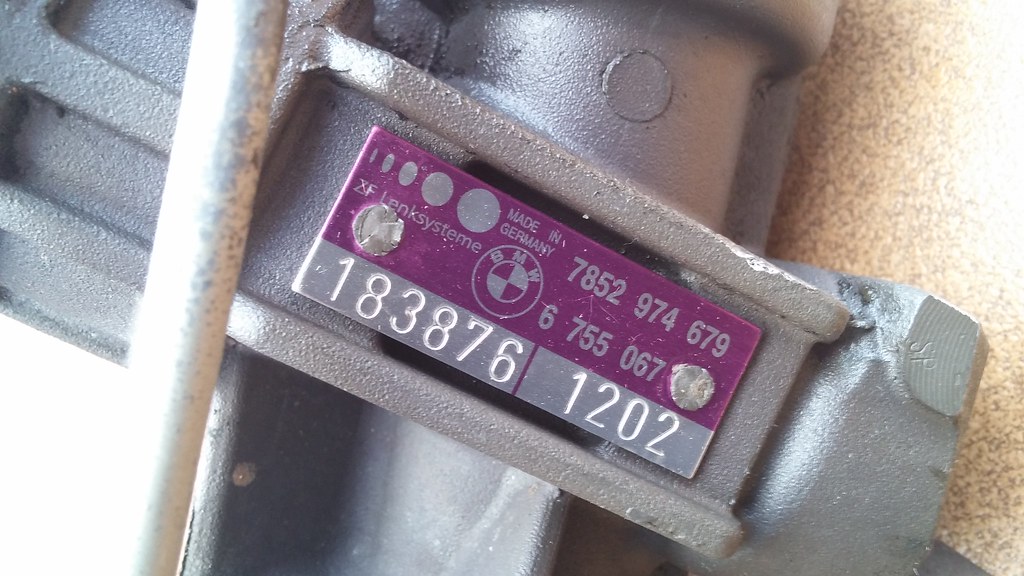 20140609_113319 by svenicusminimus, on Flickr
Only 3.2 turns lock to lock, compared the 4 turns on the standard rack. The best rack upgrade is a BMW Z3 one of some description I think (2.9 turns lock to lock or thereabouts?). However, they are now very expensive (easily £150 plus when I last looked), whereas this E46 purple tag rack only cost me £44 posted .
Anyway, back to depressing rust holes...
Here's the damage around the fuel tank vent pipe tube opening area thingy.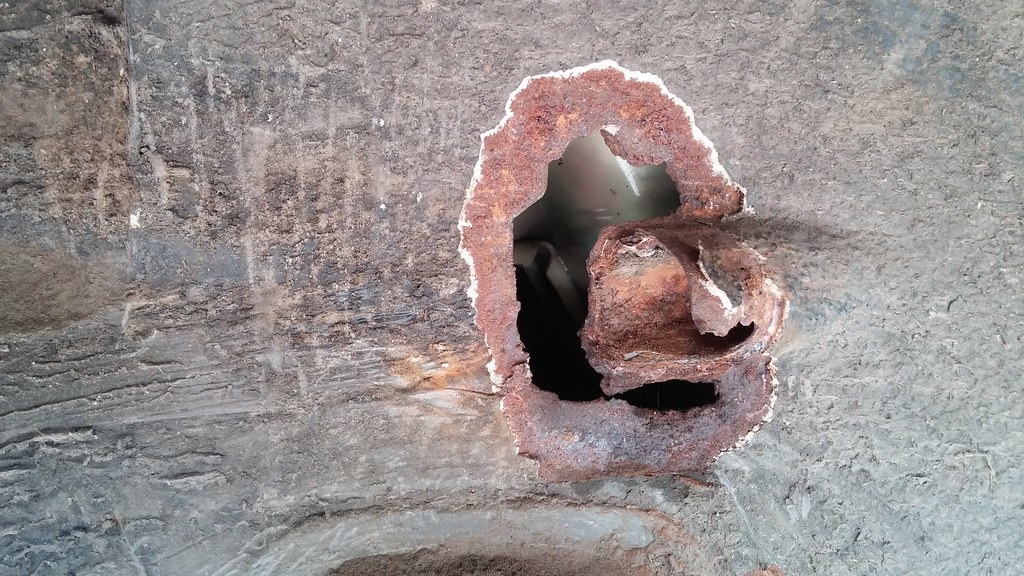 20140610_105146 by svenicusminimus, on Flickr
I also found this rust just below the area, on the corner right next to the spring pad mounting area place thingy. The photo is looking up from the bottom, that lower hole is on the underside (horizontal) bit of the chassis leg, and the top hole is on the front side (vertical).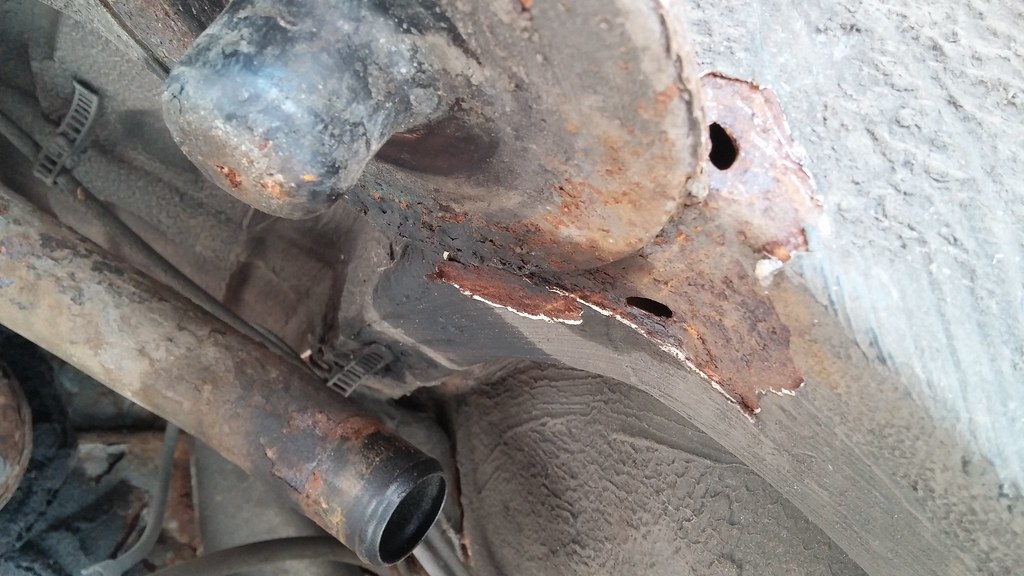 20140610_105156 by svenicusminimus, on Flickr
Cut it out, cut it all out!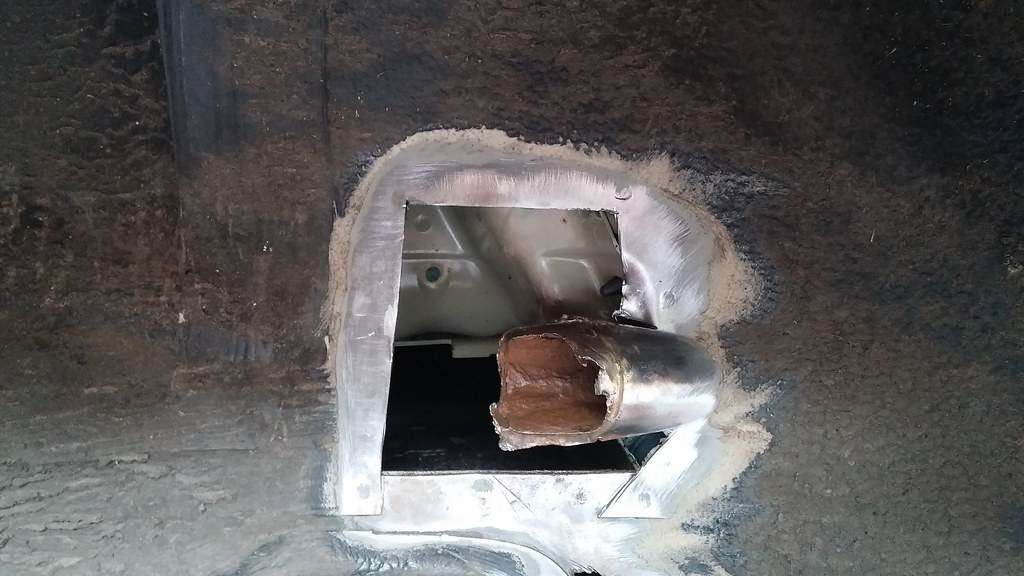 20140611_185654 by svenicusminimus, on Flickr
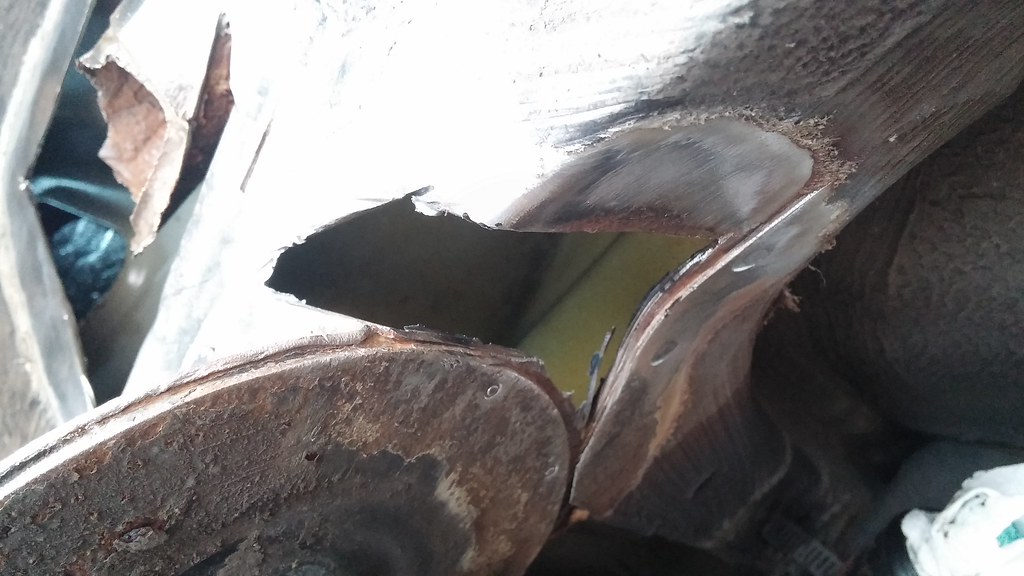 20140611_185706 by svenicusminimus, on Flickr
AAAAAAAND that's all the pictures I have for now. I made the patches and welded up those two holes yesterday/today, but forgot to take any pictures. I'll be having a full car working day tomorrow, so I should get plenty done! Next bit is to patch up the big hole on the rear side of the drivers side sill.
Almost forgot, I've got a few pictures of the headlining refurb, which I've been doing in between other jobs when I didn't want to get too dirty (oo er)... I'll do another update for that later now that it's finished!


0 members, 1 guests, 0 anonymous users


