Jump to content


Photo
- - - - -

92 City, My First Rebuild.

roundnose

  • Please log in to reply
670 replies to this topic

#136 Ben_O

Ben_O

    Mill Road Garage

  • Paint Doctor
  • PipPipPipPipPipPipPipPipPipPip
  • 9,794 posts
  • Location: Isle of Wight

Posted 14 June 2014 - 09:50 PM

WOW jay. Your work is great. Really coming on quickly.


That engine looks so great. I hope mine comes up as well.


One thing i noticed that you must have but i will mention just incase is that there looks to be quite a bit of rust in that seam along the bottom of the quarter panel/door step. Make sure you treat inside that seam otherwise it will continue to rot out and show its ugly face again down the line.


Cheers


Ben


#137 big-jay

big-jay

    Super Mini Mad

  • Members
  • PipPipPipPipPipPip
  • 518 posts
  • Location: Birmingham
  • Local Club: British Mini Club

Posted 14 June 2014 - 10:35 PM

Wow! You don't hang around. Looking good  :)

WOW jay. Your work is great. Really coming on quickly.
 
That engine looks so great. I hope mine comes up as well.
 
One thing i noticed that you must have but i will mention just incase is that there looks to be quite a bit of rust in that seam along the bottom of the quarter panel/door step. Make sure you treat inside that seam otherwise it will continue to rot out and show its ugly face again down the line.
 
Cheers
 
Ben


Cheers guys, well spotted Ben, you've got a keen eye ! Will make sure to treat that with some Deox gel tomorrow !

Edited by big-jay, 14 June 2014 - 10:58 PM.


#138 Dylanscar

Dylanscar

    On The Road

  • Noobies
  • PipPip
  • 49 posts
  • Location: Dubai

Posted 15 June 2014 - 07:12 AM

Hi Jay,


Love seeing what you are doing and doing it so well.


I see that you have used Magnum, Heritage and M-Machine panels. Which would you say were the best?


Sure it will be Heritage 1st followed by M-Machine and then maybe Magnum 3rd but are certain panels better from certain places? The areas I need to replace include the sills, front panel and the rear quarter panels. Thinking M-Machine but always worried might be way out.


What are your thoughts on the panels?


Thanks


Jon


#139 big-jay

big-jay

    Super Mini Mad

  • Members
  • PipPipPipPipPipPip
  • 518 posts
  • Location: Birmingham
  • Local Club: British Mini Club

Posted 15 June 2014 - 10:46 AM

Hi Jay,
 
Love seeing what you are doing and doing it so well.
 
I see that you have used Magnum, Heritage and M-Machine panels. Which would you say were the best?
 
Sure it will be Heritage 1st followed by M-Machine and then maybe Magnum 3rd but are certain panels better from certain places? The areas I need to replace include the sills, front panel and the rear quarter panels. Thinking M-Machine but always worried might be way out.
 
What are your thoughts on the panels?
 
Thanks
 
Jon

Hi Jon,

Thanks for the kind words ! As for panels, I would have liked to use all heritage panels of course, and even though I have used a fair few of them, they are quite expensive for what they are. M-Machine panels are absolutely spot on, closest you can get to the heritage panels, I've used a lot of them so far, and have had no problem with the fitment what so ever, I wouldn't think twice about using their panels.

As for magnum panels, I've not had the best experience with the ones I've used. Their doorsteps are poor and require a lot of modification to make them fit and their boot repair section is also poor. However, I've used magnum outer sills on both sides of my car and have had no problem with them. In hindsight I wouldn't have used any magnum panels but I was just a novice and didn't know much about welding or car restoration when I started this build. But now I've had a chance to work with panels from different company's, M-Machine seem to be far superior, the quality of the metal just feels better.

I will be using heritage panels where it matters though i.e, scuttle, door skins etc just so it looks right. As for the panels you'll be replacing, i'd be using heritage rear quarters as I've not heard great things about the magnum version. I'd use M-Machine for the outer sills and front panel. Of course a lot of this depends on your budget, if you can afford the heritage stuff than go for it, if not don't be worried about using M-Machines stuff as it's excellent, I'm sure plenty of people will agree with me.

Hope this helped you a bit !

Edited by big-jay, 16 June 2014 - 07:18 AM.


#140 rooney123

rooney123

    Mini Mad

  • Noobies
  • PipPipPipPip
  • 114 posts
  • Location: lancaster

Posted 15 June 2014 - 03:50 PM

nice job not been on for abit nice to see the progress.........................andy :proud:


#141 big-jay

big-jay

    Super Mini Mad

  • Members
  • PipPipPipPipPipPip
  • 518 posts
  • Location: Birmingham
  • Local Club: British Mini Club

Posted 15 June 2014 - 04:09 PM

nice job not been on for abit nice to see the progress.........................andy :proud:


Cheers bud, just a front end to do now then it's off for paint :D

Edited by big-jay, 15 June 2014 - 04:09 PM.


#142 castafiore

castafiore

    Mini Mad

  • Noobies
  • PipPipPipPip
  • 116 posts
  • Location: North West

Posted 15 June 2014 - 06:16 PM

I've just read all this thread. Wow. You are doing a great job and very impressive that you make time to do a bit every day - it really speeds the project along. I have trouble blowing through when welding in patches, but you are doing a good job of not blowing through or distorting the panels.

I am a Bilt Hamber fan too, but find the Deox C better than the gel, overall. The Electrox primer is good too but expensive. Looking forward to seeing more work.

#143 will_

will_

    Mini Mad

  • Members
  • PipPipPipPip
  • 201 posts
  • Location: Harborne, Birmingham

Posted 15 June 2014 - 08:27 PM

Looks great. What seam sealer you using ? Looks very neat !!

#144 big-jay

big-jay

    Super Mini Mad

  • Members
  • PipPipPipPipPipPip
  • 518 posts
  • Location: Birmingham
  • Local Club: British Mini Club

Posted 15 June 2014 - 08:55 PM

I've just read all this thread. Wow. You are doing a great job and very impressive that you make time to do a bit every day - it really speeds the project along. I have trouble blowing through when welding in patches, but you are doing a good job of not blowing through or distorting the panels.
I am a Bilt Hamber fan too, but find the Deox C better than the gel, overall. The Electrox primer is good too but expensive. Looking forward to seeing more work.


Cheers mate, I do try to do a bit every day before work as it keeps it moving along. As for blowing holes when welding, practise makes perfect. I was taught to weld by my dad and have only been doing so for around 3-4 months, but I'm pretty happy with how it's going and am fairly confident in my abilities now. I'm also a massive fan of bilt hamber products, haven't tried the deox c yet but will do so in the future, I have been using a lot of their wax products though !

#145 big-jay

big-jay

    Super Mini Mad

  • Members
  • PipPipPipPipPipPip
  • 518 posts
  • Location: Birmingham
  • Local Club: British Mini Club

Posted 15 June 2014 - 08:56 PM

Looks great. What seam sealer you using ? Looks very neat !!


Hi will, I use Upols Tiger Seal, seams to be very good stuff !

#146 alex-95

alex-95

    I am THE CLAMP MAKER

  • Members
  • PipPipPipPipPipPipPipPipPipPip
  • 6,025 posts
  • Location: l

Posted 15 June 2014 - 09:15 PM

Great work


Looks great. What seam sealer you using ? Looks very neat !!


Hi will, I use Upols Tiger Seal, seams to be very good stuff !


:lol:


#147 tino

tino

    One Carb Or Two?

  • Members
  • PipPipPipPipPipPipPip
  • 805 posts
  • Location: Southampton

Posted 15 June 2014 - 09:45 PM

Amazing progress , some really nice work there. 


#148 big-jay

big-jay

    Super Mini Mad

  • Members
  • PipPipPipPipPipPip
  • 518 posts
  • Location: Birmingham
  • Local Club: British Mini Club

Posted 16 June 2014 - 07:14 AM

Amazing progress , some really nice work there.


Cheers buddy, I'm glad you think so !

#149 big-jay

big-jay

    Super Mini Mad

  • Members
  • PipPipPipPipPipPip
  • 518 posts
  • Location: Birmingham
  • Local Club: British Mini Club

Posted 16 June 2014 - 07:17 PM

Update,

Bit of engine work today as I didn't feel like working on the shell, got a few bits tidied up and back on the engine, starting to come together now :-)

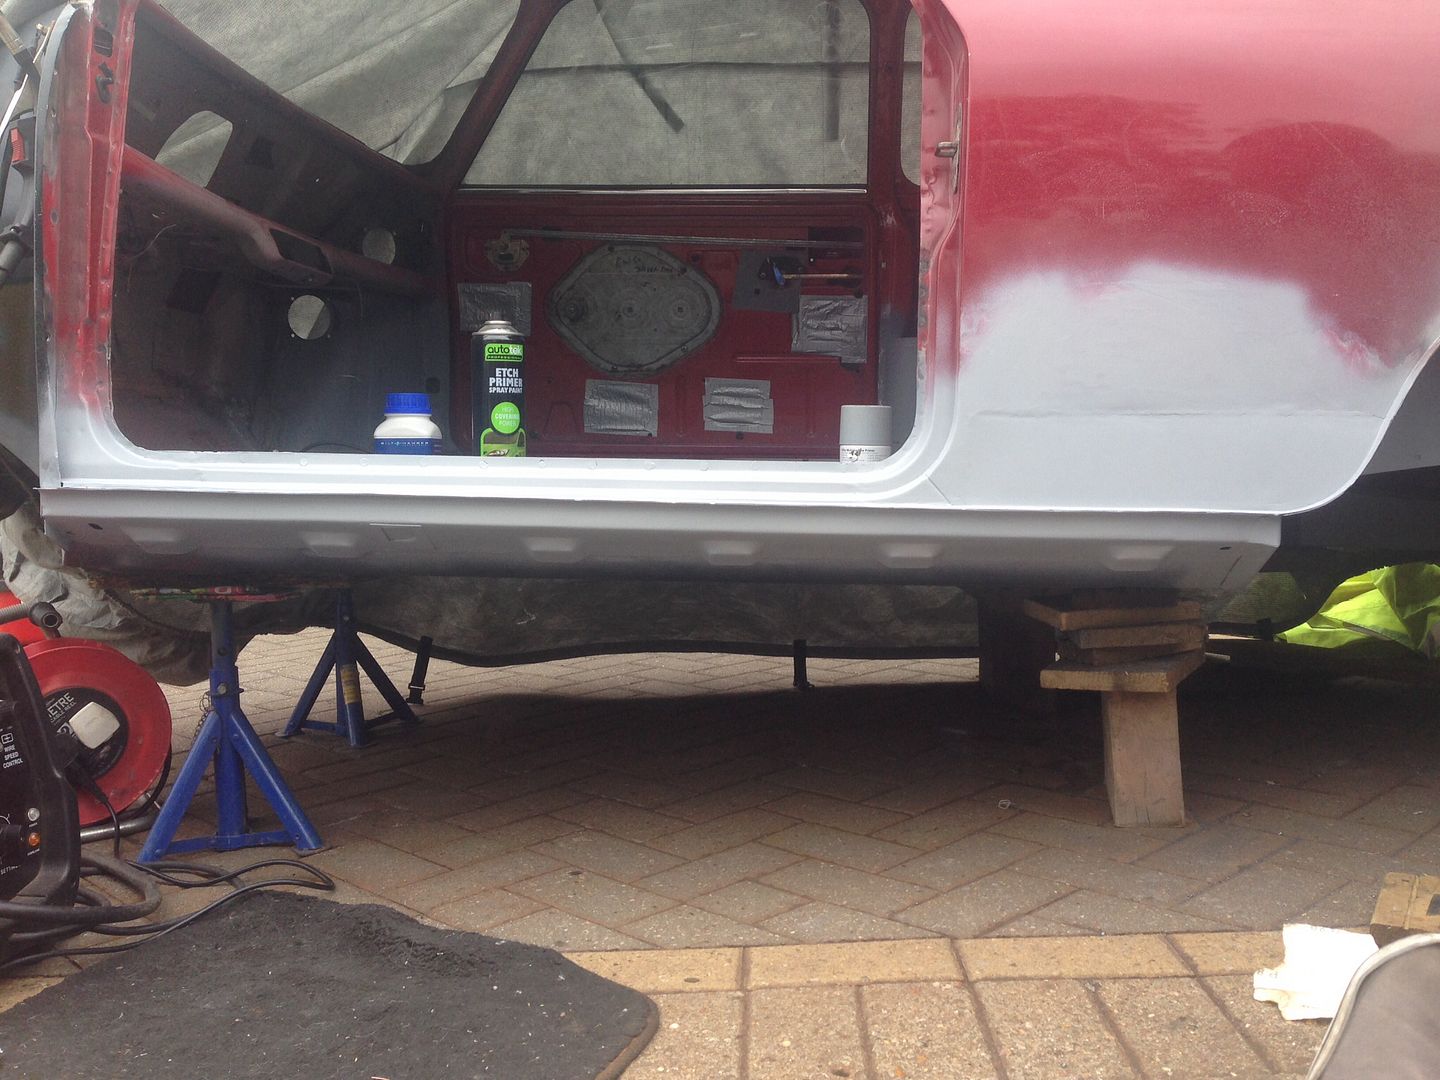
Here's a quick pic from yesterday though, sanded and primed up the outer sill and doorstep -

706796f5c13211d6c135330fd825a07a_zpsa5f8

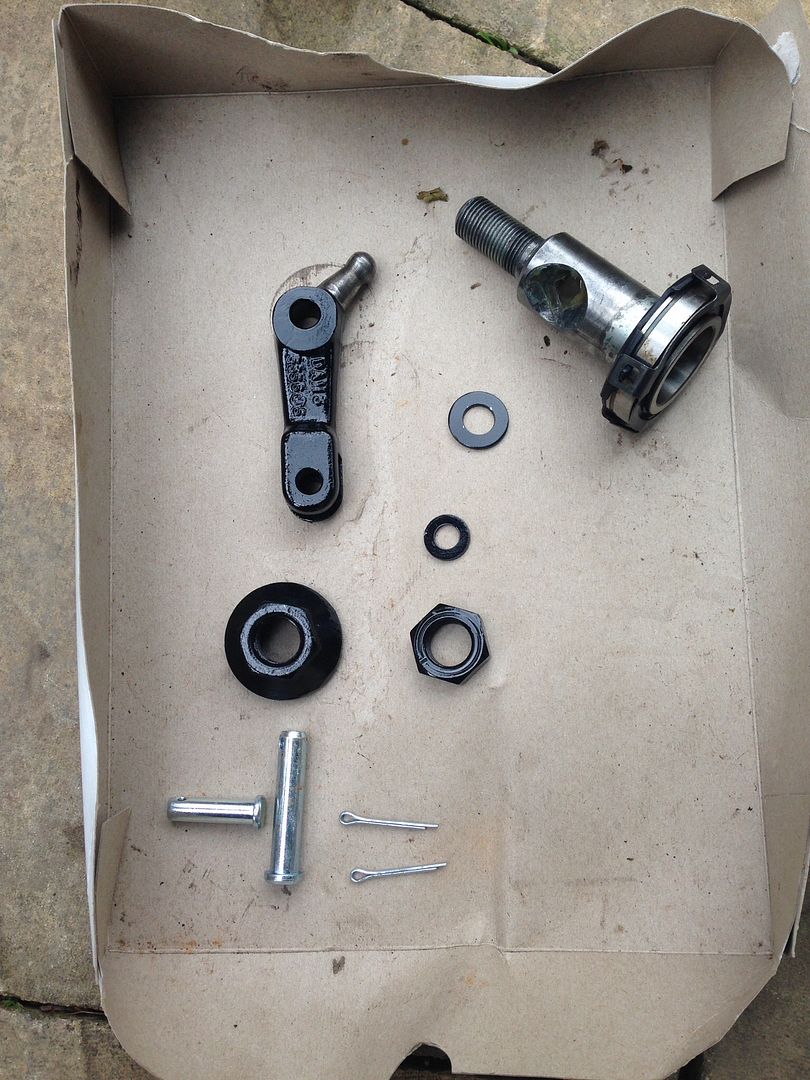
So, to today's progress, wire brushed and painted up the clutch parts, new thrust bearing, new O ring, new pins and new split pins. Also greased up the hole where the arm sits -

aaf4bbd4b9bd193b1f91eec2e8aaeb26_zpsfe5f

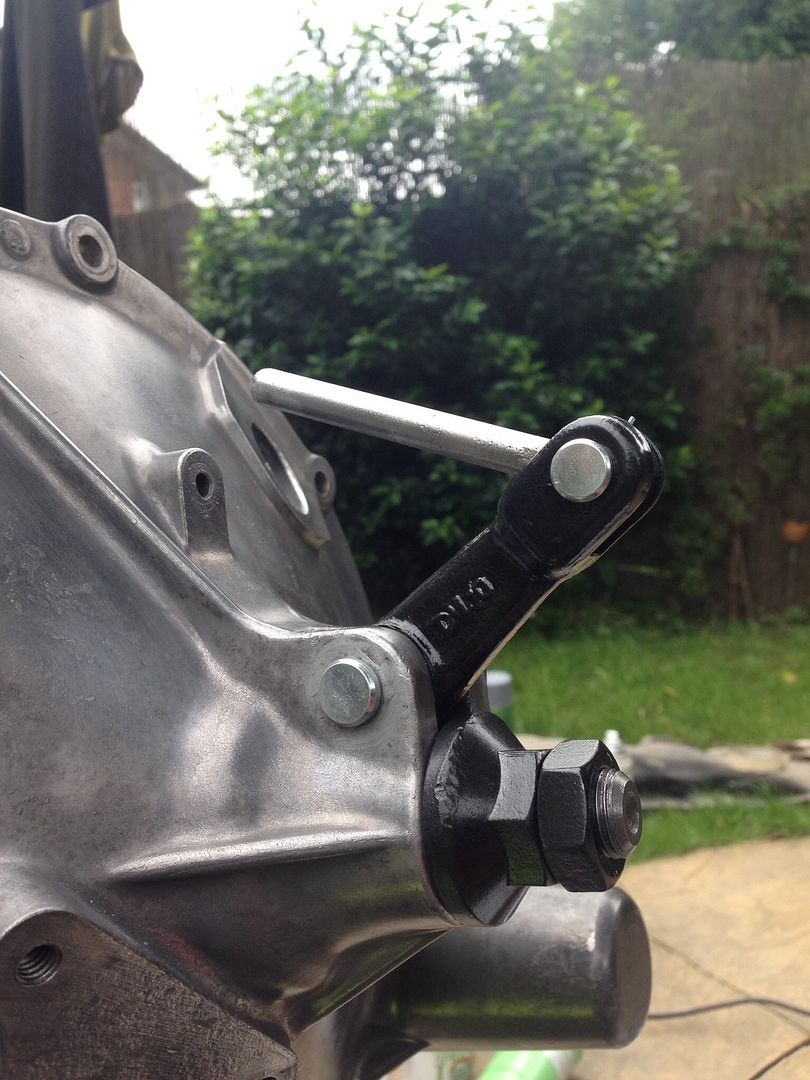
Fitted back into the bell housing -

17c9767e346c2fc987f5f41d728614bd_zps9dd6

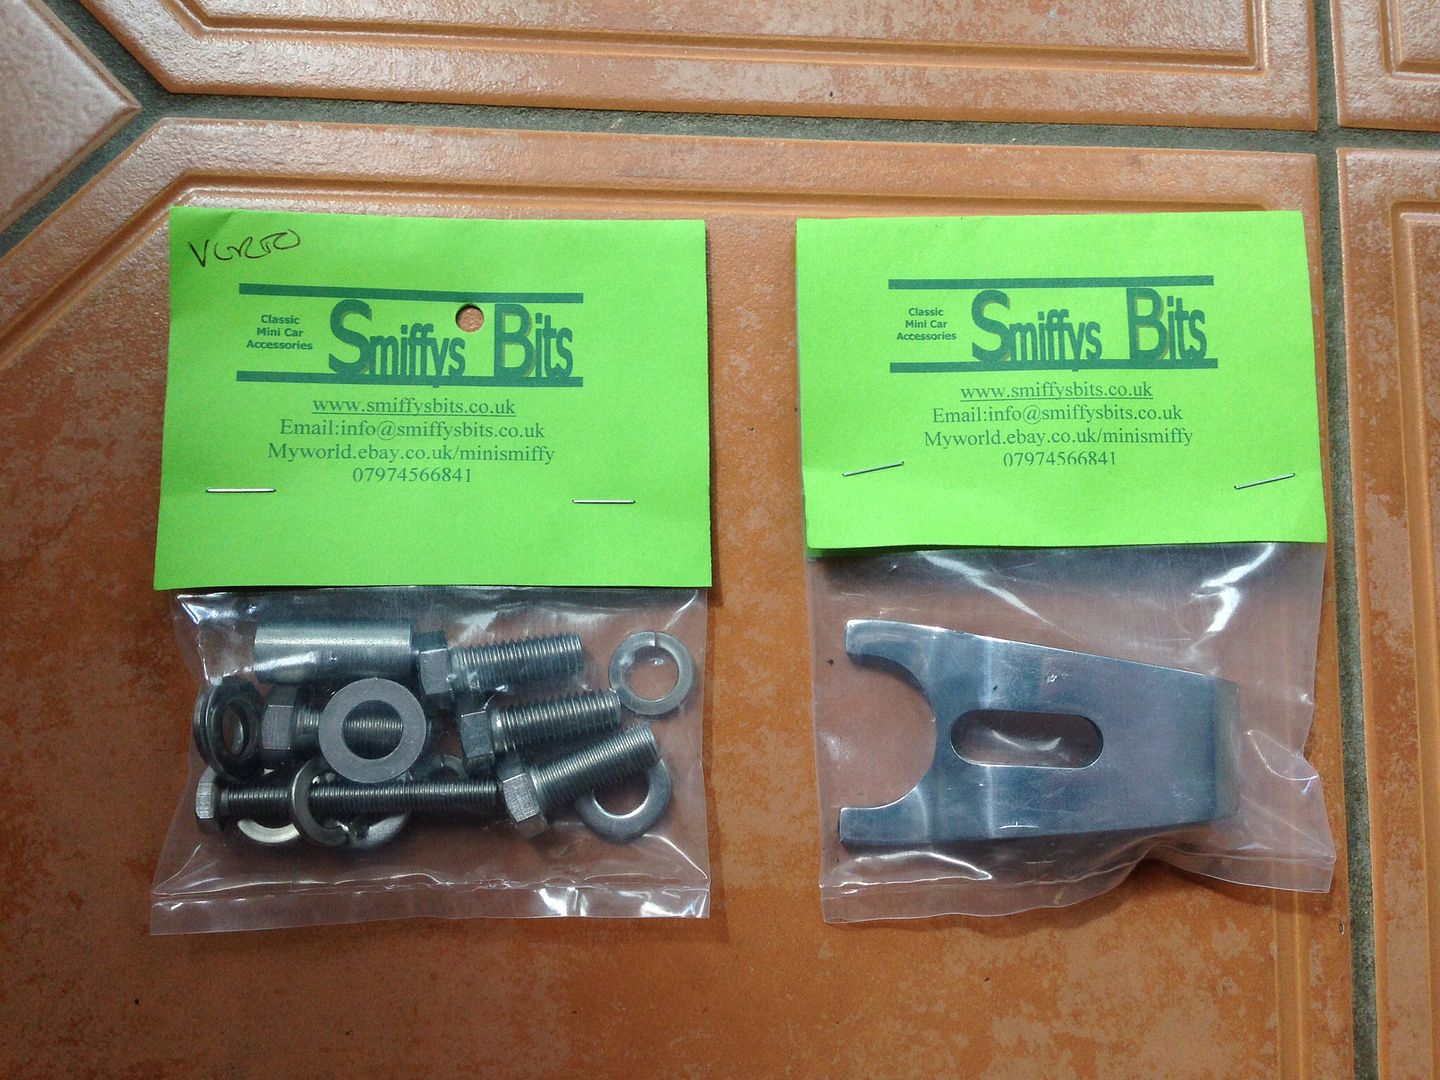
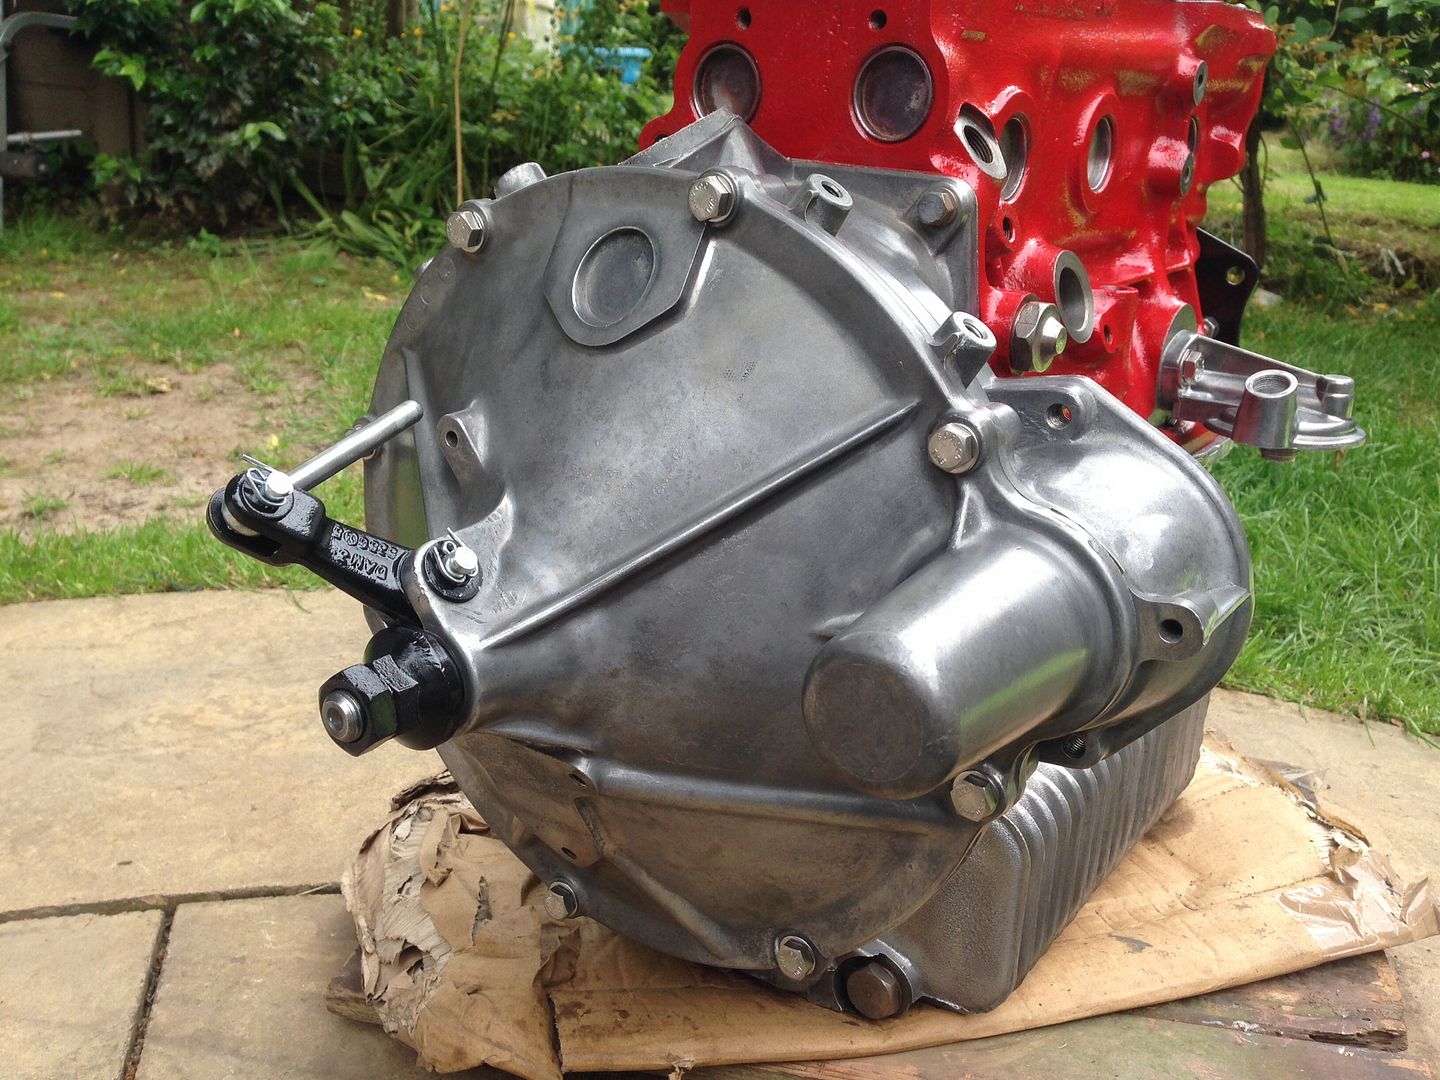
Fitted back onto the engine with new Smiffys stainless bolts, torqued down and the end float set to the correct distance (6.5 mm according to the Haynes manuel) -

7daccccd8a87b936abad7675f4f8bac7_zpsf7cc

Next up was the timing cover, primed the chain and sprockets with oil and wire brushed all the bolts. Then I centred the cover using the crankshaft pulley and screwed the bolts in finger tight, removed the pulley and then torqued down

a63ce70c1d82edd9b4d385454d8e113b_zps8dfb

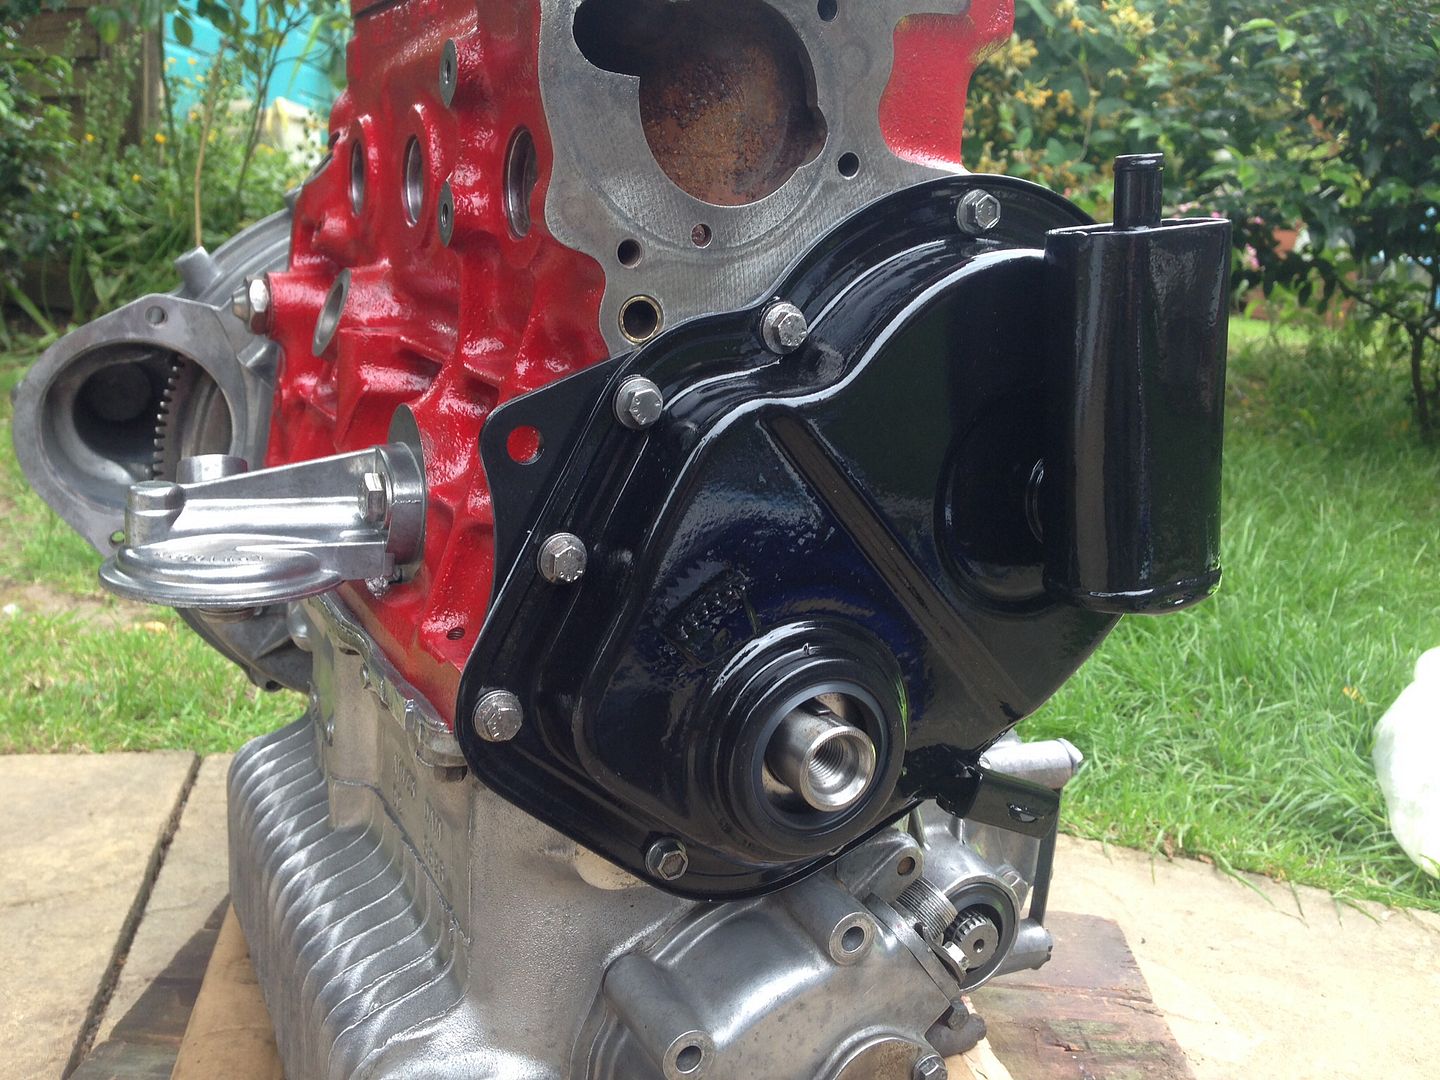
Then I cleaned up the engine mounting and fitted that back to the block -

062d8264727920d0472bf915c2aa492f_zps8b32

9af0319bd62006496e49fc6986a028e9_zps2f7d

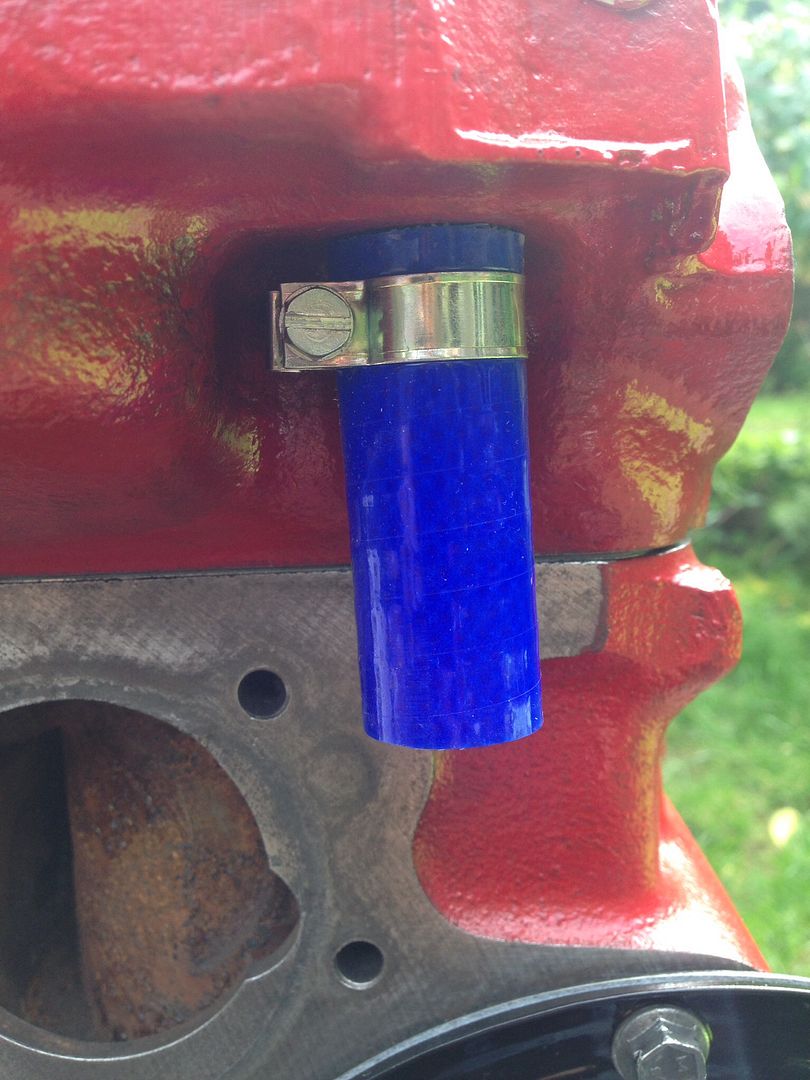
New bypass hose, (new water pump to be bought soon) -

66296cdd4b6b921f135d96e6d775c14d_zps27e9

New temperature sender -

a93c81e95dfc28c3360f0d721b9729fc_zpsbe25

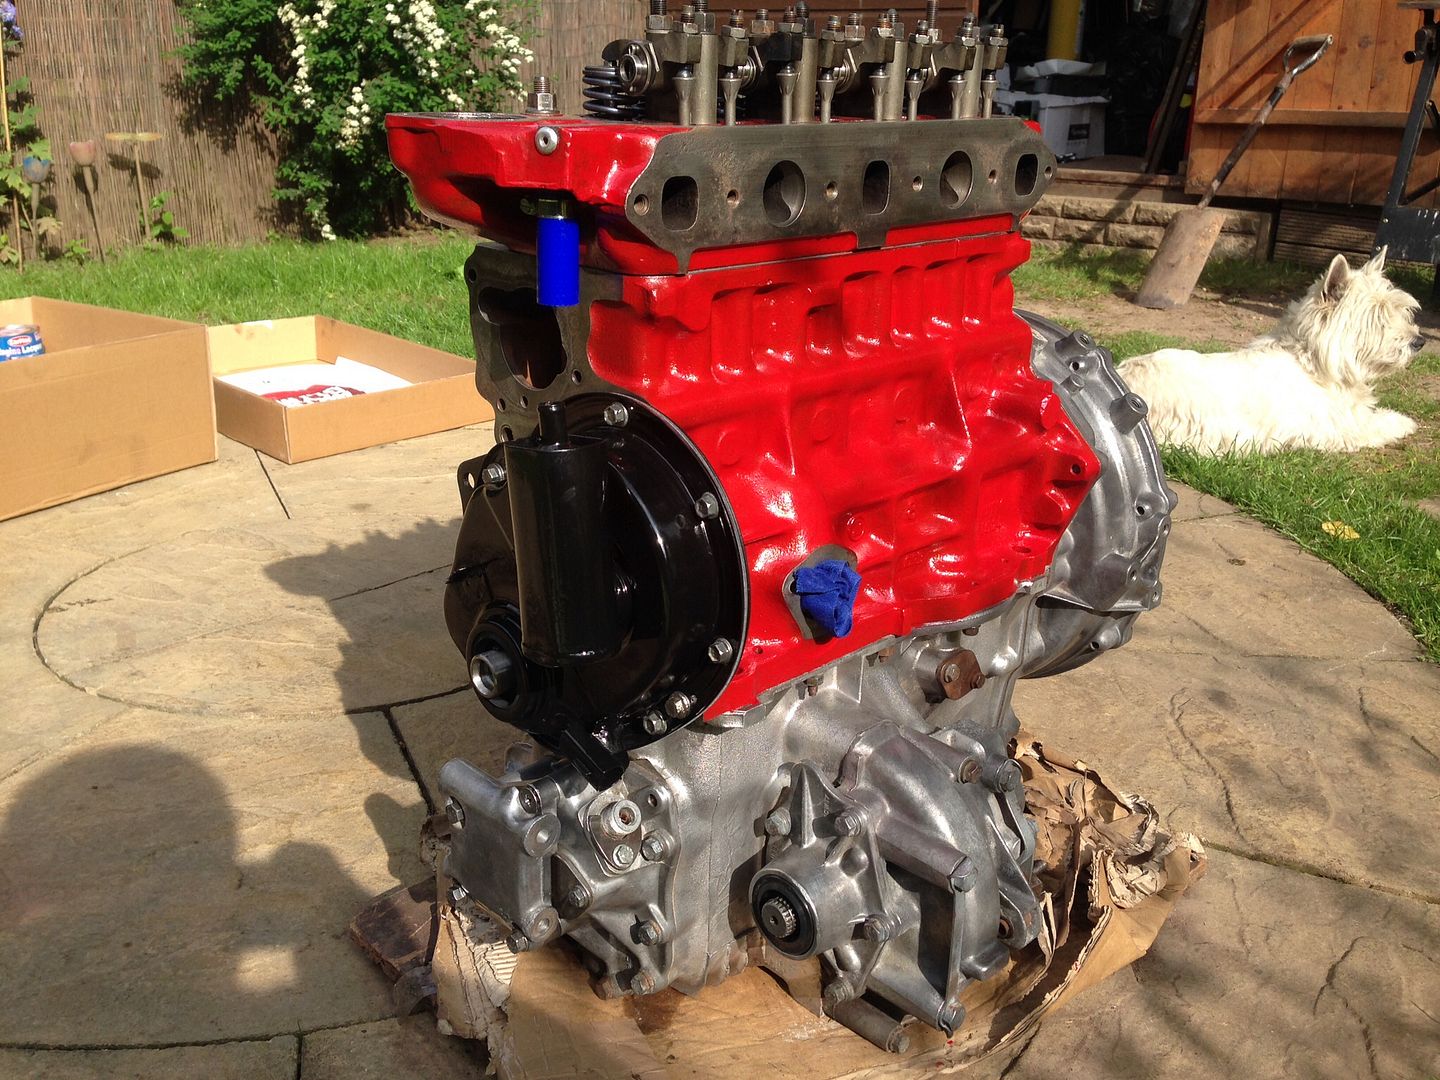
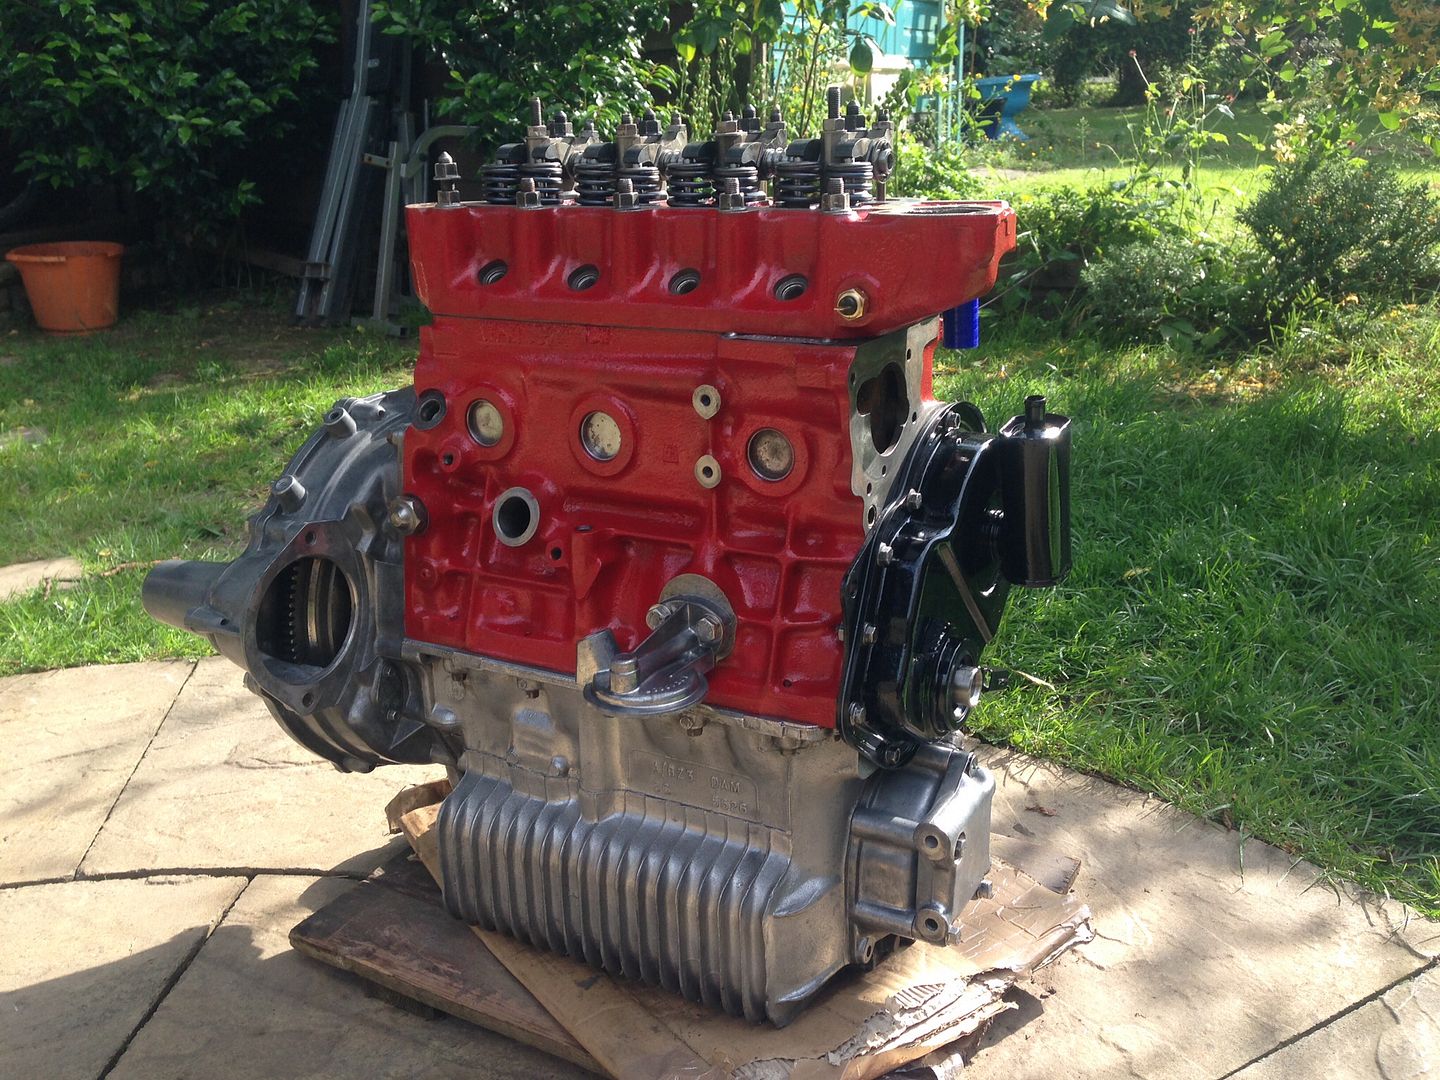
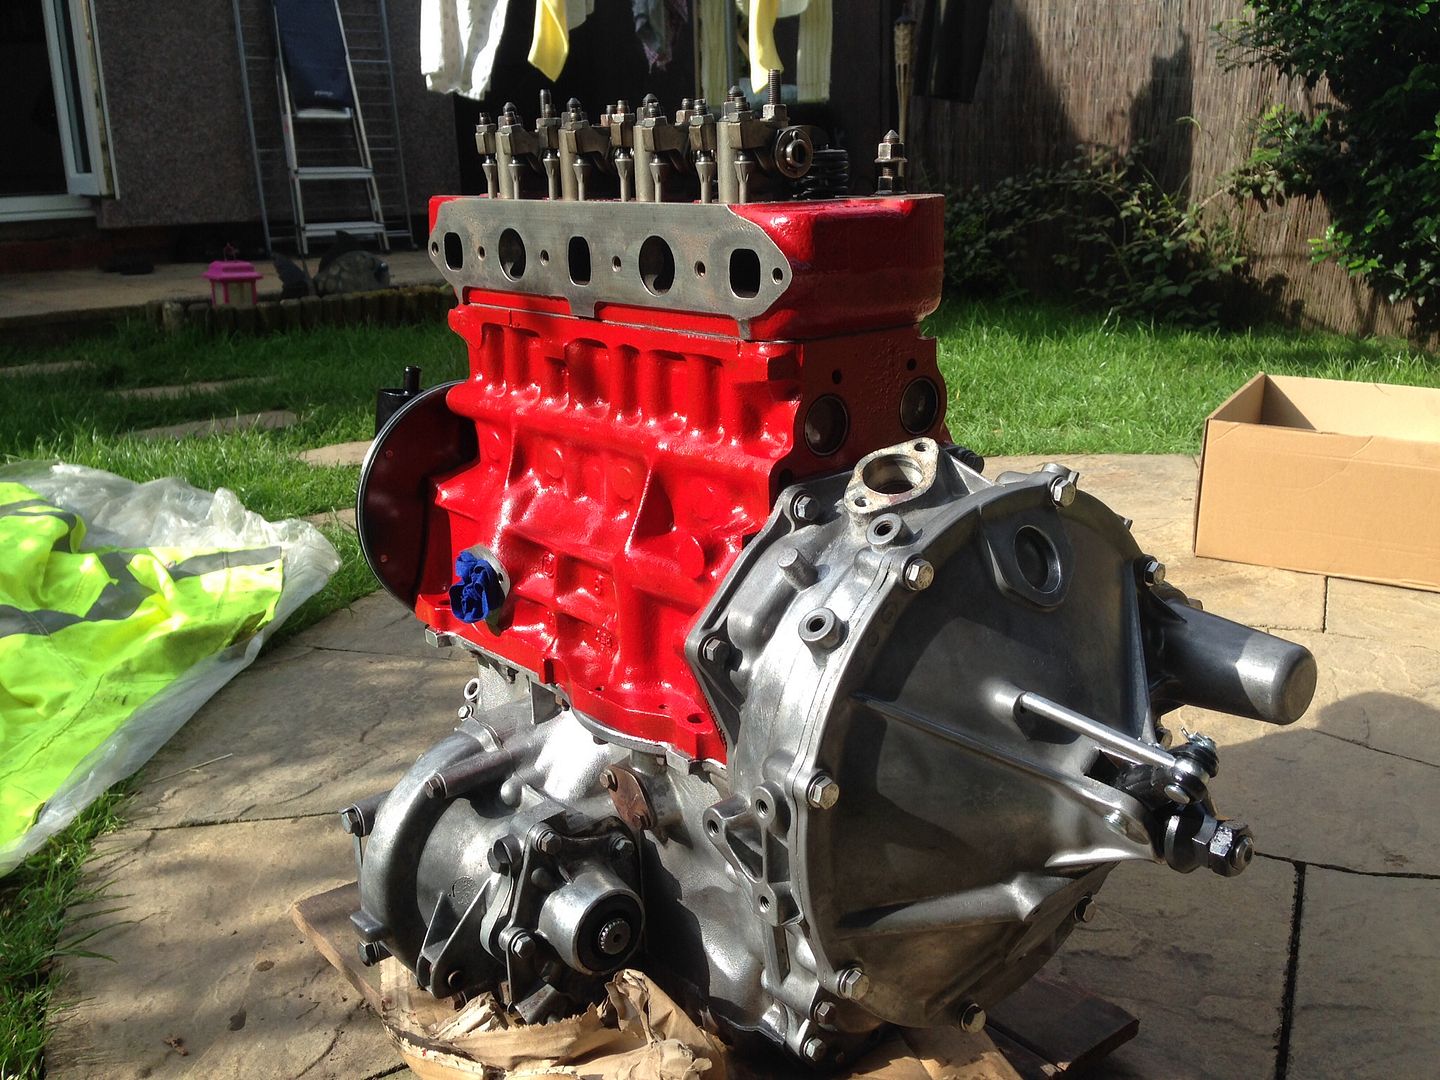
And I also touched up the block with some red paint where it was needed. Here's a few snaps of where I'm at now -

1dbeea836503d7ad6ed51e3b19b82cee_zpsa913

4afe012196ebc9d412dc10e47f34b91b_zpsc2ed

280df753757be290c9749a145373b499_zpsc5b1

139611475de9c9d856cf913bd2cd7a9d_zps666b

That's all i got done today, spent most of the day looking through the Haynes manual for torque settings !

I've also got a quick question, does anyone know what the torque setting for the timing cover bolts is. There's two settings in the Haynes manual (1/4 - 7nm & 5/8 - 16nm) and I don't know which I need. My bolts need a 3/8 socket to tighten them so are both of those settings above irrelative to me ? If so what do I need to torque them to, as I've currently torqued them to the higher 16nm, kind of confused about this so any help would be great !

#150 big-jay

big-jay

    Super Mini Mad

  • Members
  • PipPipPipPipPipPip
  • 518 posts
  • Location: Birmingham
  • Local Club: British Mini Club

Posted 21 June 2014 - 06:38 PM

Update,

Removed the drivers side toe board corner today, the rot is a fair bit worse then I expected it to be.

d31e604295e0b3a19a6ad99156cf7dff_zpsf3ba

As you can see from the picture, where I've removed the toe board lip it's completely rotted the flitch out. Looked fine from the outside, very deceiving.

View from the outside, the lower bulkhead is going to need a repair as it's also rotten

c8dbea7b0a4621e74b1ebc277362d3c6_zps81a2

I sat back and had a good look at it, and decided I just WAS NOT happy with the repairs that I've made. Me and my dad have put so much effort into rebuilding this car that I think it's only right that I do the repair properly. It probably wouldn't bother most, but it bothers me.

So I did this -

0da069aa839d616791059912685a7ffb_zps2f0a

Bit of a step back some may say, but I think that fitting the full Heritage panel, as I have done on the other side, is what this car deserves. I couldn't justify doing the other side so neatly and leaving this side 'patched up' so to say.

So I'll be sending back the half inner wing repair panel I bought from M-Machine, and I'll be ordering the full inner wing / flitch Heritage panel.

On a lighter note, had a little trip down to Minispares on Friday and picked up a few parts for my engine -

e7aec52956c8d3a80378be2a1dda5002_zps1caf

And a couple of bits from Smiffy Bits came through the post -

a7f0ac7e0f4d3e8a872b4bb46539976e_zps0422

That's all for today but I'll hopefully be getting the toe board corner repaired tomorrow.

Edited by big-jay, 27 June 2014 - 12:05 PM.


Also tagged with one or more of these keywords: roundnose

2 user(s) are reading this topic

0 members, 2 guests, 0 anonymous users