Wow that hood was bad! Turned out really good


My '72 998 Canadian Mini Rebuild
Started by
roughneckin
, Aug 29 2013 07:24 PM
51 replies to this topic
#47

roughneckin
-
- Noobies
-

- 109 posts
Mini Mad
- Location: Calgary
Posted 16 June 2020 - 09:57 PM
Wow that hood was bad! Turned out really good
It was like shining a turd! But I'll take it, I just won't tell anyone and they might not notice!
Did a little welding and cleanup of the underbody and just have to do a small cleanup around the rear subby and such and we will be either flipping it back over to finish the last inside bits or doing the underfloor liner...

#48
roughneckin
-
- Noobies
-
- 109 posts
Mini Mad
- Location: Calgary
Posted 21 June 2020 - 05:01 PM
Did some more work before flipping it over. Was considering doing the underseal and coating, but need to do a few other items that will probably involve some heat to the floor so determined that might be a bad idea. I'll flip it one more time right before the painting.
Forgot that I hadn't put in any closing panels on the rear valance, and as I hadn't ordered any determined I would just make them myself. Hell, it ain't going to be a show car just a little beauty so why not.
Measured the valance with some cardboard and started cutting it.

Cut the closing panel section and welded together the relief cuts

Got to use my new spot welder for the closing panel section, but dang does the piece ever need to be clean to spot weld it. Had to go over it a few times to make sure it was spotless on both sides.

Then put some casters on a solid pallet and flipped it back upright with a friend's help and replaced the front subframe to start on the front panels...and my wife hollaring at me to get out of the dang garage already.


Did a bit of side work and checked the GMC159 master cylinder, which seems to be already rebuilt, the clutch master which spits out fluid like a maniac and the inertia valve that has to go back in. cleaned up and gave them a spray.

Now to start on the front end and fit some companion boxes. Maybe clean up some very bad plug welds on the other side too. Man I was just in a hurry 6 years ago.
Edited by roughneckin, 21 June 2020 - 05:03 PM.
#49
roughneckin
-
- Noobies
-
- 109 posts
Mini Mad
- Location: Calgary
Posted 21 June 2020 - 10:01 PM
Snuck back into the garage on Father's Day...Bought front inner panels probably 6 years ago and they've been sitting around since then. Now time to try and fit them. Of course why not start with the wonderful removal of the top shock mounts...

Well that didn't go well, but pretty much as planned. Have had some interesting times with my spot weld cutting bit, but figured out if I do a small hole first it makes it a bit easier to guide it in otherwise it just goes all over.

and ripped off and sanded down...

Went a bit further and got it fairly clean before some primer. Now to fit the half portion of the new panel. Magnum part so a little bit of fiddle farting around but with the top mount holes to help line it up with it actually didn't take too long.

Heading out for some din-din in the backyard of an old kiwi friend of mine. Should be fun making fun of his Hurricanes loosing to my Crusaders last night!
Hope everyone had a great Father's day.
#50
roughneckin
-
- Noobies
-
- 109 posts
Mini Mad
- Location: Calgary
Posted 25 June 2020 - 05:19 PM
So pushed the old girl out from the wall today and attacked the other side of the inner wing. Having these inner wing pieces with the holes for the upper shock arm is nice, so much easier to line up, but as with the last one we had an issue with the rust, this one into the bulkhead.

Lots of sand from the sandblasting prep years ago found in the bulkhead...

Tacked in a new piece and moved on...

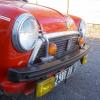
Then decided, lets fit the front end just to see...almost looks like a car my wife says!

As an extra, has anyone seen this AUSTIN emblem before? I looked it up all over and can't find when it was used. 2nd from the top.

Edited by roughneckin, 25 June 2020 - 05:22 PM.
#51
imack
-

- TMF+ Member
-
- 2,099 posts
Up Into Fourth
- Location: Orpington, Kent
Posted 25 June 2020 - 06:41 PM
Possibly early austin 1300 grille badge
Attached Files
-
 unnamed.jpg 50.79K
0 downloads
unnamed.jpg 50.79K
0 downloads
#52
roughneckin
-
- Noobies
-
- 109 posts
Mini Mad
- Location: Calgary
Posted 25 June 2020 - 07:00 PM
Possibly early austin 1300 grille badge
Very similar, if not bang on! Thanks


1 user(s) are reading this topic
0 members, 1 guests, 0 anonymous users


