Jump to content


Photo

Phoenix Estate Vvc K-Series Diy Subframe Conversion


  • Please log in to reply
212 replies to this topic

#166 Alburglar

Alburglar

    Das Pingu's

  • Members
  • PipPipPipPipPipPipPipPipPip
  • 3,331 posts
  • Location: Dover Kent
  • Local Club: Kentish Mini Club

Posted 17 October 2014 - 07:43 PM

A bit more progress with the inlet today. Can't quite call it a polish, but definately smoothed out the cast inlet internals.
2600C0B6-09D0-4B83-8DED-0BF52CB5D573_zps
FDD573F1-8C30-4AB5-972C-44113FF694AF_zps

#167 Alburglar

Alburglar

    Das Pingu's

  • Members
  • PipPipPipPipPipPipPipPipPip
  • 3,331 posts
  • Location: Dover Kent
  • Local Club: Kentish Mini Club

Posted 17 October 2014 - 07:45 PM

Then started on the jig.
FB7F8110-86CF-4476-89EF-A9D260C3417F_zps
E875E5B2-205F-40C8-B7E5-4473B6BCBBA8_zps
Then added some bracing to the jig.
984EEE9A-33E5-4714-8BFA-6DD83697D436_zps

#168 Alburglar

Alburglar

    Das Pingu's

  • Members
  • PipPipPipPipPipPipPipPipPip
  • 3,331 posts
  • Location: Dover Kent
  • Local Club: Kentish Mini Club

Posted 17 October 2014 - 07:48 PM

and ended up with this
8CC11BCB-5826-4637-9F84-8C65479AD665_zps
With tube ends flattened out (using a press) and holes drilled.
7E7CA722-0515-41B7-8AAC-16D4D4E930F5_zps
...just got to cut them to size. Which is gonna be trickier than it sounds.

Edited by Alburglar, 17 October 2014 - 07:53 PM.


#169 mayoturbo

mayoturbo

    Mini Mad

  • Noobies
  • PipPipPipPip
  • 128 posts

Posted 26 October 2014 - 08:20 PM

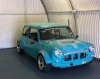
I like the idea of this. Plastic mini with a modern engine  :proud:


Edited by mayoturbo, 26 October 2014 - 08:20 PM.


#170 Alburglar

Alburglar

    Das Pingu's

  • Members
  • PipPipPipPipPipPipPipPipPip
  • 3,331 posts
  • Location: Dover Kent
  • Local Club: Kentish Mini Club

Posted 05 November 2014 - 10:54 PM

Well I made the first two pipes for the inlet and the slash cut required increases the width far more than I anticipated and leaves next to no space for welding.
CC722517-5B38-492D-8BE4-E3A196EF80B2_zps
I could sort it out with lots of time but I do believe it will actually be less work to tilt the engine and go with standard inlet.
So I've started to make some of the parts. I made up a lower arm to weld in this position, then I can cut away the one that wIll foul the engine in the new position.
70D04CE0-FC48-4EC0-BB67-9ED9ACED46D6_zps
...and then started on the plates required to move this mount.
87489DE8-3971-4FA9-92FA-D7D8062878D9_zps

#171 Alburglar

Alburglar

    Das Pingu's

  • Members
  • PipPipPipPipPipPipPipPipPip
  • 3,331 posts
  • Location: Dover Kent
  • Local Club: Kentish Mini Club

Posted 29 January 2015 - 07:13 PM

I had an afternoon at the workshop today for the first time in months.
I put some new ball joints on my mini hubs.
I got my new lower arm tacked in and cut a slot in the old one ready to tip the engine forward.
EDBED739-94F0-43F0-9F73-C863FE2CB2D2_zps
I have cut off the front of the engine mount ready for its be position too.
2C925929-E948-4E5A-A779-FE7D14F33295_zps
I just need another afternoon up there for more progress...

#172 Alburglar

Alburglar

    Das Pingu's

  • Members
  • PipPipPipPipPipPipPipPipPip
  • 3,331 posts
  • Location: Dover Kent
  • Local Club: Kentish Mini Club

Posted 12 May 2015 - 05:57 PM

Moved house, so haven't been up the workshop for a while, but made some progress today.
I got the offside engine mount in
46562A54-F0A8-4D5B-9BF5-24A1DD39BEAF_zps
And the engine is in its final position with inlet on and everything else checked for clearance.
25E7CF67-578F-4198-A1BC-46199243AD63_zps
4CDDFC89-55B3-4425-9190-5FA3C8F8AE3D_zps
Although alternator clearance and oil filter takeoff is going to be very tricky.

Edited by Alburglar, 12 May 2015 - 05:59 PM.


#173 Alburglar

Alburglar

    Das Pingu's

  • Members
  • PipPipPipPipPipPipPipPipPip
  • 3,331 posts
  • Location: Dover Kent
  • Local Club: Kentish Mini Club

Posted 12 May 2015 - 06:05 PM

Nearside mount is ready to be welded together again, then will need to redrill the hole for the mount in its new position.
F1843B77-CCB7-4207-AE05-1E3B170C6F00_zps
The driveshaft is touching the frame, but there is very little room to play with as the tie bar only just clears the gear box when hub is in its upmost position. If I cant tweak the engine position to to clear everything I'll make the drive shaft hole in the frame bigger.
C1D508B1-A5FE-4644-95AB-FAD3040B477E_zps

#174 Alburglar

Alburglar

    Das Pingu's

  • Members
  • PipPipPipPipPipPipPipPipPip
  • 3,331 posts
  • Location: Dover Kent
  • Local Club: Kentish Mini Club

Posted 14 May 2015 - 05:42 PM

I got the gearbox mount all tacked together.
71FE2DB5-5AE7-42BE-857E-EE2AA4BBCFC5_zps
I will definately need to make the driveshaft hole bigger on that side.

The oil filter take-off will have to be a thin plate with two flared pipes coming out of it, but the frame will still need some mods here.
E1A42B79-169B-4543-83D7-DD0F8F2DE882_zps

#175 Alburglar

Alburglar

    Das Pingu's

  • Members
  • PipPipPipPipPipPipPipPipPip
  • 3,331 posts
  • Location: Dover Kent
  • Local Club: Kentish Mini Club

Posted 20 May 2015 - 06:48 PM

With the front end on (not fully in position, probably 5-8mm off being pushed backed far enough) you can get a good idea of how much space I've got for the alternator.
9D4726E5-FC33-4612-A584-C76B1D84A064_zps

#176 Alburglar

Alburglar

    Das Pingu's

  • Members
  • PipPipPipPipPipPipPipPipPip
  • 3,331 posts
  • Location: Dover Kent
  • Local Club: Kentish Mini Club

Posted 20 May 2015 - 06:50 PM

...and this is, was, how much space I had for an oil filter take off.
17F992CA-0967-40D6-8A1A-D610DCBC2CEB_zps
2913FF72-C4CB-4F32-8DEC-FE9D7F79751F_zps

Edited by Alburglar, 21 May 2015 - 08:42 AM.


#177 Alburglar

Alburglar

    Das Pingu's

  • Members
  • PipPipPipPipPipPipPipPipPip
  • 3,331 posts
  • Location: Dover Kent
  • Local Club: Kentish Mini Club

Posted 20 May 2015 - 06:55 PM

So I had to make some space. And cut a big chunk out here:
588394E5-03AE-4302-BDD4-F198F07861AE_zps
And triangulated it here, to add some strength back.
8D25358B-7ED6-47F0-857F-2BEDB7A94F24_zps
(Just realised I forgot to weld it in the top right corner)

Edited by Alburglar, 20 May 2015 - 07:09 PM.


#178 Alburglar

Alburglar

    Das Pingu's

  • Members
  • PipPipPipPipPipPipPipPipPip
  • 3,331 posts
  • Location: Dover Kent
  • Local Club: Kentish Mini Club

Posted 20 May 2015 - 07:00 PM

The engine is much further over now so I don't need the notch I cut for clearance, so I'm gonna sort that out and get rid of the the second bar I tacked in.
441A28A5-43A1-4272-9E42-42D1C57801DC_zps

#179 Alburglar

Alburglar

    Das Pingu's

  • Members
  • PipPipPipPipPipPipPipPipPip
  • 3,331 posts
  • Location: Dover Kent
  • Local Club: Kentish Mini Club

Posted 20 May 2015 - 07:05 PM

Note to self:
I need to cut out here to clear the n/s drive shaft.
40EF28A8-87EA-4801-A823-F5E527DC3180_zps
And here on the nearside, because the o/s shaft touches when the suspension is fully down.
E38DF984-C111-48E5-9EF2-30FBB783F25D_zps

#180 Alburglar

Alburglar

    Das Pingu's

  • Members
  • PipPipPipPipPipPipPipPipPip
  • 3,331 posts
  • Location: Dover Kent
  • Local Club: Kentish Mini Club

Posted 20 May 2015 - 07:07 PM

I'm going to triangulate here too, for a bit more strength.
DBD62CF7-E6E3-4EB6-815F-F091A1E3C7ED_zps


2 user(s) are reading this topic

0 members, 2 guests, 0 anonymous users