Jump to content


Photo
- - - - -

Complete Rebuild Of A 1982 City Shell


  • Please log in to reply
65 replies to this topic

#16 HarrysMini

HarrysMini

    I do not have short legs!!!

  • Members
  • PipPipPipPipPipPipPipPipPip
  • 3,352 posts
  • Location: .

Posted 13 June 2013 - 03:10 PM

Thanks guys. Joe, I will be receiving an angle grinder early next week.

I had another go at welding as I thought sitting on my arse reading project threads isn't going to improve my welding!

I turned the gas down a notch, from 5 to 4 and went a lot more slowly this time. I also wire brushed the metal to clean some of the paint and rust off.


null_zps85a5ceec.jpg


I also managed to weld the metal to the vice I was using to hold the metal  :shy:

null_zps9d1e2291.jpg


Am I doing the right thing, is it getting any better? I have to bear in mind that this is very thick metal compared to the panels on a Mini so this should be easy in comparison.


#17 BenH

BenH

    One Carb Or Two?

  • Members
  • PipPipPipPipPipPipPip
  • 742 posts
  • Local Club: CV1 Minis

Posted 13 June 2013 - 03:47 PM

The metal your welding still looks too dirty/pitted, but much better than before, i use the grinder to tidy up the metal before welding, also whats your earth connection like? also needs to be on a clean bit of metal, I cut the clamp off my welder, then got a small length of copper pipe and hammered it flat over the earth wire then i clamp the flat pipe to whatevers being welded. Also are you using an auto darkening mask? £20 off ebay, the ones that stay dark are a nightmare to see through!


Youre getting better though, think youll see an improvement on cleaner metal, i taught myself too and followed peoples advice.


Good project, lots to do but youll do fine:)


Ben


#18 alex-95

alex-95

    I am THE CLAMP MAKER

  • TMF+ Member
  • PipPipPipPipPipPipPipPipPipPip
  • 6,019 posts
  • Location: l

Posted 13 June 2013 - 04:34 PM

Have a look at this, http://www.mig-weldi...uk/tutorial.htm and also the butt welding link. Try welding the clean metal where the box section has been cut. To me it look's like it need's to be on a higher setting. What sort of mask have you got?  How are you holding the torch (angle) and are you hands being surpported on anything or mid air?


#19 sonikk4

sonikk4

    Twisted Paint Polisher!!!

  • Admin
  • PipPipPipPipPipPipPipPipPipPipPip
  • 15,971 posts
  • Name: Neil
  • Location: Oxfordshire

Posted 13 June 2013 - 04:44 PM

You really need clean shiny metal otherwise it will spit and splatter.


Rather than trying to seam weld straight away do a series of tack welds one inch apart. The overlap each tack with another tack and you should end up with something like this

Its the weld in the top of the picture

IMG_1118.jpg


and the penetration of the weld shows at the bottom of the picture.

IMG_1119.jpg


Have a look at the whole thread as this will give you an idea for tools, clamps and welding tips.

http://www.theminifo...se-for-welding/


Edited by sonikk4, 13 June 2013 - 04:49 PM.


#20 HarrysMini

HarrysMini

    I do not have short legs!!!

  • Members
  • PipPipPipPipPipPipPipPipPip
  • 3,352 posts
  • Location: .

Posted 13 June 2013 - 08:09 PM

Thanks for all the tips on welding guys. I haven't yet got an auto dimming mask but it is on my list of things to get. I will try and buy some clean shiny metal to do some proper practice on. 

Here are some pictures of some more practice I did on the same bit of metal 

null_zpsc447a2c0.jpg

null_zps4b82e337.jpg


(one on the left)

null_zps70536683.jpg


Moving on from welding, I tried test fitting the inner wing I bought at Beaulieu and I can't get it to fit at all, it looks like it's come out of a completely different car.

null_zps37319080.jpg

this is the wing, does anybody have any ideas as to why it might not fit?


In other news, I have almost completely got the soundproofing off, just got the rest of the rear seat to do. I will use a wire brush and some gunk to remove the residue.

null_zps90003e9f.jpg


The front floorpan had a massive puddle in it so I drilled some holes to allow water to drain out. Eventually, I will weld in a plate to cover all the drain holes as they wont be needed.

null_zpscbc50501.jpg

null_zps3055113c.jpg


I also managed to get some pictures of the ground off seams I was saying about earlier in the thread. I am going to build two new seams using two pieces of .9mm angled steel up against each other. However, I'm not even going to attempt the seams until I am a bit more practised with the welder after I've done sills and floorpans etc.

null_zpsfdaf35ed.jpg

null_zps5b7d557f.jpg


Sorry for all the updates but I'm using this thread for my own records as well as to (hopefully) help and inspire others so I want to make sure it is very detailed.


Thanks for reading this far.


Edited by HarrysMini, 13 June 2013 - 08:10 PM.


#21 Petrol

Petrol

    One Carb Or Two?

  • Members
  • PipPipPipPipPipPipPip
  • 967 posts

Posted 13 June 2013 - 10:21 PM

I also managed to get some pictures of the ground off seams I was saying about earlier in the thread. I am going to build two new seams using two pieces of .9mm angled steel up against each other. However, I'm not even going to attempt the seams until I am a bit more practised with the welder after I've done sills and floorpans etc.


My advice would be to cut out as little as possible to repair the shell otherwise you will run into problems later down the line. It's best to repair one area at a time. I have limited welding skills but from what I have seen you could do turn the current up as the penetration seems poor. Looks to me like you are blobing it on which is what I did at first. I found vids on youtube helpful.


#22 HarrysMini

HarrysMini

    I do not have short legs!!!

  • Members
  • PipPipPipPipPipPipPipPipPip
  • 3,352 posts
  • Location: .

Posted 14 June 2013 - 08:02 PM

Thanks for the advice Petrol.


Update


I removed the n/s over sill today as I managed to get an angle grinder. It revealed lots of rot and I have decided that I will replace both the inner and outer sills.

As I wanted to have the inner sill as one whole section rather than lots of patches, I cut the inner sill section off the floorpan.

null_zpsb19813d3.jpg


The bottom of the bulkhead where it meets the inner wing is very corroded so I'm going to chop that off and use the section in the floorpan to replace it. I will be replacing both inner wings as the shock mounts are rotten through and toward the bottom they are corroded so they're not worth saving. Also, the passenger's side one has been patched and there looks to be about 4 layers of metal on one particular area.

null_zps0bec8b3a.jpg


In this photo you can see how the floorpan will patch the corroded section in the bulkhead

null_zpsbd2cfdf0.jpg


On the driver's side, the floorpan has been welded over the top of existing corrosion so that will be cut out, trimmed and welded back in place. I will also replace both sills on that side as the inner sill is currently just lots of patches. 


I have also finally finished removing the bitumen sound proofing from the floor and rear seat, here is a picture of it wire brushed and, once the sills and floorpans are fixed, ready for some primer.

null_zps9a697352.jpg

While on the subject of paint, what would you say is the best way to paint all the metal? Red Oxide, Primer, then top coat? For the bits that won't necessarily be seen, I was going to use Hammerite for the top coat. Using the hammered finish and WaxOyl for the bottom of the car. What are your thoughts?


Oh yes, I also did a bit more welding practice, this time on thinner cleaner metal.

null_zps5065fc2e.jpg

It's still rubbish, I know, but I would like to think I am getting better. With the addition of an auto dimming mask, I hope that it will be easier to place the torch in the right place, as at the moment, I seem to keep welding in the wrong place.


Thanks for reading everyone, and please keep posting your comments!


Edited by HarrysMini, 14 June 2013 - 08:05 PM.


#23 alex-95

alex-95

    I am THE CLAMP MAKER

  • TMF+ Member
  • PipPipPipPipPipPipPipPipPipPip
  • 6,019 posts
  • Location: l

Posted 14 June 2013 - 08:12 PM

That welding look's alot better, keep practicing. I would put some bracing in before you cut anymore of the floor area out to.

When you say  "the floorpan will patch the corroded section in the bulkhead" Does that mean you are going to cut the bulkhead rust out then weld the floor to make it one peice? If so you can't do that, you'll need some 1.2mm sheet metal to cut out a new peice and weld it on to the toeboard(bulkhead) then  spot weld/plug weld the floor pan top of that.


Have a look at what i done on the Ritz for the floor pan and toeboard.  http://www.theminifo...z-part-2/page-5


Edited by alex-95, 14 June 2013 - 08:19 PM.


#24 sonikk4

sonikk4

    Twisted Paint Polisher!!!

  • Admin
  • PipPipPipPipPipPipPipPipPipPipPip
  • 15,971 posts
  • Name: Neil
  • Location: Oxfordshire

Posted 14 June 2013 - 08:14 PM

That inner wing is very very poor and personally i would not waste my time with it. 

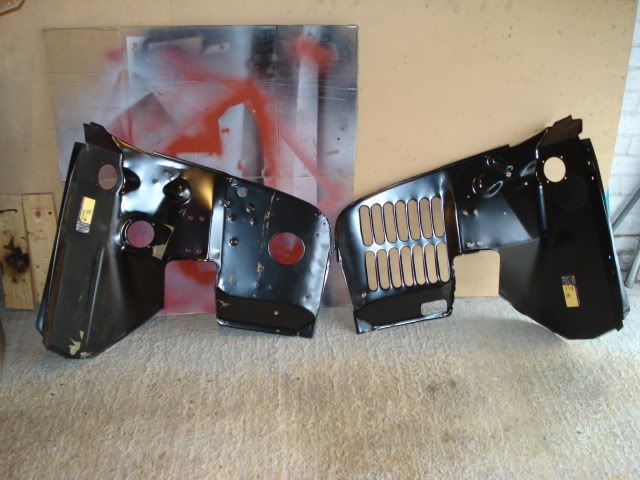
This is what heritage inners look like

DSC02701.jpg


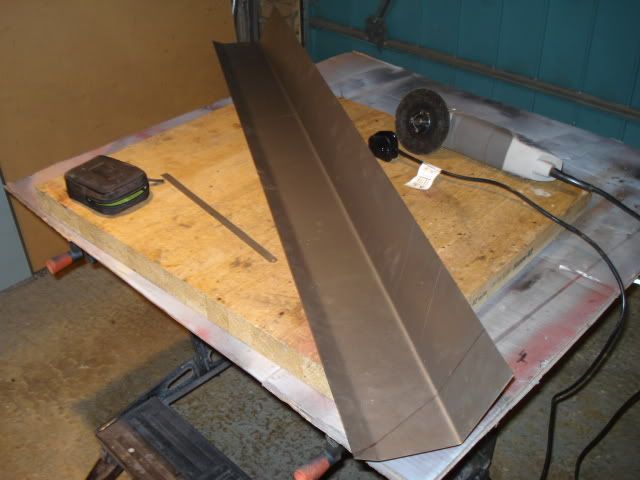
The inner sill section you have cut off the floor pan is not really suitable for what you need. The rust looks as if it has gone past the crossmember so you will need a longer section. Something like this i fabricated myself

DSC03313.jpg


#25 sonikk4

sonikk4

    Twisted Paint Polisher!!!

  • Admin
  • PipPipPipPipPipPipPipPipPipPipPip
  • 15,971 posts
  • Name: Neil
  • Location: Oxfordshire

Posted 14 June 2013 - 08:20 PM

Are you welding one handed at the moment?? if so try it two handed as this will help to steady your grip on the torch and will also enable you to keep your line straighter


#26 Shifty

Shifty

    Sponsored by Fosters (tm)

  • Admin
  • PipPipPipPipPipPipPipPipPipPipPip
  • 13,135 posts
  • Name: Sean
  • Location: Shropshire(sunny)
  • Local Club: TMF

Posted 14 June 2013 - 08:34 PM

I hate to be ' that guy' but...


To be honest mate I wouldn't bother with that shell, the deseaming is awful and repairing that would be a nightmare.  


Its not really a project for a beginner, by all means use it as practise shell but I wouldn't put any money in it.


I'd save your money and get a better starting point.


#27 HarrysMini

HarrysMini

    I do not have short legs!!!

  • Members
  • PipPipPipPipPipPipPipPipPip
  • 3,352 posts
  • Location: .

Posted 14 June 2013 - 08:35 PM

That welding look's alot better, keep practicing. I would put some bracing in before you cut anymore of the floor area out to.

When you say  "the floorpan will patch the corroded section in the bulkhead" Does that mean you are going to cut the bulkhead rust out then weld the floor to make it one peice? If so you can't do that, you'll need some 1.2mm sheet metal to cut out a new peice and weld it on to the toeboard(bulkhead) then  spot weld/plug weld the floor pan top of that.


Have a look at what i done on the Ritz for the floor pan and toeboard.  http://www.theminifo...z-part-2/page-5

Thanks for the heads up, that was exactly what I was going to do.


That inner wing is very very poor and personally i would not waste my time with it. 

This is what heritage inners look like


The inner sill section you have cut off the floor pan is not really suitable for what you need. The rust looks as if it has gone past the crossmember so you will need a longer section. Something like this i fabricated myself


I bought the inner wing at an autojumble and it is very poor, it's probably my fault for not doing enough research before I bought it. I wasn't planning on using that section I cut off, I was going to buy a whole inner sill section for both sides, would that be okay? Yes I am welding one handed at the moment as I currently only have the mask that you have to hold.


#28 HarrysMini

HarrysMini

    I do not have short legs!!!

  • Members
  • PipPipPipPipPipPipPipPipPip
  • 3,352 posts
  • Location: .

Posted 14 June 2013 - 08:54 PM

I hate to be ' that guy' but...


To be honest mate I wouldn't bother with that shell, the deseaming is awful and repairing that would be a nightmare.  


Its not really a project for a beginner, by all means use it as practise shell but I wouldn't put any money in it.


I'd save your money and get a better starting point.

Well that isn't what I wanted to hear. 


This is what I was going to do about the seams 


You could make one from two thicknesses of 0.9mm sheet, shaped like the original. The curve could be accomodated by making it in short lenghts and welding them together.


If you think it would be too much work, do you think a body shop would be able to fix them? How much do you think they would charge?


#29 sonikk4

sonikk4

    Twisted Paint Polisher!!!

  • Admin
  • PipPipPipPipPipPipPipPipPipPipPip
  • 15,971 posts
  • Name: Neil
  • Location: Oxfordshire

Posted 14 June 2013 - 09:03 PM

Yikes!!! too much money. I think Shifty has hit the nail on the head here. Those seams to do right would be a real pain for an experienced welder but for a newbie to get right, to look right and most of all to be safe will be an incredibly difficult task. So a bodyshop will ask a silly amount of money i think. It would be better to deseam it properly as this would be easier to do but to do it right will still be a huge task.


Now its not to say it cannot be done as anything can be done with enough time and money lavished on it. However unless the car is an early Cooper then it will not be worth it. Ideal for honing your welding skills, yes but to try and get it to a safe roadworthy standard will be a major uphill struggle.


#30 Shifty

Shifty

    Sponsored by Fosters (tm)

  • Admin
  • PipPipPipPipPipPipPipPipPipPipPip
  • 13,135 posts
  • Name: Sean
  • Location: Shropshire(sunny)
  • Local Club: TMF

Posted 14 June 2013 - 09:03 PM

Its just not really worth doing, the 2 seams hold the car together and need to be right, if they distort or move(or have already) then you'll have a twisted car.


Paying someone else to do it would cost way more than the shell is worth.


I wouldn't be happy driving that car around once its been repaired and to be honest its not something I'd consider undertaking.


I've considered 'un-deseaming' cars before but I would have used the full front windscreen surounds and rear panels.


Its a lot of work and needs to be done properly.


Unless you have a strong emotional attachment to the shell I'd scrap it/sell it  and find another one.


3 user(s) are reading this topic

0 members, 3 guests, 0 anonymous users