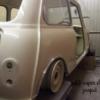
Austin Mini Mk1 Super Deluxe Restoration
#316

Posted 10 October 2013 - 06:33 PM
#317

Posted 10 October 2013 - 06:36 PM
very good job there mate .
i forgot to ask my mate out the shot blasting today but will see him on monday so texted me 1st thing plzs as i may forget again lol.
#318

Posted 10 October 2013 - 06:39 PM
ile see you sunday hopefully if not ile text you monday and thanks its getting there just need to make sure its in the right place so i can get my door step in but i am stuck now as i dont no what to do now i was thinking inner a panel and outer and get the door hung and get the door step in place and then fully weld everything? how would you go about it? anyone?
#319

Posted 10 October 2013 - 06:40 PM
Taking shape looks good mate, how's the foot ?
hi steve thanks mate it sure is im just stuck on ehat to do next to make sure its al in line any ideas?? thanks tom
#320

Posted 10 October 2013 - 06:45 PM
my foot is still sore i put on 5 pairs of socks to comfy it abit more but still hurts when all my weight goes on it so i have been walking all day with my foot tilted to the right but when i got to the garage i totally forgot about it as i was more interested in the panels lol cheers tom
#321

Posted 10 October 2013 - 06:47 PM
wish i would make such good progress :)
looking good i must say, isn`t it possible to panelbeat the lip a bit more straight so the gap closes a bit ?
freaker
#322

Posted 10 October 2013 - 06:51 PM
tryed nocking it out and its abit to far away so the only thing i can think of doing is knocking it inwards after i have tacked it in place what you reckon?
#323

Posted 10 October 2013 - 06:52 PM
with out seeing it its hard for me to say sorry
#324

Posted 10 October 2013 - 07:07 PM
Taking shape looks good mate, how's the foot ?
hi steve thanks mate it sure is im just stuck on ehat to do next to make sure its al in line any ideas?? thanks tom
No worries mate, i've not got a clue sorry mate
#325

Posted 10 October 2013 - 07:25 PM
Every time I think about how i am going to line mine up, problem is its a bit like that song ' the knee bones connected to leg bone, the leg bones connected to the hip bone, .............( hope thats not stuck in your head now lol).
To get a good fit, its always best from experience so far, to always consider the next panel to be fitted , and even the one after that. Problem with that is you need all your panels in one go, and that's too expensive in one go!
I find a lot of measuring helps to show up if there are any discrepancies, as I believe most sides should be symmetrical to each other, if that makes sense. What condition is your bonnet in? As you now have the inner wings, perhaps you could use that to ensure your inner wings sit correct in relation to each other, and then measure to see if they are sitting parallel and square to the bulk head and toe board. Perhaps if you are then happy with where they sit, then fit the rest to that. But that's just a logical approach I guess, and as I'm a mini noob , may not be the best way, but any help is good I guess?
Looking good though! I've got my flinch inner wing panels , but not fitted them yet. I'm super jealous especially as your have the reinforcing plate on and mine don't .. Thats gonna be a job I gotta do, make a set, a guess them, unless I can find a very nice person to provide a few measurements of it for me.
#326

Posted 10 October 2013 - 07:36 PM
lol thanks mate i pritty much have all the panels to mount the door now just need to make sure they are all bang on in line and tack them in place and fully weld once i am happy with everything. that is a good idea with the bonnet but i dont have a scuttle fitted and i dont have the new bonnet as yet my old one it rotted as you could imagine. the sandwich plates are pritty easy to make after asking on here and getting a few ruff photos take a look back at page 16 i think and you can see how i made mine. i wonder why yours havent got them fitted did you order from m machine? i can get you the measurements if you cant make them exact just message me ile do it. thanks tom
#327

Posted 10 October 2013 - 07:47 PM
Tom, Next step bud is to get the A-panels fitted which you start by lining up the inner A-panel in those flitch grooves which will match your A-panel inner grooves (two parts were the hinge mounting holes are re-enforced)
Now to do the first bit you need to start doing every other bit, so you'll need to put the door furniture in i.e. the door buffer and striker plate plus lock mech..
Once there in place the door can then be mounted onto the B-post and the hinges bolted up with the door and inner and outer A-panels as one assembly, this ensures you wont get any un even lines anywere and everything will line up correctly as you can keep an eye on all the gaps around the door frame.
Now everythings mocked up and mated in place you can begin by welding in the inner A-panel, prior to mocking all of this up you must drill holes to plug weld the inner A-panel lip on, simply seam welding around isn't enough so drill those holes ;)
After you,ve plug welded the inner A-panel in you can now focus on the doorstep alignment, this will be tricky as you'll have to keep the door closed for perfect gapping, i suppose if you don't mind you could drill the spot welds out of the door pocket for better access but up to you, lots of fitting and removing of the doorstep panel will be needed as you'll be trimming it back, marking it, trimming some more and finaly tack weld in place.
Once you,ve tack welded the doorstep panel in place remove the door IMPORTANT: Remember to un-do the door hinge bolts and lock whilst the door is closed and remove straight out with the help of someone to make it a little easyer, by doing this you can ensure that your inner A-panel won't have been disturbed and the doorstep won't have broke free or moved either, this is the thing you have to be careful with on external hinged mini as the A-panel takes alot of stress.
Seam weld the doorstep in but take your time accounting for warpage and the grind flush, prime and paint then re-fit the door and then start working on th outer A-panel and DON'T FORGET!! to prime and paint well in-between the A-panels T, i'm sure you don't want to be re-restoring it shortly after painting it so cover all bare metal surfaces and make sure you remove all the black coting on panels you buy, thinners and a rag are the best method for removing it in prep for some etch primer.
Cliff
#328

Posted 10 October 2013 - 08:04 PM
cheers cliff so if i drill holes in the inner a panel and tack it in place from the back then once thats done i can clean my hinges up and put the new door skin on? and mount the door and then start on the door step? once thats tacked in place weld everything up solid?? also what can i do with the excess metal that is at the top of the inner wing where the window bends at the bottom cut it off? and there is a gap from the inner wing and the bulkhead tap it in with a hammer? pictures are on last page. cheers pal ![]()
#329

Posted 10 October 2013 - 08:13 PM
No!!!! Don't put the Inner A-panel on yet!
First you need to sort your door out and get it solid with the new skin ON!
When you're doing your new skin get the skina and door flange that the skin wraps around completly cleaned up of rust and the black panel E-coating, once there cleaned up and you're ready to fold the lip of the new doorskin around spray as much Zinc primer on the surfaces that meet and fold over in place, and then spray some more over that!
Now the doors solid you can do the above i posted lastly and plug weld the inner A-panel on, theres no way of short cutting to working on the shell till this doors done, not unless you want alignment issues!
Also the inner switch panel i see you,ve got clamped to the A-post stiffener should be tacked in at the right place, im yet to figure oout exactly were as reference points for this panel placement are few and far between.
#330

Posted 10 October 2013 - 08:17 PM
lol thanks mate i pritty much have all the panels to mount the door now just need to make sure they are all bang on in line and tack them in place and fully weld once i am happy with everything. that is a good idea with the bonnet but i dont have a scuttle fitted and i dont have the new bonnet as yet my old one it rotted as you could imagine. the sandwich plates are pritty easy to make after asking on here and getting a few ruff photos take a look back at page 16 i think and you can see how i made mine. i wonder why yours havent got them fitted did you order from m machine? i can get you the measurements if you cant make them exact just message me ile do it. thanks tom
I got heritage ones, and they literally are just a single sheet pressing, nothing like them damn sexy ones you have got from m machine. Wish I had got m machine ones now as they look great! Funny thing is I have used m machine before, as they had to do my floor pans for me as they were the one piece no outer sill ones, and what they sent were very good quality .
Its so handy your doing this section now Tom, as it is my next step when I finally turn mine the right way round:-)
Have you bought your inner and outer a panels yet Tom? If so, are they m machine also?
1 user(s) are reading this topic
0 members, 1 guests, 0 anonymous users


