Hi, Im about to attempt to change the verto clutch on my engine(99HB81P136045), the engine(998 A+) is out of the car, on a pallet on the garage floor, the bellhousing cover is off, i have a nice fitting socket on the crank bolt,and ive got a flywheel puller,basically i need an idiots guide to changing this clutch, ive done old ford clutches(escorts/cortinas) but am new to minis, so any advice/tips gratefully recieved. Martin.

Verto Clutch Removal ?
Started by
bikenutmart
, Apr 12 2013 04:28 PM
15 replies to this topic
#1

bikenutmart
-
- Members
-

- 579 posts
Super Mini Mad
- Location: Bierton Bucks
Posted 12 April 2013 - 04:28 PM
#2
mini13
-
- Members
-
- 3,810 posts
Up Into Fourth
Posted 12 April 2013 - 04:52 PM
right, get that big bolt out, it will be TIGHT and you'll need to lock the engine well to get it undone with something wedged in the ring gear. or a bolt wound through one of the clutch slave cylinder mounting holes so it locks int said ring gear.
once the bolts out remove the keyed washer below (some people miss this)
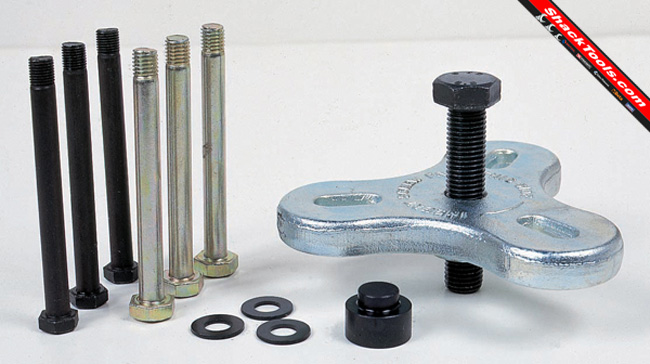
put the fly wheel puller on (which should look something like the one in the link below) I think you need the silvery/gold coloured bolts with the coarser thread for the verto flywheel ( they should screw in by hand, if not try the other ones) they should go in a good 8-10 turns
make sure you use the black metal block, this sits against the crankshaft, if you leave this out the big puller bolt can go up the crank bolt hole and knacker the thread. turn the engine over a couple of times to check the flywheel is aligned, you want all three outer bolts the same lenght so they pull evenly.
do up the centre puller bolt tight, again you'll need to lock the flywheel, give it a good heave, leave a few mins and heave again and hopfully it will pop off. some can be VERY stubborn though,
http://www.comparest...mini--metro.jpg
once the bolts out remove the keyed washer below (some people miss this)
put the fly wheel puller on (which should look something like the one in the link below) I think you need the silvery/gold coloured bolts with the coarser thread for the verto flywheel ( they should screw in by hand, if not try the other ones) they should go in a good 8-10 turns
make sure you use the black metal block, this sits against the crankshaft, if you leave this out the big puller bolt can go up the crank bolt hole and knacker the thread. turn the engine over a couple of times to check the flywheel is aligned, you want all three outer bolts the same lenght so they pull evenly.
do up the centre puller bolt tight, again you'll need to lock the flywheel, give it a good heave, leave a few mins and heave again and hopfully it will pop off. some can be VERY stubborn though,
http://www.comparest...mini--metro.jpg
#3
xrocketengineer
-

- Members
-
- 1,637 posts
Rocket Man
- Location: Florida, USA
Posted 12 April 2013 - 05:17 PM
I have only done it once and I felt very lucky it went well. This is the locking tool I used for the flywheel that worked nicely.
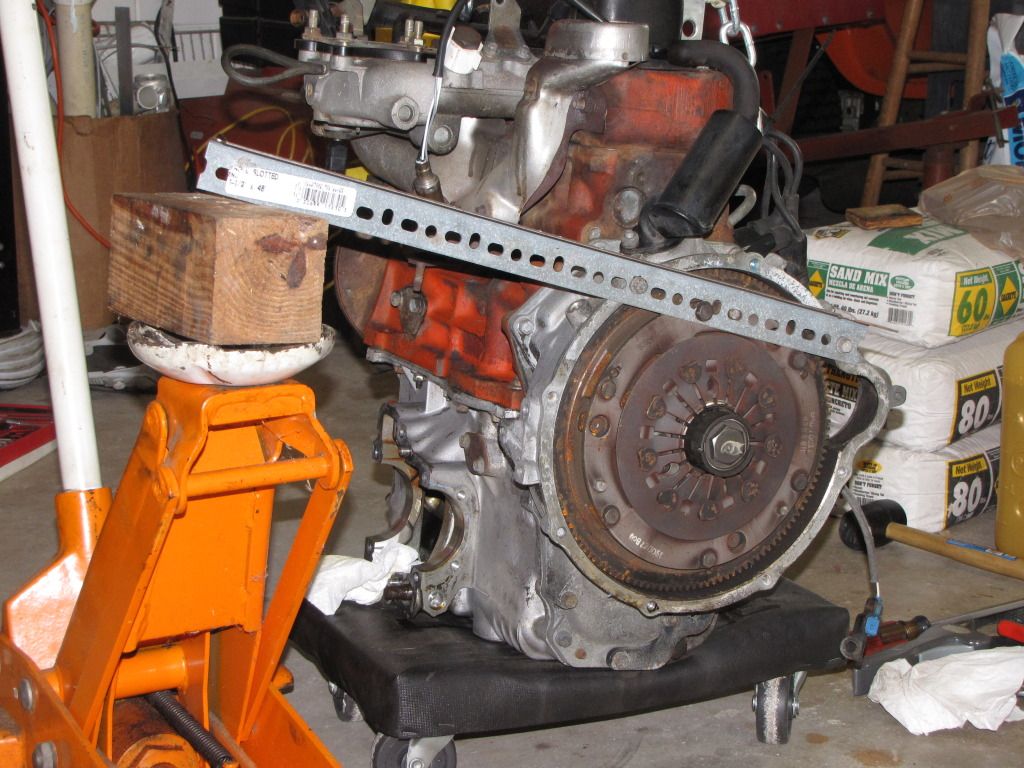
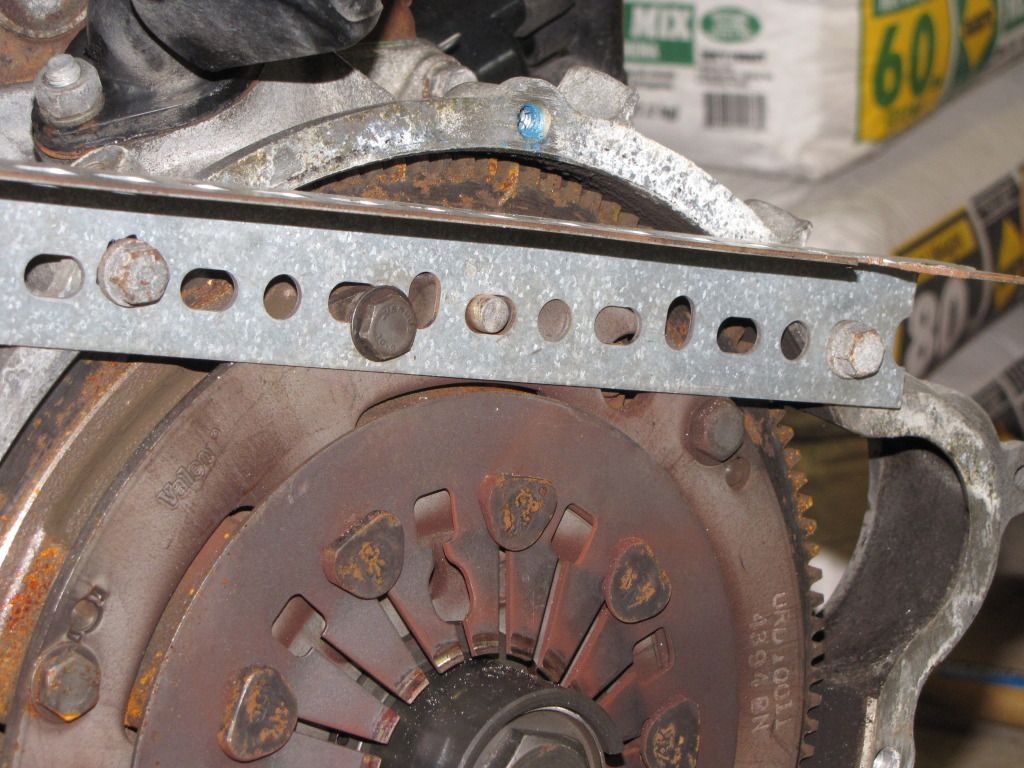
You need the slots for the nut locking tabs to be horizontal to prevent dropping the "C" shaped washer that would make the removal impossible. Lock the flywheel and bend back (if possible) the lock tabs and then remove the nut. With my setup it came out easily. Next I used some penetrating oil (not WD40) between the crankshaft and the clutch hub after removing the keyed washer. I greased the threads of the puller and the bearing plate that pushes against the crankshaft. Installed the puller as stated above by mini13.
While loading the puller, you might need to hit the center puller bolt. I used a 2 lbs. a hammer but I did not hit really hard. The flywheel lock I used also prevented the flywheel from flying off when it broke loose. It came out in about 5 min.
Edited by xrocketengineer, 12 April 2013 - 05:19 PM.
#4
mini13
-
- Members
-
- 3,810 posts
Up Into Fourth
Posted 12 April 2013 - 06:13 PM
good job on that flywheel locking!
#5
bikenutmart
-
- Members
-
- 579 posts
Super Mini Mad
- Location: Bierton Bucks
Posted 12 April 2013 - 08:10 PM
Excellent, It will come off this weekend !!!!! Martin.
#6
xrocketengineer
-
- Members
-
- 1,637 posts
Rocket Man
- Location: Florida, USA
Posted 13 April 2013 - 01:03 AM
Before reinstallation, check the "red seal" for leaks. Installation of the seal might be tricky with the primary gear and flywheel housing in place . I have no advice for that since I installed mine with the flywheel housing removed.
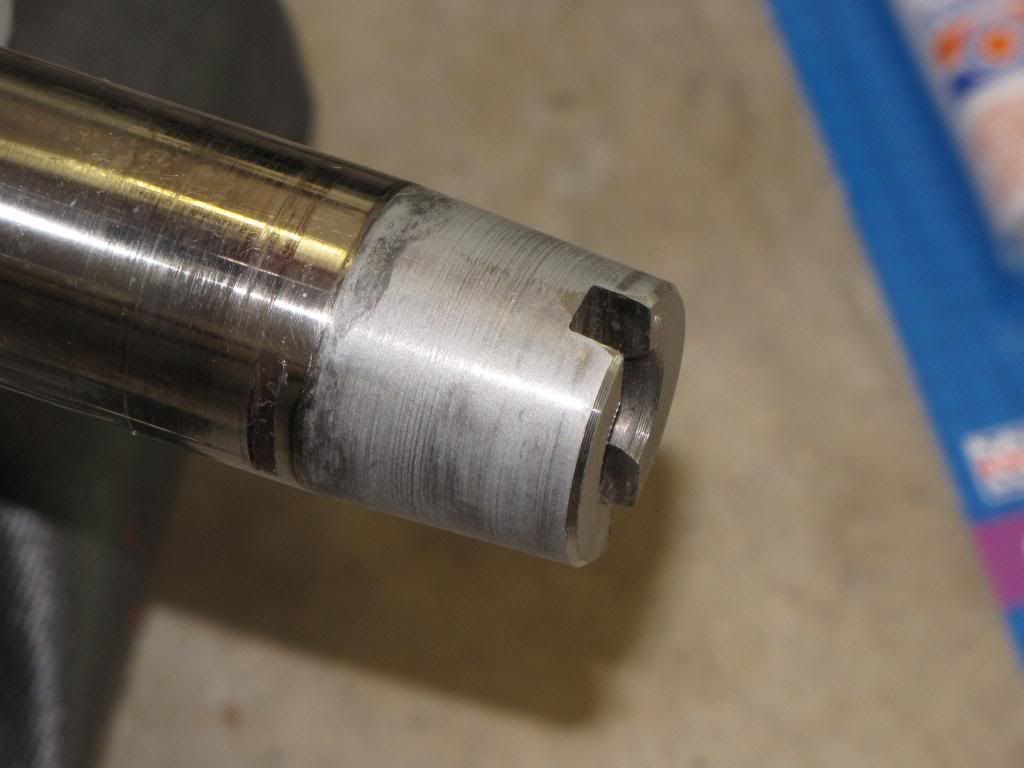
The next thing is the condition of taper on the crankshaft if it is rough. It is recommended to use fine valve lapping compound to smooth out the surface between the crankshaft and the clutch hub. This needs to be done lightly and carefully to prevent the compound to get in the primary gear bushes or they will be ruined and also not to wear the taper to the point that the clutch and flywheel end up too far in on the taper. Mine looked like this after all the lapping compound was removed and cleaned with the primary gear off.
The clutch pressure plate, disc and and flywheel need to be assembled loosely and slipped over the primary gear and crankshaft for disc centering then removed and torqued outside. On the SPI the pressure plate and flywheel fit together in only one way, I do not know if that is the case for the 998.
When finally installing the assembly I used a bit of grease that came with the disc on the internal disc splines and rubbed some WD40 with a rag on the crankshaft taper to reduce friction as the asssembly seated into the taper while torquing. Also notice that the slot on the end of the crankshaft is offset so the pressure plate has to be installed accordingly together with the keyed washer.
The next thing is the condition of taper on the crankshaft if it is rough. It is recommended to use fine valve lapping compound to smooth out the surface between the crankshaft and the clutch hub. This needs to be done lightly and carefully to prevent the compound to get in the primary gear bushes or they will be ruined and also not to wear the taper to the point that the clutch and flywheel end up too far in on the taper. Mine looked like this after all the lapping compound was removed and cleaned with the primary gear off.

The clutch pressure plate, disc and and flywheel need to be assembled loosely and slipped over the primary gear and crankshaft for disc centering then removed and torqued outside. On the SPI the pressure plate and flywheel fit together in only one way, I do not know if that is the case for the 998.
When finally installing the assembly I used a bit of grease that came with the disc on the internal disc splines and rubbed some WD40 with a rag on the crankshaft taper to reduce friction as the asssembly seated into the taper while torquing. Also notice that the slot on the end of the crankshaft is offset so the pressure plate has to be installed accordingly together with the keyed washer.
Edited by xrocketengineer, 13 April 2013 - 01:05 AM.
#7
mini13
-
- Members
-
- 3,810 posts
Up Into Fourth
Posted 13 April 2013 - 10:22 AM
my favorite refitting trick is to heat the flywheel, then bolt it up quick.
#8
bikenutmart
-
- Members
-
- 579 posts
Super Mini Mad
- Location: Bierton Bucks
Posted 13 April 2013 - 04:39 PM
I made a holding tool today out of some thick strap, its all bolted up, but had to go and help my mate with his MG carbs, so hopefully tomorrow it will be off!! Thanks for all the advice. Martin.
#9
bikenutmart
-
- Members
-
- 579 posts
Super Mini Mad
- Location: Bierton Bucks
Posted 14 April 2013 - 03:54 PM
Had an hour in the garage this afternoon, Ive made and fitted a holding tool similar to what xrocketengineer did, the centre bolt came undone fairly easily using a breaker bar, i removed the keyed washer and fitted the puller, i lightly nipped up the 3 puller bolts, i put grease on all the threads and the black metal block that sits against the crank, i loaded up the puller with a 2ft breaker bar, as tight as i dare, and gave the centre bolt a couple of lightish hits with a 2lb hammer, had a cup of tea, got a tiny bit more on the centre bolt, another few whacks on the centre bolt, didnt want any more tea, so had a beer instead!!, did this again, not moving, boy is it tight, Ill leave it loaded up over night, and try again tomorrow. Is there anything else i can do? I know these are tight, but this one is MEGA tight!!. Cheers Martin.
#10
mini13
-
- Members
-
- 3,810 posts
Up Into Fourth
Posted 14 April 2013 - 05:33 PM
Ok, not totally unecpected, somtimes they can be a ******
get some penetrating fluid on there, are you using a 1/2" drive bar? if so get a bit of tube on oit to get you up to about 3ft and give another heave.
are you going to use this flywheel again? if not give it some abuse with a blow torch.
get some penetrating fluid on there, are you using a 1/2" drive bar? if so get a bit of tube on oit to get you up to about 3ft and give another heave.
are you going to use this flywheel again? if not give it some abuse with a blow torch.
#11
Tamworthbay
-

- Members
-
- 7,025 posts
Crazy About Mini's
- Name: Clive
- Location: Tamworth
- Local Club: A5 minis
Posted 14 April 2013 - 05:35 PM
Patience is the key here. Just keeping nipping it up a bit and hitting the central bolt with a copper mallet, leave for a few hours or a day even and try again. They do go with a pop when they finally go.
#12
mini13
-
- Members
-
- 3,810 posts
Up Into Fourth
Posted 14 April 2013 - 06:20 PM
I agree, its worth being patient,
also as its a 998 ods on it should come off ok, its usually the longer stroke 1098's and 1275's that give an issue .
also as its a 998 ods on it should come off ok, its usually the longer stroke 1098's and 1275's that give an issue .
#13
xrocketengineer
-
- Members
-
- 1,637 posts
Rocket Man
- Location: Florida, USA
Posted 14 April 2013 - 10:12 PM
Like I said, - "I have only done it once and I felt very lucky it went well....."
And like the guys said, be patient. Don't over tighten the puller, just a little bit at a time after hitting it with mallet. You might want to back off on the puller and tighten it again while hitting with the hammer. Dynamic loads are better than static to shock the joint apart.
And like the guys said, be patient. Don't over tighten the puller, just a little bit at a time after hitting it with mallet. You might want to back off on the puller and tighten it again while hitting with the hammer. Dynamic loads are better than static to shock the joint apart.
Edited by xrocketengineer, 14 April 2013 - 10:16 PM.
#14
bikenutmart
-
- Members
-
- 579 posts
Super Mini Mad
- Location: Bierton Bucks
Posted 15 April 2013 - 03:45 PM
Hooray its OFF !!!!! I slackened everything off, got loads of penetrating fluid in there, tightened up again, using an old motorbike fork tube over the 1/2 in bar, walloped the puller centre bolt, tightened a bit more and was just about to pick up the mallet when there was quite a crack and it fell off!!!! Thanks so much for the all the help and advice, especially xrocketengineer for that very effective holding tool. Cheers Martin.
#15
Tamworthbay
-
- Members
-
- 7,025 posts
Crazy About Mini's
- Name: Clive
- Location: Tamworth
- Local Club: A5 minis
Posted 15 April 2013 - 04:08 PM
Glad it's sorted, patience is the key as they can be real buggers sometimes.


1 user(s) are reading this topic
0 members, 1 guests, 0 anonymous users


