Another Big One, '68 Hornet @ Mintec
#1
Posted 09 March 2013 - 10:59 PM
Before she went off to blasting we braced the inside then removed the heel board, flitches and floors and also rolled her over to cut off the plates on the boot floor. Taking all this out pre blasting means that it's easier and quicker for our blaster to get into all gaps and cavities and leaves us with less to clean up afterwards.
Now we have a nice rust free body to start fixing up. Fortunately there weren't any nasty surprises under it's many coats of paint.
#2
Posted 09 March 2013 - 11:44 PM
After a little measuring I folded a section up including the rolled bead for the outer edge.
A little more measuring, cutting, stretching, welding and I got this lot. (Nasty old section i the back ground for reference.)
Then I started test fitting it all up, just needs a little more tidying before it goes in for good.
I also made a start one replacing the curved section that sits under the rear lights as water had pooled here and rusted them away.
#3
Posted 10 March 2013 - 07:36 AM
#4
Posted 10 March 2013 - 07:36 AM
#5
Posted 12 March 2013 - 07:32 PM
#6
Posted 12 March 2013 - 10:24 PM
Thanks James, we do love breathing new life into them.Excellent work. Another mini saved
There are so many more pieces in the back of hornet compared to a regular Mini. I think there's about 7 different section where a regular Mini would have 1.Wow, fantastic fabrication skills you have! Will be watching this thread, always wondered how the rears are put together.
This one's a customer car, I'm too busy with this estate to think about another project at the moment.I was hoping i'd see mine in the background of a few pics lol. Went down on saturday but there was no one there, I can see Als is now on wheels and Bradleys has a rollcage, good work. Is this one of yours Chris or a customers?
Dad's just doing saturdays by appointment now so if you give him a ring he'll sort something out.
Sitting out in the rain had taken quite a tole on the side window frames so after a little measuring I chopped the affected sections out.
I used the shrinker to curve new pieces to match what I'd removed.
Once I was happy with their shape it was just a simple case of zincing the cavities and welding the new sections in.
The spare wheel well had also suffered from time worm and looked quite nasty so I marked out the bad section and removed it.
Again new metal to match the old, I used the stretcher around the curved edge to give it the right shape.
All tacked up ready for welding.
The worst part of this shell has got the be the A-pillar. It's shot front top to bottom but fortunately we've got a spare door frame that I can send off for blasting and use.
The rust from the A-pillar has also working it's way on to the corner of the roof.
I used the shrinker stretcher to curve a new section of steel and my sand bag and mallets to put the dome into it.
Held in with magnets just needs a little fine tuning before I tack it in.
#7
Posted 13 March 2013 - 12:03 AM
Edited by surfblue63, 13 March 2013 - 12:04 AM.
#8
Posted 13 March 2013 - 08:29 AM
Max
#9
Posted 14 March 2013 - 08:01 AM
Thanks James, we do love breathing new life into them.
Excellent work. Another mini savedThere are so many more pieces in the back of hornet compared to a regular Mini. I think there's about 7 different section where a regular Mini would have 1.Wow, fantastic fabrication skills you have! Will be watching this thread, always wondered how the rears are put together.
I was hoping i'd see mine in the background of a few pics lol. Went down on saturday but there was no one there, I can see Als is now on wheels and Bradleys has a rollcage, good work. Is this one of yours Chris or a customers?
Whats the red car in the backround looks really cool
#10
Posted 14 March 2013 - 12:56 PM
#11
Posted 17 March 2013 - 10:44 PM
No blue roof on this one, I think it was actually red originally.Did that car have a blue roof? I ask as I had a MkIII Hornet with a blue roof and a grey interior about 25 years ago.
Thanks Max, I've got a bit of a hankering for my myself now although I'm thinking space frame with a screaming small bore turbo.Love Hornets! Can't wait to see this progress, my mate got given one in almost perfect nick for free! Have been jealous ever since lol. Looking forward to more updates, good to see another Mini saved in good hands
Max
That's a 1955 Ford Zephyr Zodiac, it's very large on the outside but the interior's not that much larger than a Mini.Whats the red car in the backround looks really cool
Cheers mate there's great pleasure to be gained from doing good work.The work you do looks great!
As Mk3 Elf/Hornets are a bit of an odd crossover mark there where a few lumps ad bumps that need taking out of the MK3 Heritage flitches.
I started with the N/S removing the recess for the latter MK3 wiper motor.
The O/S flitch also had far too many holes, you can see here I've already removed the late Mk3 wiper motor recess and heater vent.
I had to employ the sand bag again to add a few curves to the heater vent plate, I do like my sand bag.
Everything else welded up and linished down, just need to fit them now.
#12
Posted 17 March 2013 - 11:01 PM
#13
Posted 17 March 2013 - 11:02 PM
#14
Posted 17 March 2013 - 11:49 PM
#15
Posted 18 March 2013 - 08:38 AM
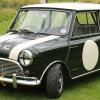
That would be cool! Not seen a spaceframed Hornet/Elf before. Turbo, yes! I think if I had one, I would make it look like a period racer, Cooper S spec engine. S wheels or period Vortz Racing Rose Petals, Surf Blue paint. Similar to this basicallyThanks Max, I've got a bit of a hankering for my myself now although I'm thinking space frame with a screaming small bore turbo.
Now that would look sweet!
Anyway sorry for clogging your thread up, great progress as always, really looking forward to seeing what you do with this
Max
Edited by minimaxie, 18 March 2013 - 08:39 AM.
1 user(s) are reading this topic
0 members, 1 guests, 0 anonymous users