just got myself a mig welder now to start my project with, just wondering what amps do people use for welding mini panels? and what thickness are mini panels or the rear aches metal thickness?

Welding Help Please
Started by
afrance94
, Feb 11 2013 07:22 PM
17 replies to this topic
#1

afrance94
-
- Members
-

- 298 posts
Mini Mad
- Location: whitby
- Local Club: none at the moment
Posted 11 February 2013 - 07:22 PM
#2
sonikk4
-

- Admin
-
- 16,033 posts
Twisted Paint Polisher!!!
- Name: Neil
- Location: Oxfordshire
Posted 11 February 2013 - 07:30 PM
The arches and majority of the panels are 0.9mm. The heel board front bulkhead cross member are 1.2mm. What make and model of welder are you using??
#3
afrance94
-
- Members
-
- 298 posts
Mini Mad
- Location: whitby
- Local Club: none at the moment
Posted 11 February 2013 - 07:35 PM
cheers much appreciated, a clarke 135 gas/no gas mig
#4
sonikk4
-
- Admin
-
- 16,033 posts
Twisted Paint Polisher!!!
- Name: Neil
- Location: Oxfordshire
Posted 11 February 2013 - 07:39 PM
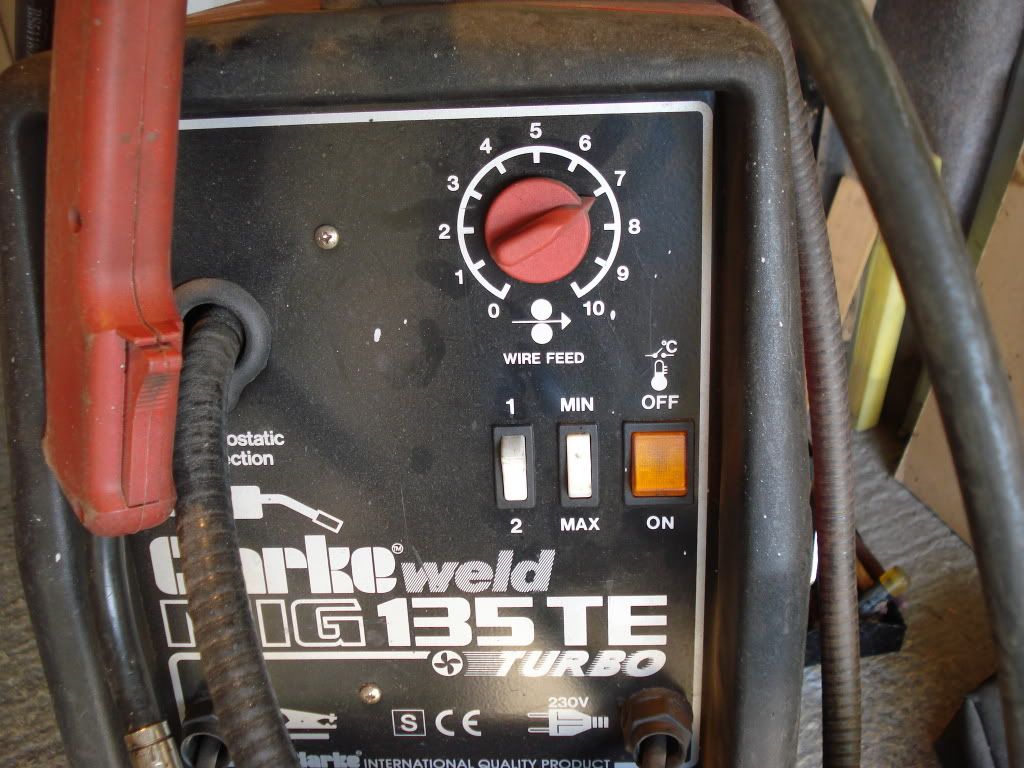
If your control panel is the same or similar to this then use these settings for the 0.9mm thick items. This a Clarke 135TE Turbo gas only MIG welder
#5
afrance94
-
- Members
-
- 298 posts
Mini Mad
- Location: whitby
- Local Club: none at the moment
Posted 11 February 2013 - 07:42 PM
oh mine has 6 power settings and a wire speed control, i work at a fabrication shop so al get some scrap and practice different settings, i am training to be a welder but its all structural stuff like 10mm thick so slightly different to welding on 0.9 mm steel ahaha
#6
Artful Dodger
-

- Members
-
- 4,435 posts
" I AM THE SPECIAL ONE"
- Local Club: aint no body got time fo dat
Posted 11 February 2013 - 08:19 PM
our welder has 1 - 6 setting. we commonly use setting 3, but 2 for smaller, delicate welds and 1 for filling pin holes. wire speed generally 5 - 6. but its mostly down to persomal preference, how fast you like to go etc. ( ;) ) so a bit of scrap mini panel and try it out!
end of the day, its all metal, you can replace it!
end of the day, its all metal, you can replace it!
#7
tiger99
-

- Members
-
- 8,584 posts
Crazy About Mini's
- Location: Hemel Hempstead
Posted 13 February 2013 - 08:40 AM
Just to explain one thing, the controls on a MIG welder actually set VOLTS, not AMPS. The actual average current sorts itself out and is determined by the wire thickness and feed rate, amongst other things. On the other hand, a plain old fashioned arc welder, or a TIG, both actually set amps, and the voltage is determined by the length of the arc. It is very rare to see the actual voltages marked on a MIG welder, because they tend to droop under load.
The very latest "intelligent" (and expensive!) MIG welders actually measure the voltage and use it to control the wire feed, so you can store the settings for various different jobs and recall them easily. I think that some may have a setting for the metal thickness that you are welding, so everything that you need is set automatically.
The very latest "intelligent" (and expensive!) MIG welders actually measure the voltage and use it to control the wire feed, so you can store the settings for various different jobs and recall them easily. I think that some may have a setting for the metal thickness that you are welding, so everything that you need is set automatically.
#8
4V8s
-

- Noobies
-
- 38 posts
On The Road
- Location: Kingston
Posted 13 February 2013 - 10:02 AM
Good thread, im about to teach myself welding on my mini too, as I bought a clarke MIG a few years ago and never even taken it out of the box! Its either a 135 or a 150, cant remember which.
Do you know if its possible to get some kind of spot welder attachment for these, or is that a completely different sort of machine?
A mate of mine is scraping a bonnet off his Saab 900 turbo so I was gonna cut some bits off it to practice welding with.
Do you know if its possible to get some kind of spot welder attachment for these, or is that a completely different sort of machine?
A mate of mine is scraping a bonnet off his Saab 900 turbo so I was gonna cut some bits off it to practice welding with.
#9
tiger99
-
- Members
-
- 8,584 posts
Crazy About Mini's
- Location: Hemel Hempstead
Posted 13 February 2013 - 05:47 PM
There used to be a sort of spot welding attachment for some MIG welders, which was a different nozzle with a couple of prongs to space it up slightly from the upper panel, and the welding action melted through both panles and joined them. I seem to recall that you had to remove the wire from the machine and fit a specal electrode. It really was a form of plug welding, and was not all that good, you can do it better by punching or drilling a 1/4" hole and filling it with weld by hand.
A similar attachment was available for arc welders, using a carbon electrode, and as well as not being much good, it was dangerous to the eyes because a carbon arc is very much brighter than a metallic arc.
A true spot welder is basically just a transformer that puts out several thousands of amps at maybe 1 to 2 volts, and a mechanism for pinching the workpieces between a pair of electrodes, so there is ideally no arc, and only resistance heating occurs. Good machines are more complex than that, as they time the weld cycle to allow for lower current if the metal is not perfectly clean or the mains voltage is a bit low. A spot welder is a very heavy thing to have to hold in your hands.
#10
Artful Dodger
-
- Members
-
- 4,435 posts
" I AM THE SPECIAL ONE"
- Local Club: aint no body got time fo dat
Posted 13 February 2013 - 06:30 PM
spot welders are very good tools. we bought one not long ago as we could see ourselves doing alot more work on minis doing panels! the sealy one is what we have, very nice and compact and does work well for what we need it for! they are not cheap though, at 600 pound (i think) but we have written off the cost through doing jobs very quickly.
#11
afrance94
-
- Members
-
- 298 posts
Mini Mad
- Location: whitby
- Local Club: none at the moment
Posted 13 February 2013 - 07:40 PM
spot welders are class for body work, been playing with my new mig welder and its a 35-135 with 6 different settings, and a dial for the wire speed, but been practising on a oversill i had left over from a job and i couldnt get the wire speed fast enough, had the amps on like 5 and wire speed maxed out it was ok then but when i tried it on the lower settings like 1/6 2/6 3/6 and could not get the wire speed correct at all  does anyone have anyone ideas to help me please? out i could be doing wrong, work with big mig welders every week on thick plate but not done alot of body work
does anyone have anyone ideas to help me please? out i could be doing wrong, work with big mig welders every week on thick plate but not done alot of body work
#12
Shifty
-

- Admin
-
- 13,138 posts
Sponsored by Fosters (tm)
- Name: Sean
- Location: Shropshire(sunny)
- Local Club: TMF
Posted 13 February 2013 - 07:42 PM
Have you set the wire feed tension and the brake on the welding wire reel?
#13
afrance94
-
- Members
-
- 298 posts
Mini Mad
- Location: whitby
- Local Club: none at the moment
Posted 13 February 2013 - 07:48 PM
i duno what tension it needs to be :/ what brake on the reel? did you get the parcel shifty?
#14
mini-luke
-
- Traders
-
- 2,362 posts
Postman Pat
- Location: Hereford
Posted 13 February 2013 - 07:48 PM
I think that some may have a setting for the metal thickness that you are welding, so everything that you need is set automatically.
A fabricator friend has one that does that, you set the metal thickness and type of weld (corner, edge, overlap etc). and just weld. It was somewhere in the region of £8k though!
#15
Shifty
-
- Admin
-
- 13,138 posts
Sponsored by Fosters (tm)
- Name: Sean
- Location: Shropshire(sunny)
- Local Club: TMF
Posted 13 February 2013 - 08:00 PM
Yup, got it yesterday, looks good cheers!!
The wire feed tension is the 2 rollers that push the welding wire up to the torch, it also needs to be the correct roller as well.
If you look at the roller(usually the bottom one), its got 2 grooves in it, a 0.6mm and a 0.8mm, which groove you use depends on the size of welding wire you use.
Once this is correct you can then set the wire tensions, if you look at the rollers theres an adjuster knob, this controls the pressure that the top and bottom roller are squeezed together at. Too little pressure and the rollers will slip and not drive the wire properly, too much and the wire can 'bunch' or jam up easily.
- Push the trigger and let some wire come out of then end of the torch(don't let it go near the welding earth or you'll get burned!!)
- Whilst pushing the trigger try and stop the wire from coming out the end with your thumb and forefinger, if its stops easily then add more pressure to the roller, too much pressure and the rollers will continure to try and drive 'bunching' up the wire by the rollers.
- Ideally it should just start to slip a bit when you squeeze tightly on the wire.


1 user(s) are reading this topic
0 members, 1 guests, 0 anonymous users


