Jump to content


Photo
- - - - -

1972 Black Tulip 1000


  • Please log in to reply
106 replies to this topic

#61 mini.rich

mini.rich

    Super Mini Mad

  • TMF+ Member
  • PipPipPipPipPipPip
  • 619 posts
  • Location: Lincs

Posted 23 June 2013 - 11:22 PM

So, I've been a bit quiet on this for the last month! I'm still waiting to get it in for paint, should be going in the next two weeks :D So in the mean time I've been planning my engine build and sorting out some suspension bits I wasn't going to fit!


I've found in amongst my spares some 2 degree camber bottom arms, HD tie-rods and adjustable rear camber brackets, I was just going to go for the Hi-Lo's and be done with it, but then remembered I had these so thought it'd be rude not to!? :P I've also got a set of Koni MPi shocks on the way. I shot blasted the bottom arms and other bits, and gave them a lick of etch-primer and black and fitted them today.


sus_zps7407e706.jpg


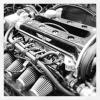
On the engine side of things I'm using the original block and going +.060(as I got the pistons cheap), MG metro head, MED Ultra-lite Flywheel setup, 266 cam, Aldon Dizzy, 28/36 Weber(if I can find one), Cooper Freeflow manifold and twin box RC40. Probably going to stick with the 3.44 CWP, but might go 3.1. I might well have the crank wedged as well, just to aid the lightened bottom end :) On closer inspection of the gearbox I noticed that second gear doesn't look too clever.. Pretty damaged on the engaging dogs(Not sure what you call them)


gears_zps238045b2.jpg


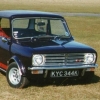
Here's the latest shot of the car, there is very little yellow paint left on it now...


bare_zps36deb42b.jpg


#62 okc78

okc78

    Mini Mad

  • Noobies
  • PipPipPipPip
  • 169 posts
  • Location: Gloucestershire
  • Local Club: none so far

Posted 24 June 2013 - 07:52 PM

Wow down to bare metal what did you use to bare metal the panels?

I'm hoping to do mine and was going to use paint stripper. Its got 6 layers of paint on it but buying decent paint stripper these days is proving more difficult than I thought it would be.

I followed your tips on fitting the drip rails by the way, working from the middle out, seemed to work pretty well for me. Cheers, Ollie


#63 mini.rich

mini.rich

    Super Mini Mad

  • TMF+ Member
  • PipPipPipPipPipPip
  • 619 posts
  • Location: Lincs

Posted 24 June 2013 - 09:20 PM

Wow down to bare metal what did you use to bare metal the panels?

I'm hoping to do mine and was going to use paint stripper. Its got 6 layers of paint on it but buying decent paint stripper these days is proving more difficult than I thought it would be.

I followed your tips on fitting the drip rails by the way, working from the middle out, seemed to work pretty well for me. Cheers, Ollie


Hi Ollie, sorry I didn't get back to you with photos of it, what did the ends turn out like? Six layers!? haha, to strip the paint I've used a combination of Polycarbide discs, wire wheels and a DA. I did use paint stripper on the doors, as there was 3 different colours! I've not done the entire roof yet, but I think I might, it's the only way to be sure theres no rust there. Even the new panels had some signs of rust under the protective coating. 


Poly discs - http://cgi.ebay.co.u...em=181158490497 They strip the paint and rust pretty well, but they don't last too long compared to the wire wheels, but then the wire wheels don't strip it as quick, swings and roundabouts really :P


#64 okc78

okc78

    Mini Mad

  • Noobies
  • PipPipPipPip
  • 169 posts
  • Location: Gloucestershire
  • Local Club: none so far

Posted 24 June 2013 - 10:07 PM

Hi Rich, no worries with the photos, I just wondered how far out you brought the drip rails as they aren't quite as deep as originals. I moved mine out about 11/6" from the body. I got on ok with them apart from the rust underneath, the welding on was the easy bit really. I just hammered the ends round slowly with a nylon mallet and reshaped a bit after with hammer and dolly. It looks pretty good I recon, maybe need to bend them down a little all the way along. I'll have to compare it to my mkIII clubby.

Have a look on my build thread if your interested, its called 1968 mkii project. I'm not as quick as you but its getting there slowly, I have replaced most of the car now. My car was repainted when it was badly restored (some time in the 80's at a guess) so the paints just been building up over the years I suppose.

I got a deal on ebay for 3M bristle discs that are amazing for paint removal but it creates loads of noise. The discs are over £20 each normally but I was buying them in boxes of 5 for a tenner as they were American 5/8" spindle grinder size instead of M14, I got an adapter for a core drill to convert. I try to keep the noise down as the neighbours wont like me bare metaling a whole car. That's why I was asking if you knew where to get decent paint stripper.

Looking forward to seeing the new black tulip paint work.


#65 blacktulip

blacktulip

    Crazy About Mini's

  • TMF+ Member
  • PipPipPipPipPipPipPipPipPipPip
  • 6,224 posts
  • Location: Braintree

Posted 25 June 2013 - 07:38 PM

love the ideas rich. are you sure the weber will fit the bulkhead?


#66 mini.rich

mini.rich

    Super Mini Mad

  • TMF+ Member
  • PipPipPipPipPipPip
  • 619 posts
  • Location: Lincs

Posted 26 June 2013 - 09:17 PM

love the ideas rich. are you sure the weber will fit the bulkhead?


The 28/36DCD is a downdraught carb, so I'm more worried about the bonnet :P


Hi Rich, no worries with the photos, I just wondered how far out you brought the drip rails as they aren't quite as deep as originals. I moved mine out about 11/6" from the body. I got on ok with them apart from the rust underneath, the welding on was the easy bit really. I just hammered the ends round slowly with a nylon mallet and reshaped a bit after with hammer and dolly. It looks pretty good I recon, maybe need to bend them down a little all the way along. I'll have to compare it to my mkIII clubby.

Have a look on my build thread if your interested, its called 1968 mkii project. I'm not as quick as you but its getting there slowly, I have replaced most of the car now. My car was repainted when it was badly restored (some time in the 80's at a guess) so the paints just been building up over the years I suppose.

I got a deal on ebay for 3M bristle discs that are amazing for paint removal but it creates loads of noise. The discs are over £20 each normally but I was buying them in boxes of 5 for a tenner as they were American 5/8" spindle grinder size instead of M14, I got an adapter for a core drill to convert. I try to keep the noise down as the neighbours wont like me bare metaling a whole car. That's why I was asking if you knew where to get decent paint stripper.

Looking forward to seeing the new black tulip paint work.


I can't believe I've not seen your project thread! very nice. Are those bristle discs plastic? They look pretty good, but if you catch an edge, like a seam dont they just shatter?? I'll try some on the next rebuild :P


#67 domdee

domdee

    Formally known as dominicdee

  • Members
  • PipPipPipPipPipPipPip
  • 1,183 posts
  • Location: hull
  • Local Club: hull clubs on FB

Posted 27 June 2013 - 06:38 AM

lovely car! Love mk3s!


#68 okc78

okc78

    Mini Mad

  • Noobies
  • PipPipPipPip
  • 169 posts
  • Location: Gloucestershire
  • Local Club: none so far

Posted 27 June 2013 - 09:24 PM

Hi Rich, Thanks the mkII has been a labour of love, I'm determined to be a mini driver again after years behind the wheel of my boring car (1.4 honda civic).


The bristle discs are pretty good, better than the strip and clean I would say but yeah they dont like sharp edges.When you hit a sharp edge the bristle's can fly off, tends to sting a litle in the face but no they don't shatter at all . The bristles are pretty flexible, like a grit impregnated tough rubber. You can get different grades, I think mine are 50 grit (green). I would say they are not worth the retail price though,  they sell for around £22 each, mine were a bargain at £2 each. I bought £50 worth so just abuse them. They last ages on flat surfaces and you don't need to bear down on them at all.


#69 mini.rich

mini.rich

    Super Mini Mad

  • TMF+ Member
  • PipPipPipPipPipPip
  • 619 posts
  • Location: Lincs

Posted 10 August 2013 - 08:32 PM

So theres not been any updates because it's still not in paint, been in the spray shop for 3 weeks but they have been pretty busy with other projects and mines only had a few hours attention! Doesn't matter too much as I have my 16v Cooper on the road and have a few issues with that at the moment which need sorting..


But here she is in the spray booth..


image-8_zps37938b80.jpeg


image-10_zpse1b1d64b.jpeg


And I have just bought my next project.. 


image-6_zps0655d7e2.jpeg


Gone to the Dark Side.. 


#70 mini.rich

mini.rich

    Super Mini Mad

  • TMF+ Member
  • PipPipPipPipPipPip
  • 619 posts
  • Location: Lincs

Posted 11 September 2013 - 09:40 PM

So I finally got it back at the weekend!! Rebuild might start this weekend! :D


Here are some photo's of the the paint...


IMG_8691_zps796cdda5.jpg


IMG_8725_zps70d67022.jpg


IMG_8702_zps0df4f545.jpg


IMG_8709_zpsb9aa42ca.jpg


IMG_8722_zps37002eb3.jpg


IMG_8717_zps736d65c8.jpg


IMG_8718_zps4f75d32d.jpg


I wasn't sure about a purple mini to start with but I'm really glad I decided to put it back to original :)


#71 oli8925

oli8925

    Up Into Fourth

  • Members
  • PipPipPipPipPipPipPipPipPip
  • 2,260 posts
  • Location: Kent

Posted 11 September 2013 - 10:24 PM

Lovely colour, I love a bit of purple, although I like darker with a bit of a pearl finish.


Good work on stripping all the paint off, must have take some time. With regards to the paint strip wheels you linked, I'd definitely recommend spending a bit more on decent branded discs. I had a couple I bought from Weld Equip made by Dronco. They lasted for ages and took a good bashing. I then thought I'd try cheap ones from Ebay, and they're rubbish. Nowhere near as effective and wear out in a fraction of the time. My experience of Silverline is also pretty bad. Needed some wire wheels quickly a couple of weeks ago so got Silverline ones from Toolstation, they're so unbalanced it hurts your hands to grind with them.


The above applies to all Dronco and all Silverline tools and consumables I've had. Definitely worth spending more on Dronco.


#72 blacktulip

blacktulip

    Crazy About Mini's

  • TMF+ Member
  • PipPipPipPipPipPipPipPipPipPip
  • 6,224 posts
  • Location: Braintree

Posted 15 September 2013 - 08:51 PM

wow rich that looks great. the colour is spot on. im looking forward to seeing it one day :-)


#73 mini.rich

mini.rich

    Super Mini Mad

  • TMF+ Member
  • PipPipPipPipPipPip
  • 619 posts
  • Location: Lincs

Posted 22 September 2013 - 07:39 PM


Lovely colour, I love a bit of purple, although I like darker with a bit of a pearl finish.


Good work on stripping all the paint off, must have take some time. With regards to the paint strip wheels you linked, I'd definitely recommend spending a bit more on decent branded discs. I had a couple I bought from Weld Equip made by Dronco. They lasted for ages and took a good bashing. I then thought I'd try cheap ones from Ebay, and they're rubbish. Nowhere near as effective and wear out in a fraction of the time. My experience of Silverline is also pretty bad. Needed some wire wheels quickly a couple of weeks ago so got Silverline ones from Toolstation, they're so unbalanced it hurts your hands to grind with them.


The above applies to all Dronco and all Silverline tools and consumables I've had. Definitely worth spending more on Dronco.


Thanks. It's a strange colour, it looks really light in the photo's but it's a bit darker in reality, and from a distance it looks dark, it's only when you're close to it it appears lighter.


to be honest, the wire wheels lasted pretty well, I've used more expensive ones and the silverline ones performed pretty similarly, never had a problem with them feeling unbalanced. The flap wheels from them on the other hand are crap! as are the slitting discs.


wow rich that looks great. the colour is spot on. im looking forward to seeing it one day  :-)


Thanks :-) It is, I really like it! It should be at alot of the shows next year so loads of chances to see it :D


I've been bolting a few bits on it over the last week...


I'll be replacing the grille, or shot blasting it and repainting it, but I'll be keeping it black


IMG_8758_zpsbeeb7d9c.jpg


IMG_8746_zps02bd061c.jpg


The nodding dog matches the seats aswell :D haha


IMG_8752_zps8758cd7b.jpg


The banded steelies just about fit under the arches :D need a refurb ideally..


IMG_8757_zpsfb7df05f.jpg


And the interior, the one thing I've been desperate to get in it! 


IMG_8760_zps2a499aab.jpg


#74 alex-95

alex-95

    I am THE CLAMP MAKER

  • Members
  • PipPipPipPipPipPipPipPipPipPip
  • 6,020 posts
  • Location: l

Posted 22 September 2013 - 08:24 PM

Look's great :wub:


#75 okc78

okc78

    Mini Mad

  • Noobies
  • PipPipPipPip
  • 169 posts
  • Location: Gloucestershire
  • Local Club: none so far

Posted 23 September 2013 - 04:25 PM

That looks stunning RIch, black tulip seems to come out looking lighter under artificial  light such as camera flash or street lights but can look almost black from a distance like you say. Are you still planning on keeping it small bore 998?


4 user(s) are reading this topic

0 members, 4 guests, 0 anonymous users