Jump to content


Photo
- - - - -

Mini Cooper 998 Screamer Nut And Bolt Rebuild


  • Please log in to reply
1843 replies to this topic

#331 Petrol

Petrol

    One Carb Or Two?

  • Members
  • PipPipPipPipPipPipPip
  • 967 posts

Posted 04 September 2013 - 10:23 PM

Its the same stuff Ben - PU adhesive. Thanks very much for posting the data sheet up which was very interesting. I noticed they recommend applying adhesive between the door crash bar and the door skin, think I will do the same as it will stiffen the door skin up and reduce drumming. PU adhesive has typically 25% flexture so it's not going to transmit vibration / noise


More work on the front floor, stripped most of the zinc primer I applied off with thinners. I only used this for temporary protection as the car was outside.  Next job is to spray on 2K etch primer followed by 2K gloss.


0502_zpsf5381804.jpg


Boot floor (another) trial fit


0496_zps9662f3a5.jpg


Decided to weld the rear valence assembly including all the stiffeners to the boot floor off the car


0497_zps1e990d90.jpg


It's a bit complicated how it all goes together so I will post up some detailed pics.


Underneath, would be uber cool to have a gloss paint job like this but I want it to last so it’s going to have a good dose of Shutz


0499_zps77c427b1.jpg


Amp will be fitted here. It's great to be able to drill all the holes before spraying the shell.


0500_zpsa94abbe8.jpg


Pete


Edited by Petrol, 05 September 2013 - 07:58 PM.


#332 Petrol

Petrol

    One Carb Or Two?

  • Members
  • PipPipPipPipPipPipPip
  • 967 posts

Posted 06 September 2013 - 09:34 PM

Welded the valence to the boot floor. There are 4 layers, it goes like this.


0503_zpscbe8733c.jpg


Other side has the wheel arch braces.


0504_zps2daadf74.jpg


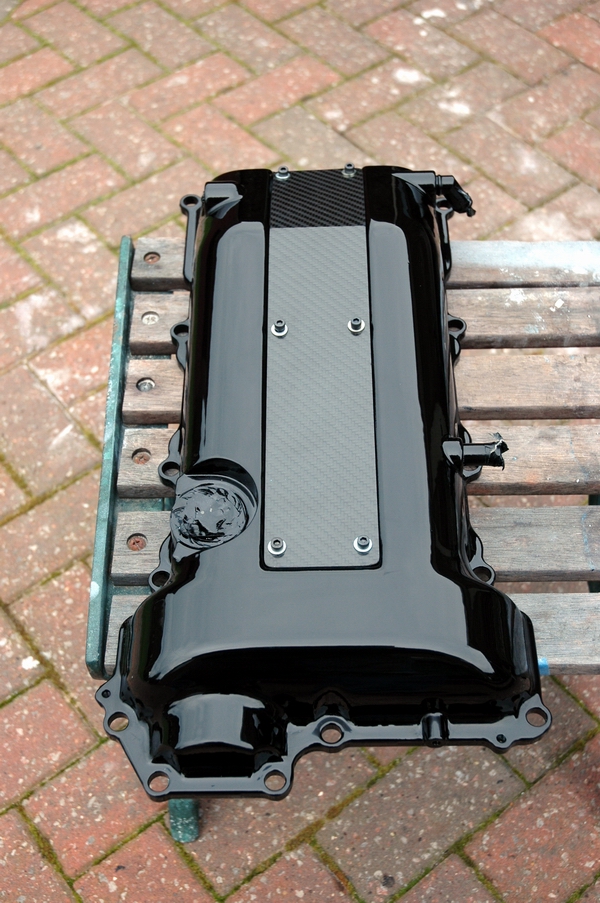
Dash mock up. I want to make proper brackets for the dash as it's a friction fit with plastic tapered wedges. I also want to mod the centre console so it bolts in. Finish will be a combination of gloss black paint, carbon fibre, black vinyl and stainless cap screws.


0505_zpse75102e2.jpg


Colour scheme was inspired by this rocker cover


920.jpg


Pete


#333 AndyFrenchMan

AndyFrenchMan

    On The Road

  • Noobies
  • PipPip
  • 39 posts
  • Location: Laon

Posted 07 September 2013 - 03:36 PM

I really like your dashboard! Can't wait to see it finished.


Can you take a picture of the back of your speedometer ? Thank you :).


Regards.


#334 myredmini

myredmini

    My Mummy Says It's OK

  • Members
  • PipPipPipPipPipPipPipPipPip
  • 3,211 posts
  • Name: Dan
  • Location: Teesside
  • Local Club: BOG MOG

Posted 07 September 2013 - 03:49 PM

You say you are going to schultz the unerside? Why not Use UPOL Gravtex stone chip and paint gloss over the top? Heard schultz breaks down over a few years causing moisture ingress etc.


:thumbsup:


#335 Petrol

Petrol

    One Carb Or Two?

  • Members
  • PipPipPipPipPipPipPip
  • 967 posts

Posted 08 September 2013 - 09:38 PM


I really like your dashboard! Can't wait to see it finished.


Can you take a picture of the back of your speedometer ? Thank you :).


Regards.


Good idea with the stonechip and overpaint :shades:


Back of speedo pic


0506_zps3256478a.jpg


Hope this is OK. If you need any more let me know


Pete


#336 Petrol

Petrol

    One Carb Or Two?

  • Members
  • PipPipPipPipPipPipPip
  • 967 posts

Posted 10 September 2013 - 09:32 PM

Boot floor welded in


0507_zpsa67d8e16.jpg


Spot welded most of it but had to plug weld the rear seat upright. Penetration on the plug welds


0513_zps32644f42.jpg


Forced zinc primer in the seam where it meets the back panel


0509_zpsdf84cfac.jpg


Same with the heelboard


0510_zps587ff5ab.jpg


All this zinc makes a bit of a mess :D


0511_zps6bb39fc0.jpg


I was a bit concerned about welding the rear seatbelt mounting to the boot floor, thick bracket to thin sheet and all that but was pleased with the result


0512_zps386df6ba.jpg


Thanks for looking

Pete


#337 Petrol

Petrol

    One Carb Or Two?

  • Members
  • PipPipPipPipPipPipPip
  • 967 posts

Posted 14 September 2013 - 09:45 PM

Bit more done, seam seal and paint


0514_zps452e494d.jpg


0515_zps2b598350.jpg


0516_zpse0262f48.jpg


0517_zps6c3c67a8.jpg


#338 Petrol

Petrol

    One Carb Or Two?

  • Members
  • PipPipPipPipPipPipPip
  • 967 posts

Posted 18 September 2013 - 10:04 PM

I’m struggling fitting the rear wheel arches due to alignment / gap problems.….


0518_zpsedd25754.jpg


0519_zpsf3df8a0d.jpg


0520_zps022dcdd3.jpg


Underneath


0521_zpsd342f204.jpg


My main concern is the alignment of the shocks. How critical is the position of the arch? If anyone could help me out I would appreciate it. Just to add, the boot floor is Heritage and the arches are Magnum.

Cheers

Pete


#339 myredmini

myredmini

    My Mummy Says It's OK

  • Members
  • PipPipPipPipPipPipPipPipPip
  • 3,211 posts
  • Name: Dan
  • Location: Teesside
  • Local Club: BOG MOG

Posted 18 September 2013 - 10:05 PM

I would think the issue is in the arch panel if the boot floor was accurately fitted :thumbsup:  


#340 Petrol

Petrol

    One Carb Or Two?

  • Members
  • PipPipPipPipPipPipPip
  • 967 posts

Posted 20 September 2013 - 10:24 PM


I would think the issue is in the arch panel if the boot floor was accurately fitted :thumbsup:  


The boot floor fitted pretty accurate, everything aligned up to within a couple of mm. I appreciate that Magnum panels will never fit as good as Heritage, but genuine panels come with a hefty price tag. My main concern was the suspension geometry, particularly the angle of the shock relative to the radius arm. Panel gaps are cosmetic and can easily be sorted but suspension alignment is pretty important on this build. I have now sorted it with a bit of adjustment; the distance between the top of the shock mounts is within a couple of mm from the dimensions taken before the shell was stripped.


0522_zps62553b4c.jpg


Next job is to fit the new rear ¼ panels. Cleaned off the celly based primer with thinners, then sprayed the inside with Electrox zinc and the outside with 2K etch primer. Note the fan which helps reduce curing times.


0523_zpsbd0d198b.jpg


Pete


#341 Archived4

Archived4

    One Carb Or Two?

  • Archived
  • PipPipPipPipPipPipPip
  • 822 posts

Posted 20 September 2013 - 10:35 PM

Wicked work. And I'm sure BL tollerences were more than a couple of mm from the factory.


And from what I've read/seen on here about wheel arch repairs is people get them at the desired angle, measuring from the boot floor, and use a spirit level to make sure they sit right. Can't think of other measurements needed to get it true?


#342 Artstu

Artstu

    One Carb Or Two?

  • Members
  • PipPipPipPipPipPipPip
  • 829 posts
  • Location: Derbyshire

Posted 22 September 2013 - 10:04 AM

Truly amazing work Pete. I came across this earlier and thought how much easier it would have made the cleaning up of your shell.


http://www.shockmans...aning-look-fun/


#343 rally515

rally515

    Up Into Fourth

  • Members
  • PipPipPipPipPipPipPipPipPip
  • 3,848 posts
  • Location: ask!

Posted 22 September 2013 - 12:22 PM

Truly amazing work Pete. I came across this earlier and thought how much easier it would have made the cleaning up of your shell.


http://www.shockmans...aning-look-fun/


Wow thats amazing haha, definatly would be easyer, less messy and more enjoyable, wonder if t works on rust ? :lol:


#344 Petrol

Petrol

    One Carb Or Two?

  • Members
  • PipPipPipPipPipPipPip
  • 967 posts

Posted 23 September 2013 - 09:30 PM


Wicked work. And I'm sure BL tollerences were more than a couple of mm from the factory.


And from what I've read/seen on here about wheel arch repairs is people get them at the desired angle, measuring from the boot floor, and use a spirit level to make sure they sit right. Can't think of other measurements needed to get it true?


Thats all about you can do.


Truly amazing work Pete. I came across this earlier and thought how much easier it would have made the cleaning up of your shell.


http://www.shockmans...aning-look-fun/


That is ace  :shades:  I want one!


Thanks for the comments, cut the rear 1/4 off


0526_zpsd950fe87.jpg


Arch closing panel, bit complicated this lot as it welds to the inner wing stiffener, companion bin, rear arch and rear 1/4 panel


0524_zpsdf0f3cd4.jpg


Panel trial fit


0525_zpsddbfe547.jpg


Pete


#345 Petrol

Petrol

    One Carb Or Two?

  • Members
  • PipPipPipPipPipPipPip
  • 967 posts

Posted 25 September 2013 - 06:33 PM

Original plan was to use a Mini Spares template to drill for the sportspack arches


0527_zps4bcf032b.jpg


Tried it on the original panel and the holes didn’t quite line up. Decided to use the old panel as a template


0528_zpsad47223e.jpg


0529_zpsdd84ff91.jpg


It was worth the effort as the holes line up perfect


0530_zps3d6555a6.jpg


Pete


3 user(s) are reading this topic

0 members, 2 guests, 0 anonymous users


    Google (1)