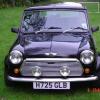
Here is a photo before anything has been started.
First Photo doesn't look that bad. But its when I looked closer and took things apart I realised how bad it actually was.

Posted 18 October 2012 - 08:07 AM
Posted 18 October 2012 - 08:17 AM
 IMG_0719.JPG 25.69K
32 downloads
 IMG_0719.JPG 25.69K
32 downloads
Posted 18 October 2012 - 08:25 AM
 IMG_0744.JPG 58.77K
42 downloads the boot floor
 IMG_0745.JPG 62.19K
45 downloads oooh look at the nice patches........ NOT!
  IMG_1202.JPG 51.92K
42 downloads I removed the arches as I could see the nasties underneath. They were put on terribly
 IMG_1201.JPG 72.41K
47 downloads Not quite sure how the bumper stayed on.....
Posted 18 October 2012 - 08:26 AM
BLEURGHH!!!!!!!!!! Get that baby fixed up please, it's making me ill
Posted 18 October 2012 - 08:35 AM
 IMG_1204.JPG 62.73K
41 downloads This is just awful...... I actually didn't know what to say when I saw it
 IMG_1206.JPG 57.85K
28 downloads Here come's a new front end then.....
 IMG_1211.JPG 31.32K
19 downloads The drivers door, underneath......
 IMG_1214.JPG 80.07K
32 downloads Drivers floor pan, sadly also has over sills on the drivers side. Thats coming right off!
Posted 18 October 2012 - 08:55 AM
 IMG_0750.JPG 61.36K
16 downloads This is the start of getting the front end off and engine out!
 IMG_0753.JPG 40.35K
21 downloads Drivers wing off, its awful under there.
 IMG_0755.JPG 74.49K
13 downloads The inner wing...
 IMG_0757.JPG 51.4K
39 downloads Some plonker actually welded this damper mount on and on the passenger side.....
Posted 18 October 2012 - 09:09 AM
 IMG_0749.JPG 49.11K
10 downloads Passenger floor
 IMG_0755.JPG 74.49K
5 downloadsPassenger side wing removed
 IMG_0759.JPG 64.28K
12 downloads wing to be removed
 IMG_0767.JPG 91.79K
14 downloads front end off, getting ready to wheel out the engine on the subframe.
Posted 18 October 2012 - 09:14 AM
Edited by Nathan94, 18 October 2012 - 09:14 AM.
Posted 18 October 2012 - 09:25 AM
 IMG_0769.JPG 66.33K
17 downloads Passenger flitch
 IMG_0772.JPG 51.54K
35 downloads This may be awkward....
 IMG_0776.JPG 89.6K
23 downloads Nearly ready for engine to come out
 IMG_0777.JPG 60.91K
35 downloads engine out, but plenty of repairs....
Posted 18 October 2012 - 09:27 AM
Good luck! I imagine mine will look something like this once I get going. You doing all the work yourself?
Posted 18 October 2012 - 09:42 AM
 IMG_0791.JPG 49.36K
19 downloads lots of cleaning & painting to do!
 IMG_0819.JPG 48.09K
26 downloads new pieces of metal welded in!
 IMG_0823.JPG 29.21K
44 downloads flitch panel welded in, door post cleaned up and primed.
 IMG_0804.JPG 79.84K
25 downloadsstill more cleaning, but progress showing!
Posted 18 October 2012 - 06:58 PM
Posted 19 October 2012 - 11:07 PM
The crustyness I can deal with it's the previous owners bodge jobs that are frustrating the hell out of me.Looking very crusty there! But looks like your getting well and truely stuck in! Good on ya!
Posted 20 October 2012 - 07:36 AM
Posted 20 October 2012 - 08:36 AM
0 members, 1 guests, 0 anonymous users