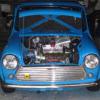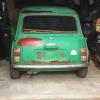


I bought my 1979 Austin Mini van a couple of years ago and built a miniature ‘campervan’ interior. I then went travelling around Europe for two months covering over 5000 miles, visiting 12 countries. Then last year driving up to Stockholm over a few weeks during the summer.

 DSC_0733.jpg 60.61K
16 downloads
DSC_0468.jpg 44.17K
22 downloads
DSC_0081.jpg 54.88K
28 downloads
DSC_0733.jpg 60.61K
16 downloads
DSC_0468.jpg 44.17K
22 downloads
DSC_0081.jpg 54.88K
28 downloadsApart from the following standard Mini mechanical issues, everything went smoothly…
- Overheating and the heater matrix spouting a leak on my passenger's foot
- Sorting out the bodged wiring
- Upgrading to disc brakes
- Clutch release bearing disintegrating in the Netherlands
- Exhaust constantly working loose and then one of the LCB manifold branches shearing off in Germany. I 'repaired' it with a coke can and some jubilee clips!
- The bonnet opening at 90kph in the rain on an autobahn
- Leaking sliding windows
- Oil leaking from a perished gear linkage seal
- Massive backfiring after the battery cable sheath perished and arced to the underside of the floor
- Electronic distributor and alternator getting soaked in storms in Slovenia and misfiring
- This list is longer than I imagined when I started writing it!
- Wipers failing on the autobahn and having to move them again with my hand out the window
- The floor filling with water regularly and only realising a few weeks ago there's a grommet I could have removed to drain it!
DSC_0027.jpg 88.13K
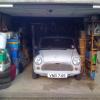
29 downloadsThe Project
After doing a bit of research on the water-in-car issues, I realised my van has had the notorious wide sills fitted. I decided that I would replace these with the originals before the rust sets in….on removing the RHS outer sill, it turns out they can hide a fair bit of corrosion before it shows externally!

After some prodding, I now know that the following areas need attention (RHS assessed only, so far!):
- Underside of box-section under front seats
- Front of sill adjacent to front wing
- Various points along inner sill (sloping part of the floor pan)
- Corner and underside where rear floor pan meets heel board underneath load bed
- Large hole (with bodged metal plates from previous owner) on panel to the side of the heel board (which is a nightmare to access!).
I’m not interested in having a concourse quality car, I’d be scared of using it! But a neat looking structurally sound van that I know is going last for a few more years and many more adventures.
Wish me luck getting this done ready for the Spring!
Jamie