Historic Rally Clubman Project
#16

Posted 17 September 2012 - 06:42 PM
On another part of preparation, the heater pipes pass inside the car and it is a requirement that all pipes carrying hot fluid inside the car are either solid walled or braided metal and are painted red.
#17

Posted 17 September 2012 - 06:45 PM
Looking forward to your progress!
Keith
#18

Posted 17 September 2012 - 07:45 PM
Great stuff, another rally Clubbie, I shall be avidly watching this one! My son & I have just bought a red one with a similar sort of spec., so I shall be looking out for tips! First thing we have to do on ours is make a lighter dash - found out last week that the previous owner had made it out of 9mm MDF & plywood.....!!
Looking forward to your progress!
Keith
Hi Keith.....loving the idea of 9mm MDF.....kinda like a built in wardrobe!!!
There will be plenty more updates soon as my first event is a few weeks away and the rear subframe is still leaning against my beetle (best thing for a beetle!!!) so need to pull my finger out!!!!
I think i read on another thread that you had just bought a rally clubman....great mini to buy in my eyes....heaps more room!!! I do have a roundnose before i upset too many people...especially after 'plate-gate'!!!!
#19

Posted 17 September 2012 - 07:56 PM
Good luck with getting it ready for your first event, my boy & I are aiming for a hillcimb next May as ours & I'm already starting to panic!
#20

Posted 23 September 2012 - 08:20 PM
Have been chasing by backside a little bit as time is getting on and first event is looming.
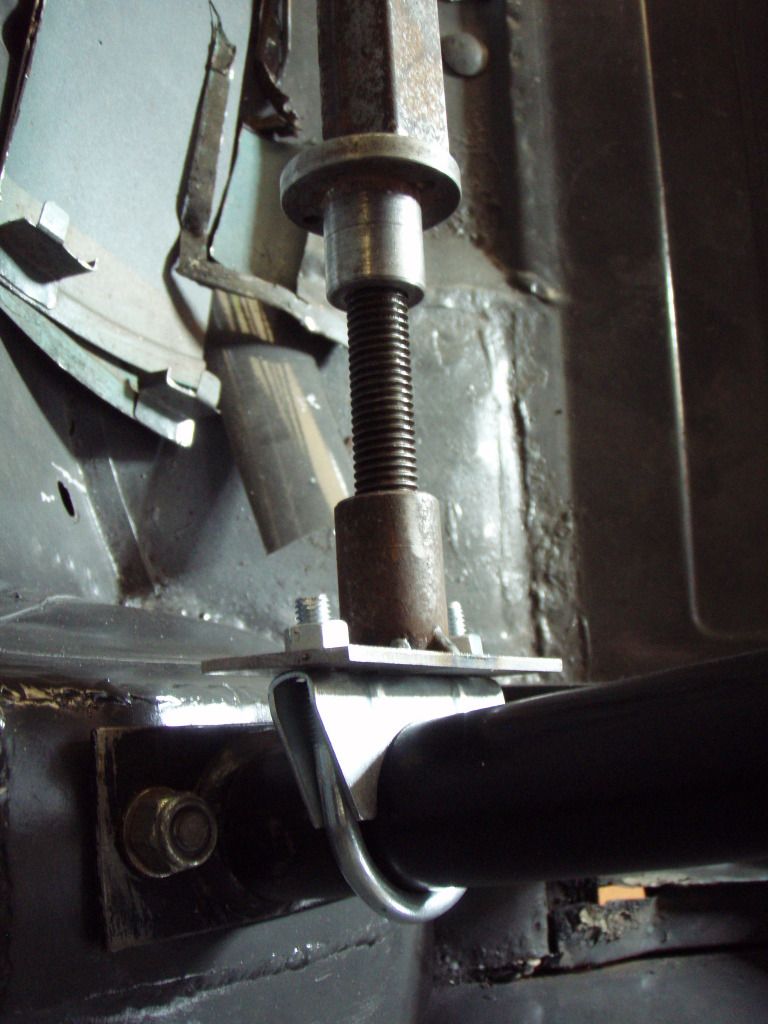
First up was to seam weld all roll cage plates and get them painted ready for cage to go in. In the pic you will also notice a funny bar going from arch to arch. This isn't my attempt at a crude harness bar (although !!!???), it is my way of pushing the rear legs out so they sit on the arches nicely. Made from a length of box section, some threaded bar, a couple of exhaust clamps and a threaded collar...kinda like a homemade acro prop. A bit overkill for some people but very quick and easy to make and it cost me nothing as i aready had all component parts lying round, so my view was why struggle?
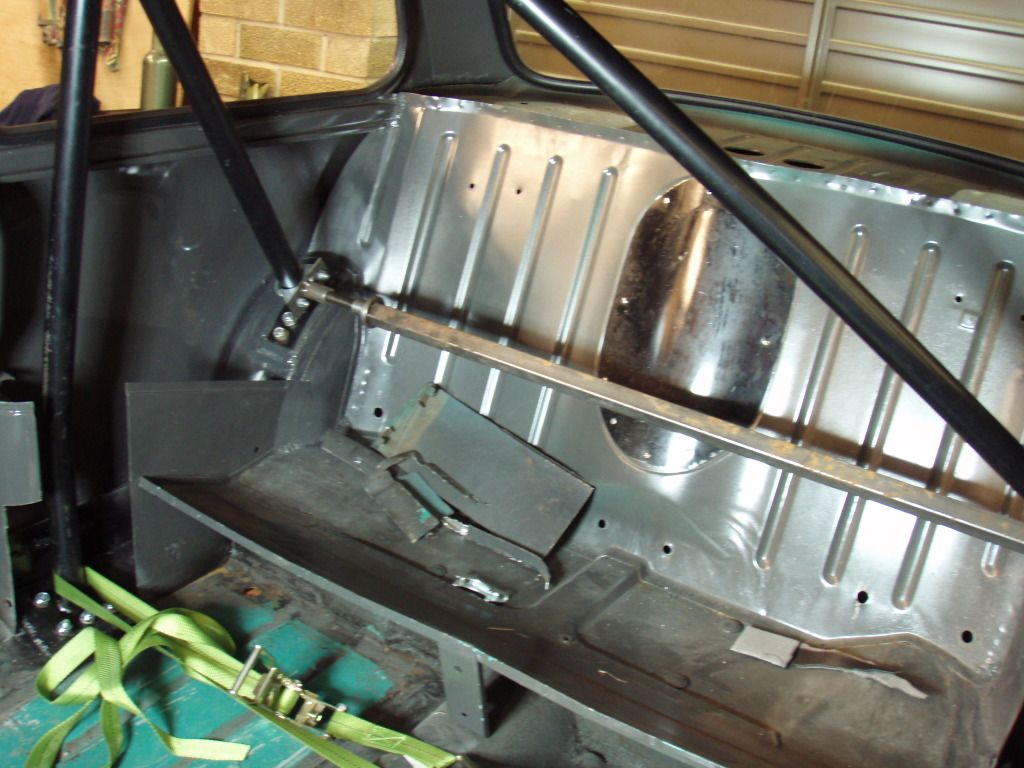
Whilst the welder was out, i set about sorting the exhaust tunnel. I think the car was originally a remote change and has a different profile exhaust tunnel. The previous owner had the gear linkage very low on a bracket which made speed bumps very interesting!!!!! This ain't any good for a rally car so out came the angle grinder and a few carefully aimed chops here and there and the hole was created allowing the rod change linkage to sit higher and away from speed bumps!!
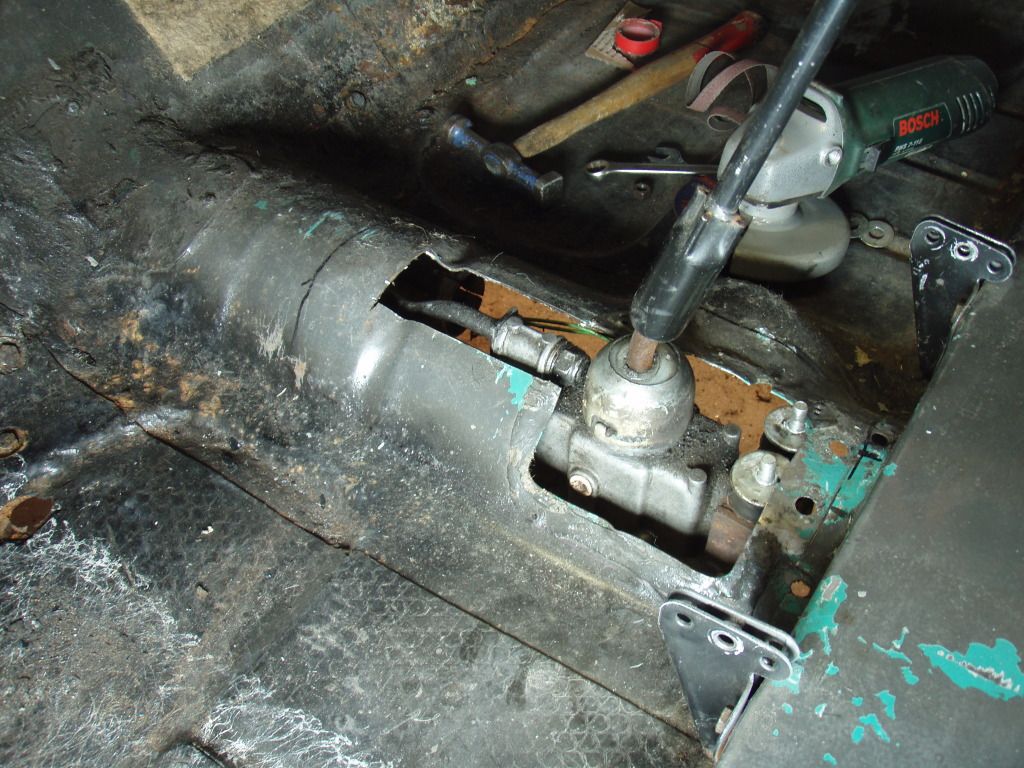
I know it ain't pretty but needs must. A cardboard template, some panel beating and an old door skin later allowed for an acceptable resolution. Although its seam welded, i reckon it could be removed and remote change panel work reinstated should the need arise in the future.
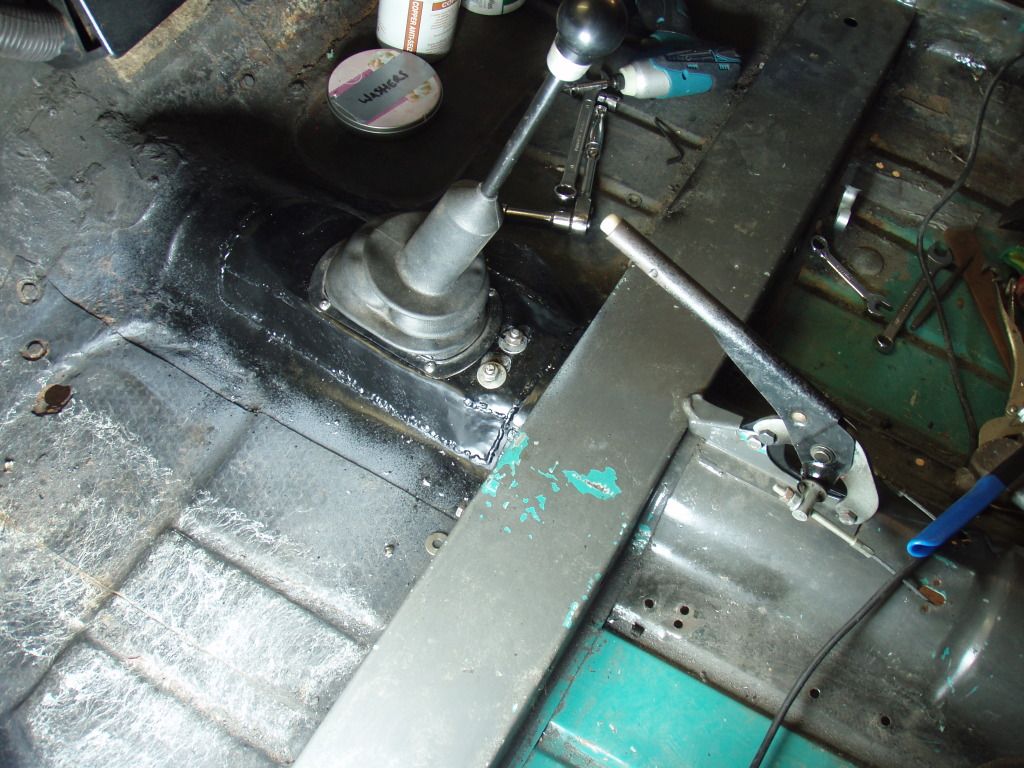
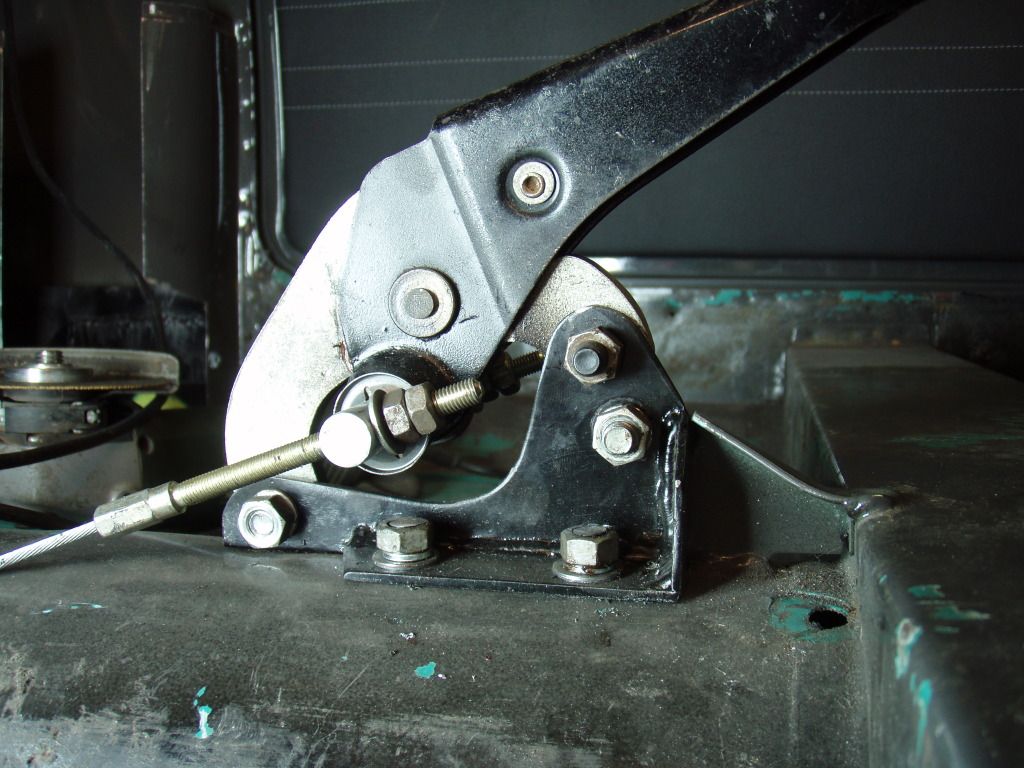
Whilst in the area, i strengthened the handbrake mounts with a bit of 3mm plate....seperate bracket and can be removed if required. The bracket also raises the handbrake lever a bit so it doesn't sit so low.
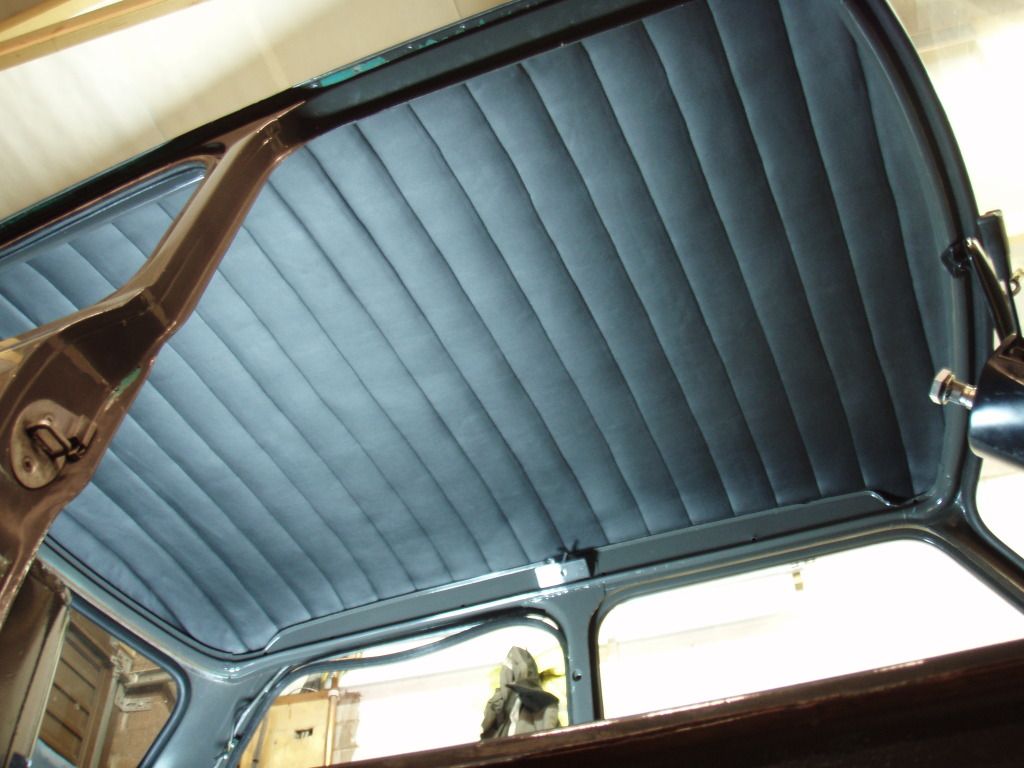
Finally, i fitted a prototype headling which i've made. The reason for a homemade job rather than an off the shelf option was because i wanted the lining as close to the roofskin as possible because the rollcage hoop sits very close to the roof skin and i didn't want any tears in the lining.
Another plus point for this lining is that you can fit it with all windows in place. Some of you might be wandering why i'm going to the trouble of bothering with a headlining in a rally car...simple reason is in some events you have to have interior trim in place...rear seats, door cards, headlining etc. Plus i weighs next to nothing so no great disadvantage
Hopefully you'll agree, but i think it looks smart...a little bit like a mk1 or 2 headlining.
Let me know what you all think
#21

Posted 23 September 2012 - 08:44 PM
#22

Posted 23 September 2012 - 08:59 PM
#23

Posted 23 September 2012 - 09:05 PM
Well the headlining looks like it would pass a scrutineers check, are you venturing out to do my local event then ?
yes, entry form ready to post in morning. I see the Perry clubman is also entered....didn't think they were novices??? Also got a scatter rally next monday for a shakedown....fingers crossed it'll be ready for then, otherwise i'll have to ask the wife very nicely for the keys to her Focus!!! In fact she is sat next to me with her roamer and os map practicing plotting.....at least she is organised.
#24

Posted 23 September 2012 - 09:07 PM

nice headlining!! looks nice and retro. keep up the good work!
cheers brad...actually looks better in the flesh....the stitching through the vinyl and foam gives a more pronounced fluted/ribbed effect....if that makes sense.
#25

Posted 23 September 2012 - 09:26 PM
Is your wife getting the hand of the maps refs ?
#26

Posted 23 September 2012 - 09:50 PM
#27

Posted 24 September 2012 - 06:29 AM
Well they qualify for novices due to their results, julia is still learning on the maps.
Is your wife getting the hand of the maps refs ?
She certainly is.....she is very intelligent (i have to say that!!!) so fingers crossed we won't have too many issues. The main head scratching is where to put everything in the car so it is at hand and nice and organised....need a bigger car!!!!
#28

Posted 24 September 2012 - 06:38 AM
Loving this thread, may I ask how you did that headlining, 1) looks the dogs danglies and 2) when I had my front and rear screens fitted (I wasnt there at the the time) they didnt tuck the headlining into the lip and so at the moment its duct taped up and looks carp so been looking at a headlining that fits like yours above the roof edge. Thanks! and good luck getting ready for and competing!
I work as a furniture designer/manufacturer so have access to the correct materials and equipment. I may make a few and sell them on here to try and fund this project, but it is essentially vinyl with a foam backing sewn through with an industrial sewing machine. Then glued up onto roof skin. Sounds simple, but sewing the lines in the centre was very difficult and making sure the lines are square to the car also tricky.
In theory you could have any design you want....squares, diamonds, lines font to back etc etc etc...even dare i say it a mini logo?
You could buy any fabric/vinyl and glue it up. I was considering a carpet type material but wanted a more retro vibe.
#29

Posted 24 September 2012 - 04:41 PM
yes, entry form ready to post in morning. I see the Perry clubman is also entered....didn't think they were novices??? Also got a scatter rally next monday for a shakedown....fingers crossed it'll be ready for then, otherwise i'll have to ask the wife very nicely for the keys to her Focus!!! In fact she is sat next to me with her roamer and os map practicing plotting.....at least she is organised.
Funny you say that!!
We did our first 12 car rally of the seaon last week. Mini had blown yet another headgasket so we had to do it with the Focus, my wife is my navigator too... Definitely much more room in the Focus to play with the maps...
She's still a Beginner having only done three other events, with Chelmsford MC Beginners get the route 15 minutes before due start time. Only 2 fails this time, that's a big improvement from our last 12 rally in the Mini!!!
Headlining looks great!
#30

Posted 24 September 2012 - 07:57 PM
im sure if you made a couple they would sell
Good luck with the build,,, keep it up!
2 user(s) are reading this topic
0 members, 2 guests, 0 anonymous users


