As per title
Step by stp removal of 998 cam whilst engine still in car
Pictures appreciated


Step By Step Removal 998 Cam
Started by
Rusty1182
, Aug 24 2012 12:02 AM
16 replies to this topic
#1

Rusty1182
-
- Members
-

- 389 posts
Speeding Along Now
- Location: swanage
- Local Club: Mini Allsorts
Posted 24 August 2012 - 12:02 AM
#2
lrostoke
-

- Members
-
- 6,923 posts
Crazy About Mini's
- Location: Maybank, Staffordshire
- Local Club: none
Posted 24 August 2012 - 04:35 AM
remove rocker cover
remove rocker assy.
remove push rods
take off rear cover plates on block, and pull out valve sliders, bit of wiggling involved.
take off fuel pump
take off dizzy
pull out dizzy drive shaft
remove radiator
remove fan and pulley, alternator , fan belt
take off crank pulley
take off timing cover plate
take off chain tensioner
remove timing chain and sprockets
remove cam thrust plate
cam I think should pull out carefully now so you don't damage bearing surfaces.
You may need to spread the vent holes in the inner wing
Edited by lrostoke, 24 August 2012 - 04:37 AM.
#3
irish.yobbo
-

- Noobies
-
- 90 posts
Stage One Kit Fitted
Posted 24 August 2012 - 05:14 AM
I'm pretty sure you need to cut a hole in the wheel arch to get it out too. I've never done this, but I can only imagine that it would be much easier if you lift the engine out.
#4
petey81
-

- Members
-
- 1,325 posts
One Carb Or Two?
Posted 24 August 2012 - 06:10 AM
yeah just 2 inch hole unless like alot of us you have no inner wing.
#5
Rusty1182
-
- Members
-
- 389 posts
Speeding Along Now
- Location: swanage
- Local Club: Mini Allsorts
Posted 24 August 2012 - 06:52 AM
The one thing that puts me off doing,it is re timing the engine
#6
lrostoke
-
- Members
-
- 6,923 posts
Crazy About Mini's
- Location: Maybank, Staffordshire
- Local Club: none
Posted 24 August 2012 - 07:28 AM
We did it and no hole was needed just spread the slats slightly on the inner wing
#7
chris211083
-

- Noobies
-
- 111 posts
Mini Mad
Posted 24 August 2012 - 08:47 AM
The one thing that puts me off doing,it is re timing the engine
Don't worry about the timing, just align the dot to the dot and it will be fine. If you want to be a perfectionist then get a crank degree wheel but I think you will be better just getting it in first. You will also need the large crank socket and a big breaker bar to turn it with. Everything else should be in a normal tool box.
Chris.
#8
Rusty1182
-
- Members
-
- 389 posts
Speeding Along Now
- Location: swanage
- Local Club: Mini Allsorts
Posted 24 August 2012 - 11:22 AM
So not too bad of a job
I think I will fit my cylinder head stage one kit and carb with roller rockers
See how that goes an probs change the cam at a later date
I think I will fit my cylinder head stage one kit and carb with roller rockers
See how that goes an probs change the cam at a later date
#9
1984mini25
-

- Members
-
- 8,784 posts
Crazy About Mini's
- Location: -
Posted 24 August 2012 - 11:25 AM
Just one question. How can you remove the rocker assembly without disturbing the rear head bolts and releasing the clamping force on the headgasket
#10
Tudor
-

- Noobies
-
- 41 posts
On The Road
- Location: Ashford, Middlesex
Posted 24 August 2012 - 11:34 AM
To be honest if you have the money to buy a whole new rocker assembly you might as well change the head gasket, it would cost you something like £15 for a set with all the gaskets you need.
#11
jaydee
-

- Members
-
- 8,565 posts
Crazy About Mini's
Posted 24 August 2012 - 11:37 AM
Just one question. How can you remove the rocker assembly without disturbing the rear head bolts and releasing the clamping force on the headgasket
Start from the central nut then go to the outer, sometimes it works and you wont need a new HG, sometimes not.
An HG change is recommendable though.
#12
lrostoke
-
- Members
-
- 6,923 posts
Crazy About Mini's
- Location: Maybank, Staffordshire
- Local Club: none
Posted 24 August 2012 - 11:39 AM
your most of the way there anyway to removing head so doesn't hurt..I seem to recall we moved engine steadies let us line the engine up with the wing slats for sliding the cam out.
#13
chris211083
-
- Noobies
-
- 111 posts
Mini Mad
Posted 24 August 2012 - 08:43 PM
Ok if you loosen any of the head bolts then you must remove the head and replace the gasket. £15 for a gasket or don't replace it and the Gasket blows and you warp your head and then you have to replace the coolant etc. Don't be daft and try to save £15, just replace it.
Anyway here is you pic's and walk through.
Ok so you drain the coolant remove the top coolant hose, radiator and heater hose from head. Drain the oil. Then remove the spark plugs and water temp sensor wire and then remove the rocker cover. And you will see this(but without the mayo).
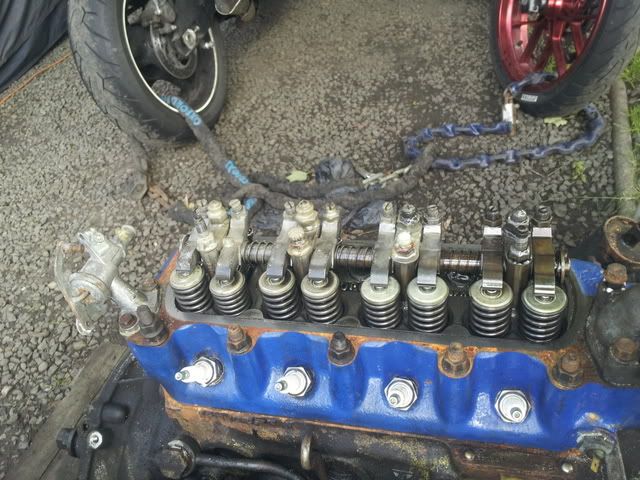
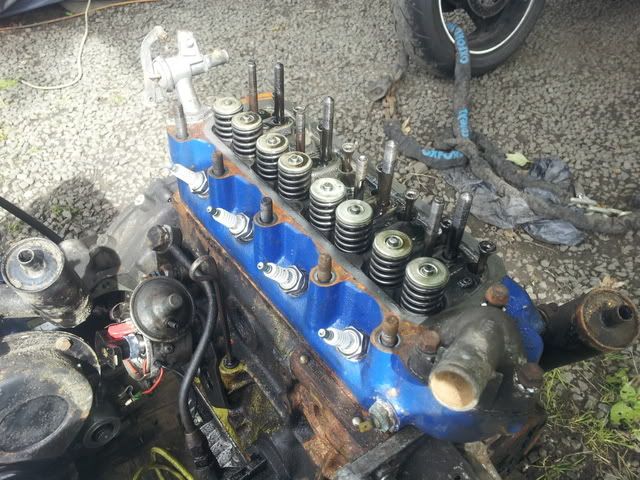
Then you need to remove the rockers, undo the small nuts on the rockers and put them to one side with the washers and note the oval washer and its position as this one locks the rocker screw in place. Then after they have been removed, you can then undo the head securing nuts(the larger ones five near the spark plug side and four on the back of the rocker pedestals. Undo them from the ends inward at half a turn per nut until all the nuts have been undone half a turn. Repeat this procedure until all are loose and then remove the nuts and place to one side. Then lift off the rockers and then undo the water pump bypass hose and then remove the head here are some pic's.

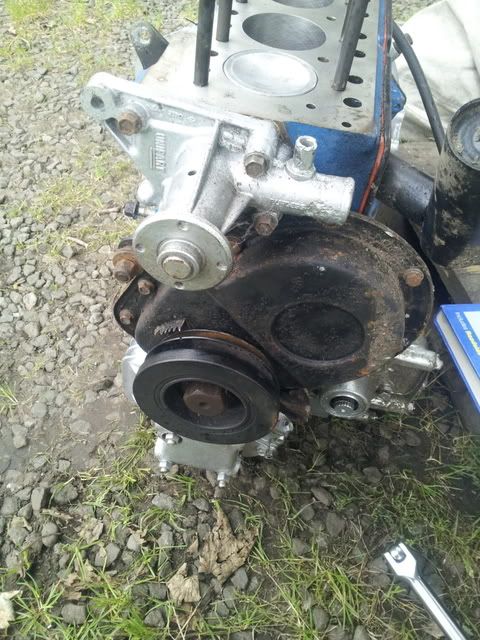
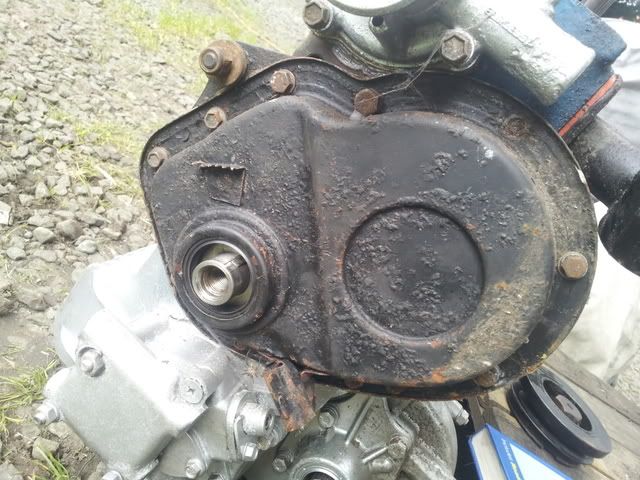
Next look at the timing cover end.
Then remove the starter motor and lock the fly wheel against the casing.
Then knock back the tab washer on the crank pulley nut with a chisel or screw driver.
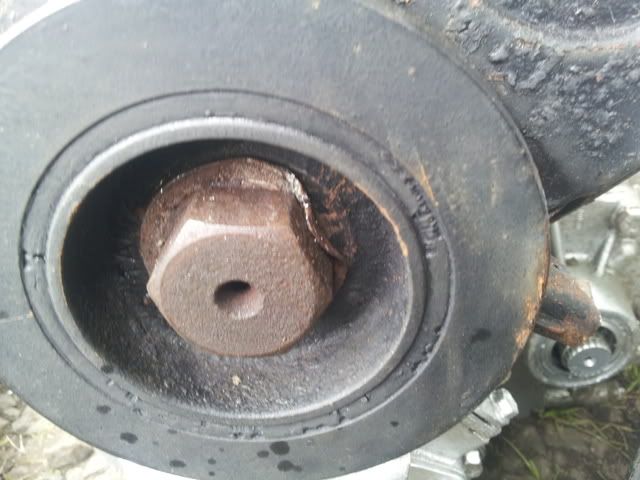
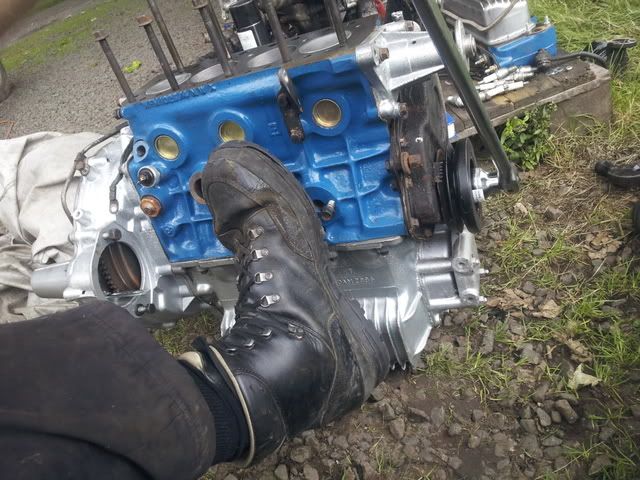
Then with the fly wheel locked put your breaker bar with socket onto the crank nut and turn. My engine was out the car so I put my foot on the engine.
Then remove the bolt and the locking washer and put to screw drivers behind the pulley and lever the pulley off and towards you. This is whats left.
Next remove the cover bolts and then use a screw driver to gently prize the timing cover off.

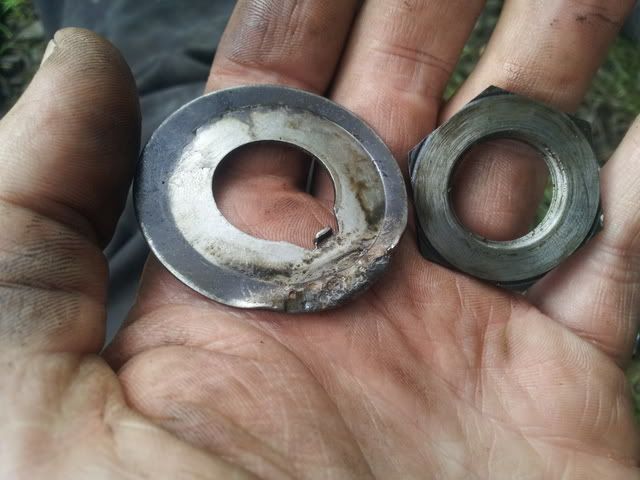
Next you need to remove the washers of the crank nose and remember there order and which way round they go. Then knock back the locking washer on the cam timing sprocket and undo the cam nut (with the fly wheel still locked) and remove the locking washer.
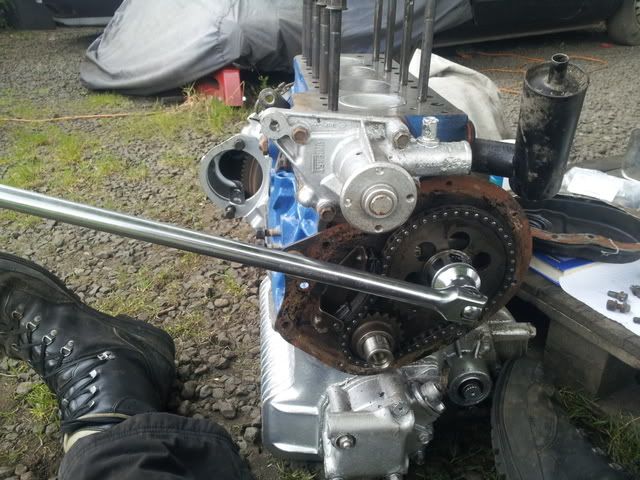
Note the tail on the locking washer and where it sits in the cam sprocket.
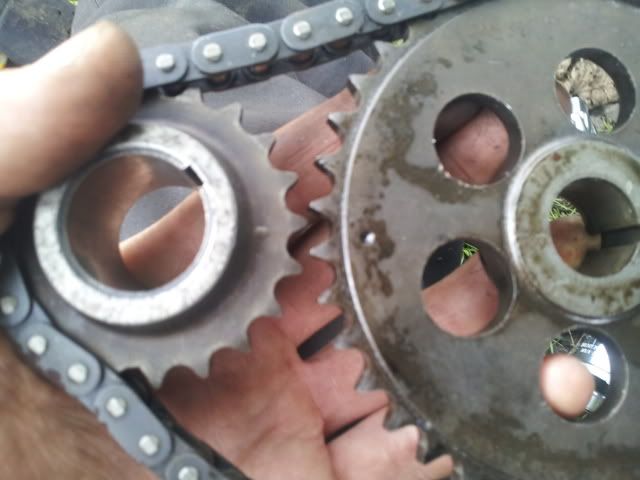
Then you can slide off the sprockets, here you can see the two timing dots that need to be aligned.
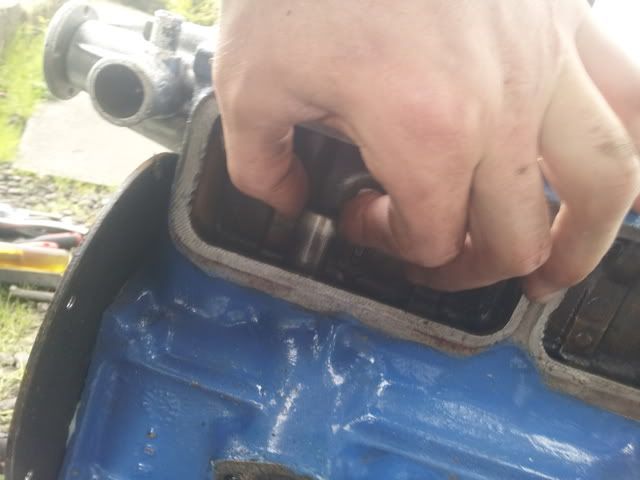
At this point, you can remove the rear cam followers covers and then lift out the followers.

Then remove the Dizzy securing bolt, pull out the dizzy and then inner dizzy shaft.
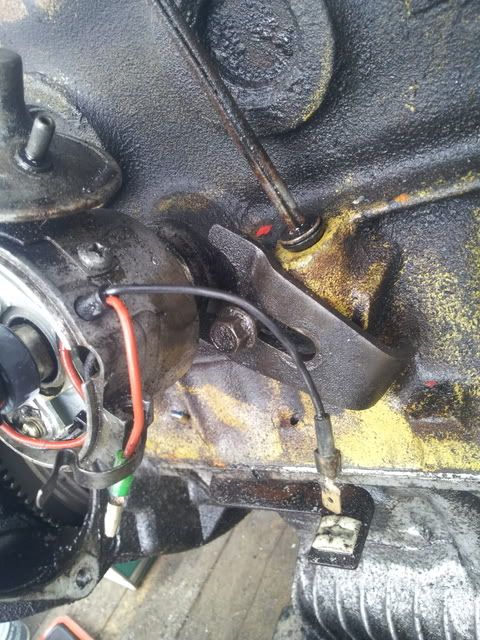
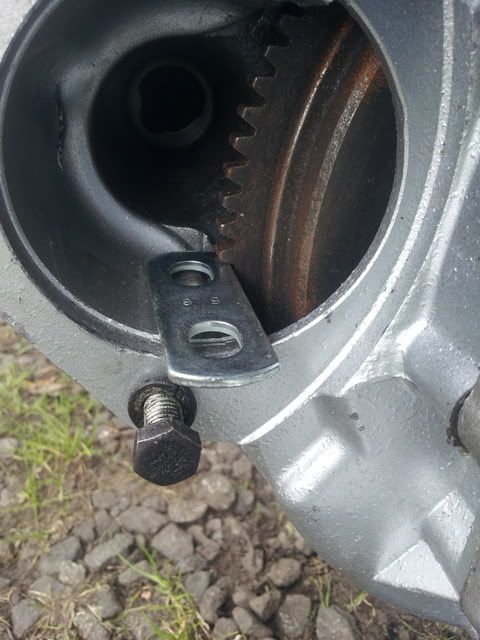
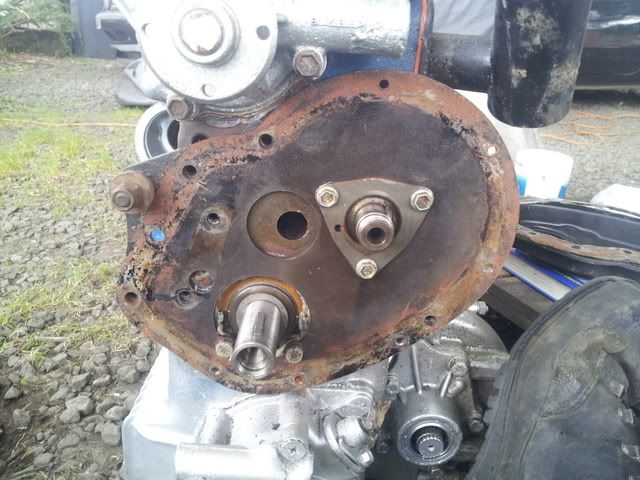
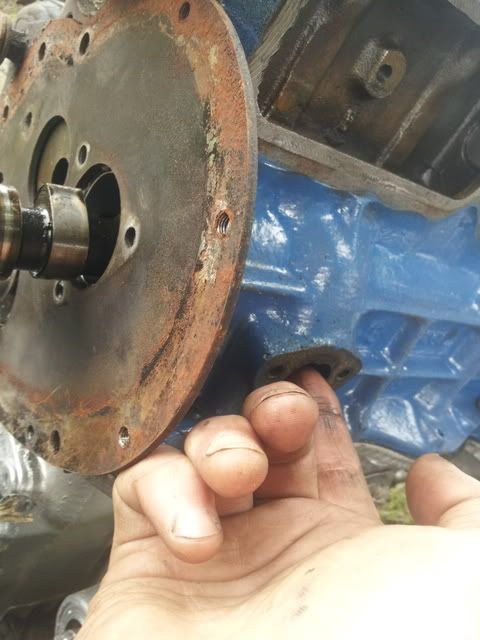
This is the next view. Remove the three bolts and collect the shims that are with the cam plate.
Next is removing the cam. insert your finger through the fuel pump hole to support the cam and then slide it out minding not to knock the cam or the bearings.
With the cam removed you can see where the cam engages with the cam.
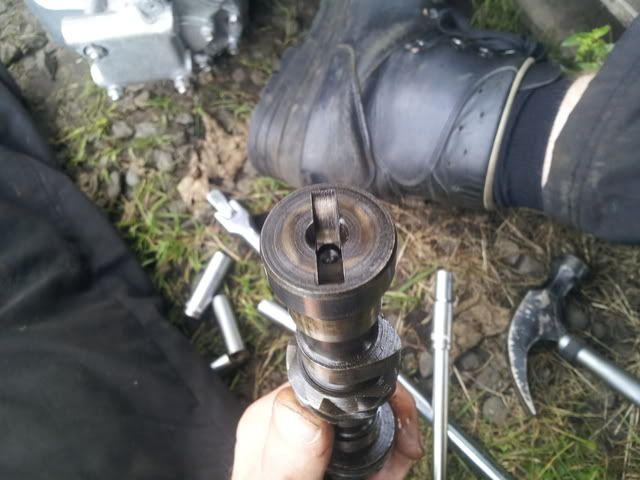
And thats the cam out. However I wont be reassembling for a week so you will have to wait for that.
Cheers Chris.
Anyway here is you pic's and walk through.
Ok so you drain the coolant remove the top coolant hose, radiator and heater hose from head. Drain the oil. Then remove the spark plugs and water temp sensor wire and then remove the rocker cover. And you will see this(but without the mayo).
Then you need to remove the rockers, undo the small nuts on the rockers and put them to one side with the washers and note the oval washer and its position as this one locks the rocker screw in place. Then after they have been removed, you can then undo the head securing nuts(the larger ones five near the spark plug side and four on the back of the rocker pedestals. Undo them from the ends inward at half a turn per nut until all the nuts have been undone half a turn. Repeat this procedure until all are loose and then remove the nuts and place to one side. Then lift off the rockers and then undo the water pump bypass hose and then remove the head here are some pic's.
Next look at the timing cover end.
Then remove the starter motor and lock the fly wheel against the casing.
Then knock back the tab washer on the crank pulley nut with a chisel or screw driver.
Then with the fly wheel locked put your breaker bar with socket onto the crank nut and turn. My engine was out the car so I put my foot on the engine.
Then remove the bolt and the locking washer and put to screw drivers behind the pulley and lever the pulley off and towards you. This is whats left.
Next remove the cover bolts and then use a screw driver to gently prize the timing cover off.
Next you need to remove the washers of the crank nose and remember there order and which way round they go. Then knock back the locking washer on the cam timing sprocket and undo the cam nut (with the fly wheel still locked) and remove the locking washer.
Note the tail on the locking washer and where it sits in the cam sprocket.
Then you can slide off the sprockets, here you can see the two timing dots that need to be aligned.
At this point, you can remove the rear cam followers covers and then lift out the followers.
Then remove the Dizzy securing bolt, pull out the dizzy and then inner dizzy shaft.
This is the next view. Remove the three bolts and collect the shims that are with the cam plate.
Next is removing the cam. insert your finger through the fuel pump hole to support the cam and then slide it out minding not to knock the cam or the bearings.
With the cam removed you can see where the cam engages with the cam.
And thats the cam out. However I wont be reassembling for a week so you will have to wait for that.
Cheers Chris.
Edited by chris211083, 24 August 2012 - 08:46 PM.
#14
chris211083
-
- Noobies
-
- 111 posts
Mini Mad
Posted 24 August 2012 - 08:45 PM
Obviously, when you pull the cam out you will have to either cut a hole in the inner fender or as some one else says splay the cooling vents.
Chris.
Chris.
#15
Rusty1182
-
- Members
-
- 389 posts
Speeding Along Now
- Location: swanage
- Local Club: Mini Allsorts
Posted 24 August 2012 - 08:50 PM
Obviously, when you pull the cam out you will have to either cut a hole in the inner fender or as some one else says splay the cooling vents.
Chris.
Ok thanks very much that helped loads


1 user(s) are reading this topic
0 members, 1 guests, 0 anonymous users


