Jump to content


Photo
- - - - -

'cherry' The Red Mini Thirty.


  • Please log in to reply
205 replies to this topic

#166 joezone2001

joezone2001

    Speeding Along Now

  • Members
  • PipPipPipPipPip
  • 332 posts
  • Location: kirkby in ashfield

Posted 07 March 2013 - 05:49 PM


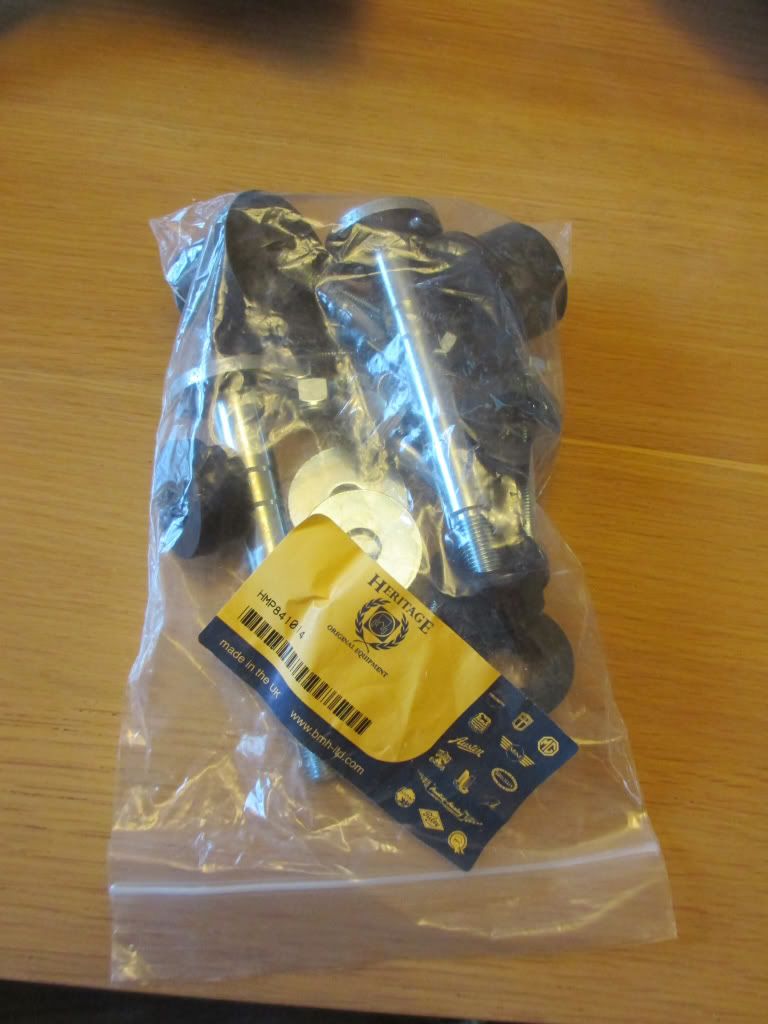
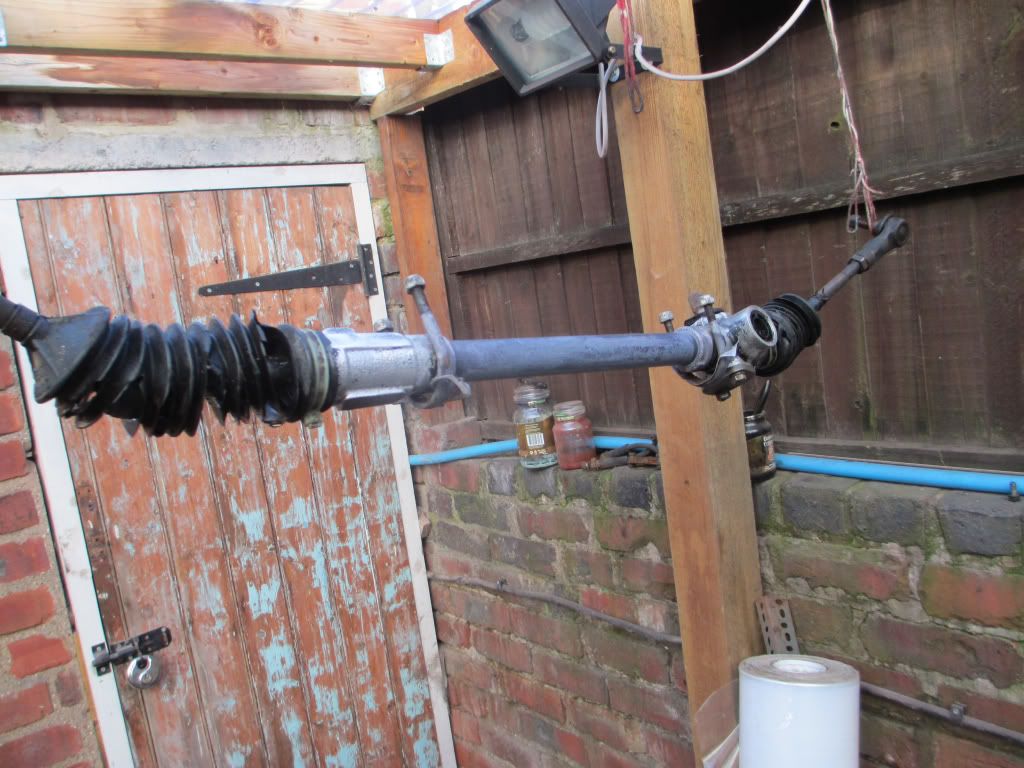
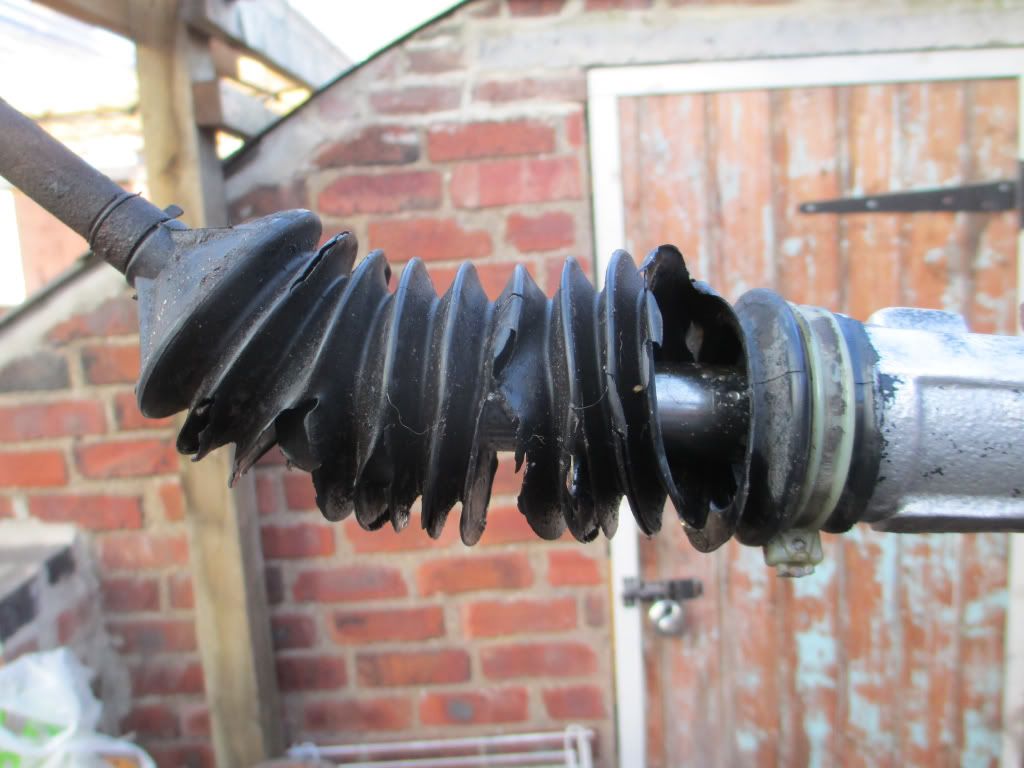
Hi all. Glad we're starting to see the back of this cold weather! I've started to sort of a few outstanding bits that need refurbishing. I started today with the steering rack. I decreased it and gave it a going over with the wire brush as there was a bit of surface rust showing. I then rust treated it. I left the old gators on just to protect the insides etc.

Posted Image

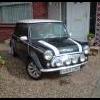
This car actually had an MOT... Lol
Posted Image
Posted Image

Is this a worth while thing to replace? The car drove ok (except the brakes) so I'm unsure if its worth replacing or just painting it up with new gators and track rod ends..

Thanks for looking
Joe


Wouldn;t pass he MOT like this - My Honda just failed it's MOT on steering gaiters - Easy mend tho - Thankfully!


Hi Jason.
Thanks for your comment. Sorry to hear about your Honda.
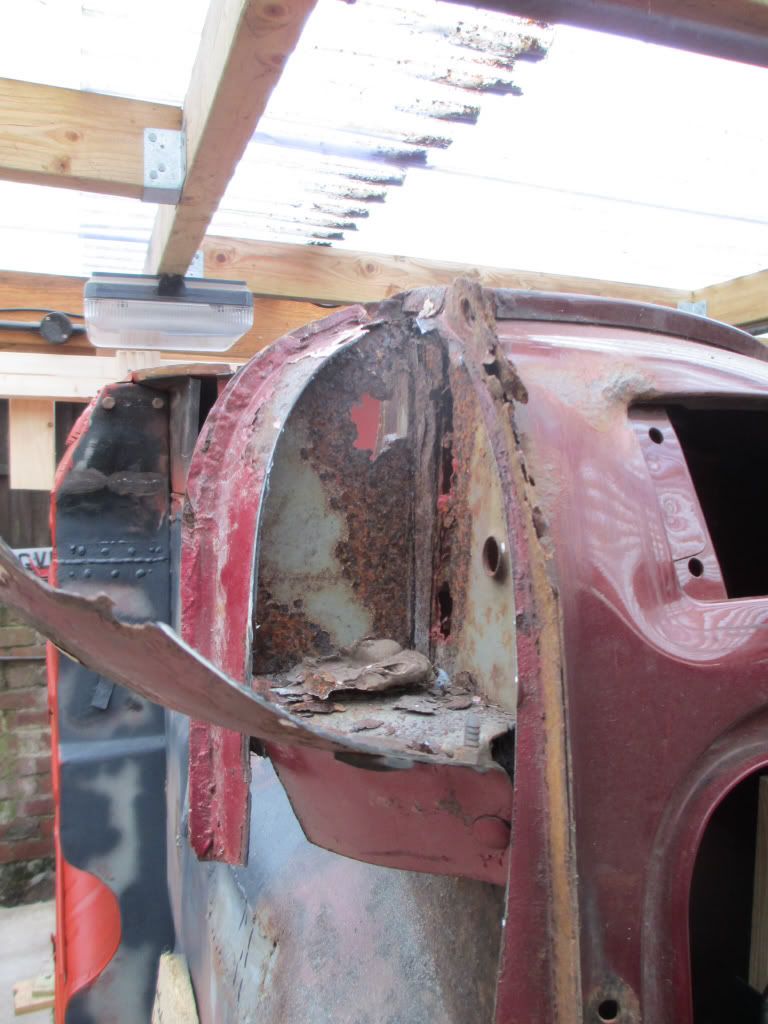
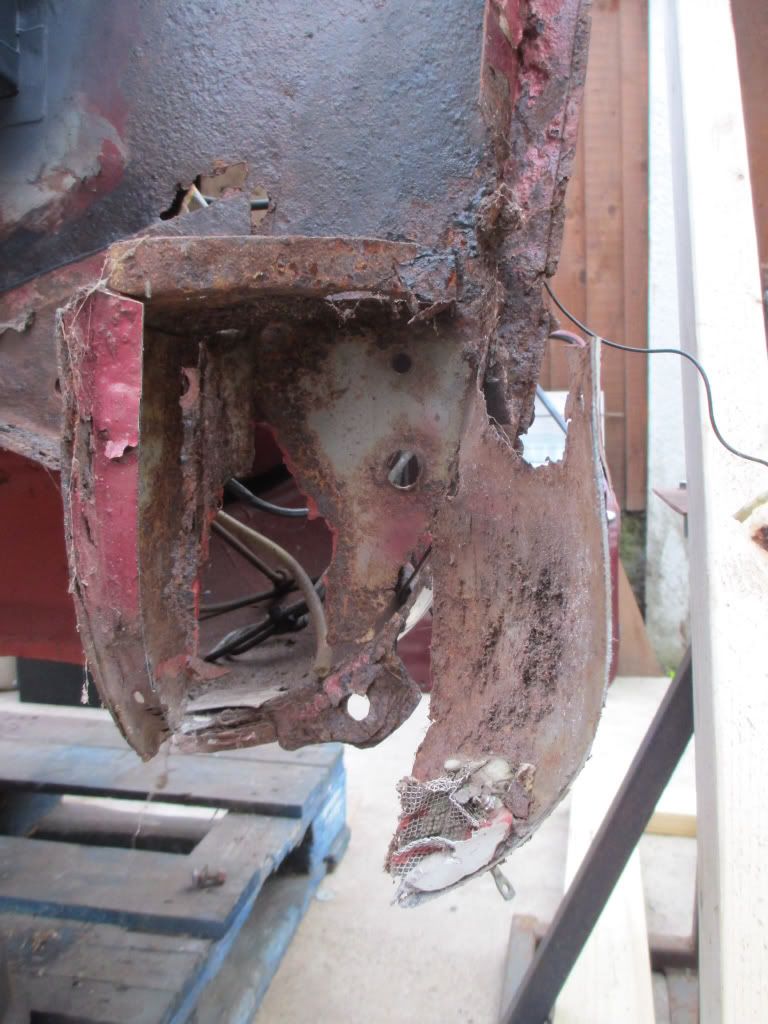
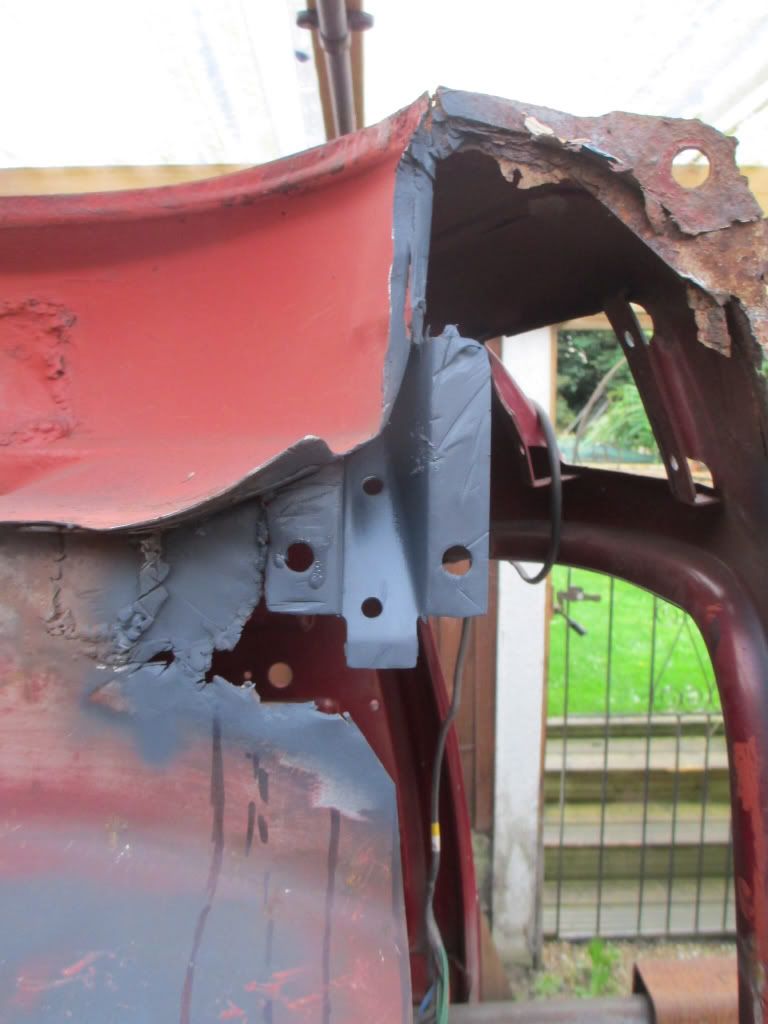
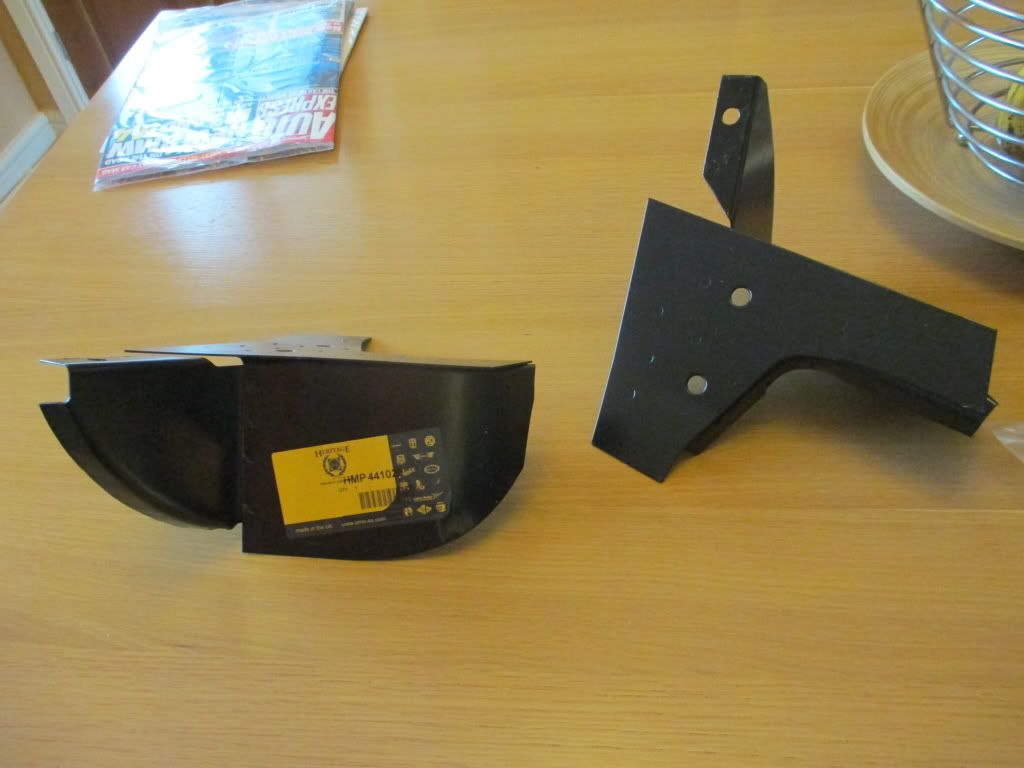
When I bought the mini back in 2010 it had 10 months MOT and some of the things that were wrong with it were truly shocking (to say it could have been legally driven on the road) the sills were totally knackered, there was zero suspension and the wheels actually rubbed the front wings, the tyres were all cracked and went down after about 48 hours, the front passenger side disk Caliper was seized, the wheels don't match and obviously the steering rack gators and various bushes etc were all knackered. Lol.
I expected it though to be fair. It was a complete mini 30 with tax and mot for £595 sooo.. I think the guy I bought it off had got it and realised how much work she needed to keep her going.. He was also talking about turning her into a trailer.. (Noooooooo!!!) With that, I had to have her.. Lol.. When the car is done I hope to email him and show him how she looks now she's done. I think mini owners always think about their old minis from time to time.. Lol I know I do..

Cheers, joe

#167 joezone2001

joezone2001

    Speeding Along Now

  • Members
  • PipPipPipPipPip
  • 332 posts
  • Location: kirkby in ashfield

Posted 15 April 2013 - 03:21 PM

Hi all.
Been a while since I last posted on here. I've not been doing a great deal due to the weather and work commitments. Things are finally looking up though as the sun is shining and the snow is fianally gone! Even though my mini is under the cover of a carport the snow had drifted all over it. I just gave up trying to do anything on it. Every time I cleared the snow, more came back.. Every time I painted something it wouldn't set as it was too cold.. Never mind.. I'm determined to get her finished this year..
Today I have been out and had a bit of a clear up, painted the backs of my new a panels, put another coat of paint on my steering rack and clamped my wings back on. A soon as I have got the hinges for my passenger door, I plan on welding the wings and a panels on. My next job will be to assemble the spit so I can do the underside of the car.
I have also bought some stainless steel screws from smiffys bits to refit the hinges to the doors. They seem great quality.

Cheer. Joe

#168 Minidarren83

Minidarren83

    One Carb Or Two?

  • Members
  • PipPipPipPipPipPipPip
  • 1,207 posts
  • Location: Stanford Le hope

Posted 15 April 2013 - 04:27 PM

Good to see you back joe

#169 joezone2001

joezone2001

    Speeding Along Now

  • Members
  • PipPipPipPipPip
  • 332 posts
  • Location: kirkby in ashfield

Posted 09 June 2013 - 10:29 PM

Hi all! Long time no update! I have been busy with the mini though! Unfortunetly my daily driver has been letting me down.... but it's all sorted now so it's mini(ing) all the way now!!

Ok, so I've got both wings and A panels on.. I am quite happy with the drivers side but the passenger side I am less so...


Drivers Side

Front

IMG_0146_zpsd04c766a.jpg

Round Scuttle

IMG_0155-1_zps135a5263.jpg

IMG_0156-1_zps0d7a4ce5.jpg

IMG_0157_zpsf285ed1e.jpg

To me, this looks right.. Am I wrong?

Door Gap.. (door needs reskinning, So i doubt this will be the final gap. Although I am happy with it..)

IMG_0151_zps5d08f18a.jpg


Passenger Side

The Passenger side is where it all went wrong... I had a nightmare getting the A panel and the wing to clamp together properly as the gap was massive. I think the A panel is too small as we had to trim a fair bit off the flitch panel to get it anywhere near the wing (thus the MASSIVE door gap) My door is also very dinted and bent!

When It came to welding it all on I had it clamped up at the front, on the Apanel/wing seam and on the top of the inner wing. I welded it at the front first then on the inner wing. I  then thought I would remove a clamp from the top of the inner wing (as I had welded it in place anyway) just to put on the seam to give it a bit of extra support while I spot welded it.. What a mistake! As I removed the clamp, the clamp I had at the bottom of the wing/A panel seam flew off... And could I get it back on?? could I heck... Anyway I clamped it a bit further up not realizing it had dropped and started welding it. In my opinion the wing is now too low, the door gap is too wide and the bottom of the wing/A panel seam is too far apart. The only solution I can think of is to remove the A panel and get a new one. The A panel I had was a pattern part and I am not sure what the wing is as it was from an Auto Jumble and the label has been removed. The metal is quite thick though so I don't think its the cheapest make you can get. Anyway, ill add some pictures even though I am ashamed of what I have done..


Front

IMG_0160_zpsd13c590e.jpg

Top of wing (my bonnet is also really out of shape! I have no idea what has happened to it)

IMG_0162_zpse3d2f850.jpg

Panel Gap :(

IMG_0166_zpsc85fcc08.jpg


Overall view

IMG_0167-1_zps0679d71a.jpg


Thanks for looking. Any comment/advice welcome even if its just to say how shocking that door gap is! haha

hope everyone is keeping ok.

Joe


Edited by joezone2001, 09 June 2013 - 10:31 PM.


#170 evansisgreat

evansisgreat

    One Carb Or Two?

  • TMF+ Member
  • PipPipPipPipPipPipPip
  • 1,103 posts
  • Local Club: Not yet

Posted 12 June 2013 - 11:48 PM

This is exactly what I fear when doing my front end. I'll be watching closely to see how this is resolved because I'm sure the exact same thing will happen to me. Good luck mate.

#171 joezone2001

joezone2001

    Speeding Along Now

  • Members
  • PipPipPipPipPip
  • 332 posts
  • Location: kirkby in ashfield

Posted 13 June 2013 - 12:27 AM

This is exactly what I fear when doing my front end. I'll be watching closely to see how this is resolved because I'm sure the exact same thing will happen to me. Good luck mate.

Hi. Thanks for the reply. Good to know someone is watching. Lol. I think my problem lies with the fact I bought none genuine panels. I only bought the wings as I got them for £25 each from an autojumble. I think that's cheap anyway... the a panels also came from the same place and were both different makes. I believe the drivers side wing to have been a Hadrian panel as I have now sanded all the paint off and I could make out the word Hadrian on a sticker that had been painted over. It looks quite good in my opinion.

I think the only thing to do with the passenger side is to take the A panel off and go from there. I will be buying genuine bits from now on.. haha. I can't see the point faffing with it as its something that's going to be seen.. if it was a floorpan it wouldn't be so bad as you wouldn't see it.. good luck with yours. I will keep this updated with what I do.
Cheers. Joe

Edited by joezone2001, 13 June 2013 - 12:32 AM.


#172 sonikk4

sonikk4

    Twisted Paint Polisher!!!

  • Admin
  • PipPipPipPipPipPipPipPipPipPipPip
  • 16,026 posts
  • Name: Neil
  • Location: Oxfordshire

Posted 13 June 2013 - 08:22 AM

Joe it looks like the wing needs to be lifted up a touch more to get the scuttle contour correct. The A panel is not good as you have said. It looks as if the wing has pulled it forward. It could be the picture but the wing to A panel flange looks as if its pulled forward as well.


The removal of the A panel will not do a lot to be honest so the other option or options is to add weld to the edge of the A panel or weld some welding filler rods to the edge to close the gap.


The bonnet looks like it needs to be lifted up at the back to sort that out.


#173 joezone2001

joezone2001

    Speeding Along Now

  • Members
  • PipPipPipPipPip
  • 332 posts
  • Location: kirkby in ashfield

Posted 13 June 2013 - 10:01 AM

Joe it looks like the wing needs to be lifted up a touch more to get the scuttle contour correct. The A panel is not good as you have said. It looks as if the wing has pulled it forward. It could be the picture but the wing to A panel flange looks as if its pulled forward as well.
 
The removal of the A panel will not do a lot to be honest so the other option or options is to add weld to the edge of the A panel or weld some welding filler rods to the edge to close the gap.
 
The bonnet looks like it needs to be lifted up at the back to sort that out.


Hi Sonikk.
Thanks for the reply. I have sorted the bonnet out now I think. I adjusted it a bit at the back and pushed it down a bit in the middle so that it followed the contour of the scuttle. I think it will be fine. I don't think it's the original bonnet actually. My new scuttle was a genuine bit so I would assume that would be correct.. As for the wing and A panel I haven't touched it yet.. I may order a genuine a panel just to see if it is a different shape. I won't cut anything till I've got it though.
Cheers, Joe

#174 sonikk4

sonikk4

    Twisted Paint Polisher!!!

  • Admin
  • PipPipPipPipPipPipPipPipPipPipPip
  • 16,026 posts
  • Name: Neil
  • Location: Oxfordshire

Posted 13 June 2013 - 10:19 AM

Joe you might be wasting your money if the wing is out of position or has been formed badly. I think you best bet is to add metal to the rear of the A panel.


There have been other members on here that have had to cut down the A panel flange to add a wedge of metal to get the A panel to actually contact the wing.


#175 Minidarren83

Minidarren83

    One Carb Or Two?

  • Members
  • PipPipPipPipPipPipPip
  • 1,207 posts
  • Location: Stanford Le hope

Posted 13 June 2013 - 09:14 PM

Looking good joe the gaps are not all that bad check out Graham's thread he had the same on the passenger side and slotted a strip in turned out good I don't think it matters on the panels you buy as they all need adjusting or smashing with a large hammer to fit lol good to see you back at it

Darren

#176 joezone2001

joezone2001

    Speeding Along Now

  • Members
  • PipPipPipPipPip
  • 332 posts
  • Location: kirkby in ashfield

Posted 14 June 2013 - 09:30 AM

Looking good joe the gaps are not all that bad check out Graham's thread he had the same on the passenger side and slotted a strip in turned out good I don't think it matters on the panels you buy as they all need adjusting or smashing with a large hammer to fit lol good to see you back at it

Darren


Cheers for the comment mate. I think you're right about the panels.. I can just imagine the rover production line where the only tools that were used were a spot welder and a lump hammer.. Lol..
Cheers, joe.

#177 joezone2001

joezone2001

    Speeding Along Now

  • Members
  • PipPipPipPipPip
  • 332 posts
  • Location: kirkby in ashfield

Posted 13 October 2013 - 11:33 PM

hi All!
Time for a much overdue update! Recently I have been busy back on the restoration. After spending far too long on other things I have finally got round to starting the mini again.

Last time I updated I think I was fitting the passenger side a panel and wing. I removed it all again as it was rubbish. I have to admit I bought a genuine a panel and I am much more pleased with the fit. Here is how the second attempt looked

aabc9fba181336cacbf695e053caa1ce_zps62e4

Like I say I am much more pleased with how it looks. The genuine a panel was actually 1/4 inch wider than my none genuine which is why I have got a much more acceptable gap.

The project stalled again due or various reasons/excuses that I can't quite recall hehe.

I have now modified the stands that I had under the rear of the car when I had it elevated, into a spit for the car. I can't take credit for this actually. Someone else designed and made the stand and pole supports although I did put them together.

Old stands
30f051390fd7b8b959899d98b2190751_zps2ac1
Old stands with spit attachments
99081c2ad59cc2a5366065ce8802362b_zps575d
New stand in relation to the car
836a17a78b3098d6244826313a4ce455_zps0941
Car on pole
0b9cec96b2741a24698a1898e68431e0_zps2e60
7c093ff45cc77ace3704502ca4aa4f6f_zps5303
The stands have had some stabilizing supports added too. I don't seem to have a photo of them though.

So anyway we rolled the car.....
Bit of a mess.. Uurrrghh!
d363f61c998e5dd190f6fcfb1cdfa1a4_zps587f
a3dacf8c14a55903e7682a4e491c5764_zps875b
Looking slightly better
c34e6b30833dfb117d870a04ba30db45_zps5d08
Looking loads better (in my opinion.. Anyone else's opinion is GREATLY appreciated)
f9e8290d6d67c619887fab282c8d78c2_zps0220

Now onto the boot area....
1bac7292ce64e9bebc46a73d8ef86a09_zpsc6be
The battery box is actually very good so I stripped and painted it to protect it. The rest of the floor is looking less than very good. In some ways I do wish I had opted to put a complete new boot floor in but I've done it this way and I can fix what's there. It will just take time. Which I have plenty of so It's ok. There are some patches that I put in when I first got my welder that I think are rubbish so they will be cut out and replaced.
I welded up a hole in the back seat.
9b71808c4266640efc144640558d6e47_zpsfe8e
0317acb3963fbd5cbb97b2d76768eb3e_zpsf09c
71408f451d88e366d59c68d71d9cc74e_zps6957
I think it's turned out ok

I cut the remainder of the rear valance off... This car had an MOT(I know I keep repeating this throughout this thread but it's just unbelievable that it had an MOT with no advisories!)
c4fa72785349bf1e49dd6cce8f4ccdd3_zps7fae
14245f7d7984d6b08afff5d122b9c022_zpsa277

I then offered up my new repair panel which I got from an auto jumble
13e7c09f0e1cff0ebc8c6aea9eab999e_zps0b1d

It all seems to line up ok.

I then started to remove the old subframe mounting plates.. What a mess..
ccc6271755eb673d2d059dac6b71c3ae_zps3286
The rough looking metal and welding to the left will be sorted out. Don't worry.
I have got new valance closing plates ready..
45db0f34403ad51ec2ec7f0f510c21bc_zpse976
I have also ordered a new subframe mounting kit.
d4193dd20ff593b9dc43332c5f3109aa_zpse4b6

This is about where I am up to.
I plan on cracking on with the boot floor this week and hopefully getting it ready to finish welding up.
Thanks for looking and I will update again soon.
Cheers Joe

#178 Marco1972

Marco1972

    One Carb Or Two?

  • Members
  • PipPipPipPipPipPipPip
  • 822 posts
  • Location: Birmingham

Posted 14 October 2013 - 06:28 PM

Hi joe

Just read your thread from start to finish
Great work it's going to be a really nice mini when it's finished I've always liked the mini 30

Keep up the good work I will be following your progress

#179 joezone2001

joezone2001

    Speeding Along Now

  • Members
  • PipPipPipPipPip
  • 332 posts
  • Location: kirkby in ashfield

Posted 14 October 2013 - 08:16 PM

Hi joe

Just read your thread from start to finish
Great work it's going to be a really nice mini when it's finished I've always liked the mini 30

Keep up the good work I will be following your progress

Thanks Marco. Its good to know someone is reading my thread and enjoying my progress. Thanks for the comment. Joe

#180 Minidarren83

Minidarren83

    One Carb Or Two?

  • Members
  • PipPipPipPipPipPipPip
  • 1,207 posts
  • Location: Stanford Le hope

Posted 14 October 2013 - 09:53 PM

Hi joe

Just read your thread from start to finish
Great work it's going to be a really nice mini when it's finished I've always liked the mini 30

Keep up the good work I will be following your progress

Thanks Marco. Its good to know someone is reading my thread and enjoying my progress. Thanks for the comment. Joe

I'm still watching nice to see you back and getting on with it!


2 user(s) are reading this topic

0 members, 2 guests, 0 anonymous users