Jump to content


Photo
- - - - -

Ivy - Austin Mini City E 1988


  • Please log in to reply
44 replies to this topic

#1 iDemonix

iDemonix

    One Carb Or Two?

  • Members
  • PipPipPipPipPipPipPip
  • 958 posts
  • Location: Nottingham

Posted 24 December 2011 - 06:15 PM

Finally!

Posted Image

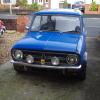
After a long search and seeing many duds, I found a nice mini with minimal body rot, a fresh paint job and just the right level of project for me.

As I said there's next to no rust, a few tiny bits of surface rust and a small patch near the drain hole next to the rear right arch - but I'll sort that at some point (I won't let it get any worse but I'll wait until the new year to sort it).

Her shell is in good condition, the paint job is quite recent so it doesn't need a touch up although at some point the roof may be painted black, but not sure on that yet.

For now, here's a fix-list:

To Fix
  • Overheats after 5 minutes running - possibly thermostat or water pump
  • Oil leak from somewhere around sump - probably drain plug as looks to have no O ring
  • Oil leak from right side of engine (near radiator) - presumed to be from filter
  • Tachometer non-functional
  • Headlights slightly temperamental
  • Half the bonnet locking mechanism is absent
She drove home a good 70 miles without a hitch, but after getting stuck in some stop/start traffic on a hill she overheated and steam came out from under the bonnet and also in to the car. Pulled over and allowed her to cool but now she'll only run a mile before she's overheating with steam coming out the bonnet and a loud hissing noise. This is obviously the first thing to fix so that she's drivable, will do this soon but she's not yet a daily driver so not urgent.

The Plans
  • Recover dashboard rails with black leather effect
  • Replace dashboard with 3+3 custom consoles dash
  • Wire up three Smiths gauges I have (amps, volts, oil pressure)
  • Replace hideous seats with some nice ones (undecided yet)
  • Replace multi-coloured steering wheel with black leather one
  • Recover rear seats to match the front seats (when new front seats are fitted)
  • Fit stereo
  • Fit speakers - possibly in to dash board, will talk to custom consoles about this
  • Possibly fit sub to boot (to be researched, going for quality sound not loudness)
  • Replace carpet
  • Use soundproofing on bulkhead and floor
  • Replace door cards
  • Replace door accessories
  • Replace external door handles (flaking)
  • Replace headlight chrome (heavily pitted)
  • Replace front grill (heavily pitted)
  • Add four spotlights to the front
  • Wire up so that when door is opened, roof light comes on as well as some footwell lighting
  • Wire in and hide a kill switch
  • Fit boot lining kit
The overall plan is to have a nice daily driver that's not too heavily modified. I want inside to be more modern, but not to the point of digital gauges and LED's everywhere. I'm not too bothered about keeping it strictly to how it rolled out of the factory, as such the arches will stay and spotlights will probably be added as I quite like the look of them.

The last thing to mention is that she's currently an automatic!!! My original plan was to get that engine out straightaway and replace with a manual, but to be honest I'm having fun with the auto and will likely drive it until it has a big problem, then drop the engine + subframe and replace them both with whatever engine I can find - but for now it's not a priority as long as the auto runs.

I'll get some more pictures up soon!

#2 iDemonix

iDemonix

    One Carb Or Two?

  • Members
  • PipPipPipPipPipPipPip
  • 958 posts
  • Location: Nottingham

Posted 24 December 2011 - 06:32 PM

Just got the dash off:

Posted Image

A few relatives have sent me money in cards, not sure how much, but it will all be going towards a new dashboard (and seats if there's any left over). Not sure how long custom consoles take to make + deliver though, if anyone's dealt with them before and knows then let me know :)

I'm sure I've seen the name 'Smiths' chucked about at some point on here, are these a good brand? Not sure if they work yet, anyone know how to test them off the car? I tried running a 9V battery through the prongs on the two electrical ones but nothing happened.

Posted Image

Enough for tonight, took me long enough to get the dash off - which also made me realise what the most important tool is when working on a mini: small hands!

#3 jim190

jim190

    On The Road

  • Noobies
  • PipPip
  • 36 posts
  • Location: Chelmsford

Posted 24 December 2011 - 06:35 PM

looks very nice, hope it was worth the wait too.
Sounds like it will be a very nice mini when you have done what you intend to do to it, good luck :thumbsup:

#4 minimaxie

minimaxie

    Camshaft & Stage Two Head

  • Members
  • PipPipPipPipPipPipPipPip
  • 1,687 posts
  • Location: Romford

Posted 24 December 2011 - 06:38 PM

Nice looking mini mate. Glad youve finally got one after all your searching!

Edited by minimaxie, 24 December 2011 - 06:41 PM.


#5 iDemonix

iDemonix

    One Carb Or Two?

  • Members
  • PipPipPipPipPipPipPip
  • 958 posts
  • Location: Nottingham

Posted 24 December 2011 - 07:48 PM

Having done a bit of research, I've decided since my bonnet catch is missing anyway, I might as well convert to an internal release. Has anyone else converted, where's the best place to run the pull-lever through and mount inside?

#6 Tommyboy12

Tommyboy12

    Up Into Fourth

  • Members
  • PipPipPipPipPipPipPipPipPip
  • 2,253 posts
  • Location: Peterborough

Posted 25 December 2011 - 05:35 PM

Smiths are some of the most expensive gauges. Dunno about best... I wouldnt bother with the Ammeter though. Fancy having 30-50amps running around in the back of your dashboard waiting to set fire to something?

Other than that its a nice car!

#7 iDemonix

iDemonix

    One Carb Or Two?

  • Members
  • PipPipPipPipPipPipPip
  • 958 posts
  • Location: Nottingham

Posted 25 December 2011 - 08:40 PM

Ty Tommy, intending to drop the ammeter for a standard clock :)

Also, ordered an oil T-piece, internal bonnet catch - just need an oil feed pipe for the pressure gauge. That and a dashboard.

Edited by iDemonix, 25 December 2011 - 08:41 PM.


#8 Andyagl

Andyagl

    Mini Mad

  • Traders
  • PipPipPipPip
  • 241 posts
  • Location: Rushden, Northamptonshire

Posted 25 December 2011 - 08:57 PM

nice to see you getting to work as soon as. ill keep an eye on this to see how its going.

#9 iDemonix

iDemonix

    One Carb Or Two?

  • Members
  • PipPipPipPipPipPipPip
  • 958 posts
  • Location: Nottingham

Posted 25 December 2011 - 09:25 PM

Glad you're keeping watch Andy! It's a rebuild on a budget so things will be moving slowly but I'll get there in the end.

Unfortunately she overheated in traffic and now she won't run for more than 5-10 minutes without steam pouring out the bonnet. I'm going to drop all the coolant tomorrow and refill then run with the rad cap off to eliminate the possibility of an air lock. With the rad cap back on if she still boils over then it'll be time to remove + test the thermostat. Never worked on a car before, only bikes, so should be interesting!

#10 iDemonix

iDemonix

    One Carb Or Two?

  • Members
  • PipPipPipPipPipPipPip
  • 958 posts
  • Location: Nottingham

Posted 31 December 2011 - 02:30 PM

Thermostat opened fine in boiling water, ran her again and she shot up to temperature and pissed water out from the back of the block so the assumption is that it's the bypass hose or water pump gasket. Ordered:
  • Thermostat 88c (82c currently fitted, will keep it for summer)
  • Thermostat gasket
  • Water pump gasket
  • Fan belt
  • Lower rad hose in silicon (might as well)
  • Oil pressure braided hose
  • Oil pressure T piece
  • New fuel cap (key broke)
  • Bypass hose in silicon
  • Hose clips
Half have arrived from minispares, just waiting on minisport to get my parts to me now!

Also, custom consoles won't cut 5" speaker holes in the dash so I think I may be going for fresh air vents and under dash speaker pods or a door build - undecided yet.

Also another decision: spots. Been thinking about a setup for ages but decided I'm going to go for four spotlights in a row. I originally planned for 2x spots and 2x fogs but I've only used fogs once in my 3 years of driving so going for 4 spotlights wired to main beam. I'll also wire them to their own switch on the right hand switch panel, so I can use main beams without spots or with.

I'll be making a thread about that closer to when I can afford spots though as I'll need relays + better wiring etc. I'll also consider a new alternator (as part of the 'big three') as eventually the car will have spots and a small neat sound system (with a small sub to power too).

#11 iDemonix

iDemonix

    One Carb Or Two?

  • Members
  • PipPipPipPipPipPipPip
  • 958 posts
  • Location: Nottingham

Posted 04 January 2012 - 07:37 PM

Getting a bit pissed off now, MiniSport phoned me last thursday to tell me my parts would arrive tomorrow or the next day so make sure someone is home for delivery. Fast forward 6 days and still no parts! It's all well + good blaming Royal Mail but I ordered from MiniSpares the day after MiniSport and they got me my parts within 3 days!

Tempted to just start removing the rad etc and replace the bypass hose + lower rad hose, then just wait until new gaskets arrive before rebuilding.

Here's my plan of action, if anyone can see a bit that's wrong then please let me know. The following are plans to replace: thermostat, lower rad hose, bypass hose.
  • Drain coolant (aka put a knife through the lower hose or remove it and piss coolant all over the drive)
  • Remove radiator bracket from thermostat to rad cowling
  • Remove thermostat housing and upper rad hose
  • Replace thermostat + gasket
  • Remove grill (rivets will have to be drilled out - damn you Andy!)
  • Remove lower bolt that supports radiator
  • Remove radiator
  • Remove fan + the pulley thing that sits on the water pump (no idea how, cross this bridge when I come to it)
  • Remove fan belt (possibly replace it)
  • Remove water pump
  • Replace bypass hose
  • Clean old water pump mating area, new gasket + replace pump
  • Re-attach pulley + fan + fan belt
  • Re-attach rad lower bolt and lower rad hose (small hands are a blessing)
  • Re-attach thermostat housing + upper rad hose
  • Re-attach radiator bracket
  • Fill up radiator + let the car run with no rad cap until steaming to rid airlocks
  • Pray to any god that will listen that the car won't overheat + spit out water everywhere.
Job jobbed.

Hoping it'll be fairly straight forward. Also hoping with the rad out the way I can lean in round the back of the engine and tighten the clamp on the leaking exhaust. Internal bonnet release is ordered from MiniSport too so should have a bonnet that shuts properly shortly - could of had all this done a week ago if MiniSport were more reliable.

Soldiering on,
Dan

#12 miniBrain

miniBrain

    Mini Mad

  • Members
  • PipPipPipPip
  • 192 posts
  • Location: Preston

Posted 04 January 2012 - 09:44 PM

Dan,

Looks a nice car - hope there's no nasties lurking under the carpets!

On the overheating, is the internal heater working?

If not, then there's poor circulation. It could be the water pump but water pumps usually leak through the bearing if there's a problem. If the water pump turns smoothly with no noise and there's no noticible play in the pulley shaft and no signs of a water leak through the bearing then I'd say its OK - but worth changing anyway since the bearing will go at some point.

I'd suggest you should put a couple of bottles of flushing agent through the system - you be amazed at how much silt builds up in the engine, hoses, radiator and heater. After the flushing agent, which is acidic, I'd flush clean water through the system - e.g. through the heater pipe - until clean water comes out the other end. If the radiator looks less than OK I'd replace this also. You also need to make sure the radiator shroud and the rubber seal between it and the radiator is in place - otherwise the fan will draw warm air from the engine bay rather than cool air through the slats.

If you use a flushing agent before you replace any gaskets, it will dissolve any "stop leak" stuff that might have been put in the system, so don't be too surprised if you see leaks appearing. But this is a good thing since you will be able to fix the problem rather than the symptom.

To purge air out of the system, remember to have the internal heater on at max temp - this ensures water flows through the heater matrix.

Here's a picture of the "coolant" that came out of an overheating Spitfire - it was like mud! This only came out after "power flushing" through the block even though the water in the radiator was clear.

Bob

Attached Files


Edited by miniBrain, 04 January 2012 - 09:50 PM.


#13 iDemonix

iDemonix

    One Carb Or Two?

  • Members
  • PipPipPipPipPipPipPip
  • 958 posts
  • Location: Nottingham

Posted 04 January 2012 - 10:17 PM

Cheers for the advice, the heater has stopped working since the overheating problem developed - it worked fine driving her home!

I was umming and ahhing over whether or not to change the water pump but I think I will now you've said that, just for peace of mind. After all once I get a new engine all these bits will be moved to the new engine so might as well buy some new parts. Don't want to order a water pump and then wait days as per usual though, so I might see if I can find one in Nottingham (new) and fit that at the same time. I think there's a place called Nottingham Mini Bits although it's a bit of a treck from me - we'll see.

My plan with the rad whilst it's off the car was to stick a hose pipe on it and rinse it out for 15 minutes, wasn't going to bother with a cleaning agent. As for the block, I'm guessing you either shove a hose pipe where the thermostat is and all the water will come out of where the lower rad hose connects - or am I wrong?

Cheers for the advice.

#14 miniBrain

miniBrain

    Mini Mad

  • Members
  • PipPipPipPip
  • 192 posts
  • Location: Preston

Posted 04 January 2012 - 11:54 PM

Hi Dan,

I'd "reverse flush" the system by connecting a garden hose to the heater matrix return - that's the heater hose on the right of the engine nearest the radiator. (Hot water flows from the head to the heater matrix through the heater valve in normal operation). Make sure the heater valve is open and allow the water to flow out at the engine bottom hose. I'd do it this way 'cause I could make a good connection from a garden hose to the heater hose and get maximum flow rate through the system. This flushes the block and the heater matrix. If you just wanted to flush the block, I'd connect a garden hose to the outlet of the heater valve, again letting the water out at the bottom hose.

Flushing water through the rad from both ends upside down and right way up is the right way to clean it out - but I'd guess the engine has 10x more sediment than you'll find in the radiator.

I flushed the engine & radiator on my old Spit about three times - each time removing loads of brown water but never running clean. Eventually I used an acid flush (Holts Radflush I think) and was able to get even more sludge out of the engine and at last the coolant stayed relatively clear. There was a marked improvement in the heater as well. It also flushed out the radweld/stop-leak that was put in the system - it came out of the water pump flange and exposed a failed gasket.

Regards,
Bob

#15 iDemonix

iDemonix

    One Carb Or Two?

  • Members
  • PipPipPipPipPipPipPip
  • 958 posts
  • Location: Nottingham

Posted 05 January 2012 - 04:32 PM

Cheers for that Brain!

RIGHT.

Sick of waiting for MiniSport, I've been to a local car parts store and got myself a water pump + gasket, sod it.

This thread will be updated a lot over the next few hours as I work through my steps above, I'll get the coolant drained and the grill removed then probably report back, wish me luck - this is the first work I've ever really done on a car!

Dan


2 user(s) are reading this topic

0 members, 2 guests, 0 anonymous users