 This topic is locked


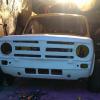
Not bad really, quite solid isnt it. Ive got front floor pans to go in and rest will be repaired by cutting out/welding in sections of panels rather than a full panel.

Traders Area Specialist Mod, North and Scotland Area Manager

Posted 03 December 2012 - 08:06 PM
Traders Area Specialist Mod, North and Scotland Area Manager
Posted 28 December 2012 - 08:00 PM
Traders Area Specialist Mod, North and Scotland Area Manager
Posted 04 February 2013 - 08:00 PM


Camshaft & Stage Two Head

Posted 05 February 2013 - 09:11 AM
Traders Area Specialist Mod, North and Scotland Area Manager
Posted 06 February 2013 - 09:02 PM


Traders Area Specialist Mod, North and Scotland Area Manager
Posted 04 March 2013 - 08:49 PM


Traders Area Specialist Mod, North and Scotland Area Manager
Posted 18 March 2013 - 09:22 PM

Traders Area Specialist Mod, North and Scotland Area Manager
Posted 18 March 2013 - 10:04 PM
Mini Mad

Posted 18 March 2013 - 10:18 PM
Traders Area Specialist Mod, North and Scotland Area Manager
Posted 18 March 2013 - 10:19 PM
Traders Area Specialist Mod, North and Scotland Area Manager
Posted 22 March 2013 - 05:44 PM
Super Mini Mad
Posted 23 March 2013 - 10:55 PM
Traders Area Specialist Mod, North and Scotland Area Manager
Posted 26 March 2013 - 07:25 PM


I am a mini daddy.

Posted 27 March 2013 - 05:15 PM
Traders Area Specialist Mod, North and Scotland Area Manager
Posted 03 April 2013 - 09:00 PM


Projects →
Mini Variants →
Australian 1970 Morris Mini K VanStarted by braad , 16 Mar 2023 |
|

|
||
Projects →
Mini Variants →
1977 Portuguese Ima Van With LiftgateStarted by one60 , 22 Sep 2022 |
|

|
||
Projects →
Mini Variants →
Mini Van Fuel Tank FittingStarted by Dylpants80 , 29 Jan 2022 |
|

|
||
Projects →
Mini Variants →
Mini Van RestorationStarted by DJStrange , 21 Feb 2019 |
|

|
||
Projects →
Mini Variants →
1974 Mini Van - Back To Basics BuildStarted by Vudu , 13 Jan 2019 |
|

|
0 members, 2 guests, 0 anonymous users


